
Two tone torn edge technique. Stampin’ Up! carries two-tone card stock which is lighter in weight and primarily used for scrapbooking. However it is fabulous for creating more interest and texture in card making. A technique that is super simple and effective and economical – no need for extra dies or stamping! Why? This cardstock is two sided with shades of the same colour on each side and its core is white, so when you tear it toward you, it will expose the white core inside.
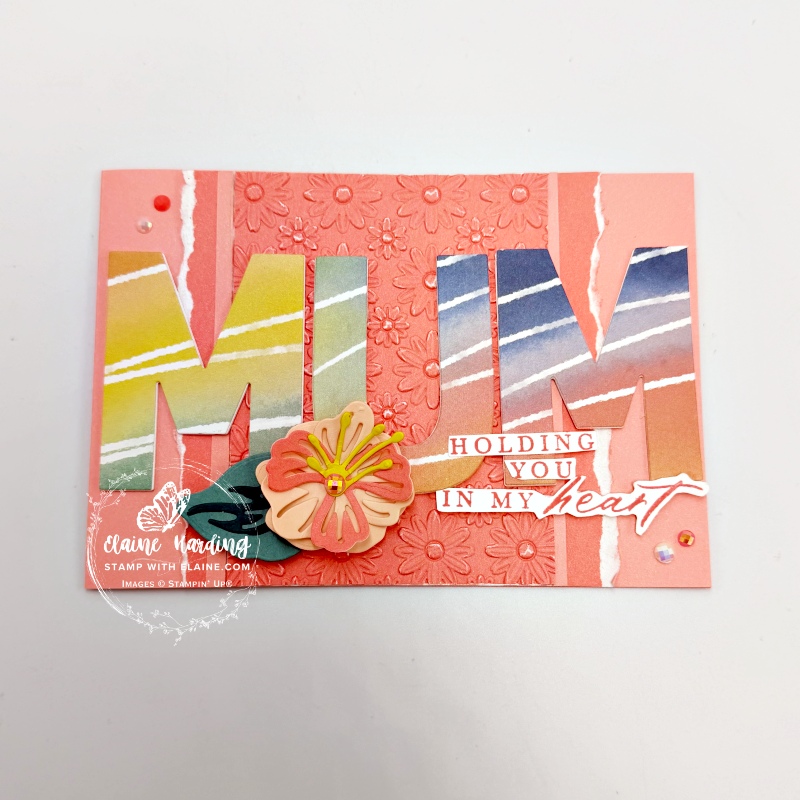
Here is another Mother’s Day card using the same Lovely & Beautiful Suite. This time I’m using the lovely papers for February’s exclusive product of the month and the Party Alphabet dies. In UK, Mothering Sunday falls on March 15th, 2026, but I believe it is different in other countries.
Current Product of the month
February’s Product of the month is the Painted Illusions 12″ x 12″ (30.5 x 30.5 cm) Designer Series Paper. Beautiful watercolours and whimsical patterns make up this one-of-a-kind paper. You can make a wide variety of projects with this paper that will surely dazzle!
Product of the month can be yours for a one time only purchase @ £5.00 subject to a single qualifying order of £70.00 excluding coupons, rewards and shipping while stocks last.
FYI there are two other Products of the month still available. If you still haven’t taken advantage of purchasing it yet, please be aware that multiples of £70 on a single order (i.e., £140 or £210) does not mean you can get 2 or all 3 of the product of the month. If you want 2 products of the month, you will need to submit two separate £70 orders, and if you want all 3, you’ll need to submit three separate £70 orders to qualify for purchasing each Product of the month @ £5 each.

Cutting guide
- Card base : 4″ x 11 ½”(10 cm x 29 cm) landscape folded in half. I used Flirty Flamingo two-tone cardstock.
- Two-tone Flirty Flamingo card stock for embossing darker side 3″ x 4″ (7.5 cm x 10 cm) with the new Lazy Daisy 3D embossing folder (March online exclusive sneak peek).
- Flirty Flaming two tone card stock 2″ x 4″ (5 cm x 10 cm). On the darker side, tear outside edge toward you to expose white core. Rotate 180 degrees and tear other edge toward you to expose white core. Cut down the middle so you have two torn edges.
- On the straight side on each piece, cut ⅛” strip. You want to use the lighter side of both these pieces.
- Basic White scraps : Die cut 6 letter M and 3 Letter U. Stack and adhere 3 letters of each on top of one another to make them sturdier.
- DSP – reverse side, cut 2 M and 1 U and adhere these on top of the corresponding white stack of letters.
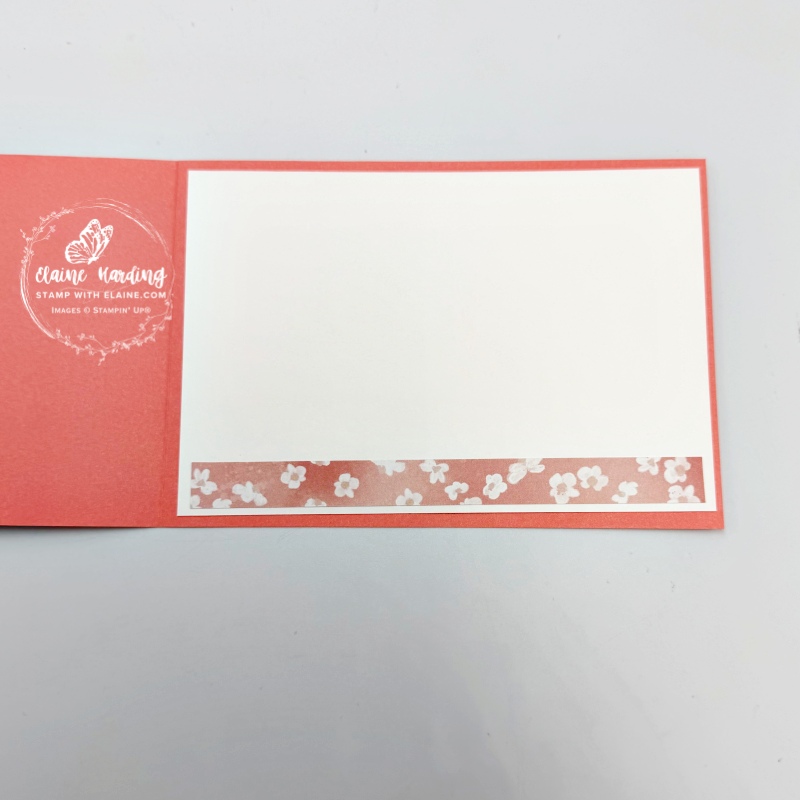
- Basic White inside card : 3 ¾” x 5 ½” (9.5 cm x 14 cm)
Die cutting flower and leaf
- Flirty Flamingo card stock scrap – cut small whole flower.
- Two-tone Flirty Flamingo card stock – cut one larger detailed petal in light Flirty Flamingo, and the smaller detailed petal in darker Flirty Flamingo. Curl and adhere larger light Flirty Flamingo flower first, followed by darker petal.
- Darling Duckling – die cut flower centre and adhere in flower centre.
- Lost Lagoon – die cut small single leaf. Curl.
- Pretty Peacock – die cut leaf detail. Adhere detail in middle of leaf.
Assembling card
- Put a thin line of glue on the reverse side of 3″ x 4″ (7.5 cm x 10 cm) on the 4″ longer edges.
- Attach the dark torn pieces of Flirty Flamingo on either side, then apply more adhesive to adhere to card front.
- Apply thin line of adhesive as close to the Embossed piece edge on either side as possible. Adhere one ⅛” strip with the pale side facing up and butted to the edge of DSP as pictured on each side.
- Adhere the M letter on the left edge, and align the other “M” letter to the right edge. To ensure they’re in a straight line, use a ruler to butt the bottom of the letter to.
- Lastly adhere the equidistant “U” in between the two “M”-s.
- Next adhere flower and leaf at the bottom left of the “U”.
- Stamp the greeting on a scrap of Basic White. Fussy cut and adhere as shown.
Inside card
- Adhere the Basic White piece inside
- Use a scrap of left over DSP to adhere to inside as shown.
I left out the sentiment so that you can use it either for Mother’s Day by penning your own greeting, and if not, the card can be used for some other occasion. I will add the link for the new Daisy Flower 3D embossing folder when it is available in March.
Supply list
Listed below is the supply list. Just click on the picture to take you directly to the item in my online store.
Product List![Simply Beautiful Bundle (English) [ 166965 ]](https://assets1.tamsnetwork.com/images/EC042017NF/166965s.jpg "Simply Beautiful Bundle (English) [ 166965 ]")
![Party Alphabet Dies [ 165263 ]](https://assets1.tamsnetwork.com/images/EC042017NF/165263s.jpg "Party Alphabet Dies [ 165263 ]")
![Lazy Daisy 3 D Embossing Folder [ 167196 ]](https://assets1.tamsnetwork.com/images/EC042017NF/167196s.jpg "Lazy Daisy 3 D Embossing Folder [ 167196 ]")
![Painted Illusions 12" X 12" (30.5 X 30.5 Cm) Designer Series Paper [ 167977 ]](https://assets1.tamsnetwork.com/images/EC042017NF/167977s.jpg "Painted Illusions 12\" X 12\" (30.5 X 30.5 Cm) Designer Series Paper [ 167977 ]")
![Flirty Flamingo 12" X 12" (30.5 X 30.5 Cm) Two Tone Cardstock [ 166667 ]](https://assets1.tamsnetwork.com/images/EC042017NF/166667s.jpg "Flirty Flamingo 12\" X 12\" (30.5 X 30.5 Cm) Two Tone Cardstock [ 166667 ]")
![Basic White A4 Cardstock [ 166781 ]](https://assets1.tamsnetwork.com/images/EC042017NF/166781s.jpg "Basic White A4 Cardstock [ 166781 ]")
![Flirty Flamingo A4 Cardstock [ 141421 ]](https://assets1.tamsnetwork.com/images/EC042017NF/141421s.jpg "Flirty Flamingo A4 Cardstock [ 141421 ]")
![Lost Lagoon A4 Cardstock [ 133686 ]](https://assets1.tamsnetwork.com/images/EC042017NF/133686s.jpg "Lost Lagoon A4 Cardstock [ 133686 ]")
![Pretty Peacock A4 Cardstock [ 150886 ]](https://assets1.tamsnetwork.com/images/EC042017NF/150886s.jpg "Pretty Peacock A4 Cardstock [ 150886 ]")
![Darling Duckling A4 Cardstock [ 165294 ]](https://assets1.tamsnetwork.com/images/EC042017NF/165294s.jpg "Darling Duckling A4 Cardstock [ 165294 ]")
![Pearlized Faceted Circles [ 166978 ]](https://assets1.tamsnetwork.com/images/EC042017NF/166978s.jpg "Pearlized Faceted Circles [ 166978 ]")

- SHOP ONLINE – EARN 10% REWARDS ON ALL PURCHASES OVER £20
- PURCHASE A STARTER KIT : Get £155 worth of products for only £99. Choose from current catalogues and any specials available. Free Shipping. Read more
- Subscribe to my Video Tutorials – click here