
Cute jam jar shape card. You can add a dash of delight to handmade cards with the Filled with Sweetness Bundle. Its dies have marmalade jar-themed designs so that you can create marmalade jar-shaped cards and coordinating tags with a variety of labels, fruity accents and even a “cloth” lid!
Filled with Sweetness Bundle
The Filled with Sweetness Bundle is part of the Homemade Sweetness Suite Collection which captures the simple joys of summer : think picnics, channelling your cooking skills to jam making and making pretty labels for those jars of jam for gifting to friends and family and keeping a ready store for your own use. This card is so much prettier in real life. The photo doesn’t do it justice.

How to make jam jar shaped card

- Die cut the jam jar shaped card with Filled with Sweetness die pictured above.
- On separate pieces of Basic White, stamp 2 jam jar images with Filled with Sweetness stamps. Because the die incorporates a fold, you’ll have to trim the fold side yourself with scissors.
Colouring with Stampin’ Blends
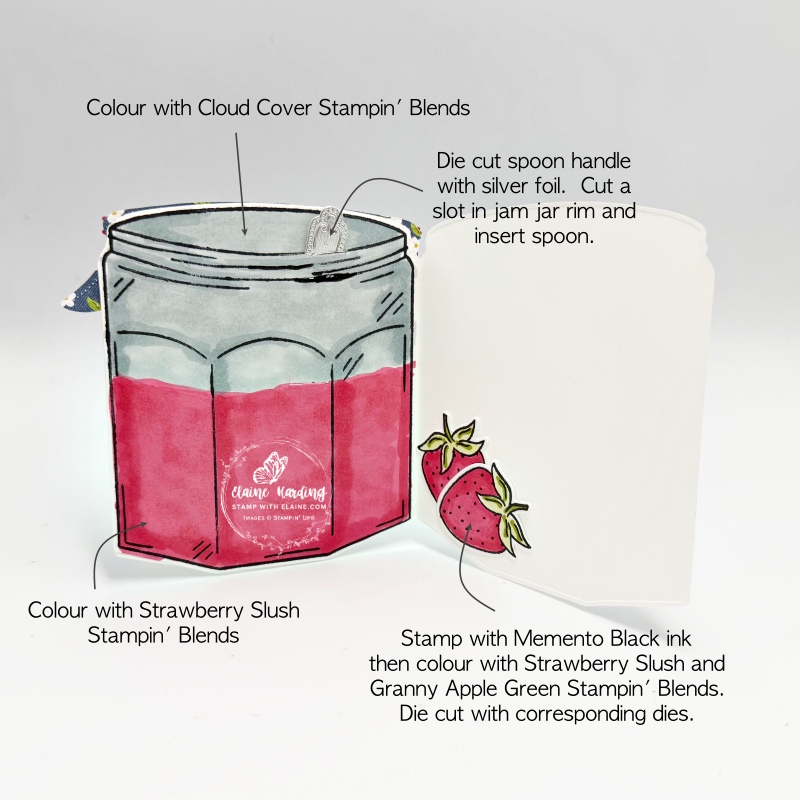
- Colour one of the stamped jars from underneath screw top lid with Strawberry Slush Stampin’ Blends – omit the rim. This is for the front of the card. The top of jar from rim upwards will be covered up so there’s no need to colour it.
- On the second jam jar, colour approximately a third with Cloud Cover (for the glass bit) and the remaining in Strawberry Slush for the jam.
- Die cut the checkered pattern cloth lid with correponding die. Also die cut the “Bakers Twine and bow” with Strawberry Slush card stock as well as the label in Basic White as well as 3 little flowers with Basic White card stock. Keep the centres of the flowers by securing them with a mini dimensional on the back. Colour the centre of the flowers with Strawberry Slush and the petals with Peach Pie Stampin ‘ Blends.
- Die cut a spoon handle with Silver foil.
- Cut a small slot with a craft knife along the rim of the jar on the Cloud Cover and Strawberry Slush jam jar piece so that you can tuck the spoon handle in.
- Stamp two strawberries on a scrap of Basic White with Tuxedo Memento Black ink and colour the leaves with Granny Apple Green and the fruit with Strawberry Slush. Then die cut both with corresponding die.
Assembling card
Card front
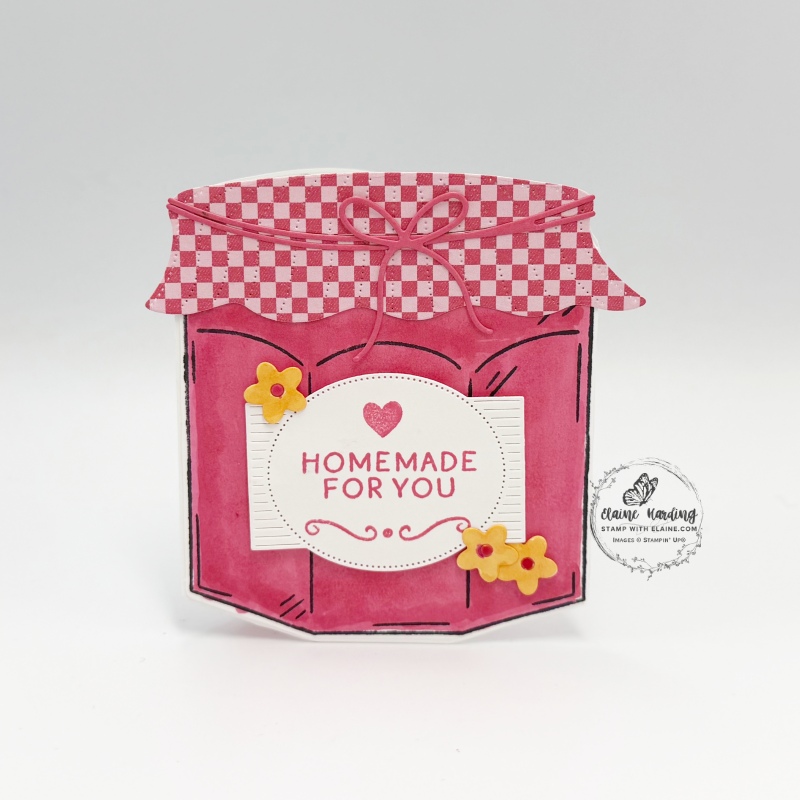
- Adhere the jam jar with the Strawberry Slush colouring from rim to bottom of jar then adhere to the front of jam jar card base.
- Next adhere the die cut checkered DSP cloth lid on top, followed by the thread and bow.
- Die cut a label in Basic White as pictured. Stamp as shown with Strawberry Slush ink. Apply dimensionals on the back and adhere to centre of jam jar card front.
- Add the trio of flowers to embellish.
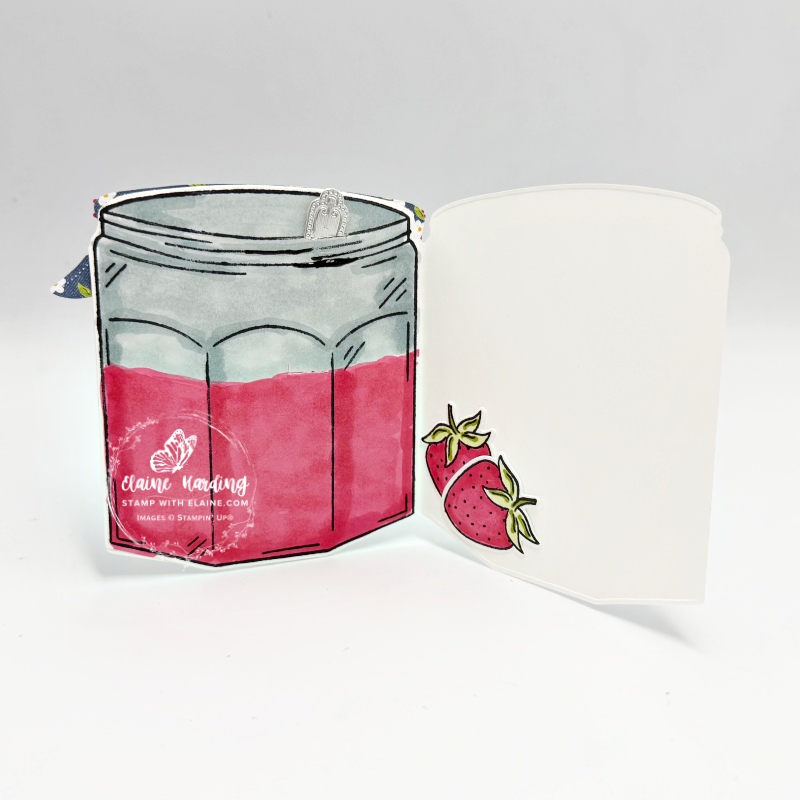
Inside card
- Adhere second jam jar coloured with Cloud Cover and Strawberry Slush.
- Ensure you have tucked the die cut Silver spoon handle in through the slot before adhering to inside of jam jar card base.
- Adhere the die cut strawberries to opposite side of card as pictured.
Supply list
Listed below is the supply list. Just click on the picture to take you directly to the item in my online store.
Product List![Filled With Sweetness Bundle (English) [ 167475 ]](https://assets1.tamsnetwork.com/images/EC042017NF/167475s.jpg "Filled With Sweetness Bundle (English) [ 167475 ]")
![Filled With Sweetness Dies [ 167474 ]](https://assets1.tamsnetwork.com/images/EC042017NF/167474s.jpg "Filled With Sweetness Dies [ 167474 ]")
![Filled With Sweetness Photopolymer Stamp Set (English) [ 167469 ]](https://assets1.tamsnetwork.com/images/EC042017NF/167469s.jpg "Filled With Sweetness Photopolymer Stamp Set (English) [ 167469 ]")
![Homemade Sweetness 12" X 12" (30.5 X 30.5 Cm) Designer Series Paper [ 167467 ]](https://assets1.tamsnetwork.com/images/EC042017NF/167467s.jpg "Homemade Sweetness 12\" X 12\" (30.5 X 30.5 Cm) Designer Series Paper [ 167467 ]")
![Basic White A4 Cardstock [ 166781 ]](https://assets1.tamsnetwork.com/images/EC042017NF/166781s.jpg "Basic White A4 Cardstock [ 166781 ]")
![Strawberry Slush Classic Stampin' Pad [ 165286 ]](https://assets1.tamsnetwork.com/images/EC042017NF/165286s.jpg "Strawberry Slush Classic Stampin' Pad [ 165286 ]")
![Strawberry Slush Stampin’ Blends Combo Pack [ 165290 ]](https://assets1.tamsnetwork.com/images/EC042017NF/165290s.jpg "Strawberry Slush Stampin’ Blends Combo Pack [ 165290 ]")
![Granny Apple Green Stampin' Blends Combo Pack [ 154885 ]](https://assets1.tamsnetwork.com/images/EC042017NF/154885s.jpg "Granny Apple Green Stampin' Blends Combo Pack [ 154885 ]")
![Tuxedo Black Memento Ink Pad [ 132708 ]](https://assets1.tamsnetwork.com/images/EC042017NF/132708s.jpg "Tuxedo Black Memento Ink Pad [ 132708 ]")
![Silver 12" X 12" (30.5 X 30.5 Cm) Foil Sheets [ 163387 ]](https://assets1.tamsnetwork.com/images/EC042017NF/163387s.jpg "Silver 12\" X 12\" (30.5 X 30.5 Cm) Foil Sheets [ 163387 ]")

- SHOP ONLINE – EARN 10% REWARDS ON ALL PURCHASES OVER £20
- PURCHASE A STARTER KIT : Get £155 worth of products for only £99. Choose from current catalogues and any specials available. Free Shipping. Read more
- Subscribe to my Video Tutorials – click here
Pingback: Easy thank you card - Filled with Sweetness - Stamp with Elaine