
Any occasion card plus earn double rewards from 15-17 April!
Earn double rewards for 3 days

- Earn double rewards (2x rewards) for three days only, starting 15 April 2026.
- This offer applies to ALL products (excluding non-commissionable products and existing Paper Pumpkin subscriptions).
- All orders qualify once the rewards threshold of 25 € | £20 is met.
- To participate, you must have a Stampin’ Up! account and be opted in to Stampin’ Rewards.
Any occasion card
Help me Grow. By adding just a “hello” greeting, this can be used for any occasion. However, I did struggle trying to find my mojo. Do you get creative blocks from time to time? Procrastinating doesn’t help so I just jumped in and started die cutting the elements and it did the trick.
Die cutting Help me Grow dies
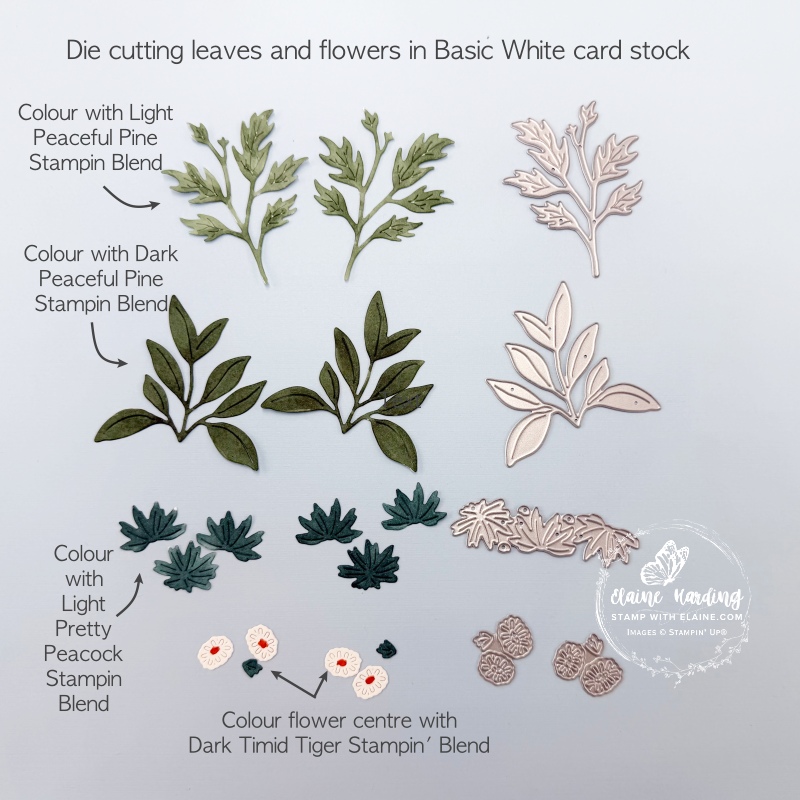
This is the result of die cutting all those pieces. I cut the leaves, floral pieces in Basic White card stock which opened up the choice of what colours to use to colour the leaves and flowers. I chose one of the new 2026-2028 In Colors called Peaceful Pine which will be available wef 5 May 2026. One pair used the Light Peaceful Pine, and the other pair, I used the Dark Peaceful Pine Stampin’ Blends.

How to make card
The card base was cut in Basic Beige at 5 ¾” x 8 ¼” (14.5 cm x 21 cm) folded in half.
First picture
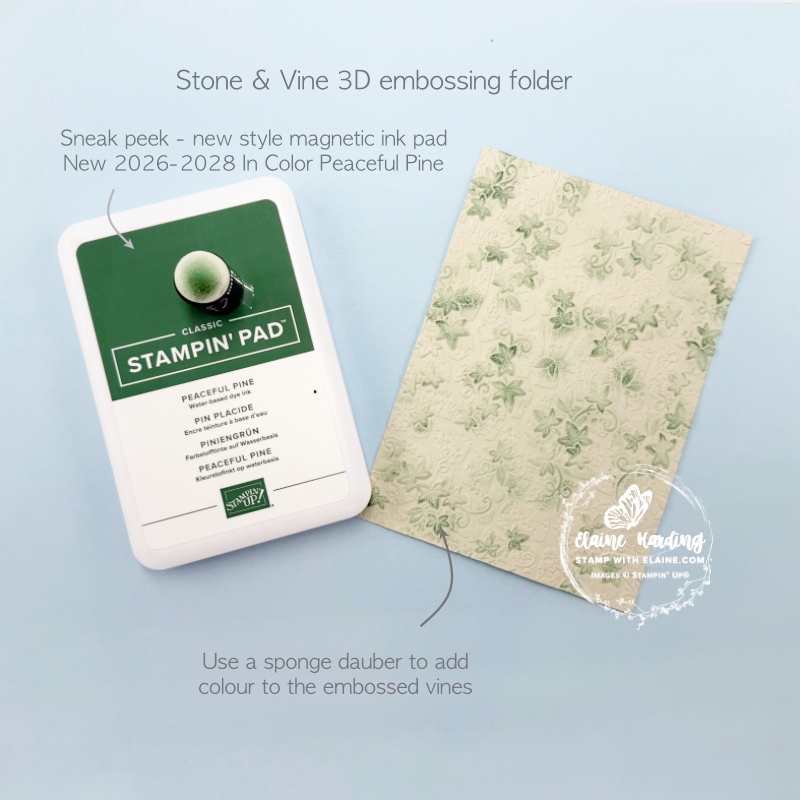
- Card front layer in Basic Beige cut at 4 ⅛” x 5 ¾” (10.5 cm x 14.5 cm) and emboss with Stone & Vine 3D embossing folder. Use a sponge dauber to add colour (Peaceful Pine) to embossed vine leaves pictured above.
- Early Espresso layers for the soil.
Middle picture
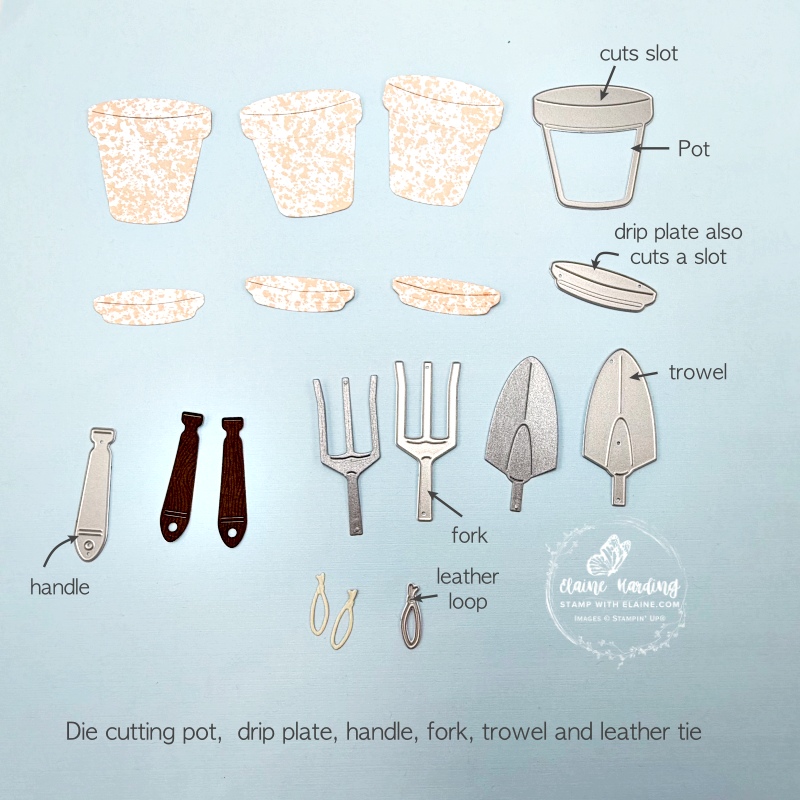
- Die cut 3 flower pots and 3 drip plates – these have slots through which you can insert your leaves or pot. DSP used is from Cute as a Bug Designer Series Paper. Use a blending brush to add colour in Cajun Craze.
- The handles and leather loops were die cut from Wood Grain Wonders 12″ x 12″ (30.5 x 30.5 cm) DSP.
- Trowel and fork are die cut from Lunar Lustre 12″x 12″ (30.5 x 30.5 cm) Specialty Paper.
Picture on right
- Sneak peek of the 2026-2028 Peaceful Pine new In Color. Detailed leaves were coloured with the brush end of Stampin’ Blends Peaceful Pine Light.
- Fuller leaves were coloured in with Peaceful Pine Dark Stampin’ Blend.
- Smallest leaves were coloured with Light Pretty Peacock Stampin’ Blend.
- Flower centres coloured with Dark Timid Tiger Stampin’ Blend.
Assembling card
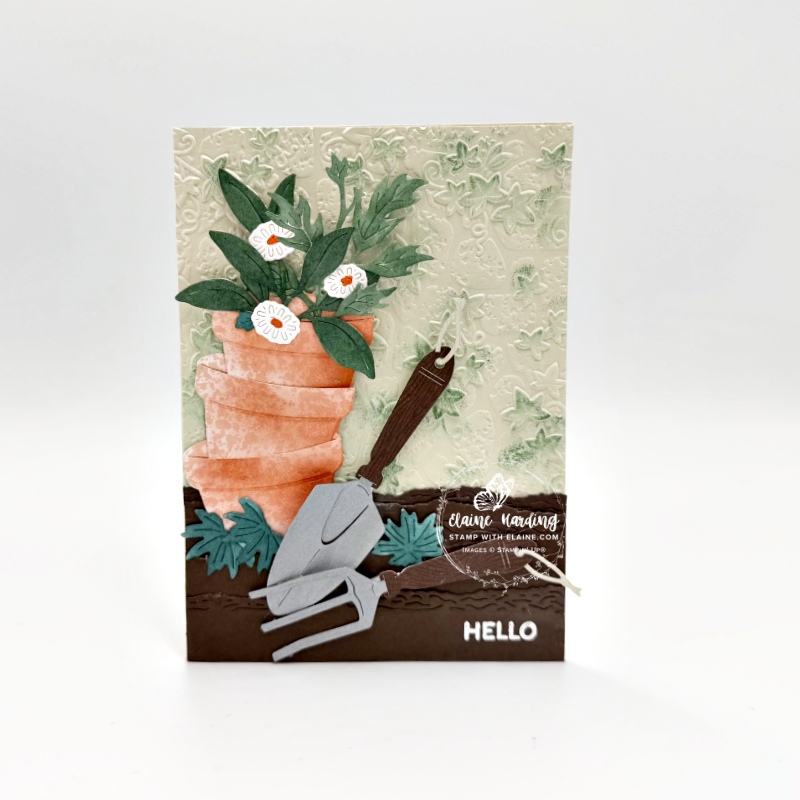
- Adhere the embossed piece on to card front as the background.
- Apply adhesive to the two sides and bottom of the Early Espresso layers. Leave top open so you can insert pot or leaves in the opening.
- Stack 2 flower pots and insert bottom one into the “earth” and adhere.
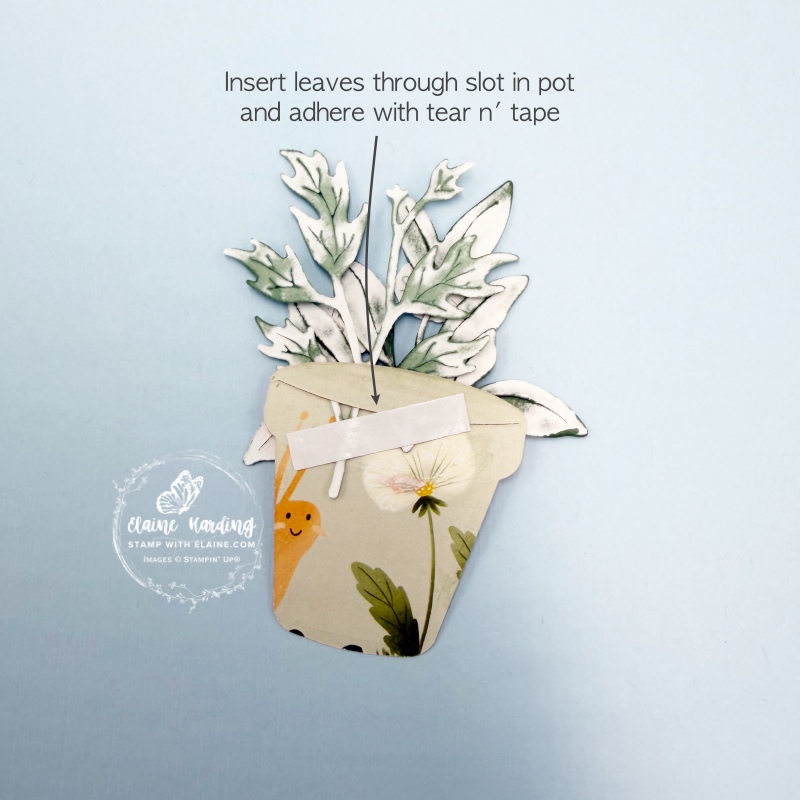
- Insert leaves into 3rd flower pot, flip over to the back and apply tear n’ tape to secure leaves. Flip back to right side and insert into middle flower pot. Ensure the leaves are within the card.
- Adhere handles to fork and trowel, arrange and adhere to front of card as pictured then adhere the smallest Pretty Peacock leaves as pictured above.
- White emboss “Hello” in bottom right corner as shown.
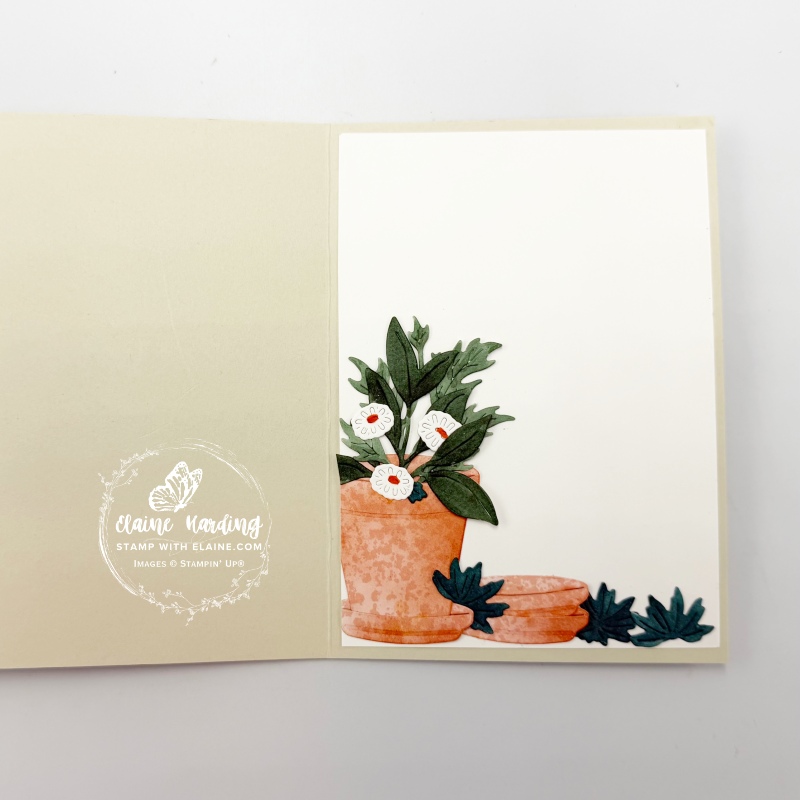
Inside card

- Cut a Basic White pieces 3 ⅞” x 5 ½” (10 cm x 14 cm)
- Insert pot into drip plate and adhere at the back to secure it. Do the same with the other two drip plates.
- Insert leaves into pot, flip over and adhere with tear n’ tape. Apply adhesive to the centre but leave the right side of pot so that you can tuck the double dripping plates behind it.
- Flip over and cut off any excess and apply adhesive to whole of Basic White layer and adhere to inside of card leaving an even border on all four sides.
- Insert and adhere smaller leaves as shown and finally adhere a trio of flowers to complete card.
Supply list
Listed below is the supply list. Just click on the picture to take you directly to the item in my online store.
Product List![Help Me Grow Bundle (English) [ 167167 ]](https://assets1.tamsnetwork.com/images/EC042017NF/167167s.jpg "Help Me Grow Bundle (English) [ 167167 ]")
![Cute As A Bug 12" X 12" (30.5 X 30.5 Cm) Designer Series Paper [ 166994 ]](https://assets1.tamsnetwork.com/images/EC042017NF/166994s.jpg "Cute As A Bug 12\" X 12\" (30.5 X 30.5 Cm) Designer Series Paper [ 166994 ]")
![Stone & Vine 3 D Embossing Folder [ 166990 ]](https://assets1.tamsnetwork.com/images/EC042017NF/166990s.jpg "Stone & Vine 3 D Embossing Folder [ 166990 ]")
![Wood Grain Wonders 12" X 12" (30.5 X 30.5 Cm) Designer Series Paper [ 167428 ]](https://assets1.tamsnetwork.com/images/EC042017NF/167428s.jpg "Wood Grain Wonders 12\" X 12\" (30.5 X 30.5 Cm) Designer Series Paper [ 167428 ]")
![Lunar Lustre 12" X 12" (30.5 X 30.5 Cm) Specialty Paper [ 167199 ]](https://assets1.tamsnetwork.com/images/EC042017NF/167199s.jpg "Lunar Lustre 12\" X 12\" (30.5 X 30.5 Cm) Specialty Paper [ 167199 ]")
![Basic White A4 Cardstock [ 166781 ]](https://assets1.tamsnetwork.com/images/EC042017NF/166781s.jpg "Basic White A4 Cardstock [ 166781 ]")
![Basic Beige A4 Cardstock [ 164512 ]](https://assets1.tamsnetwork.com/images/EC042017NF/164512s.jpg "Basic Beige A4 Cardstock [ 164512 ]")
![Sponge Daubers [ 133773 ]](https://assets1.tamsnetwork.com/images/EC042017NF/133773s.jpg "Sponge Daubers [ 133773 ]")
![Blending Brushes [ 153611 ]](https://assets1.tamsnetwork.com/images/EC042017NF/153611s.jpg "Blending Brushes [ 153611 ]")
![Cajun Craze Classic Stampin' Pad [ 147085 ]](https://assets1.tamsnetwork.com/images/EC042017NF/147085s.jpg "Cajun Craze Classic Stampin' Pad [ 147085 ]")
![Versamark Pad [ 102283 ]](https://assets1.tamsnetwork.com/images/EC042017NF/102283s.jpg "Versamark Pad [ 102283 ]")
![Basics Wow! Embossing Powder [ 165679 ]](https://assets1.tamsnetwork.com/images/EC042017NF/165679s.jpg "Basics Wow! Embossing Powder [ 165679 ]")
![Embossing Additions Tool Kit [ 159971 ]](https://assets1.tamsnetwork.com/images/EC042017NF/159971s.jpg "Embossing Additions Tool Kit [ 159971 ]")
![Heat Tool - Uk Plug [ 129054 ]](https://assets1.tamsnetwork.com/images/EC042017NF/129054s.jpg "Heat Tool - Uk Plug [ 129054 ]")
I will add the 2026-2028 Peaceful Pine In Color once it becomes available.

- SHOP ONLINE – EARN 10% REWARDS ON ALL PURCHASES OVER £20
- PURCHASE A STARTER KIT : Get £155 worth of products for only £99. Choose from current catalogues and any specials available. Free Shipping. Read more
- Subscribe to my Video Tutorials – click here