
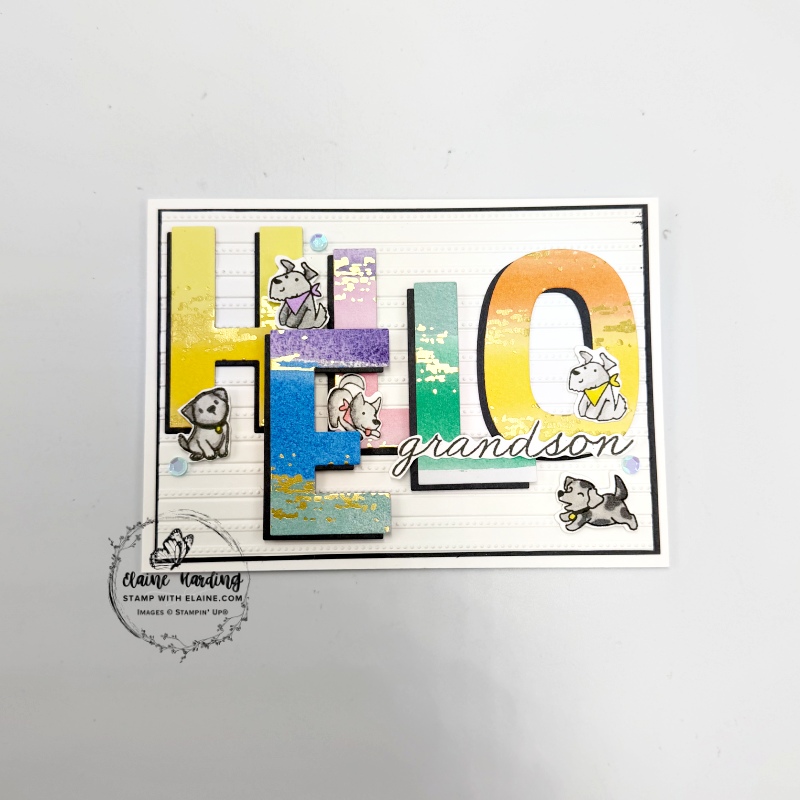
Teenage Birthday card – Cutest Crew. My youngest grandson had his 16th birthday recently and I combined the Party Alphabet die set with the Cutest Crew bundle to make him a card. The Party Alphabet is a big investment, but so worth it and I’m thrilled that it has been carried through to the May-August 2026 catalogue.
Sneak peeks
I’ve also got a sneak peek for you with the Family Celebration stamp set which is a really useful set because it includes greetings which start with a birthday phrase and can finish with family titles. Consequently every card can be personalised no matter who is blowing out the candles!

Cutting guide
- Card base : 4 ⅛” x 11 ½” (10.5 cm x 29 cm) folded in half.
- Basic Gray mat layers : cut 2 pieces 3 ⅞” x 5 ½” (10 cm x 14 cm)
- Basic White mat layers : cut 2 pieces 3 ⅝” x 5 ¼” (9.5 cm x 13.5 cm)
Die cutting
Party Alphabet dies
- Splash of Sparkles 12″ x 12″ (30.5 x 30.5 cm) DSP : die cut 1 x H, 1 x E, 2 x L and 1 x “0”.
- Use the inside of the Basic Gray mat layers to die cut 1 x “H”, 1 x “E”, 2 x “L” and 1 x “0” to use as “shadows” for each letter. The card stock has the dual purpose of strengthening the DSP as well for adhering to embossed card layer.
- Emboss one of the Basic White layers with Lovely Stripes 3D embossing folder.
Cutest Crew Die
- Stamp the dogs from Cutest Crew in Basic Gray on Basic White stock. Use die to die cut the row.
- Use a variety of Smoky Slate, Gray Granite, Light Darling Duckling, Pretty in Pink, Shy Shamrock, Highland Heather Stampin’ Blends to colour the dogs, scarves, tongue and medallion.
- You can use the individual dies to die cut each dog to separate them, but I found it easier to fussy cut them by hand.
Assembling card
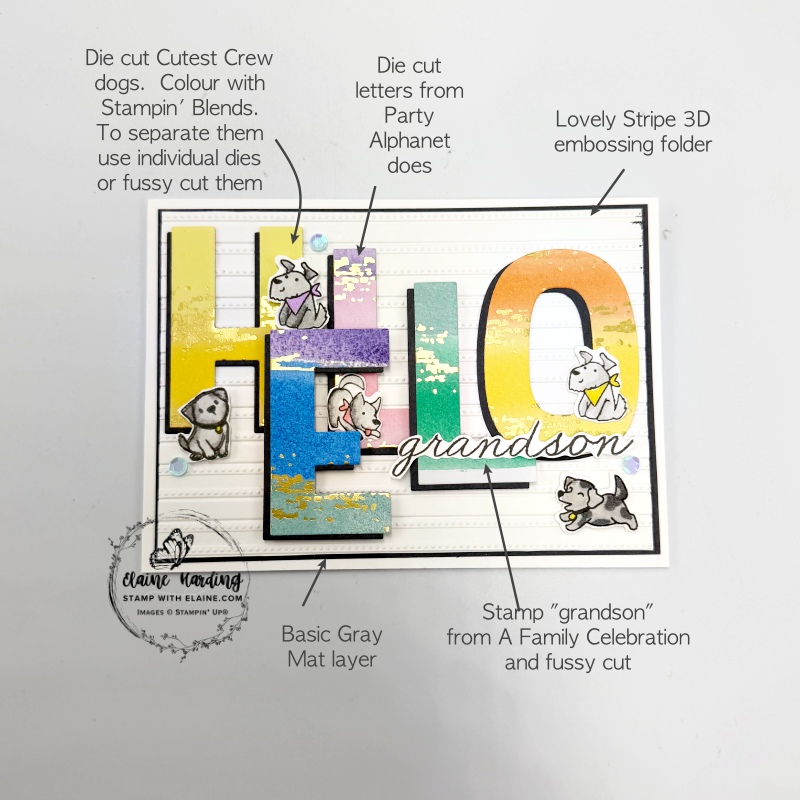
- Emboss one of the Basic White layers with Lovely Stripes 3D embossing folder and adhere to Basic Gray mat layer.
- Adhere DSP cut letters to corresponding letters in Basic Gray to give illusion of 3D shadow effect.
- Arrange letters as desired – adhere H, L and O letters directly on card base and the E & L with dimensionals.
- Apply dimensionals to back of fussy cut dogs and adhere as pictured above.
A Family Celebration
This is new from the May-August 26 catalogue. It has no images, only sentiments and family titles.
- To stamp grandson, use a masking technique – mask “child” and only stamp “grand”.
- Ink up “son” and align with the end of “grand” and stamp “son” next to it so that it appears as one continuous word.
- Fussy cut and adhere as shown on top of the second “L”. You’ll need to apply dimensionals on the latter half and adhere to card front as pictured.
Finishing touches and Cutest crew fussy cut dogs
- Adhere the individual dogs in amongst the letters as pictured.
- Use the Sunset Sparkle sequins (new – available 5 May 2026).
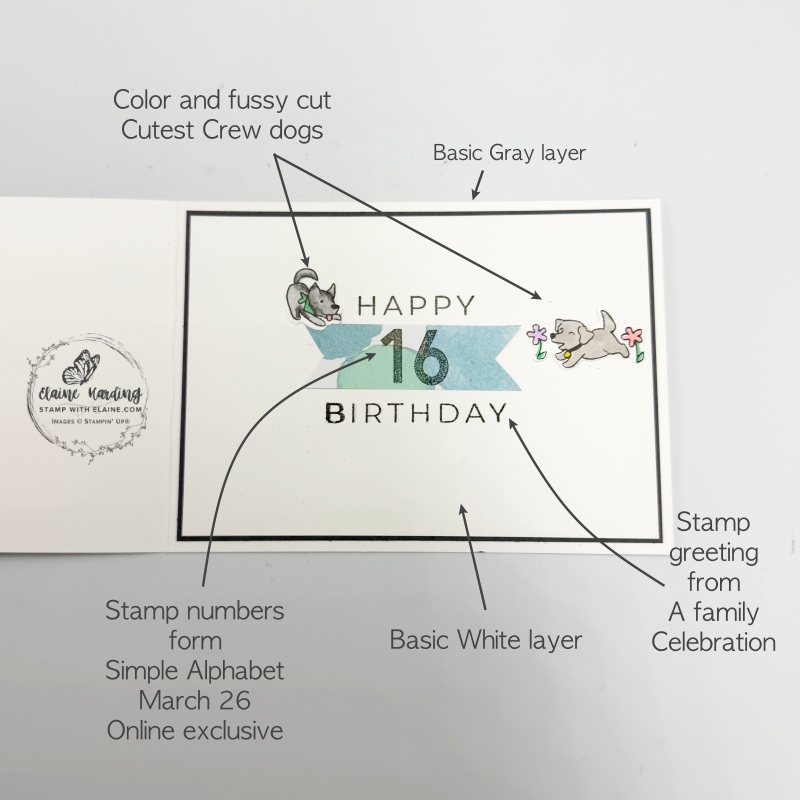
Inside card
- Adhere Basic Gray layer to inside card.
- Mask “birthday” and stamp “happy” first on Basic White layer.
- On scrap of Splash of Sparklesl stamp numerals “16” from Simple Alphabet stamp set and trim ends to create flag ends for a banner.
- Mask “Happy” when you ink up stamp, remove mask and stamp “birthday” below the the banner.
- Adhere fussy cut dogs as shown to complete card.
Not all supplies have been listed. I will add the new items once they become available.
Supply list
Listed below is the supply list. Just click on the picture to take you directly to the item in my online store.
Product List![Cutest Crew Bundle (English) [ 167149 ]](https://assets1.tamsnetwork.com/images/EC042017NF/167149s.jpg "Cutest Crew Bundle (English) [ 167149 ]")
![Party Alphabet Dies [ 165263 ]](https://assets1.tamsnetwork.com/images/EC042017NF/165263s.jpg "Party Alphabet Dies [ 165263 ]")
![Simple Alphabet Photopolymer Stamp Set [ 167541 ]](https://assets1.tamsnetwork.com/images/EC042017NF/167541s.jpg "Simple Alphabet Photopolymer Stamp Set [ 167541 ]")
![Lovely Stripes 3 D Embossing Folder [ 167179 ]](https://assets1.tamsnetwork.com/images/EC042017NF/167179s.jpg "Lovely Stripes 3 D Embossing Folder [ 167179 ]")
![Splash Of Sparkles 12" X 12" (30.5 X 30.5 Cm) Specialty Designer Series Paper [ 167200 ]](https://assets1.tamsnetwork.com/images/EC042017NF/167200s.jpg "Splash Of Sparkles 12\" X 12\" (30.5 X 30.5 Cm) Specialty Designer Series Paper [ 167200 ]")
![Basic Gray A4 Card Stock [ 121689 ]](https://assets1.tamsnetwork.com/images/EC042017NF/121689s.jpg "Basic Gray A4 Card Stock [ 121689 ]")
![Basic White A4 Cardstock [ 166781 ]](https://assets1.tamsnetwork.com/images/EC042017NF/166781s.jpg "Basic White A4 Cardstock [ 166781 ]")
![Darling Duckling Stampin’ Blends Combo Pack [ 165288 ]](https://assets1.tamsnetwork.com/images/EC042017NF/165288s.jpg "Darling Duckling Stampin’ Blends Combo Pack [ 165288 ]")
![Highland Heather Stampin' Blends Combo Pack [ 154887 ]](https://assets1.tamsnetwork.com/images/EC042017NF/154887s.jpg "Highland Heather Stampin' Blends Combo Pack [ 154887 ]")
![Pretty In Pink Stampin’ Blends Combo Pack [ 163824 ]](https://assets1.tamsnetwork.com/images/EC042017NF/163824s.jpg "Pretty In Pink Stampin’ Blends Combo Pack [ 163824 ]")
![Shy Shamrock Stampin’ Blends Combo Pack [ 163825 ]](https://assets1.tamsnetwork.com/images/EC042017NF/163825s.jpg "Shy Shamrock Stampin’ Blends Combo Pack [ 163825 ]")
![Gray Granite Stampin' Blends Combo Pack [ 154886 ]](https://assets1.tamsnetwork.com/images/EC042017NF/154886s.jpg "Gray Granite Stampin' Blends Combo Pack [ 154886 ]")
![Smoky Slate Stampin' Blends Combo Pack [ 154904 ]](https://assets1.tamsnetwork.com/images/EC042017NF/154904s.jpg "Smoky Slate Stampin' Blends Combo Pack [ 154904 ]")
![Gray Granite Classic Stampin' Pad [ 147118 ]](https://assets1.tamsnetwork.com/images/EC042017NF/147118s.jpg "Gray Granite Classic Stampin' Pad [ 147118 ]")

- SHOP ONLINE – EARN 10% REWARDS ON ALL PURCHASES OVER £20
- PURCHASE A STARTER KIT : Get £155 worth of products for only £99. Choose from current catalogues and any specials available. Free Shipping. Read more
- Subscribe to my Video Tutorials – click here