
Triple tiered wiper card. I have made wiper cards before, but this one is designed to have 3 layers decreasing in size, and uses the same wiper mechanism attached to each layer so that when you pull it at the side the wipers from each layer pops out to reveal an image. Here’s a sneak peek at Joyful Friends coming soon in the new September-December 2026 catalogue (page 43).
Triple tiered wiper card
This triple tiered wiper card is not as difficult as it appears. Better still, you don’t need any special dies to create it. This post may be picture heavy, but I hope the picture instructions will help you visualise how to make it. This card is a labour of love. It is quite thick, so hand delivery is advised just for that someone special. I don’t intend making multiples of this because it would cost too much on postage!
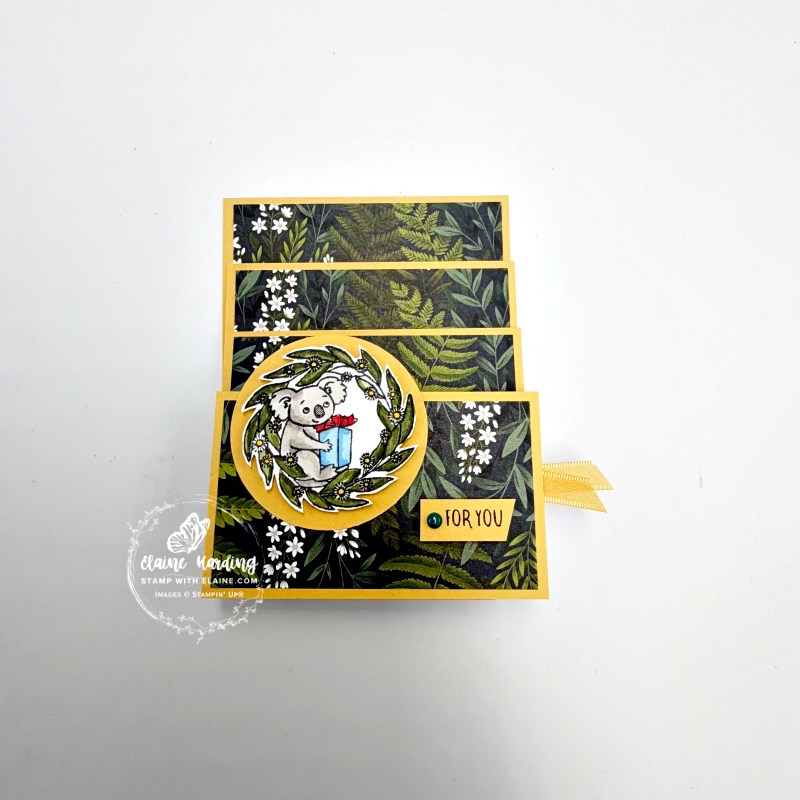
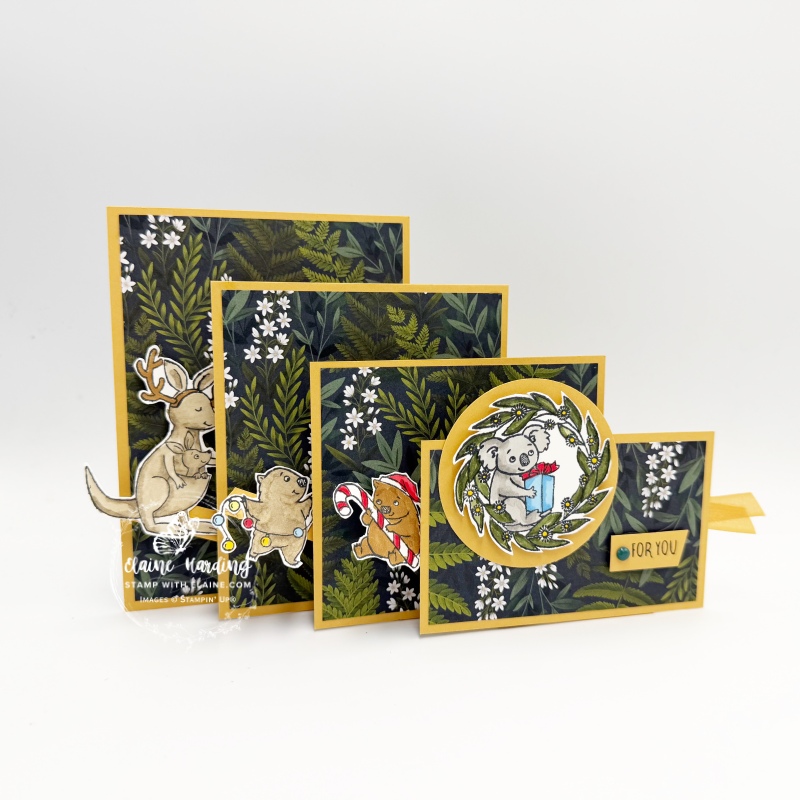
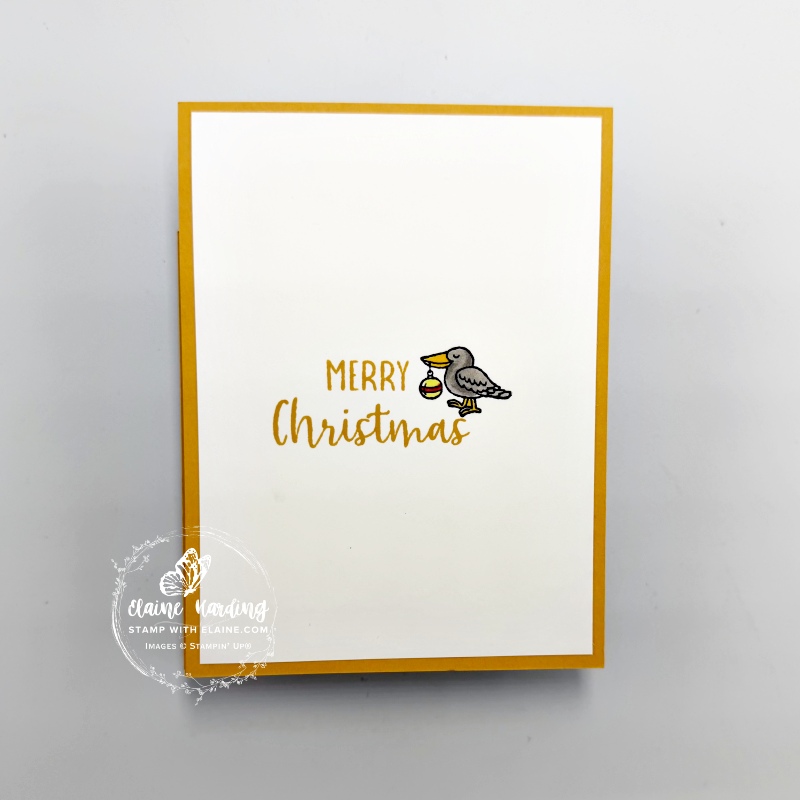
I added some ribbon so that the recipient would know to pull on tab to release the hidden images on the wiper mechanism. Lastly I added an additional Basic White layer on the back so that you could write a message behind if desired.
Cutting guide card tiers/layers
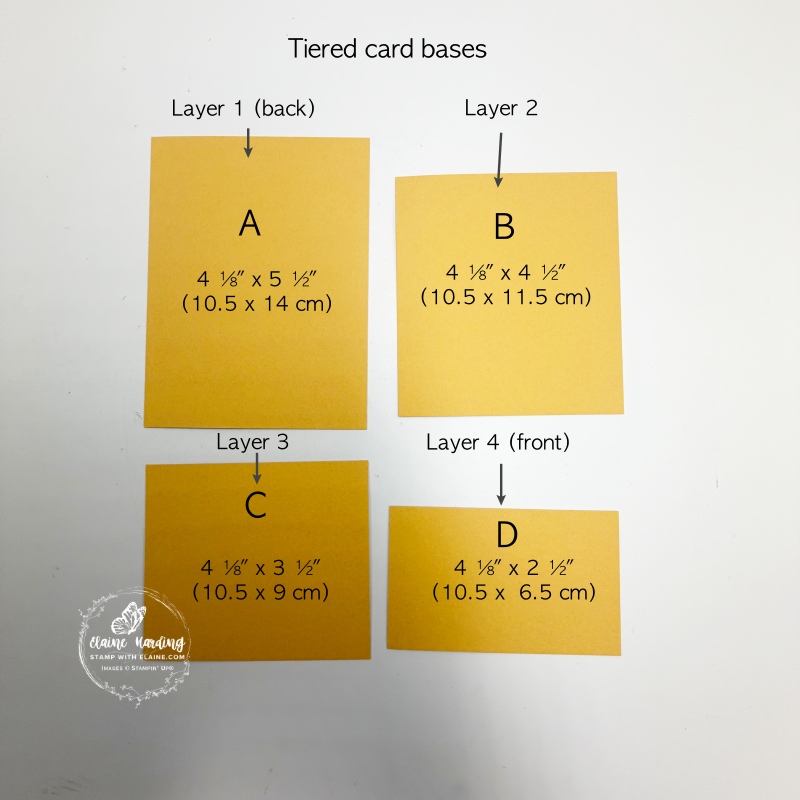
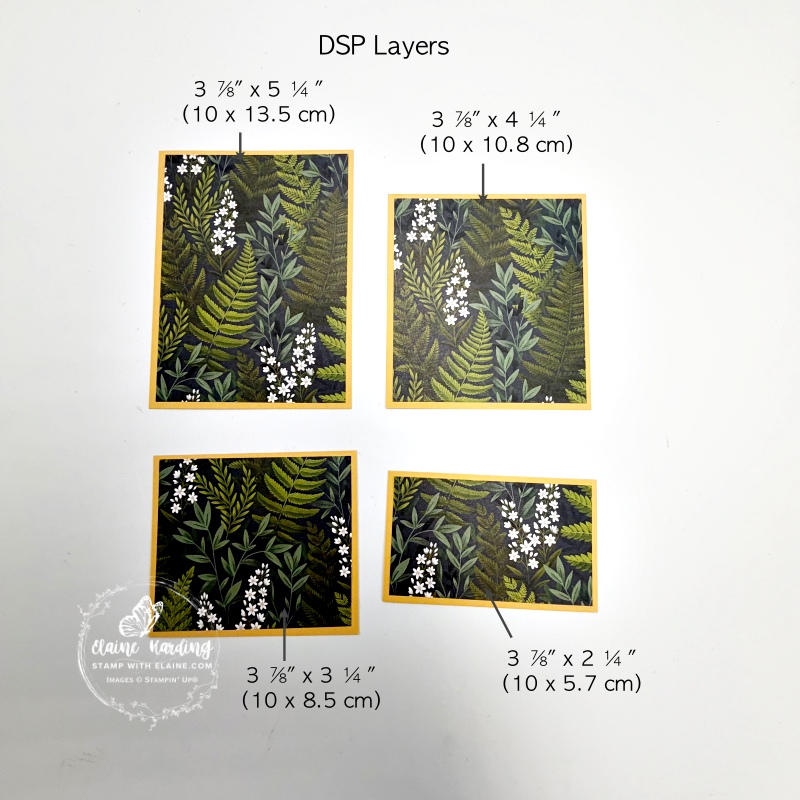
- First layer “A” : Golden Glow cut at 4 ⅛” x 5 ½” (10.5 x 14 cm)
- Second layer “B” : Golden Glow cut at 4 ⅛” x 4 ½” (10.5 x 11.5 cm)
- Third layer “C” : Golden Glow cut at 4 ⅛” x 3 ½” (10.5 cm x 9 cm)
- Fourth layer “D” (front of card) : Golden Glow cut at 4 ⅛” x 2 ½” (10.5 cm x 6.5 cm)
DSP – Moonlight Flora 12″x 12″ (30.5 x 30.5 cm)
- “A” – 3 ⅞” x 5 ¼” (10 x 13.5 cm)
- “B” – 3 ⅞” x 4 ¼” (10 x 10.8 cm)
- “C” – 3 ⅞” x 3 ¼” (10 x 8.5 cm)
- “D” – 3 ⅞” x 2 ¼” (10 x 5.7 cm)
- How to make wiper mechanism
Wiper mechanism
To make scoring wiper mechanism easier, cut a piece of cardstock incorporating all 3 pieces on just one piece of card stock which you can then split into 3 pieces afterwards.
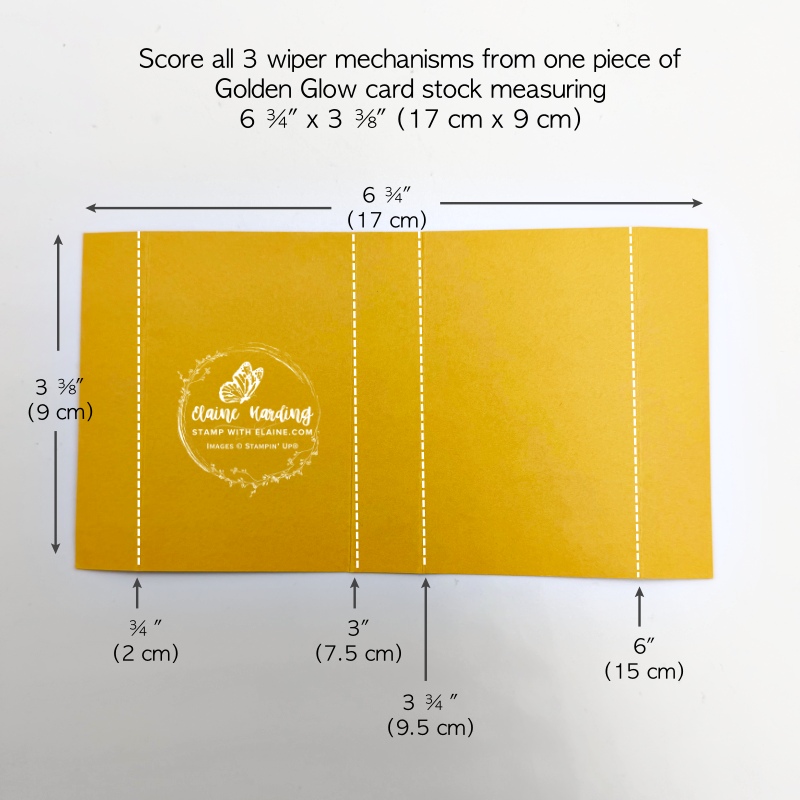
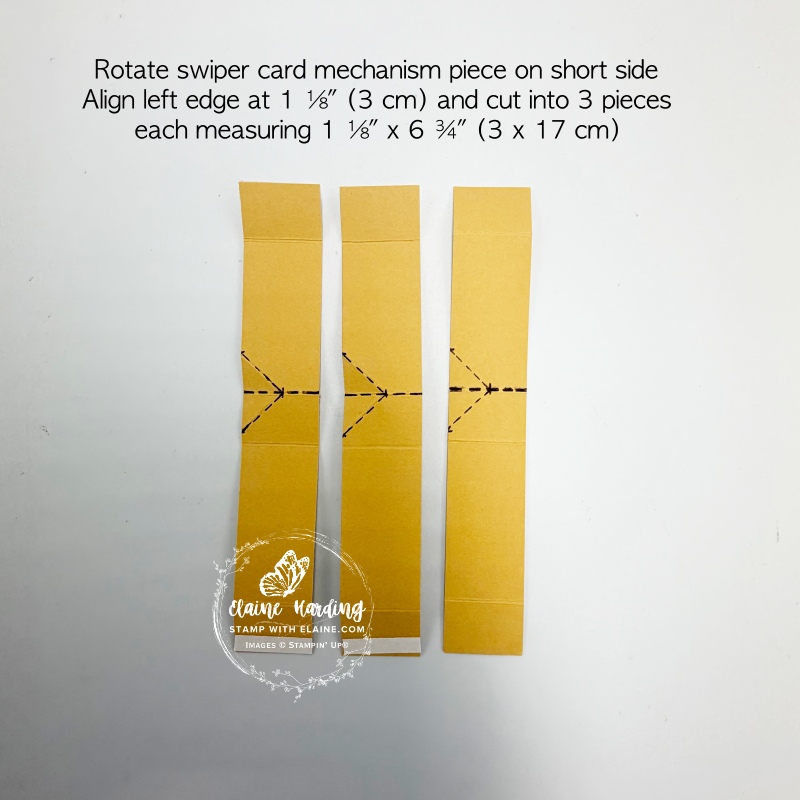
- Long side on top, score 6 ¾” x 3 ⅜” at ¾”, 3″, 3 ¾” and 6″ (2 cm, 7.5 cm, 9.5 cm and 15 cm)
- Burnish score lines well. Rotate to short side and align left edge at 1 ⅛” (3 cm) and cut into 3 pieces each measuring 1 ⅛” x 6 ¾” (3 cm x 17 cm).
Additional scoring of wiper mechanism
Now is the time to score the wiper mechanism in order to attach the arm for the wiper mechanism.
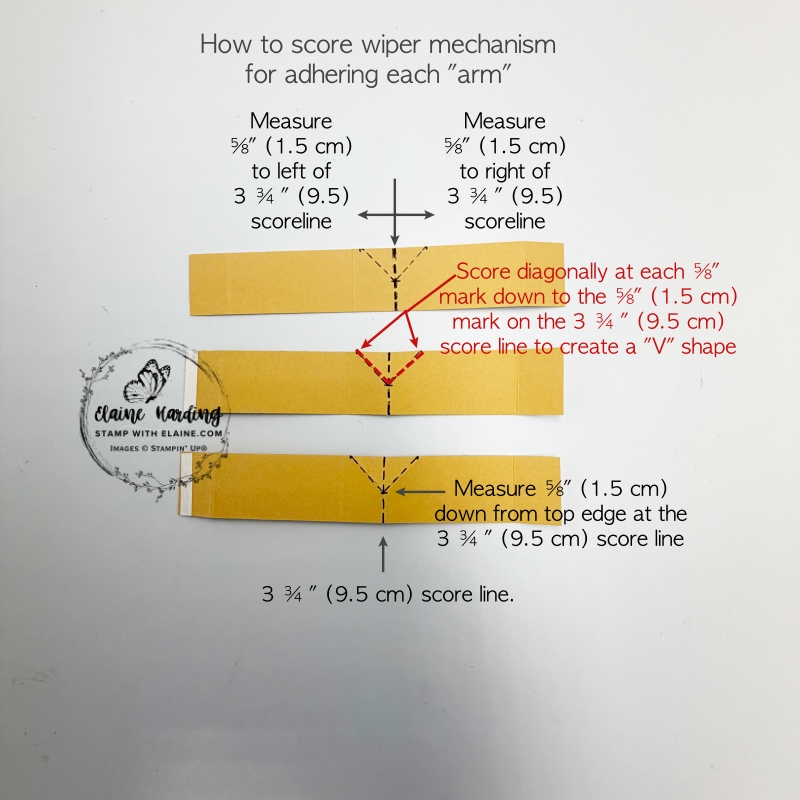
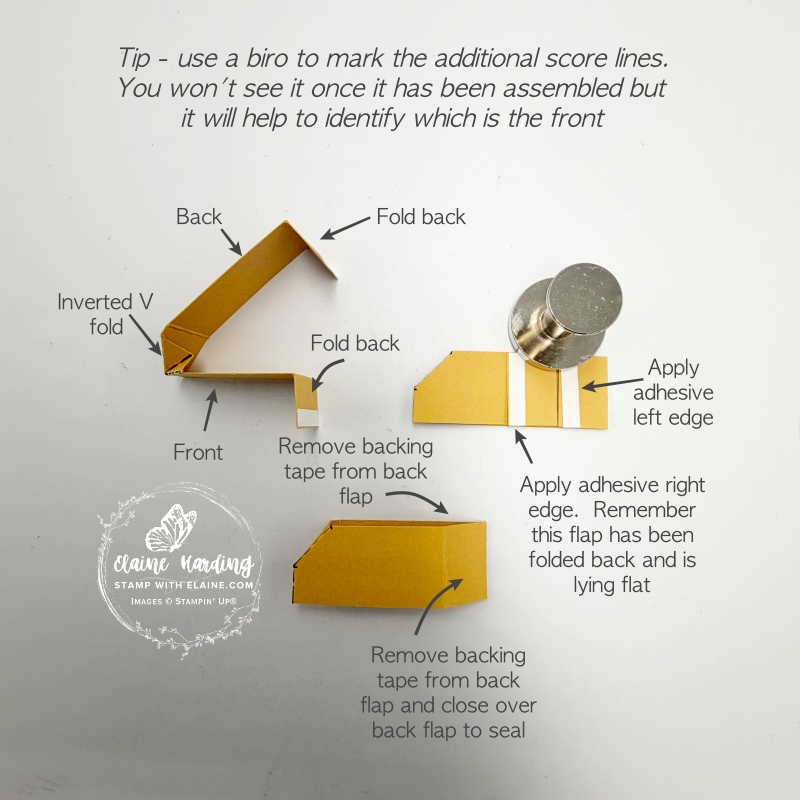
- Follow the picture instructions above for scoring. Use a biro to mark the score lines as shown.
- Repeat for each wiper piece – 3 in total.
- Where the “V” score lines are, invert the fold. The front and back of the mechanism is depicted by arrows pointing to it.
- Follow picture instructions to apply adhesive and repeat for the other two wiper mechanisms.
Assembling wiper mechanism/applying adhesive front and back
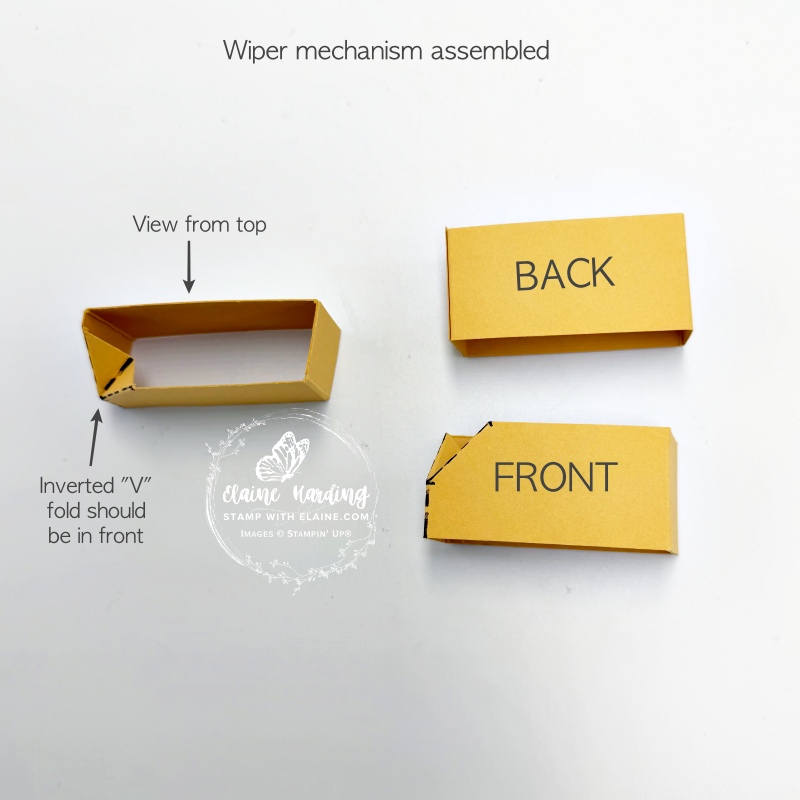
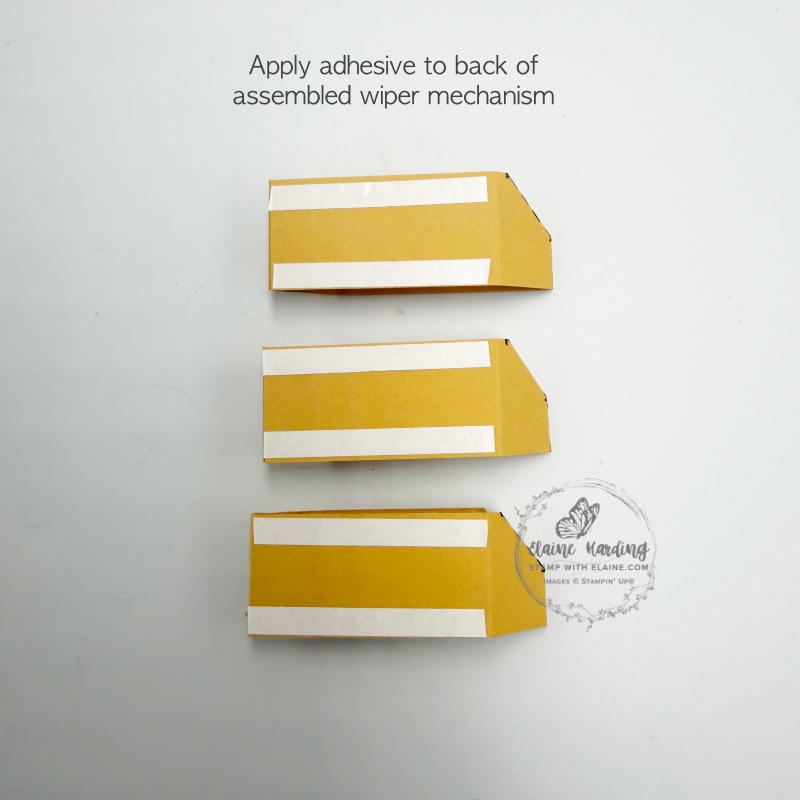
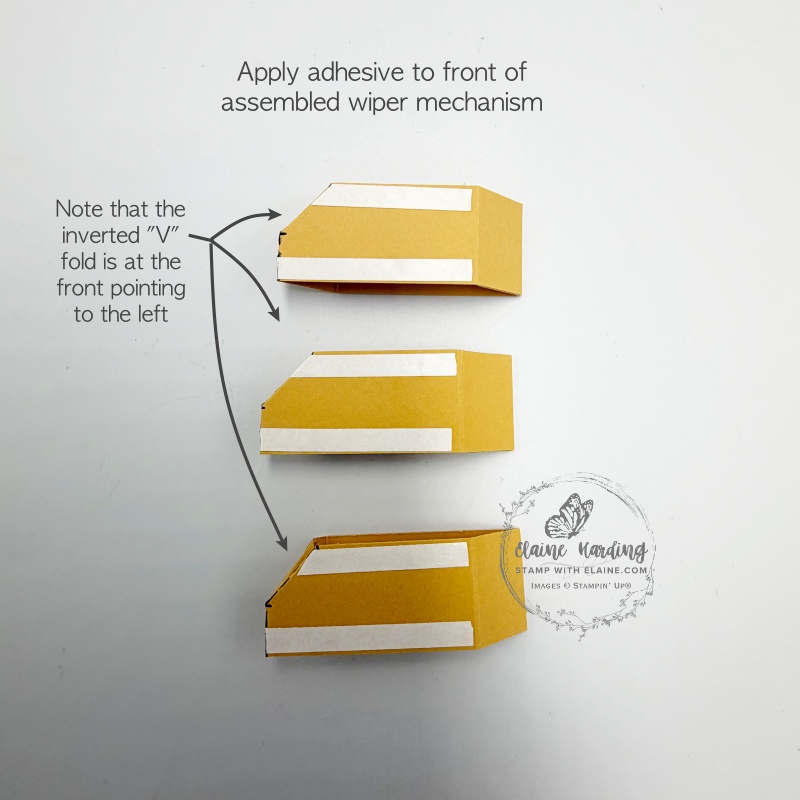
- Picture on the left shows what the wiper mechanism looks like from the top. The back of the mechanism is rectangular in shape and the front is angled at the top on the left.
- Middle picture is the back of the mechanism flattened so that you can apply adhesive as pictured.
- Picture on the right shows the front of the box flattened so that you can apply adhesive as pictured. You can tell it is the front because the “V” fold is pointing to the left.
Cutting/adhering the arms for the wiper mechanism
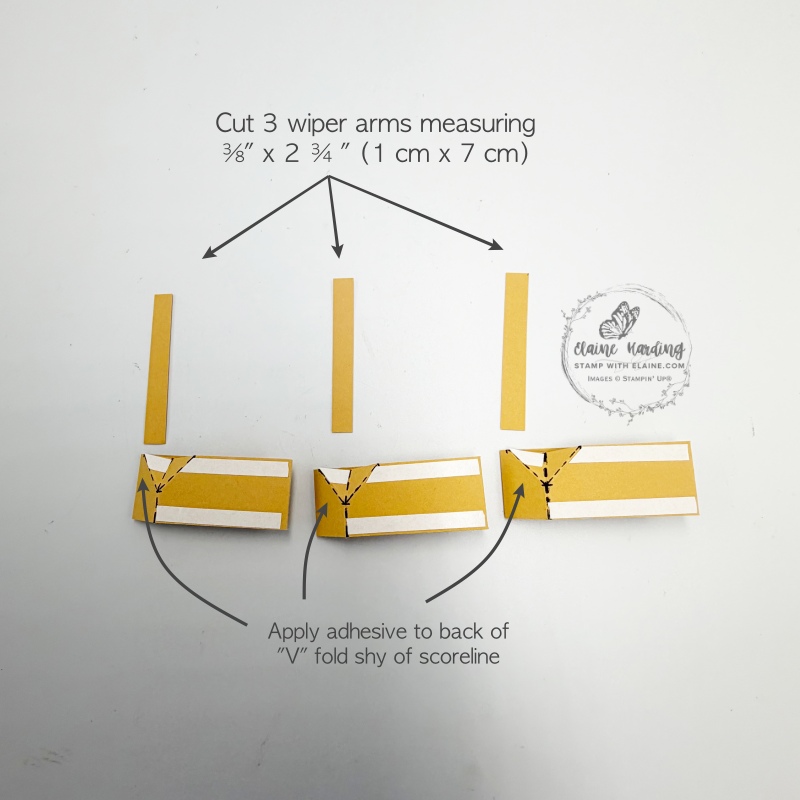
- Cut 3 pieces of Golden Glow card stock at ⅜” x 2 ¾” (1 cm x 7 cm) for the arms of the wiper mechanism.
- On the back left of the “V” fold on each wiper mechanism, apply adhesive.
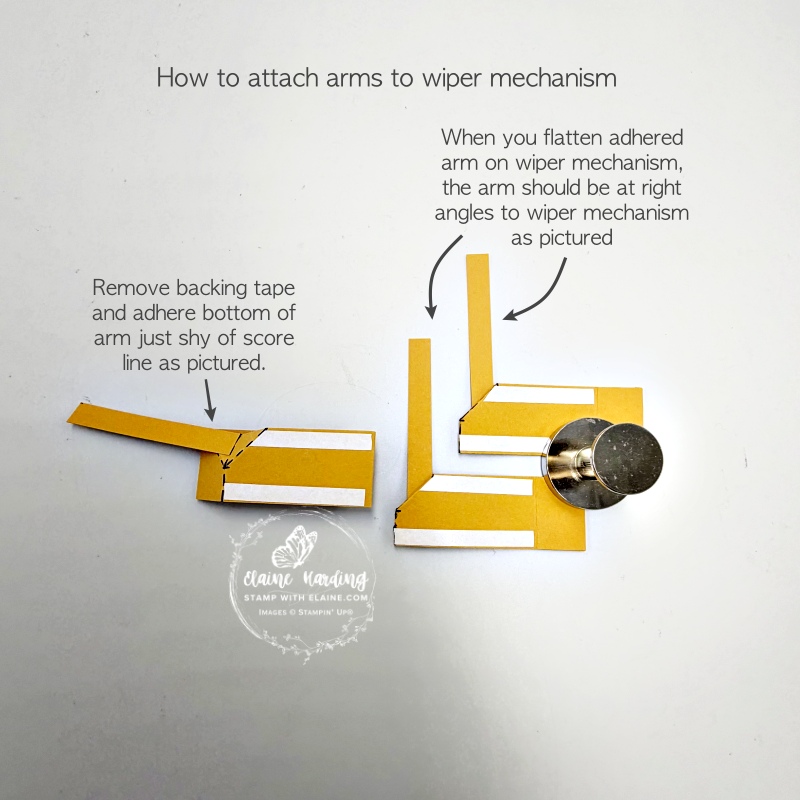
- Remove backing tape (refer to picture on the right above), align bottom of arm just shy of score line and adhere to mechanism.
- When you flatten the mechanism, it should close at a 90 degree angle as pictured.
Attaching wiper mechanisms to the tiers
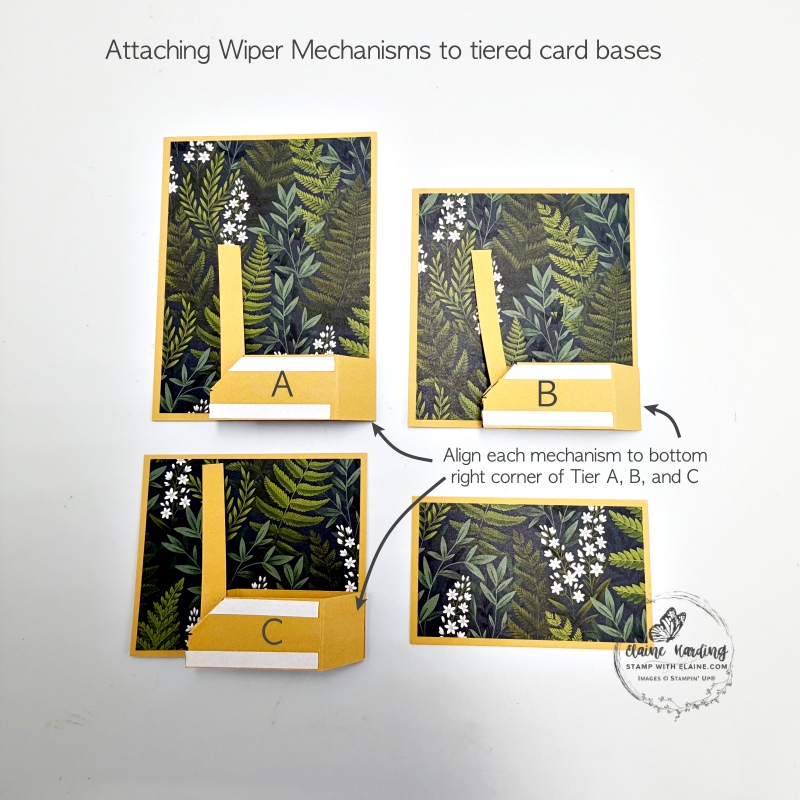
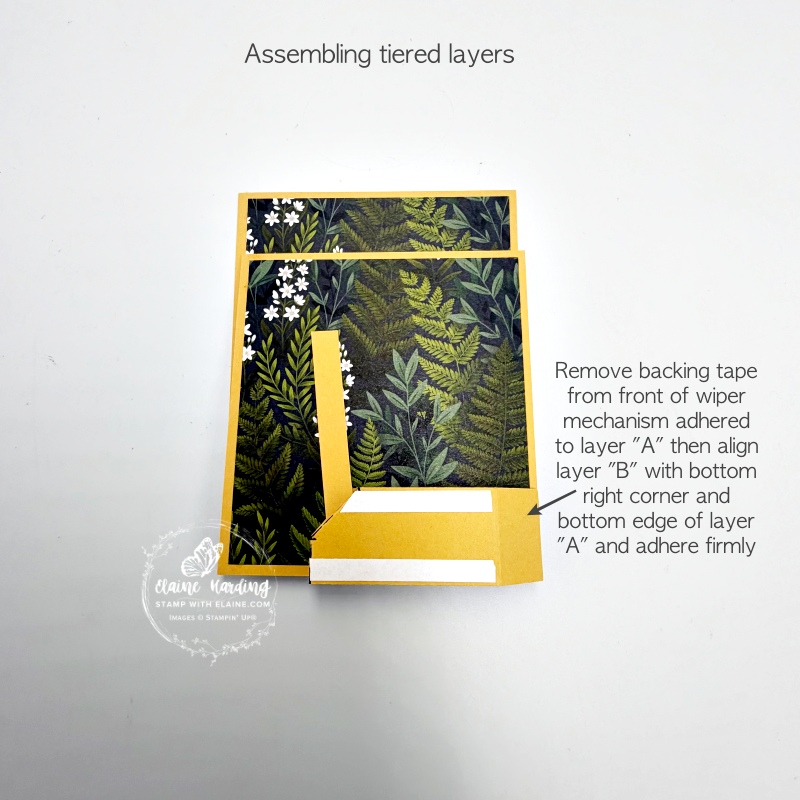
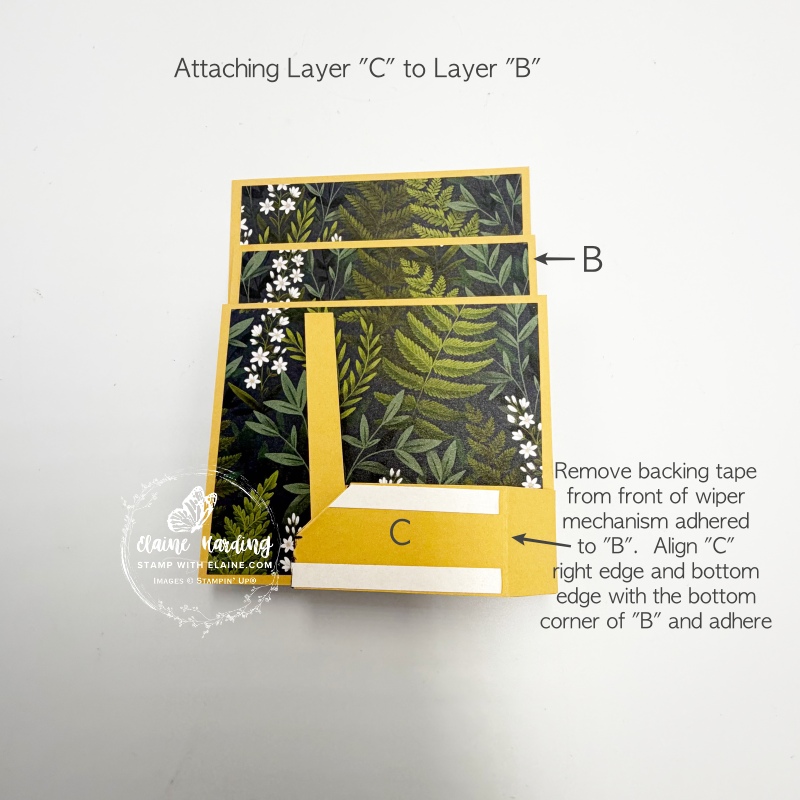
- Remove backing tape from back of each wiper mechanism. Align each to bottom right corner on the right and bottom edges on tiers “A”, “B” and “C”.
- On Tier “A”, remove backing tape from front of wiper mechanism. Align tier “B” with bottom right edge and bottom edge with Tier “A” and adhere as pictured in picture in the middle.
- Repeat for attaching Tier “C” to “B”.
Final tier “D” – front of Tiered Wiper card
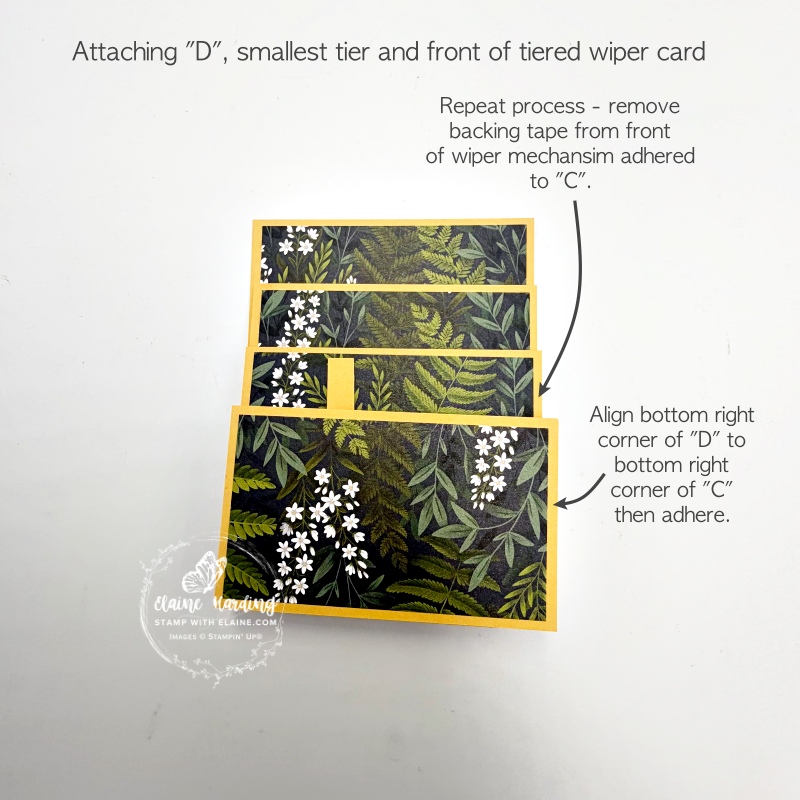
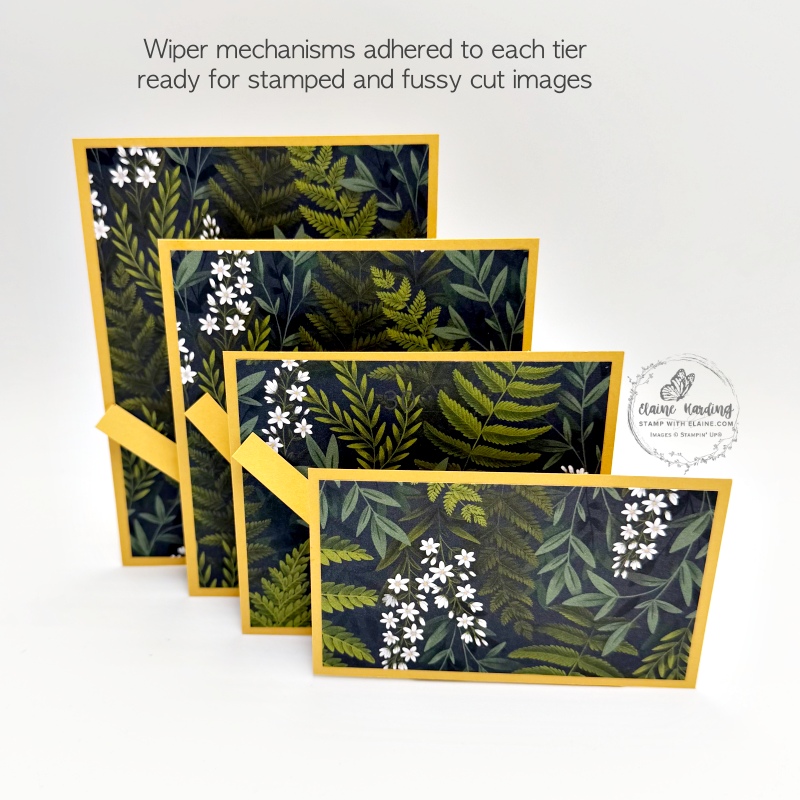
- Remove backing tape from front of wiper mechanism “C” and align “D” to bottom right corner of “C” then adhere.
- Once all tiers have been adhered, when you pull it out, it should like picture on the right.
Stamping and colouring images
This is a sneak peek of a new stamp set called Joyful Friends. I got it because of its Australian critters. It will be available from 1 September 2026.
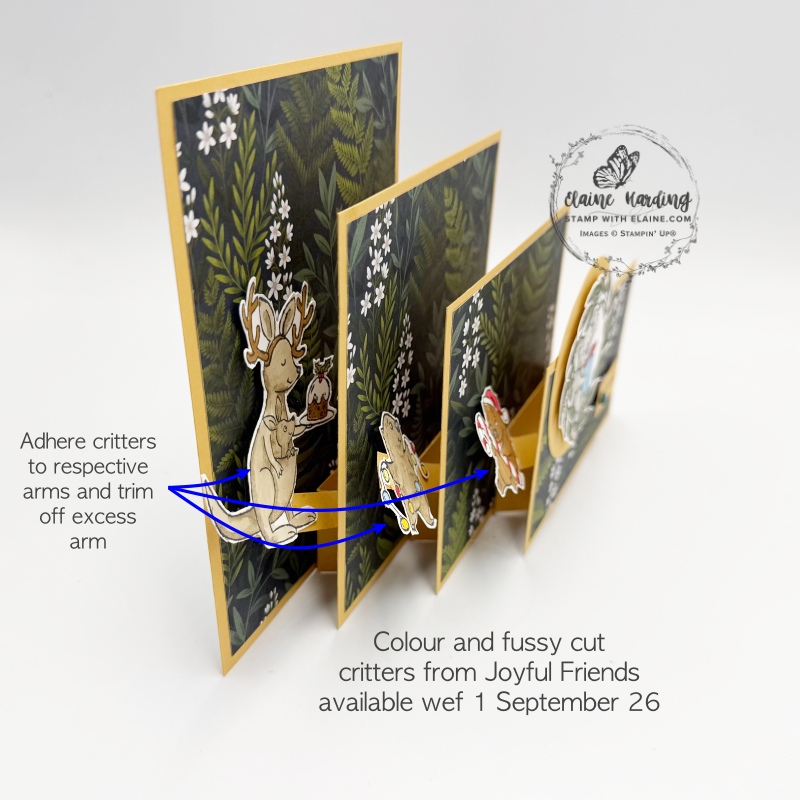
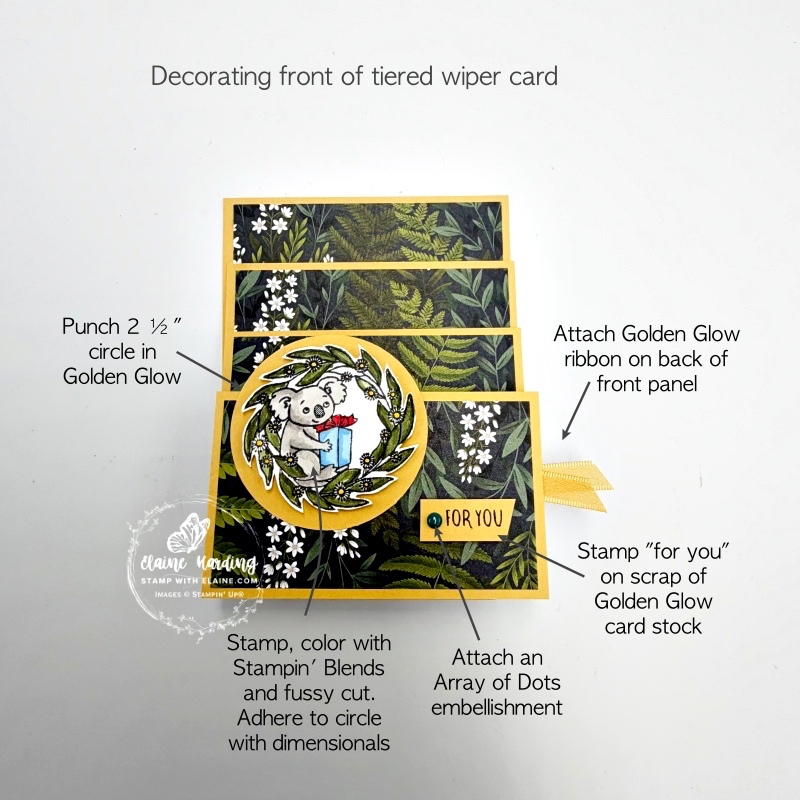
- Stamp the critters and colour with Stampin’ blends. I used a combination of Azure Afternoon, Crumb Cake, Daffodil Delight, Lemon Lime Twist, Mossy Meadow, Pecan Pie, Poppy Parade and Smoky Slate, .
- Fussy cut the animals and adhere to the arm of the wiper mechanism as desired and trim off any excess.
- Punch a 2 ½” circle with Golden Glow card stock. Apply dimensionals to back of Koala and adhere on top.
- Apply adhesive to back half of the circle and adhere to left of front of card so that it covers the arm behind,
- Stamp greeting “for you” and trim as pictured and adhere as shown.
Finishing touches and back of card
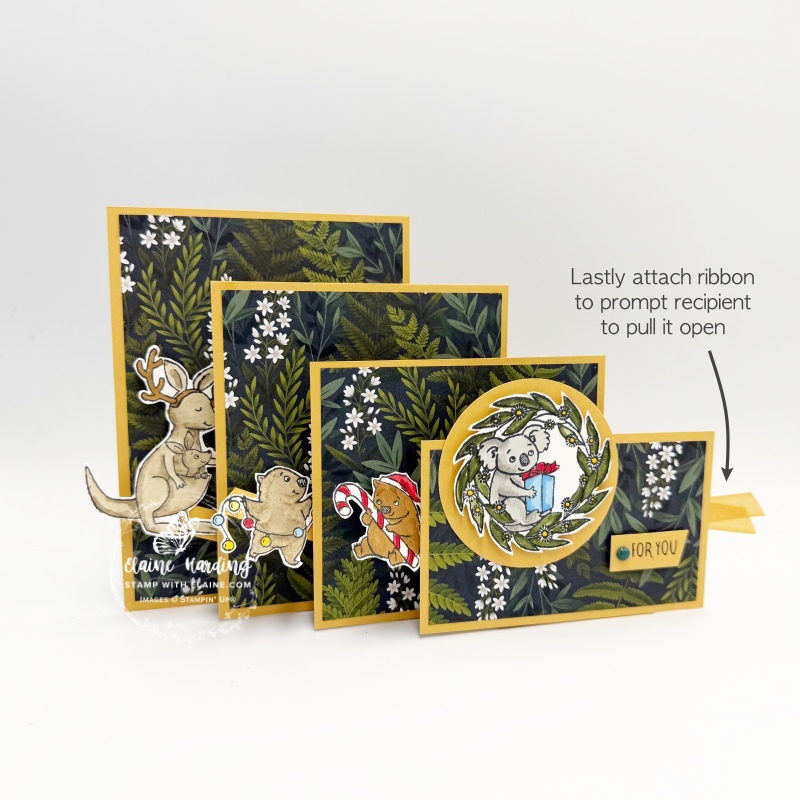
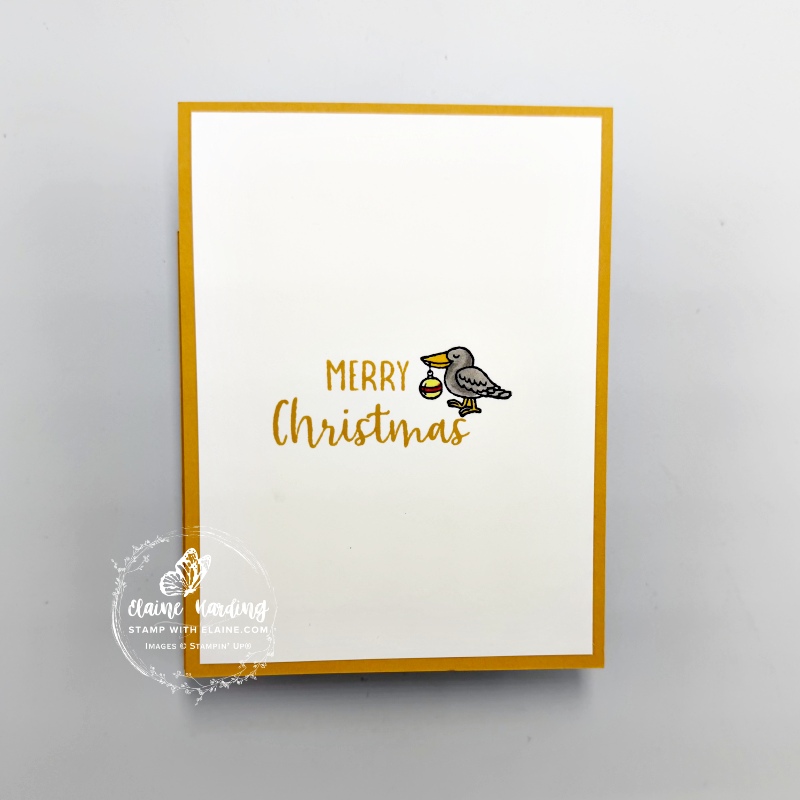
- Attach ribbon to back of card front on right. This is to prompt recipient to pull on tab and activate wiper card mechanism and reveal the creatures.
- Cut Basic White piece 3 ⅞” x 5 ¼” (10 cm x 13.5 cm) and adhere to back of layer “A” (largest layer).
- Stamp greeting in Golden Glow ink.
- Lastly stamp bird and colour it to finish card.
Supply list
Listed below is the supply list. Just click on the picture to take you directly to the item in my online store.
Product List![Joyful Friends Photopolymer Stamp Set (English) [ 168554 ]](https://assets1.tamsnetwork.com/images/EC042017NF/168554s.jpg "Joyful Friends Photopolymer Stamp Set (English) [ 168554 ]")
![Moonlit Flora 12" X 12" (30.5 X 30.5 Cm) Designer Series Paper [ 167737 ]](https://assets1.tamsnetwork.com/images/EC042017NF/167737s.jpg "Moonlit Flora 12\" X 12\" (30.5 X 30.5 Cm) Designer Series Paper [ 167737 ]")
![Golden Glow A4 Cardstock [ 167686 ]](https://assets1.tamsnetwork.com/images/EC042017NF/167686s.jpg "Golden Glow A4 Cardstock [ 167686 ]")
![Basic White A4 Cardstock [ 166781 ]](https://assets1.tamsnetwork.com/images/EC042017NF/166781s.jpg "Basic White A4 Cardstock [ 166781 ]")
![2 3/8" (6 Cm) Circle Punch [ 161354 ]](https://assets1.tamsnetwork.com/images/EC042017NF/161354s.jpg "2 3/8\" (6 Cm) Circle Punch [ 161354 ]")
![Azure Afternoon Stampin’ Blends Combo Pack [ 161672 ]](https://assets1.tamsnetwork.com/images/EC042017NF/161672s.jpg "Azure Afternoon Stampin’ Blends Combo Pack [ 161672 ]")
![Crumb Cake Stampin' Blends Combo Pack [ 154882 ]](https://assets1.tamsnetwork.com/images/EC042017NF/154882s.jpg "Crumb Cake Stampin' Blends Combo Pack [ 154882 ]")
![Daffodil Delight Stampin' Blends Combo Pack [ 154883 ]](https://assets1.tamsnetwork.com/images/EC042017NF/154883s.jpg "Daffodil Delight Stampin' Blends Combo Pack [ 154883 ]")
![Lemon Lime Twist Stampin’ Blends Combo Pack [ 161682 ]](https://assets1.tamsnetwork.com/images/EC042017NF/161682s.jpg "Lemon Lime Twist Stampin’ Blends Combo Pack [ 161682 ]")
![Mossy Meadow Stampin' Blends Combo Pack [ 154890 ]](https://assets1.tamsnetwork.com/images/EC042017NF/154890s.jpg "Mossy Meadow Stampin' Blends Combo Pack [ 154890 ]")
![Pecan Pie Stampin’ Blends Combo Pack [ 161674 ]](https://assets1.tamsnetwork.com/images/EC042017NF/161674s.jpg "Pecan Pie Stampin’ Blends Combo Pack [ 161674 ]")
![Poppy Parade Stampin' Blends Combo Pack [ 154958 ]](https://assets1.tamsnetwork.com/images/EC042017NF/154958s.jpg "Poppy Parade Stampin' Blends Combo Pack [ 154958 ]")
![Smoky Slate Stampin' Blends Combo Pack [ 154904 ]](https://assets1.tamsnetwork.com/images/EC042017NF/154904s.jpg "Smoky Slate Stampin' Blends Combo Pack [ 154904 ]")
![Golden Glow 3/8" (1 Cm) Bordered Ribbon [ 167548 ]](https://assets1.tamsnetwork.com/images/EC042017NF/167548s.jpg "Golden Glow 3/8\" (1 Cm) Bordered Ribbon [ 167548 ]")
![Paper Trimmer [ 152392 ]](https://assets1.tamsnetwork.com/images/EC042017NF/152392s.jpg "Paper Trimmer [ 152392 ]")

- SHOP ONLINE – EARN 10% REWARDS ON ALL PURCHASES OVER £20
- PURCHASE A STARTER KIT : Get £155 worth of products for only £99. Choose from current catalogues and any specials available. Free Shipping. Read more
- Subscribe to my Video Tutorials – click here
