
Altered Paper Pumpkin – Kindred Greetings. My apologies for this August Paper Pumpkin being late, but July’s Paper Pumpkin didn’t come until the 1st week of August and it had a knock on effect so I had to re-schedule a lot of my posts but couldn’t shoe horn an August slot with the advent of the new September to December 2026 as well for the August Paper Pumpkin Kit!
Trying to design alternates for nine cards is no mean feat – my brain hurts! lol! I hope you like them and will be inspired to make your own. With 9 cards to cover, this is a long post – pull up a chair, grab your favourite tipple and/or snacks! Here we go…..
Additional Materials Used
I added Calpso Coral, Petal Pink, Gray Granite, Pool Party, Lost Lagoon, Silver Foil for some of the card bases/and/or layers but tried to refrain from using other dies or embossing folders in my stash.
Wherever possible, I used the kit card bases as additional card stock. I also cut up the envelops to use as DSP and the remnants from pre-cut pieces in the kit to create alternative designs. For variety, I made use of the paper pumpkin kit add on die set “Detailed Flora Dies” and added the Sending Salutations stamp set for extra sentiments.
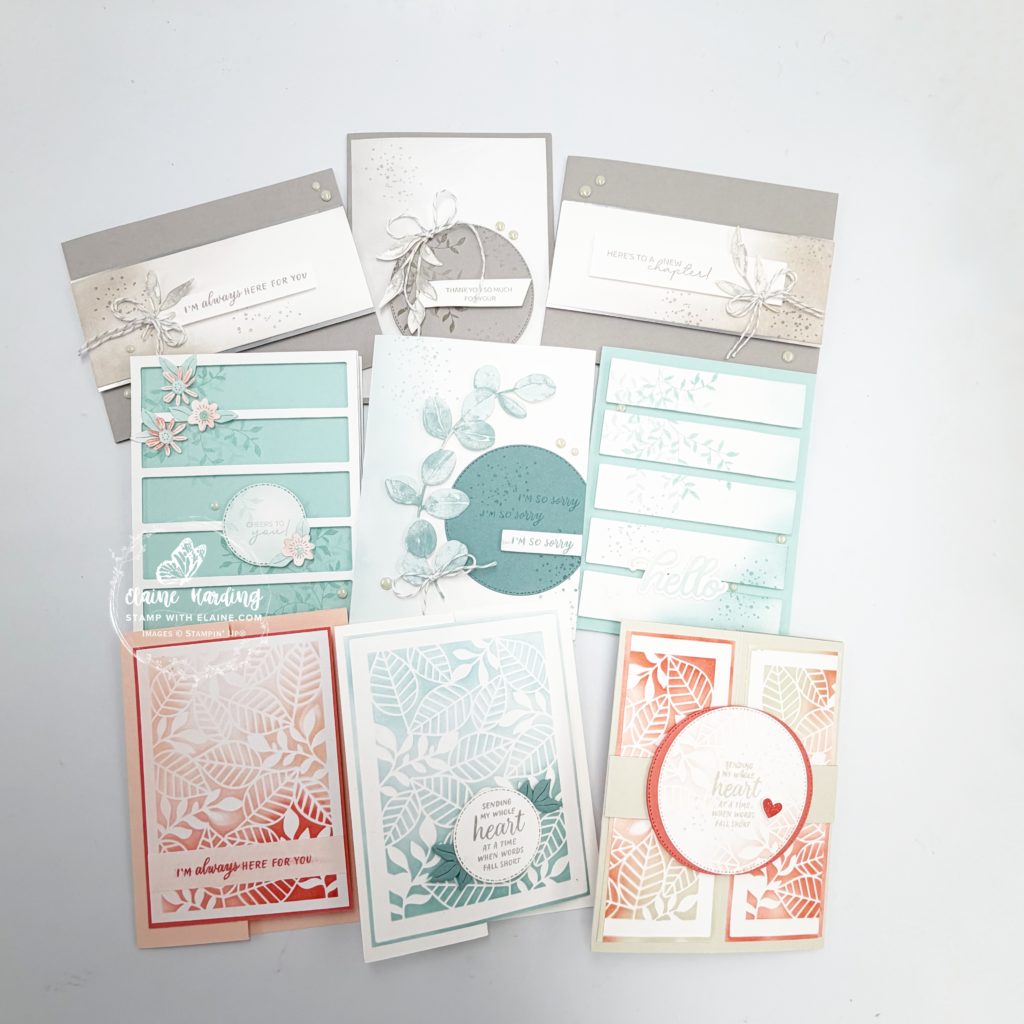
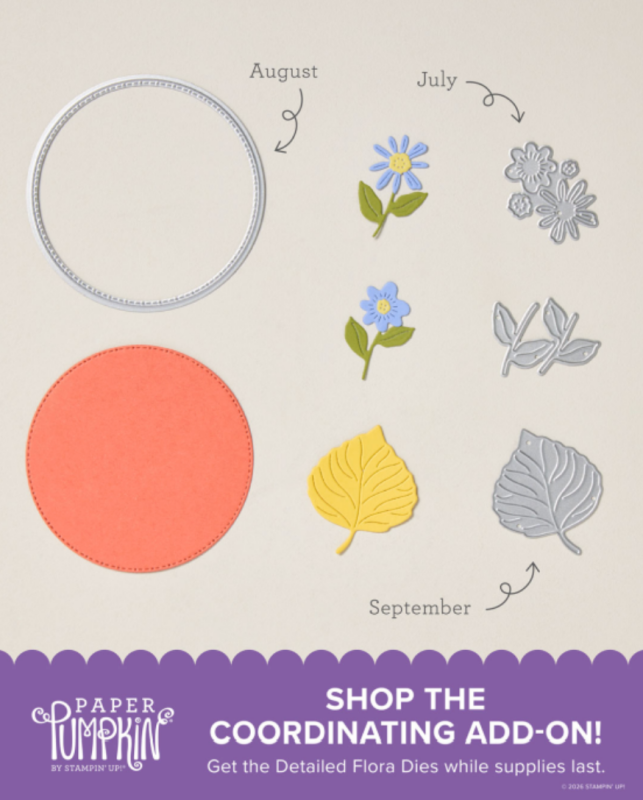
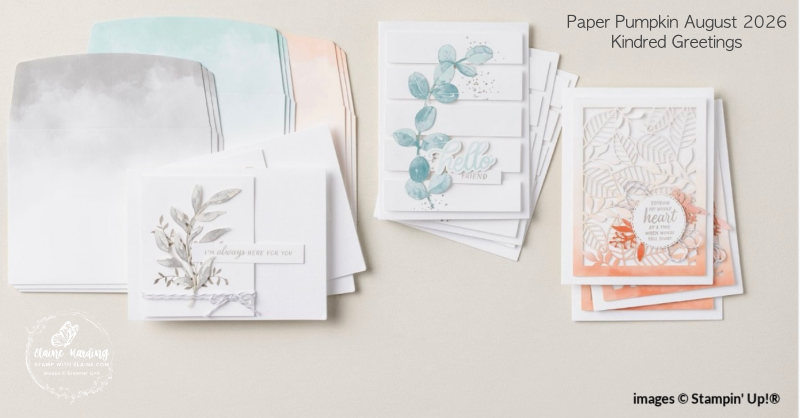
My alternates meant sharing the supplies to make each design with 3 alternates so that’s 9 cards for each design making a total of 27 cards. Hence adding a stamp set with a plethora of greetings you can mix and match.
The cards below are the original designs. You have enough supplies to make 3 of each design. However, if you so wish, you could follow the choreographed designs and ignore my alternates.
Gray Granite trio of cards – alternates for Gray Granite Kit Card Design #1
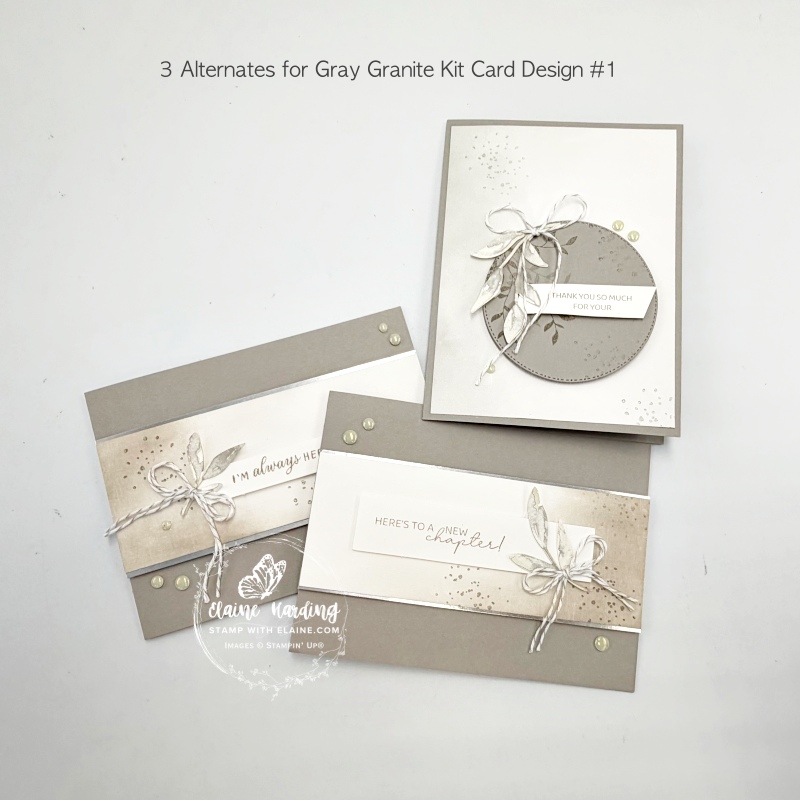
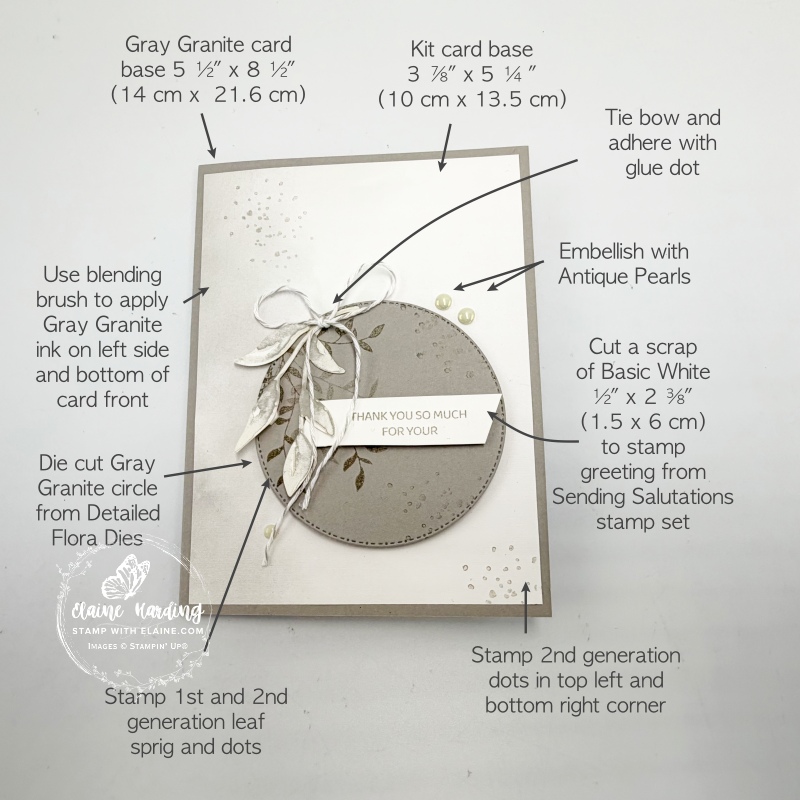
Gray Granite Altered Kit Card #1 design
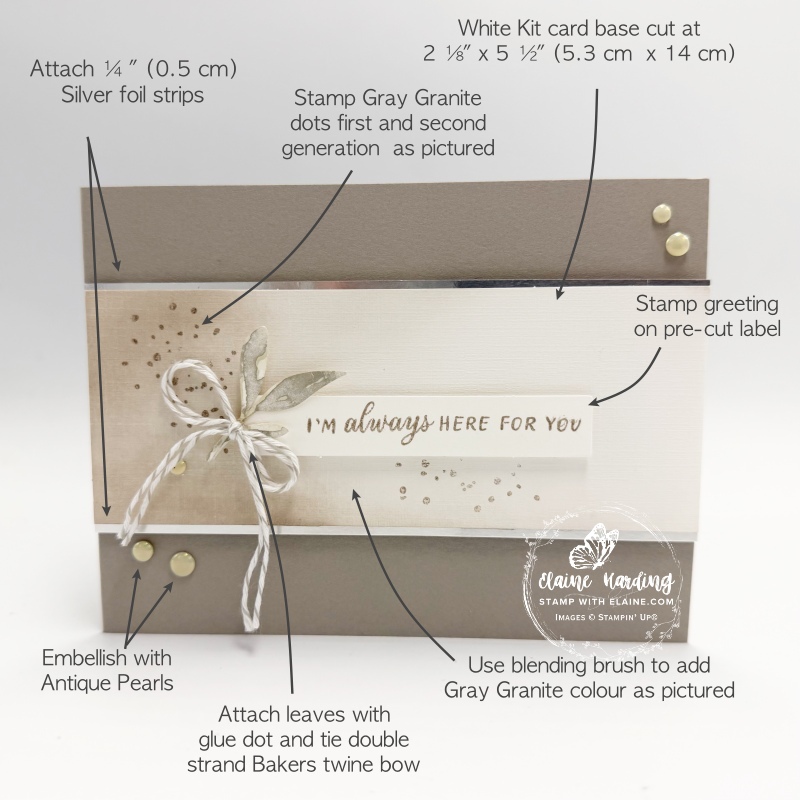
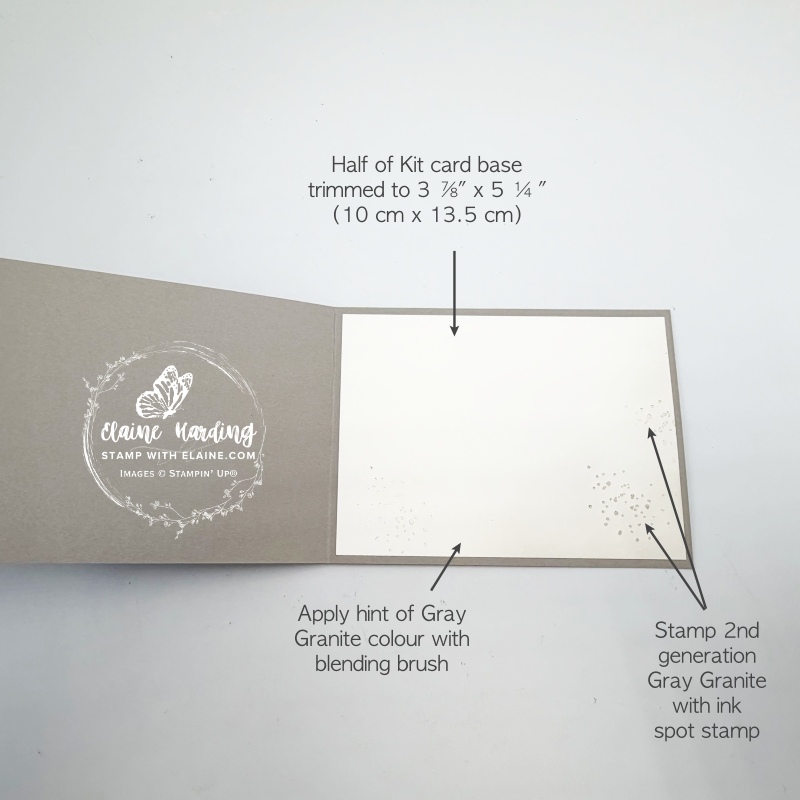
- Card base Gray Granite cut at 4 ⅛” x 11″ (10.5 cm x 28 cm). Long side scored at 5 ½”(14 cm).
- Cut Kit Card base in half. Reserve one half and on the other, cut in half horizontally so that it measures 2 ¼” x 5 ½” (5.3 cm x 14 cm). Set aside remaining piece for 2nd altered card.
- Use blending brush and add colour to left and part bottom edge with Gray Granite colour. Stamp with dotted stamp as pictured.
- Cut large sprig of leaves into sections – 2 with 3 leaves and 1 with 5 leaves. Use one 3 leaf section for this card and set aside the other two.
- Stamp greeting with one of the larger pre-cut rectangle labels, adhere with dimensionals as pictured.
- Cut two ¼” Silver Foil strips and attach each to the outer edge of centre coloured Gray Granite strip.
- Use Bakers twine and a two strand bow and attach with glue dot to stem.
- Attach Antique Pearls to finish.
Second Gray Granite Altered Kit Card design #2
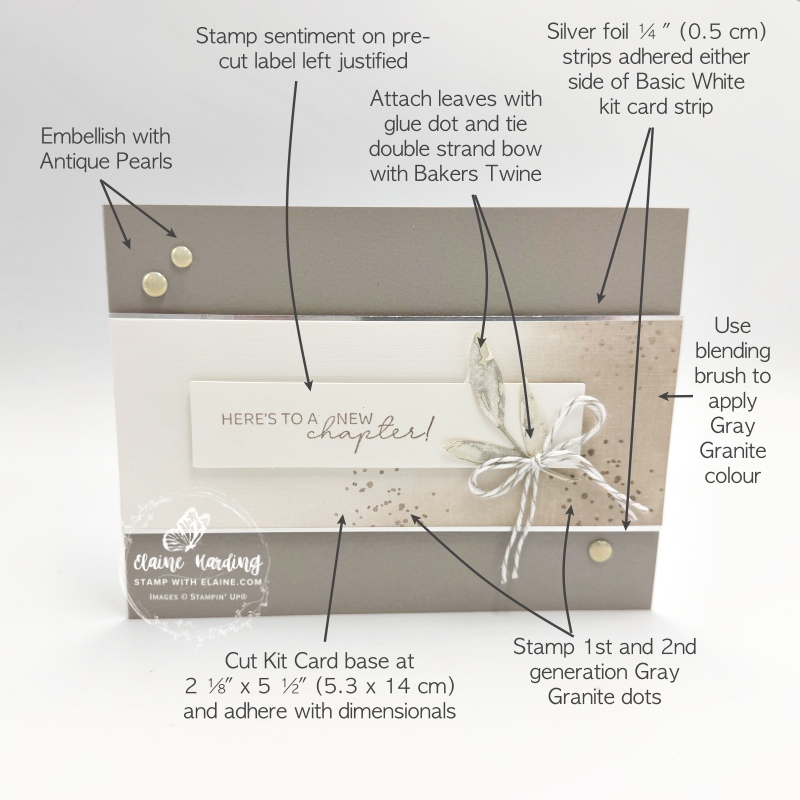
- Card base Gray Granite cut at 4 ⅛” x 11″ (10.5 cm x 28 cm). Long side scored at 5 ½”(14 cm).
- Use blending brush and add colour to right and part bottom edge with Gray Granite colour. Stamp with dotted stamp as pictured.
- Cut two ¼” Silver Foil strips and attach each to the outer edge of centre coloured Gray Granite strip.
- Adhere remaining 2 ¼” x 5 ½” (5.3 cm x 14 cm) with dimensionals to front of card.
- Stamp greeting with one of the larger pre-cut rectangle labels, adhere with dimensionals as pictured.
- Attach remaining trio of leave in bottom right corner of sentiment label.
- Tie double strand Bakers Twine bow and adhere to leaf sprig with glue dot.
- Embellish with Antique Pearls.
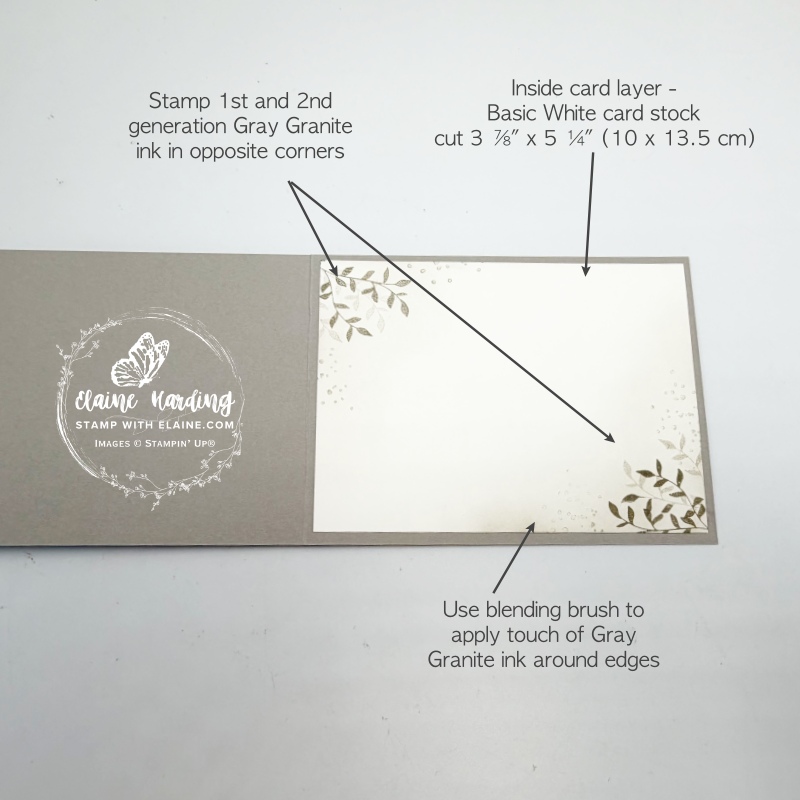
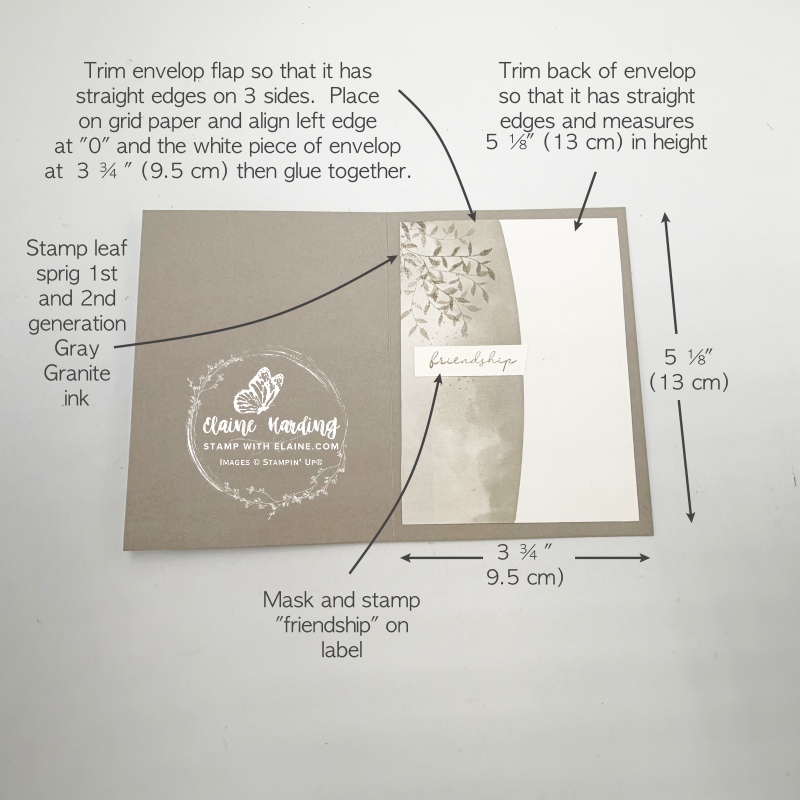
Inside card
- Inside card – cut Basic White layer 3 ⅞” x 5 ¼” (10 x 13.5 cm).
- Use blending brush to apply hint of colour around edges with Gray Granite ink as pictured above.
- Stamp 1st and 2nd generation leaf sprig in Gray Granite as pictured then adhere to inside card base leaving an even border on all 4 sides.
Third Gray Granite Altered Kit card #3
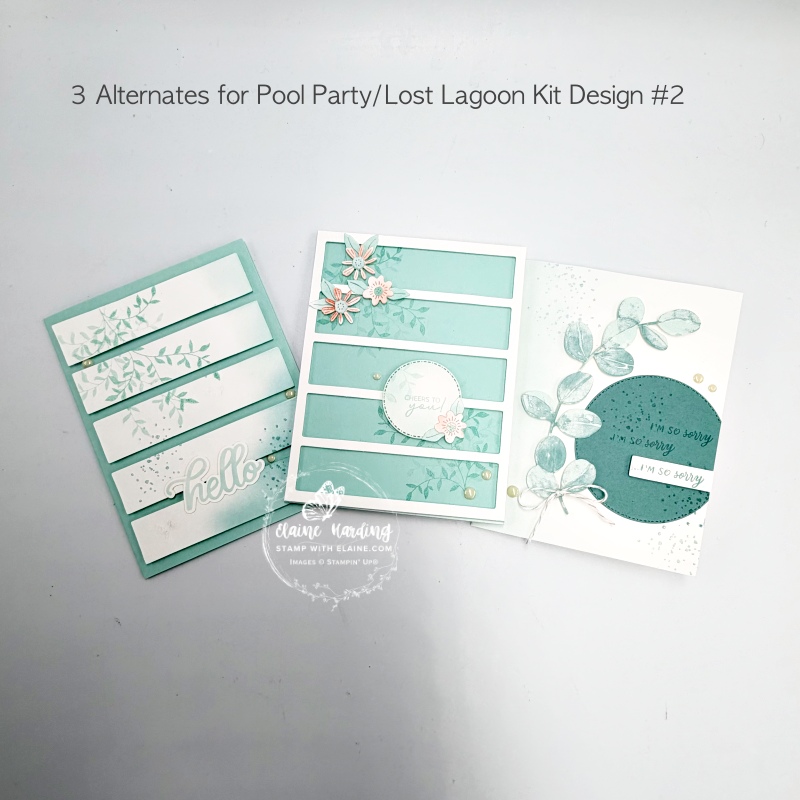
Trio of Pool Party/Lost Lagoon – alternates for Pool Party/Lost Lagoon Card Design #2
Pool Party/Lost Lagoon Altered Kit Card #1 design
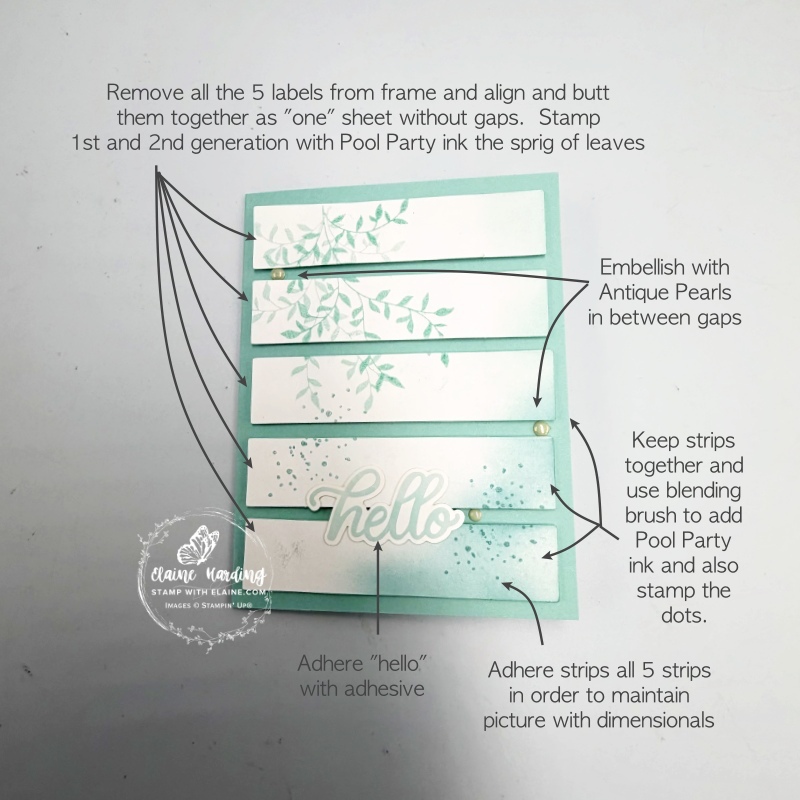
- Cut a Pool Party card base at 5 ½” x 8 ½” (14 cm x 21.6 cm). Fold in half.
- Remove all the 5 labels from frame and align and butt them together – you can put re-positionable tape on the back of each label to keep them secure. Align and butt them together as “one” sheet without any gaps. Stamp 1st and 2nd generation Pool Party ink with the sprig of leaves stamp.
- Use a blending brush to add a touch of colour in the bottom right corner as pictured and stamp some dots as well.
- Take the frame and use low tack tape to secure the frame to the front of card as a guide for adhering the strips on card front.
- Apply dimensionals in the gaps, then carefully place each strip in order to keep the picture. Remove frame carefully because we will be using it for the next altered card.
Inside card
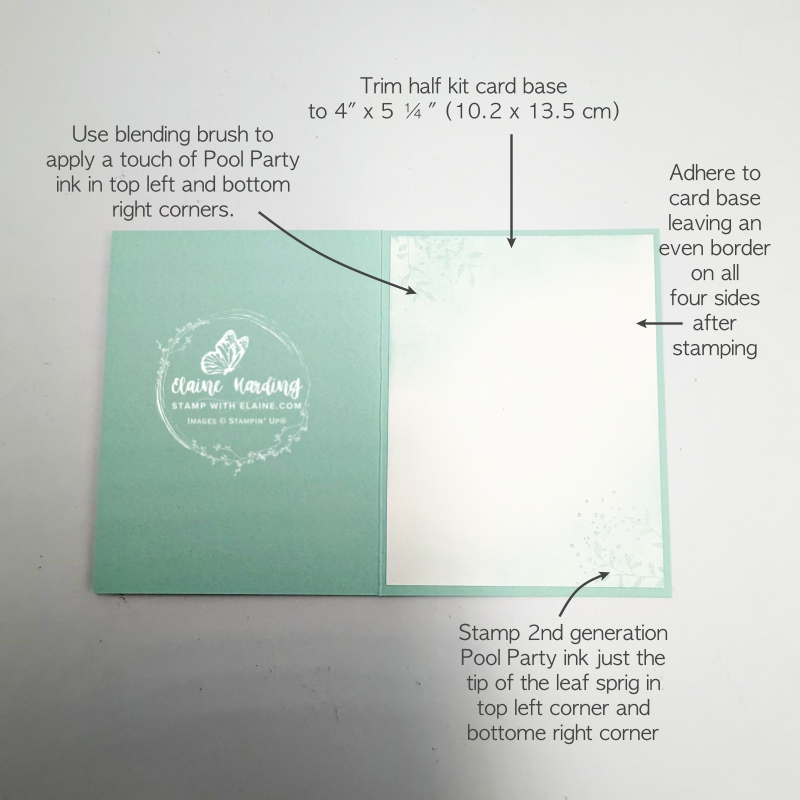
- Trim one half of a Kit Card base to 4″ x 5 ¼” (10.2 cm x 13.5 cm)
- Use a blending brush to add colour in top left and bottom right corner.
- Next stamp 2nd generation Pool Party ink just the tip of the leaf sprig in top left and bottom right corner.
- Adhere to inside card base leaving an even border on all four sides.
Second Pool Party/Lost Lagoon Altered Kit Card design #2
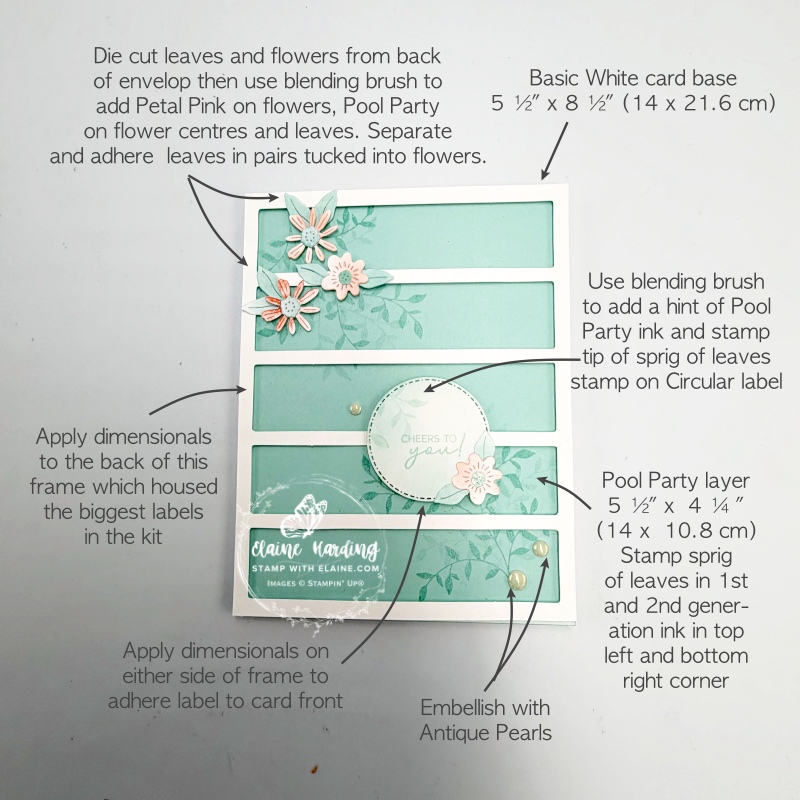
- Cut a Basic White card base 5 ½” x 8 ½” (14 cm x 21.6 cm) and fold in half.
- Pool Party mat layer for card front : 4 ¼” x 5 ½” (10.8 cm x 14 cm). Stamp 1st and 2nd generation Pool Party ink with leaf sprig stamp in top left and bottom right corner. Adhere to card front.
- Die cut two sets of leaves and flowers with the Detailed Flora dies from the back of an envelop. Use blending brush to add Petal Pink to flowers, and Pool Party to flower centres and leaves. Tip: Use Blending brush to add colour patches on envelop before you die cut the elements.
- Apply dimensionals to back of frame that housed all the big pre-cut labels. Carefully align with edges of the card before adhering firmly.
- Adhere flowers as pictured.
- Use. blending brush to add colour to the circular label – stamp second generation Pool Party ink the tip of the sprig of leaves. Attach a flower and pair of leaves as pictured.
- Lastly attach some Antique Pearls.
Inside card
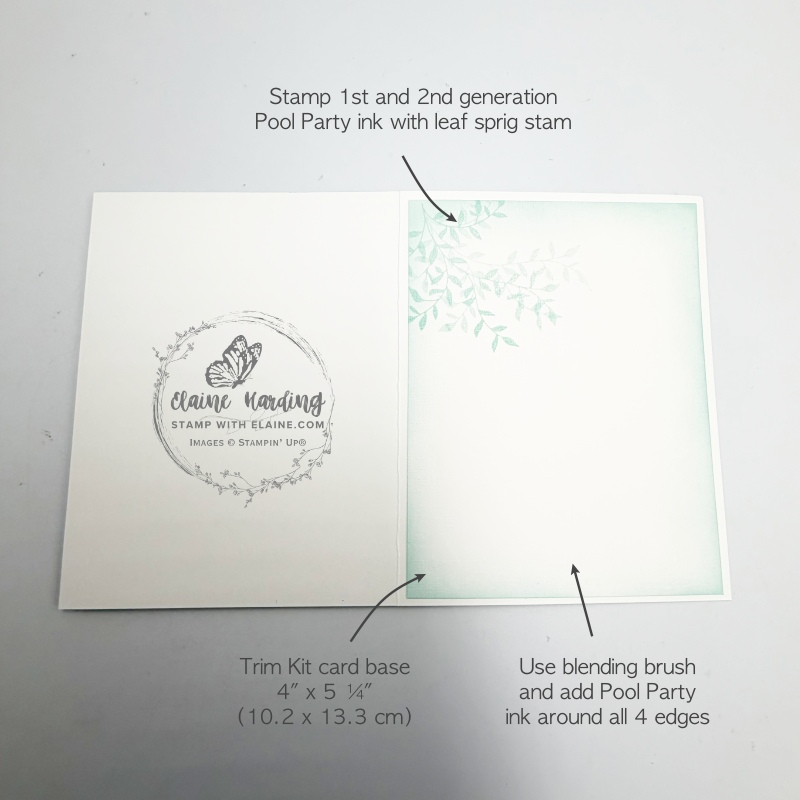
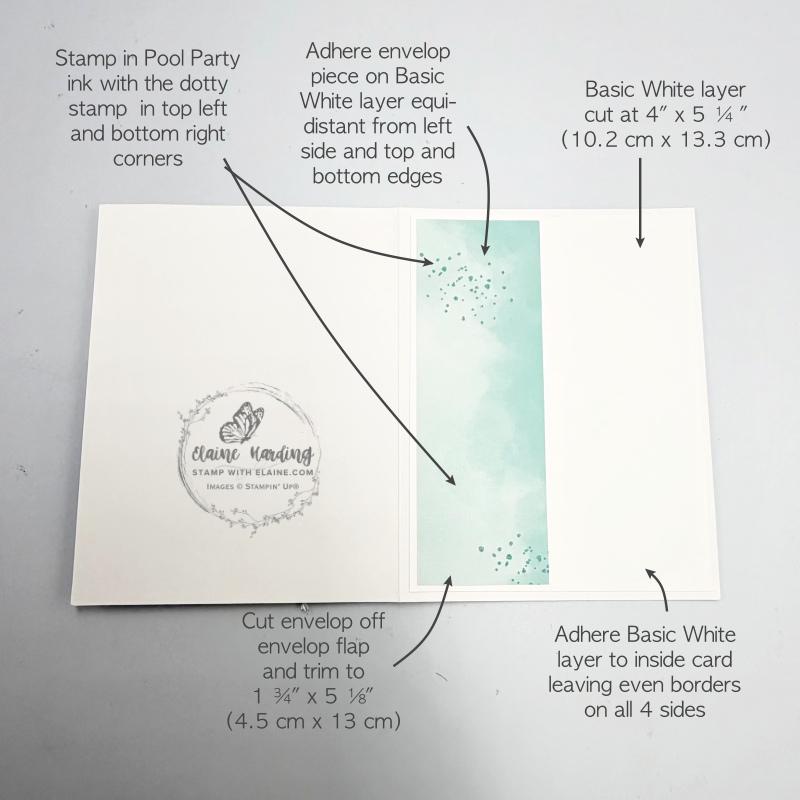
- Trim one half of a kit card base to 4″ x 5 ¼” (10.2 cm x 13.3 cm)
- Use blending brush to apply colour on all 4 edges of kit card layer.
- Stamp first and second generation Pool Party ink in top left corner with the leaf sprig stamp.
Third Pool Party/Lost Lagoon Altered Kit card #3
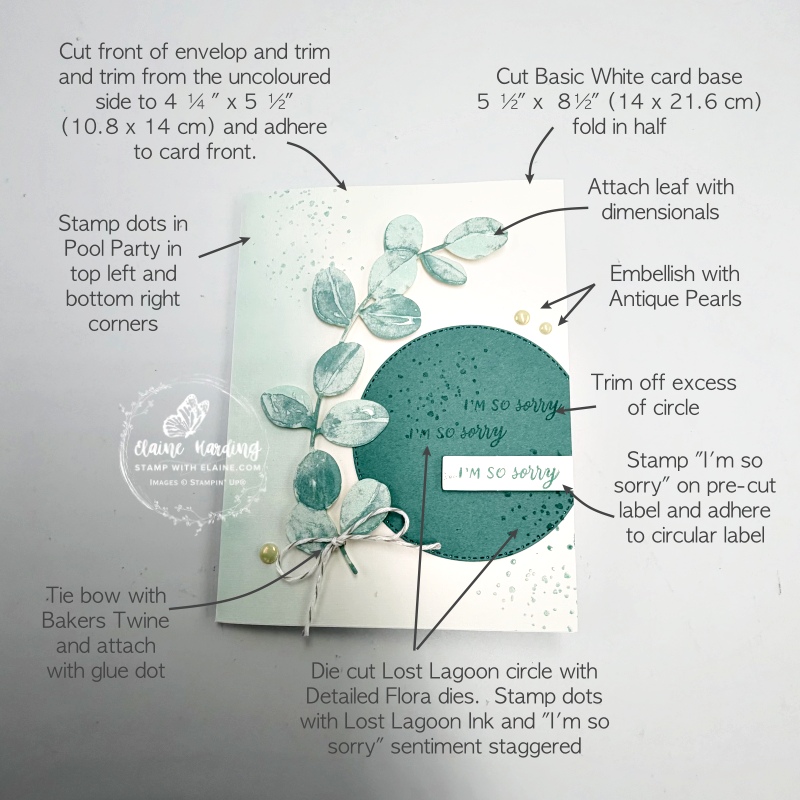
Petal Pink/Calypso Coral trio of cards – alternates for Petal Pink/Calypso Coral Kit Card Design #3
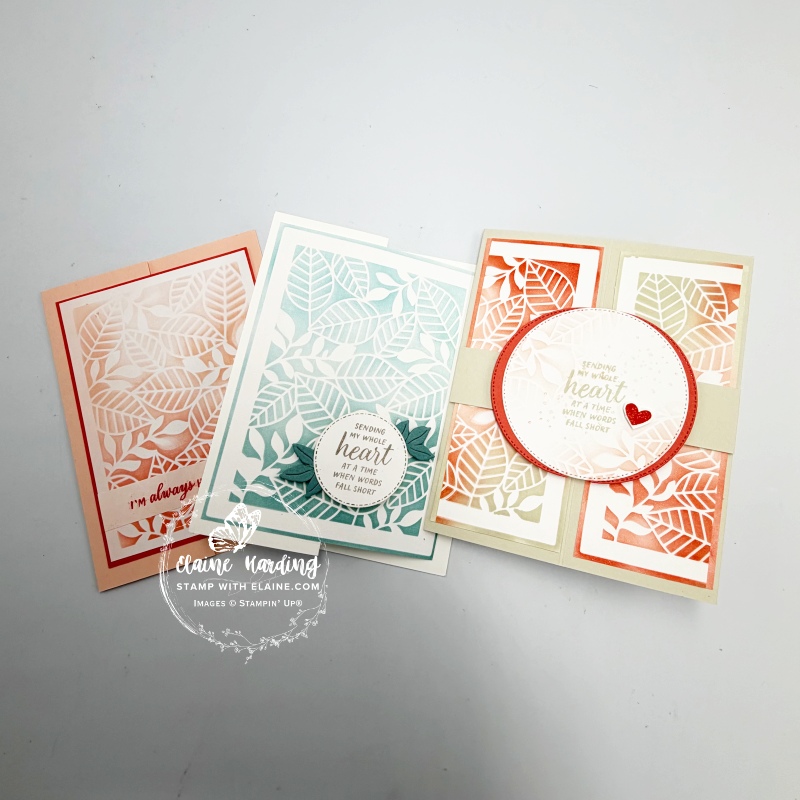
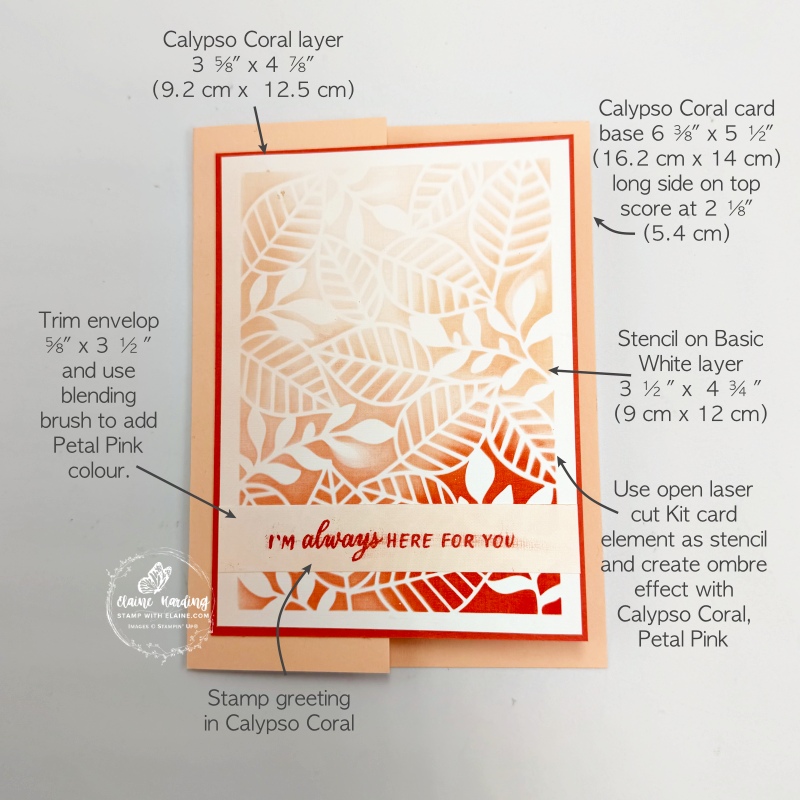
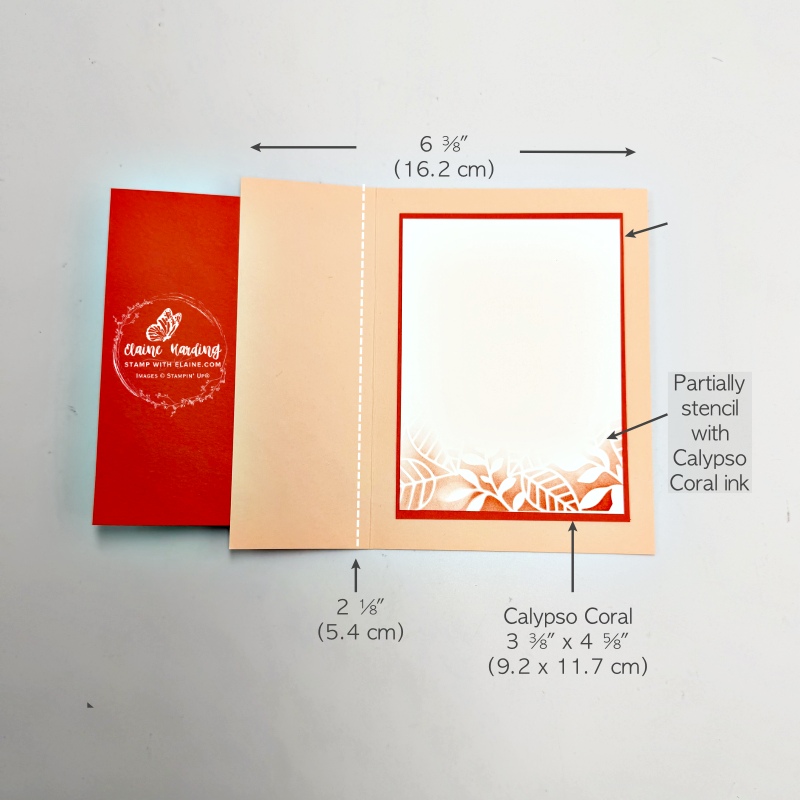
First Petal Pink/Calypso Coral Altered Kit Card #3 design
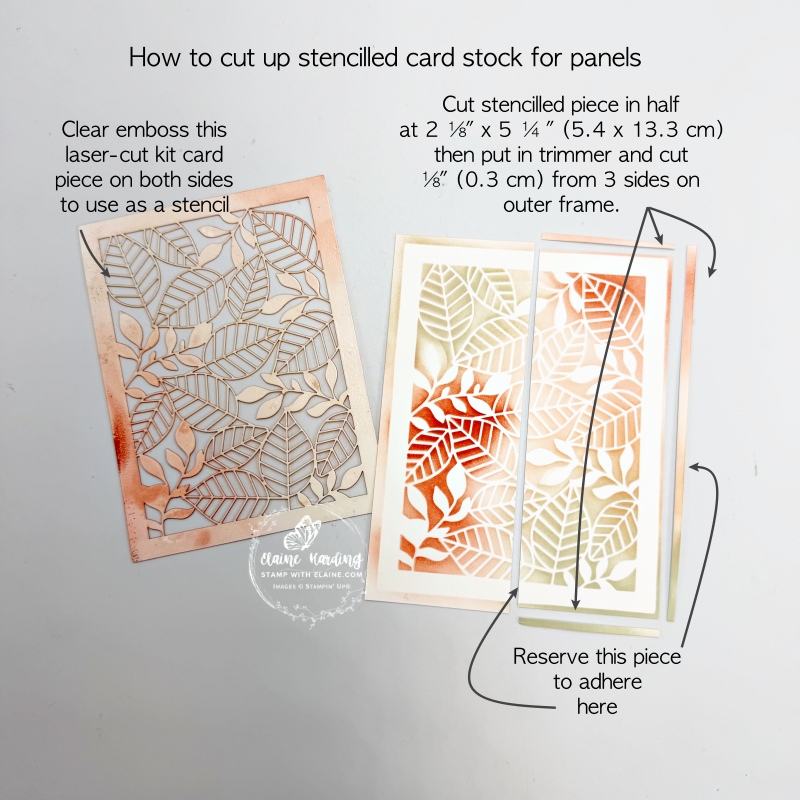
I used the laser cut layer for this design as a stencil – so in order to strengthen it, I inked it up with Versamark ink and clear embossed both sides. This makes it much stronger for using it multiple times. You only need to do it on one. I haven’t decided what to create with this layer yet because I had already created 3 styles of cards with the stencil idea.
Second Altered Kit Card design #3 – Pool Party/Lost Lagoon stencil
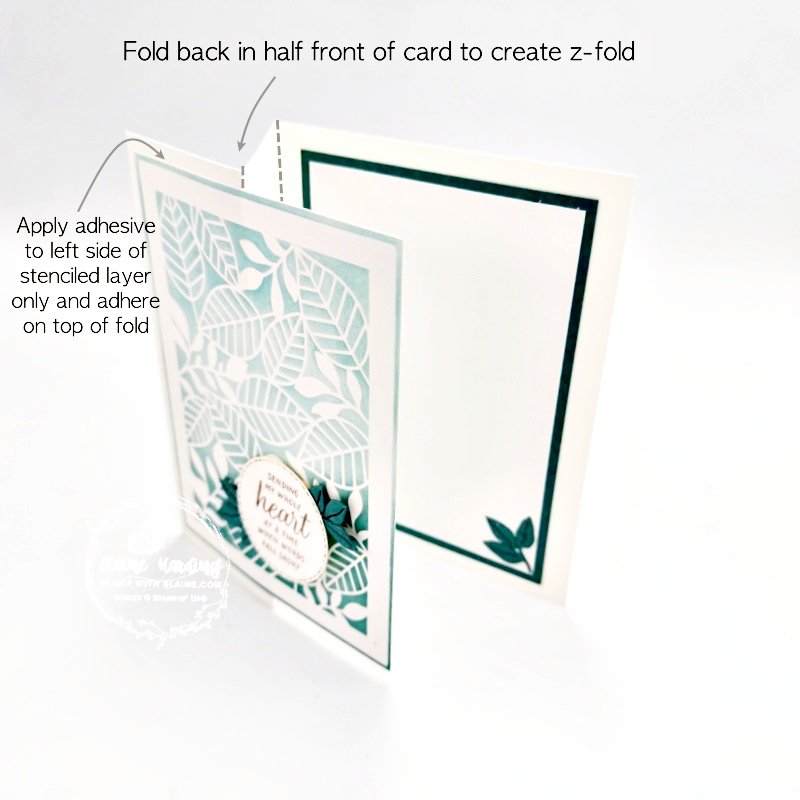
- Cut Basic White card stock 5 ½” x 8 ½” (14 cm x 21.6 cm). Fold back front of card in half (picture on the left).
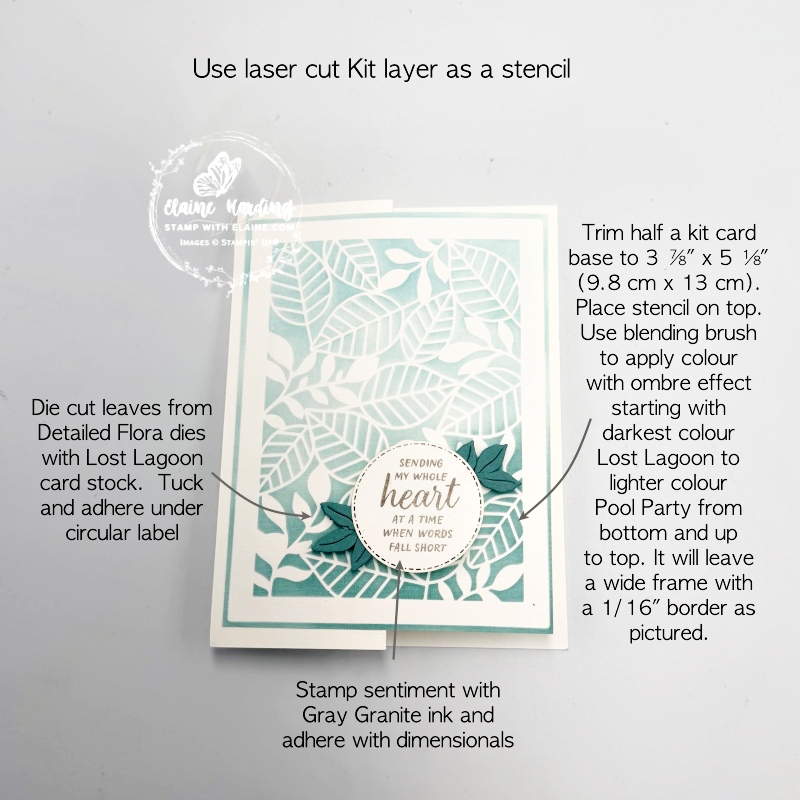
- Kit card base : cut in half to use as card front layer and trim to 3 ⅞” x 5 ⅛” (9.8 cm x 13 cm). Place stencil on top and use a blending brush to apply an ombre effect starting with the darkest colour Lost Lagoon, then switch to Pool Party. Start with darkest at the bottom about a third of the way up, then with Pool Party. Partially adhere to front half with an even border on the top and bottom and left side.
- Die cut leaves with Lost Lagoon card stock scraps using the Detailed Flora Paper Pumpkin Add on dies.
- Stamp sentiment on the pre-cut circle label, adhere with dimensionals.
- Tuck leaves in on opposite corners.
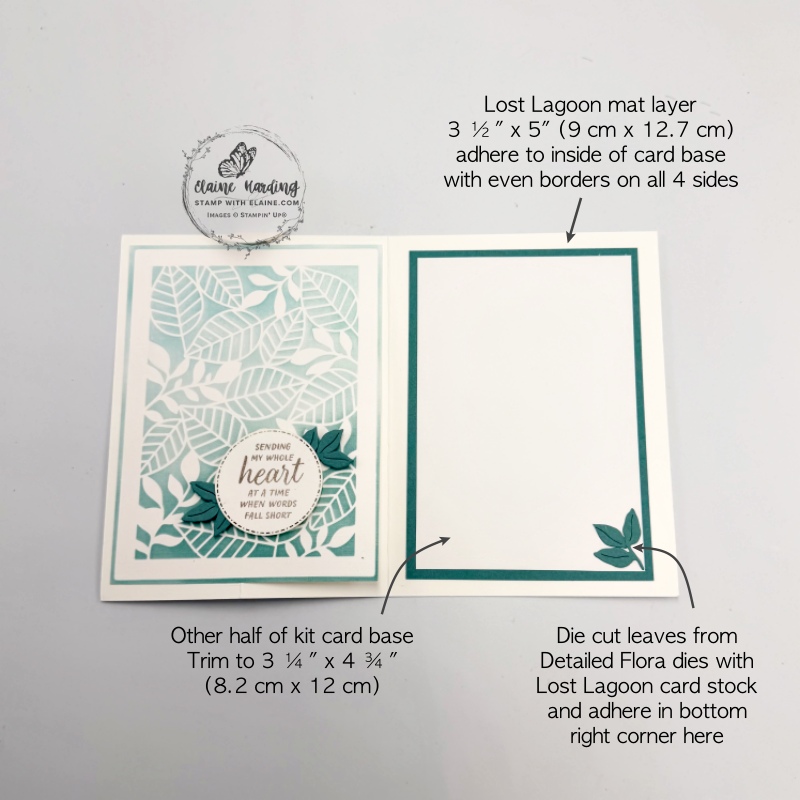
Inside card
- Cut Lost Lagoon layer at 3 ½” x 5″ (9 cm x 12.7 cm) and adhere to inside of card base with even borders on all 4 sides.
- Use the other half of the Kit card base and trim to 3 ¼” x 4 ¾” (8.2 cm x 12 cm). Adhere on top of Lost Lagoon layer leaving an even border on all 4 sides.
- Die cut leaves with Lost Lagoon card stock scrap and adhere leaves to bottom right corner.
Third Altered Kit Card design #3 – Accordion fold with floating panel
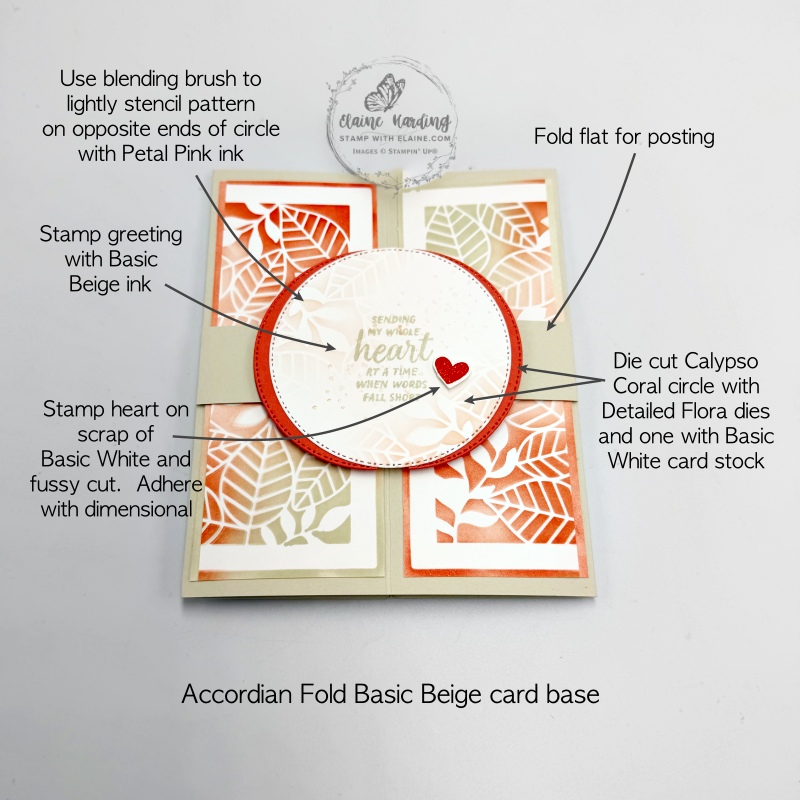
- Cut Basic Beige card base : 5 ½” x 9″ (14 cm x 29 cm). Long side score at 2 ¼”, 4 ½”, 6 ¾” (5.7, 11.4, 17.1 cm)
- Prepare floating panel – die cut circle – one each in Calypso Coral and Basic White. On Basic White circle, lightly stencil opposite ends of circle with laser cut kit card element. Stamp greeting in Basic Beige ink. Cut Calypso Coral circle in half and adhere to back of white circle as pictured. Stamp heart on scrap of Basic White and fussy cut. Adhere on circle with dimensional. Set aside for later.
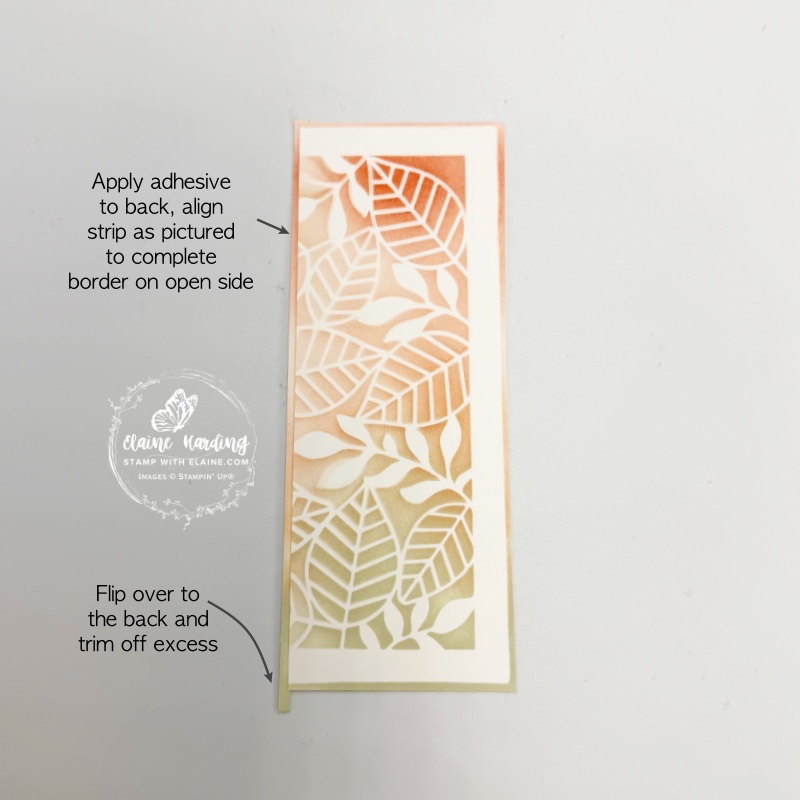
- Cut 3 pieces Basic White card stock 2 ¼” x 4″ (5.7 cm x 10.2 cm). Place stencil on top with an even border all round and blend with Basic Beige, Calypso Coral and Petal Pink inks. Cut in half lengthways.
- Trim off ⅛” on all 3 sides of frame – discard 2 shorter pieces but adhere longer piece on the open edge of stencil (pictured on the right).
Floating mechanism
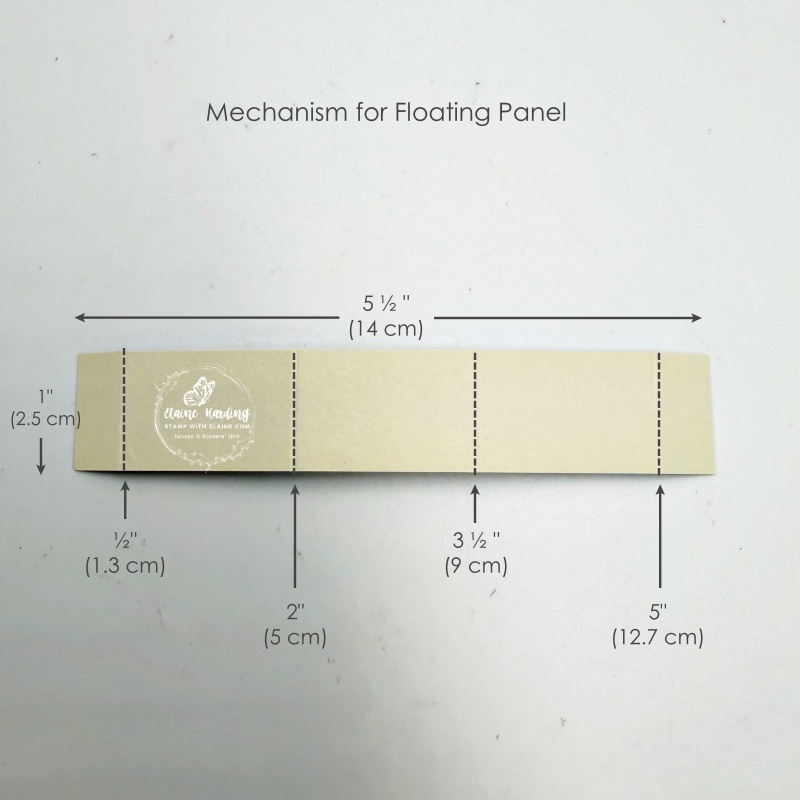
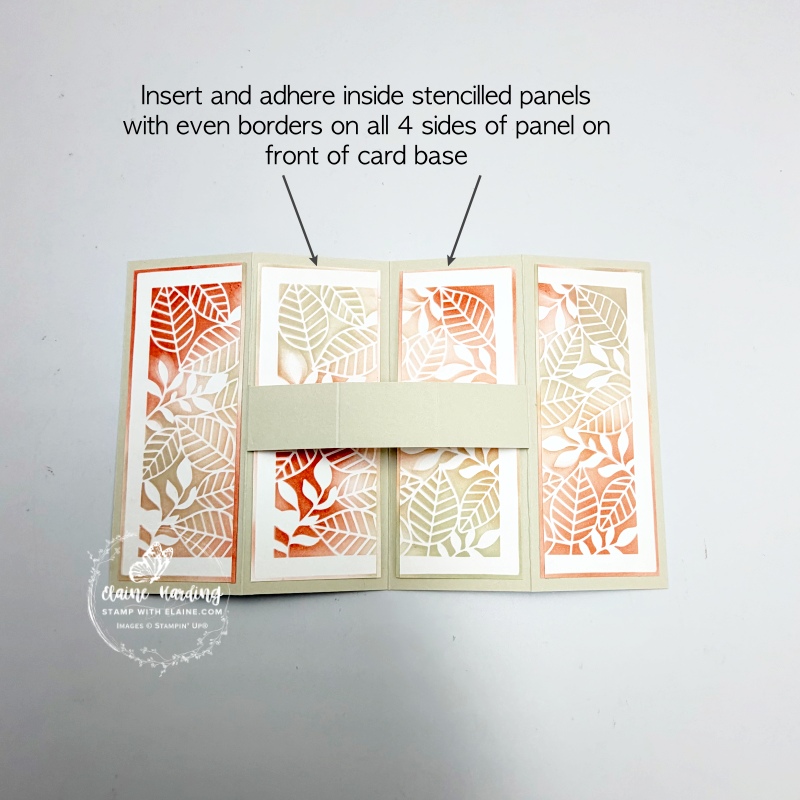
- Cut floating mechanism in Basic Beige at 1″ x 5 ½” (2.5 cm x 14 cm). On long side score at ½”, 2″, 3 ½” and 5″ (1.3, 5, 9 and 12.7 cm).
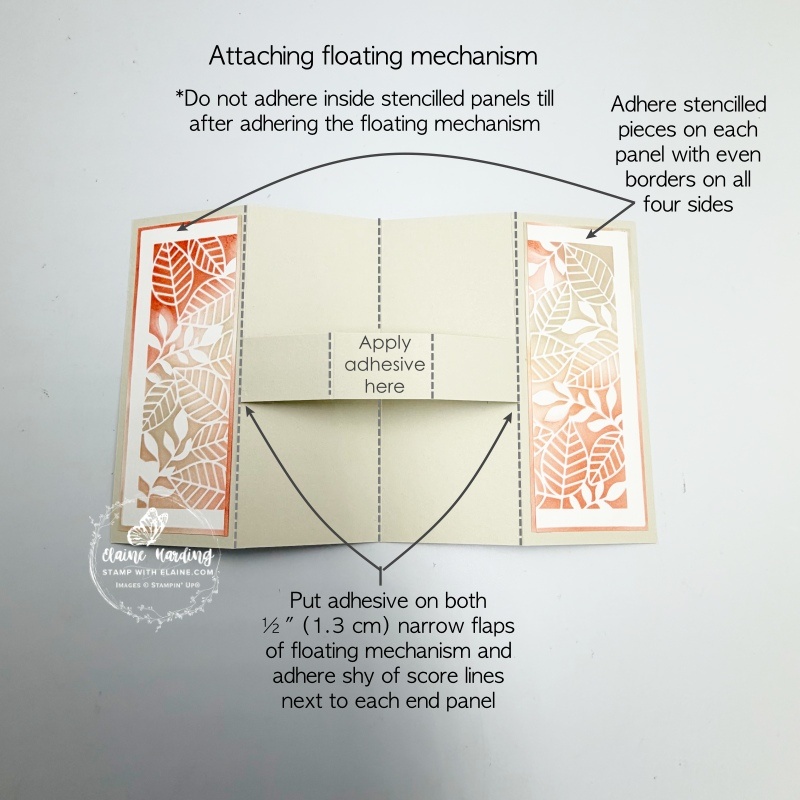
- Adhere prepared stencil pieces on end panels as pictured.
- Next apply adhesive to the ½” (1.3 cm) tabs at each end and tuck under then adhere on score lines next to end panel on the left and end panel on the right (middle picture). Do this before you adhere two inner panels.
- Insert remaining end panels underneath Floating Mechanism and adhere leaving an even border on all 4 sides then apply adhesive to the middle portion only of the Floating Mechanism (middle picture).
Reverse side of card base / Attaching prepared circular floating panel piece
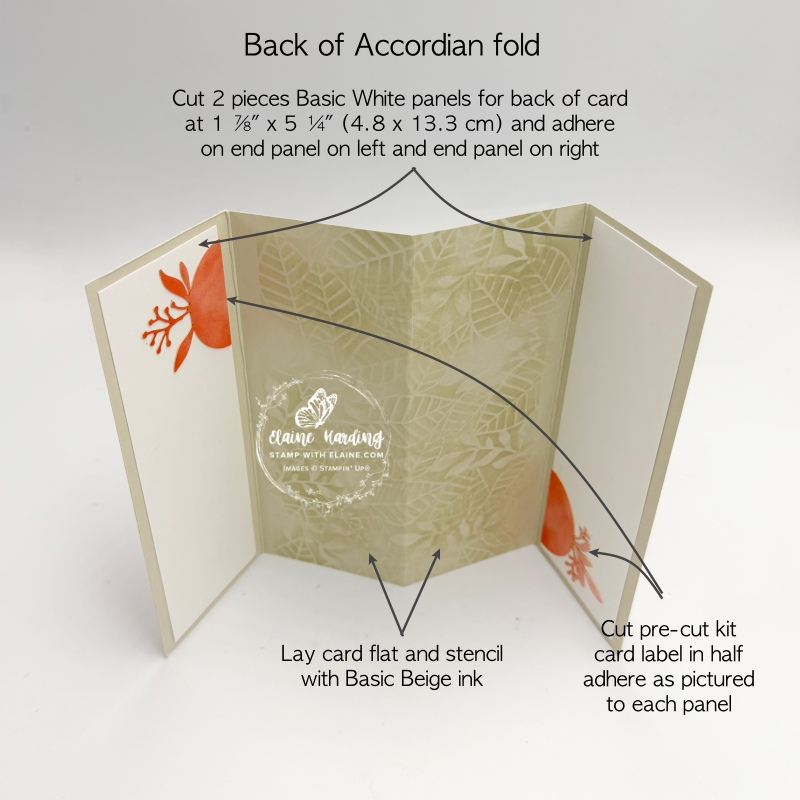
- Take stencil and place on two inner panels and use blending brush to apply Basic Beige pattern on the two inner panels as pictured on left.
- Cut 2 pieces Basic White panels for the back of card cut at 1 ⅞” x 5 ¼” (4.8 cm x 13.3 cm) and adhere on the end panel on left and end panel on right.
- Cut the pre-cut Calypso Coral circular kit card label and adhere one half at top right corner of left panel and the other in the bottom left panel of the Basic White layers. Then adhere Basic White layers to end panels as shown in photo, leaving an even border on all 4 sides.
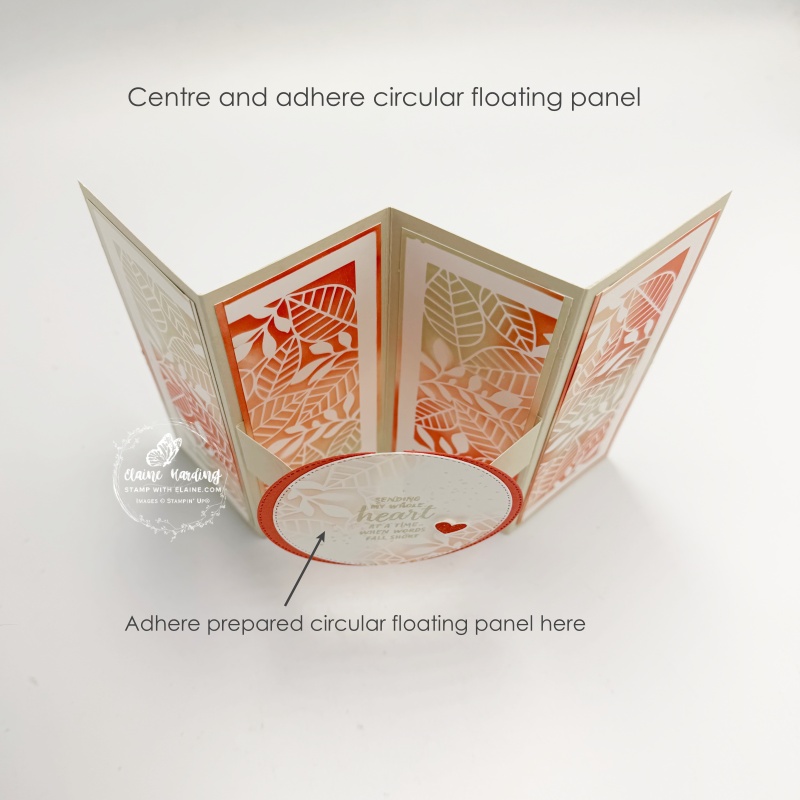
- Picture on the left – now you can centre and adhere the circular floating panel you prepared earlier to the centre section of the Floating mechanism.
Note, if you fold card base as an accordion fold, the floating panel will stick out. For posting, fold 2 end panels back so that the Floating Panel circular piece will sit flat as shown in the trio of cards photo for Kit Card Design #3.
I hope you’ve enjoyed my alternates and have been inspired to make your own. If you’ve lasted this far, thank you for staying the course!
Supply list
Listed below is the supply list. Just click on the picture to take you directly to the item in my online store.
Product List![Detailed Flora Dies (English) [ 168664 ]](https://assets1.tamsnetwork.com/images/EC042017NF/168664s.jpg "Detailed Flora Dies (English) [ 168664 ]")
![Paper Pumpkin Subscription [ 166815 ]](https://assets1.tamsnetwork.com/images/EC042017NF/166815s.jpg "Paper Pumpkin Subscription [ 166815 ]")
![Paper Pumpkin 3 Month Subscription [ 166816 ]](https://assets1.tamsnetwork.com/images/EC042017NF/166816s.jpg "Paper Pumpkin 3 Month Subscription [ 166816 ]")
![Paper Pumpkin 6 Month Subscription [ 166817 ]](https://assets1.tamsnetwork.com/images/EC042017NF/166817s.jpg "Paper Pumpkin 6 Month Subscription [ 166817 ]")
![Paper Pumpkin 12 Month Subscription [ 166818 ]](https://assets1.tamsnetwork.com/images/EC042017NF/166818s.jpg "Paper Pumpkin 12 Month Subscription [ 166818 ]")
![Basic Beige A4 Cardstock [ 164512 ]](https://assets1.tamsnetwork.com/images/EC042017NF/164512s.jpg "Basic Beige A4 Cardstock [ 164512 ]")
![Basic White A4 Cardstock [ 166781 ]](https://assets1.tamsnetwork.com/images/EC042017NF/166781s.jpg "Basic White A4 Cardstock [ 166781 ]")
![Gray Granite A4 Cardstock [ 147008 ]](https://assets1.tamsnetwork.com/images/EC042017NF/147008s.jpg "Gray Granite A4 Cardstock [ 147008 ]")
![Lost Lagoon A4 Cardstock [ 133686 ]](https://assets1.tamsnetwork.com/images/EC042017NF/133686s.jpg "Lost Lagoon A4 Cardstock [ 133686 ]")
![Pool Party A4 Card Stock [ 124391 ]](https://assets1.tamsnetwork.com/images/EC042017NF/124391s.jpg "Pool Party A4 Card Stock [ 124391 ]")
![Petal Pink A4 Cardstock [ 147009 ]](https://assets1.tamsnetwork.com/images/EC042017NF/147009s.jpg "Petal Pink A4 Cardstock [ 147009 ]")
![Basic Beige Classic Stampin Pad [ 163806 ]](https://assets1.tamsnetwork.com/images/EC042017NF/163806s.jpg "Basic Beige Classic Stampin Pad [ 163806 ]")
![Calypso Coral Classic Stampin' Pad [ 147101 ]](https://assets1.tamsnetwork.com/images/EC042017NF/147101s.jpg "Calypso Coral Classic Stampin' Pad [ 147101 ]")
![Gray Granite Classic Stampin' Pad [ 147118 ]](https://assets1.tamsnetwork.com/images/EC042017NF/147118s.jpg "Gray Granite Classic Stampin' Pad [ 147118 ]")
![Lost Lagoon Classic Stampin' Pad [ 161678 ]](https://assets1.tamsnetwork.com/images/EC042017NF/161678s.jpg "Lost Lagoon Classic Stampin' Pad [ 161678 ]")
![Petal Pink Classic Stampin' Pad [ 147108 ]](https://assets1.tamsnetwork.com/images/EC042017NF/147108s.jpg "Petal Pink Classic Stampin' Pad [ 147108 ]")
![Pool Party Classic Stampin' Pad [ 147107 ]](https://assets1.tamsnetwork.com/images/EC042017NF/147107s.jpg "Pool Party Classic Stampin' Pad [ 147107 ]")
![Versamark Pad [ 102283 ]](https://assets1.tamsnetwork.com/images/EC042017NF/102283s.jpg "Versamark Pad [ 102283 ]")
![Basics Wow! Embossing Powder [ 165679 ]](https://assets1.tamsnetwork.com/images/EC042017NF/165679s.jpg "Basics Wow! Embossing Powder [ 165679 ]")
![Embossing Additions Tool Kit [ 159971 ]](https://assets1.tamsnetwork.com/images/EC042017NF/159971s.jpg "Embossing Additions Tool Kit [ 159971 ]")
![Blending Brushes [ 153611 ]](https://assets1.tamsnetwork.com/images/EC042017NF/153611s.jpg "Blending Brushes [ 153611 ]")


- SHOP ONLINE – EARN 10% REWARDS ON ALL PURCHASES OVER £20
- PURCHASE A STARTER KIT : Get £155 worth of products for only £99. Choose from current catalogues and any specials available. Free Shipping. Read more
- Subscribe to my Video Tutorials – click here