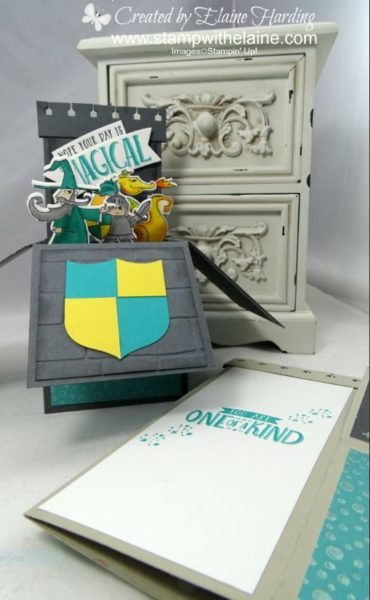
This type of “Card in a Box” was all the rage in 2014. It folds flat to fit in an envelop which can be mailed easily. It looks complicated, but it really isn’t! The lovely Monica Gale, a Stampin’ Up! Demonstrator in the UK, shared it on her blog so I thought I would create an updated version using the Magical Day stamp set.
I am also using the gorgeous Myths & Magic Specialty Designer Papers from the Myths & Magic Suite on pages 36 & 37 of the 2018 Spring/Summer Catalogue. The first is this gorgeous card in a box and if you scroll down you can also see an infinity card – never ending card I made with the same papers.

For the battlements, I used a retired punch – do you remember the spiral punch? There are some items which I’ll never part with and this is one of them! Before you dive into the video tutorial below take a look at this sweet card.
Extra card – to Infinity and beyond!
The papers are so lovely, I couldn’t resist making more, so here’s another card I made with the Myths & Magic Specialty paper. It’s an infinity card, but that’s a tutorial for another day. In picture 1, that’s the front of the card. Then when you open it, it reveals the second picture. Open it again and you get the third image. Finally on the last “page” there’s somewhere for you to address it and sign off. Then you go back to the beginning and carry on ad infinitum! The patterns were so busy, it required no stamping.

Video Tutorial
Here’s the video tutorial, a visual is so much easier to follow and when you’ve made it once, you’ll want to make more!
Cutting Guide:
Imperial Measurements
|
1 x A4 Sheet |
Basic Grey, long side on top score @ 2 ¾”, 5 ½”, 8 ¼”, 11”. Rotate 90o anti-clockwise and score @ 2 ¾” on short side. Slide cardstock to the left of trimmer and align with 5 ¾” mark and cut. Set aside larger piece. |
|
3 x ¾” x 4 ¼” |
Use leftover piece from A4 to create 3 bridges. With narrower score line on your left, align 2nd scoreline on ¾” mark to the right of your cutting groove on a Stampin’ Up! trimmer and cut. Then measure ¾” on short side and make your second cut to yield 3 bridging pieces each measuring ¾” x 4 ¼” |
|
4 x 2 ½” x 2 ½” |
Basic Grey (for embossing with Brick Wall TIEF) |
|
2 x ¾” x 3” |
Basic Grey for battlements (punch with spiral punch) |
|
3 x 2 ⅞” x 2 ½” |
Myths & Magic Specialty DSP to adhere to longer half of panels |
|
3 x 2 ½” x 2 ½” |
Myths & Magic Specialty DSP for underside of the box flaps |
|
1 x 5 ¾” x 2 ½” |
Whisper White for back of box |
|
3 of each colour |
Bermuda Bay Scrap, Daffodil Delight scrap – badge punch |
Metric Measurements:
|
1 x A4 Sheet |
Basic Grey, long side on top score @ 7 cm, 14 cm, 21 cm, 28 cm. Rotate 90o anti-clockwise and score @ 7cm on short side. Slide cardstock to the left of trimmer and align with 15cm mark and cut. Set aside larger piece. |
|
3 x 2 cm x 10.8 cm |
Use leftover piece from A4 to create 3 bridges. With narrower score line on your left, align 2nd scoreline on 2cm mark to the right of your cutting groove on a Stampin’ Up! trimmer and cut. Then measure 2cm on short side and make your second cut to yield 3 bridging pieces each measuring 2cm x 10.8cm |
|
4 x 6.35 x 6.35 cm |
Basic Grey (for embossing with Brick Wall TIEF) |
|
2 x 2 cm x 7.6 cm |
Basic Grey for battlements (punch with spiral punch) |
|
3 x 7.3 cm x 6.35 cm |
Myths & Magic Specialty DSP to adhere to longer half of panels |
|
3 x 6.35 cm x 6.35 cm |
Myths & Magic Specialty DSP for underside of the box flaps |
|
1 x 14.6 cm x 6.35 cm |
Whisper White for back of box |
|
3 of each colour |
Bermuda Bay Scrap, Daffodil Delight scrap – badge punch |
Did you know that if you click on the pictures below it will take you directly to the item in my online store which will give you more detail on the product? You can place an order too, if you wish and it would be very much appreciated and take advantage of Sale-A-Bration! Please note that the spiral punch has been retired. If you haven’t got one, then you can create your battlements by cutting by hand.

Use my 2024 May Host Code 2H4CUTKC. All orders over £40 will receive a special gift from me. Ordering over £150? Keep the rewards for yourself & still get my gift!
- SHOP ONLINE
- Purchase a Starter Kit: Get £155 worth of products for only £99. Choose from current catalogues and any specials available. Free Shipping. Read more
- Subscribe to my Video Tutorials – click here


