
Hello everyone. At time of writing, December 2nd is the day the second national lock down ends. Eek, Christmas is approaching and I’m still not sure if we’ll be able to meet with family and friends. We’ll just have to take each day as it comes.
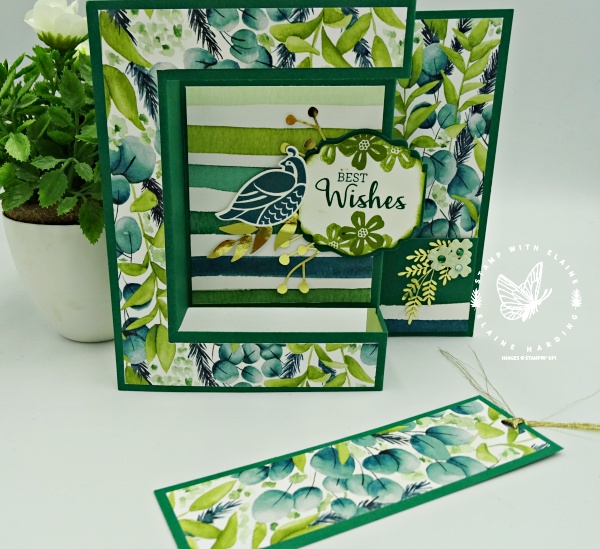
Many years ago, we used to have a tool that made perforations. I created a card which had an extra long inside panel. The extra length was to incorporate a 2″ book mark and you could use the perforating tool to run it along the score line which you could then detach.
Without the perforating tool, an alternative way was to create a pocket on the side.

It’s rather difficult to explain so do watch the video. Actions speak louder than word.
I’ve broken down the measurements into sections so it is easier to follow.
Imperial measurements:
1. Card Base
- Cut card stock at 5-3/4″ x 8-1/4″.
- Short side on top: Align right edge of card stock at 1″ to right of cutting groove on trimmer then cut from 1″ down to 5-1/4″.
- Slide card stock to the right and align left edge at 1″ mark and cut from 1″ down to 5 1/4″.
- Switch from trimmer to Simply Scoring tool (if you have one – it’s easier to see) . Long side at the top, score between the cut lines 1, 2″ & 5-1/4″
- Partially score outside cut lines 4-1/4″ at the top, and then at the bottom.
- Score all the way at 6-1/4″
Metric measurements
1. Card Base Shaded Spruce
- Cut card stock at 14.6 cm x 21 cm.
- Short side on top: Align right edge of card stock at 2.5 cm to right of cutting groove on trimmer then cut from 2.5 cm down to 13.3 cm.
- Slide card stock to the right and align left edge at 1″ mark and cut from 2.5 cm down to 13.3 cm
- Switch from trimmer to Simply Scoring tool (if you have one – it’s easier to see) . Long side at the top, score between the cut lines 2.5 cm, 5 cm and 13.3 cm.
- Partially score outside cut lines 10.8 cm at the top, and then at the bottom.
- Score all the way at 15.9 cm
Burnishing score lines
- Orient card in landscape so that the 6-1/4″ (15.9 cm) score line is on the right.
- Gently tease the first 1″ (2.5 cm) score line in between the cut lines into a Mountain fold.
- The 2″ (5 cm) score line is a Valley fold.
- Outside the cut lines at 4-1/4″ (10.8 cm) top and both are Mountain folds.
- In between the cut lines at 5-1/4″ (15.9 cm) is also a Mountain fold
- At the 6-1/4″ (15.9 cm) score line all the way is a Valley fold.
“C” shape cuts in Imperial Measurement
Please note that the one for the front is cut with Patterned Paper of your choosing and the one for the back of the card is in coordinating plain card stock. Both pieces of “C” shapes in the two sizes have same cutting guide.
2. Card front and back
- 1 x Forever Greenery DSP and 1 x Shaded Spruce card stock 4″ x 5-1/2″
- If pattern is directional, ensure pattern is upright for the vertical section. With short side on top, align right edge of paper at 3/4″ to right of cutting groove. Cut from 3/4″ down to 4-3/4″.
- Rotate paper so that the cut is uppermost on the long side near the top.
- Align right edge of paper at 3/4″ to the right of the cutting groove. Cut from 3/4″ down to the end.
- Slide paper without changing the orientation to the right and align left edge at 3/4″ to left of cutting groove and cut from 3/4″ down to the end.
3. Middle panel back only
- Pear Pizzazz card stock 1 x 1-3/4″ x 5-1/2″.
- With short side on top, align right edge of paper at 3/4″ to right of cutting groove. Cut from 3/4″ down to 4-3/4″.
- Rotate paper so that the cut is uppermost on the long side near the top.
- Align right edge of paper at 3/4″ to the right of the cutting groove. Cut from 3/4″ down to the end.
- Slide paper without changing the orientation to the right and align left edge at 3/4″ to left of cutting groove and cut from 3/4″ down to the end.
“C” shape cuts in Metric Measurement
Please note that the one for the front is cut with Patterned Paper of your choosing and the one for the back of the card is in coordinating plain card stock. Both pieces of “C” shapes in the two sizes have same cutting guide.
2. Card front and back
- Piece of paper / card stock 10.2 cm x 14 cm
- If pattern is directional, ensure pattern is upright for the vertical section. With short side on top, align right edge of paper at 1.9 cm to right of cutting groove. Cut from 1.9 cm down to 12.1 cm.
- Rotate paper so that the cut is uppermost on the long side near the top.
- Align right edge of paper at 1.9 cm to the right of the cutting groove. Cut from 1.9 cm down to the end.
- Slide paper without changing the orientation to the right and align left edge at 1.9 cm to left of cutting groove and cut from 1.9 cm down to the end.
3. Middle panel back only
- Pear Pizzazz 1 x 4.4 cm x 14 cm.
- With short side on top, align right edge of paper at 1.9 cm to right of cutting groove. Cut from 1.9 cm down to 12.1 cm
- Rotate paper so that the cut is uppermost on the long side near the top.
- Align right edge of paper at 1.9 cm to the right of the cutting groove. Cut from 1.9 cm down to the end.
- Slide paper without changing the orientation to the right and align left edge at 1.9 cm to left of cutting groove and cut from 1.9 cm down to the end.
Rectangular Cuts
Please note that the metric measurements are in brackets:
4. Recessed centre panel front & back:
Please note that the one for the front is cut with Patterned Paper of your choosing and the one for the back of the card is in Whisper White plain card stock.
- Reverse side of Forever Greenery DSP 1 x 3″ x 3-1/2″ [7.6 cm x 8.9 cm]
- Whisper White 1 x 3″ x 3-1/2″ [7.6 cm x 8.9 cm]
5. Bookmark Pocket Panel for Front of card:
- Forever Greenery cut 6-1/2″ x 1-3/4″ [16.5 cm x 4.4 cm]. Long side on top, score at 5-1/2″ [14 cm]. This is to create a pocket for the bookmark.
- Extension pocket piece in card stock 2-1/2″ x 1-1/4″ [6.4 cm x 3.2 cm]. Long side on top, score 3/8″ [ 1 cm] on one side.
6. Bookmark Mat layer:
- Shaded Spruce : 1-1/2″ x 5-1/4″ [3.8 cm x 13.3 cm]
7. Bookmark Patterned paper layer:
- Forever Greenery DSP – 1-1/4″ x 5″ [3.2 cm x 12.7 cm]
8. First panel for back of card only:
- Pear Pizzazz 1 x 1-3/4″ x 5-1/2″ [4.4 cm x 14 cm)
Supply list
Product List")
")


- SHOP ONLINE – EARN 10% REWARDS ON ALL PURCHASES OVER £20
- PURCHASE A STARTER KIT : Get £155 worth of products for only £99. Choose from current catalogues and any specials available. Free Shipping. Read more
- Subscribe to my Video Tutorials – click here
Pingback: Tower block fold card - Stamp with Elaine