
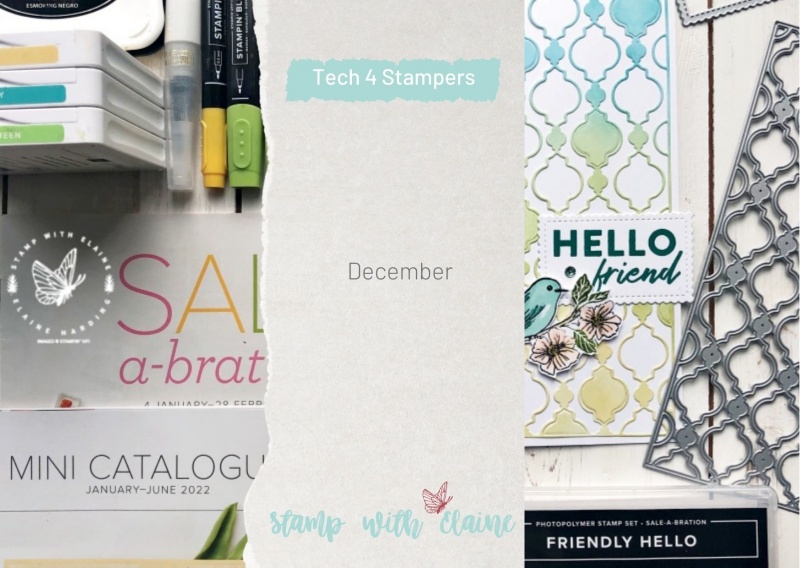
It’s “Case the Catalogue” for Tech 4 Stampers blog hop in December. Thank you to the lovely Sara Sayers for setting this month’s theme.
Casing the January-June 2022 Mini
If you’re an avid fan of Stampin’ Up! products you will be aware that at the beginning of each new year, Stampin’ Up! holds a “Sale-a-bration” event. During Sale-a-bration, for every £45 or £90 spend or more excluding shipping/handling, customers can choose free product from Stampin’ Up!’s Sale-a-bration brochure. This event is repeated later in the year to coincide with the July-December Mini, so Sale-a-bration happens twice a year.
My “Case the Catalogue” topic, I’m giving you a sneak peek at an exciting brand new die in the forthcoming January-June 2022 mini!
The Build & Bloom Stampers Blog hop (formerly Tech 4 Stampers)is a monthly subscription group run by Louise Sims. She mentors and enables members to understand IT jargon and equips them with a fountain of Technical knowledge to build or manage their own websites. It takes the mystery out of “tech” and I’ve certainly grown in confidence thanks to her expertise, patience and guidance. Not only that, I’ve met and made new friends with my fellow “Techs” and love the camaraderie within the group.
Sneak peek!
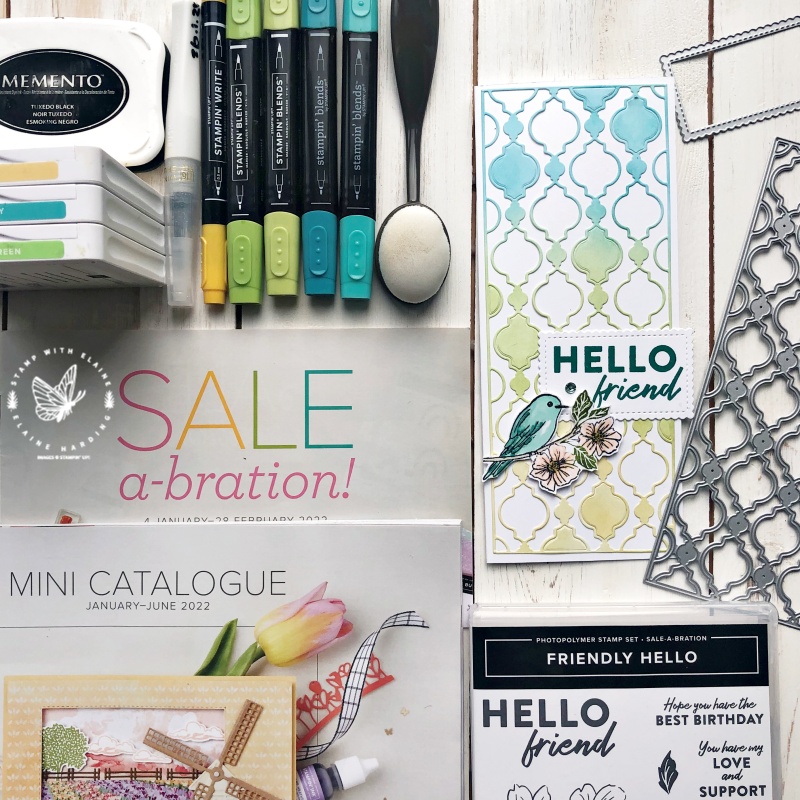
I chose to create this slim, tall card from a bundle called “Slim Sayings Bundle”. I’m not able to show you the inside of the catalogue until after it launches on 4 January 2022. You’ll find it on page 52. The largest die is 8-1/4″ x 3-1/4″ (21 cm x 8.3 cm) and there are two patterns of the rectangular dies. The other die features chevrons, but I will feature that at a later date.
There are also two border dies of similar length so you can create interesting edges.
The only similarity to the card in the catalogue is the ombre mosaic background. Stampin’ Up! featured the “Happy Birthday” sentiment from the Slim Sayings stamp set on its card. I went off piste and used one of the Sale-a-bration freebies called “Friendly Hello” which also included a pack of 12″ x 12″ (30.5 x 30.5 cm) Friendly Hello Designer Series Paper. Both these are free with a £90 purchase.
The details
- The card base was cut from Basic White Thick card stock. It measures 7″ x 8-1/2″, short side scored at 3-1/2″. Stampin’ Up! is introducing Slimline envelops in a pack of 15. Each pack contains 5 each of 3 colours in Soft Succulent. White, and Smoky Slate. The envelop size measures 3-7/8″ x 8-7/8″ (9.8 x 22.5 cm). Best of all, they have printing on the inside and are so pretty!
2. I adhered an adhesive sheet on standard Basic White card stock cut at 3-1/2″ x 8-1/2″ (9 cm x 21.5 cm). Then I used blending brushes to add colour starting from the darkest to the lightest in Bermuda Bay, Granny Apple Green and So Saffron.
3. Using the mosaic die, I die cut the card stock and left it in the die frame so that I could remove all the “insides”.
4. Make a selection of mosaic inserts and adhere at random as pictured above.
5. Stamp the bird and flowers in Tuxedo Black memento ink from “Friendly Hello” and colour the image with a combination of Stampin’ Blends: Bermuda Bay, Granny Apple Green, Petal Pink. I forgot to include the latter in the photo – oops! The centre of the flowers were coloured in with Crushed Curry Stampin’ Write marker from the Regals collection and I added Clear Wink of Stella on the bird and flower centres.
6. I stamped “Hello friend” on Basic White card stock in Bermuda Bay ink then die cut it with the third smallest Stitched Scalloped rectangle from Stitched So Sweetly dies.
7. Lastly, I adhered the bird and flowers with dimensionals and added a Holiday rhinestone to the sentiment.
Tip:
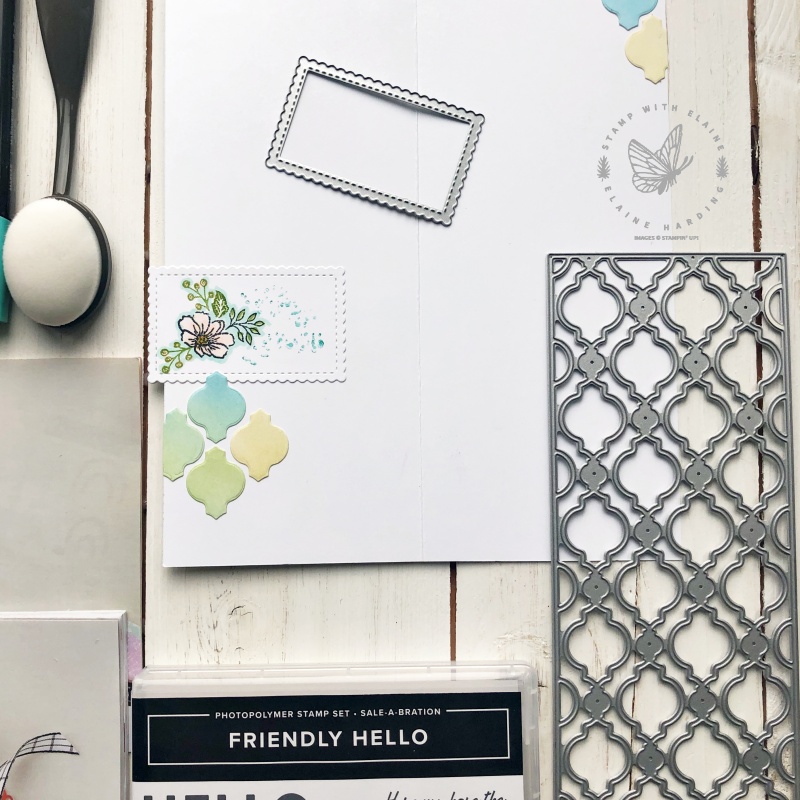
Leave the die cut rectangle in situ in the die while you remove the adhesive sheet backing paper. Align the die cutting edge face up with your die cut paper still inside the die on your grid paper. Place card base on top. Use your grid paper to ensure there is an even border on all four sides. Flip card base over and remove die. Make sure it is straight before adhering.
Inside card
- To tie in the inside of the card with the card front, I adhered some of the left over mosaics to the inside of the card.
2. I die cut a second Stitched Scalloped rectangle and stamped a floral image from “Friendly Hello”which I coloured in Petal Pink and Granny Apple Green.
3. It was aligned with the other Stitched Scalloped rectangle on the card front and glued together as a focal point.
Supply list
Listed below is the supply list. Just click on the picture to take you directly to the item in my online store.
Product List")


Thanks for visiting. I would love to know what you think of my project and would appreciate it if you could leave a comment. To visit the next person on the list and see their fabulous creations, simply click on the link below or before my name depending who you visited initially. Happy hopping!

- SHOP ONLINE – EARN 10% REWARDS ON ALL PURCHASES OVER £20
- PURCHASE A STARTER KIT : Get £155 worth of products for only £99. Choose from current catalogues and any specials available. Free Shipping. Read more
- Subscribe to my Video Tutorials – click here
Pingback: Merry Christmas Greetings or Happy Holidays - Stamp with Elaine
Pingback: Sneak peek for Tall Slim Card - Stamp with Elaine
Pingback: Fancy border cut card - Stamp with Elaine
Pingback: Sale-a-bration for Tech 4 Stampers Blog Hop - Stamp with Elaine