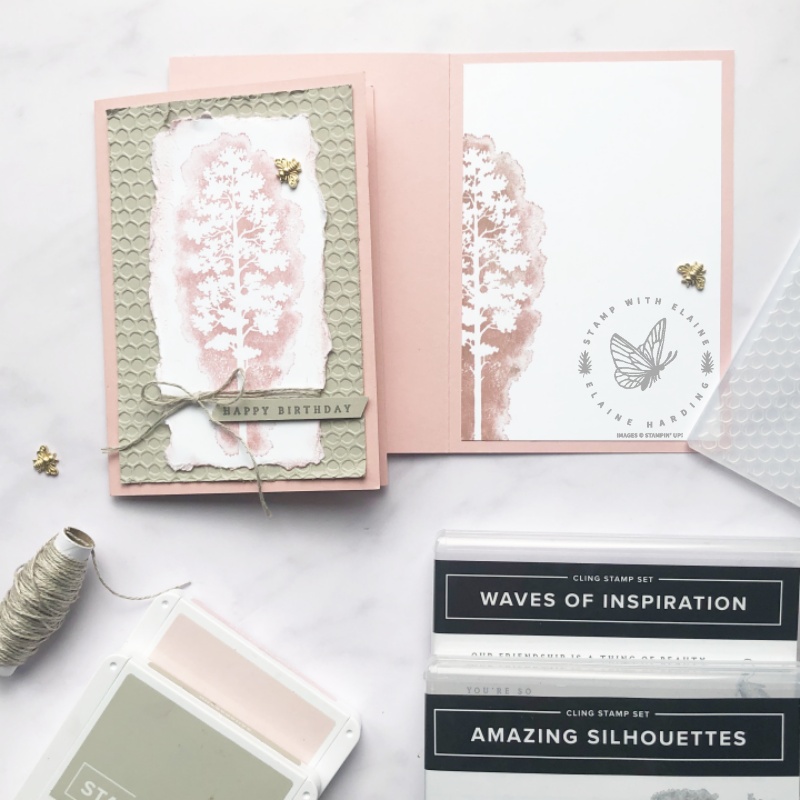
A vintage card with Amazing Silhouettes bundle. I made this as a birthday card, using one of the sentiments from the newly launched Waves of Inspiration stamp set. Waves of Inspiration is an early release product from the 2022-2023 Annual Catalogue.
The tree image was stamped on Basic White card stock with Blushing Bride ink. Then I tore the paper toward me on all four sides to create the vintage look. Each side was sponge daubed with Blushing Bride to give it some definition.

Hive 3D embossing folder
The mat layer in Sahara Sand was embossed with the Hive 3D embossing folder. I adhered it with the de-bossed side facing up so that the hive was more distinctive. The edges were “rucked” up with the sharp blades of my scissors and if it tears a little, that’s even better because it adds to the vintage look.
Before I adhered the torn stamped piece, I wrapped some linen thread around it.
Inside card
The Stamparatus is a stamp positioning tool. It makes stamping an image with duo tones alot easier. First I inked the image in Blushing Bride and cleaned ink off randomly in spots before stamping. Then I cleaned the stamp and re-inked it with Sahara Sand and repeated the process before stamping again. If you look closely, you can see parts of the image is covered with Blushing Bride and in other parts, with Sahara Sand.
Finishing touch
I stamped the sentiment from Waves of Inspiration, trimmed it and adhered it with dimensionals below the linen thread bow. The bumblebee trinket was attached with a glue dot as a finishing touch.
This card came together so quickly!
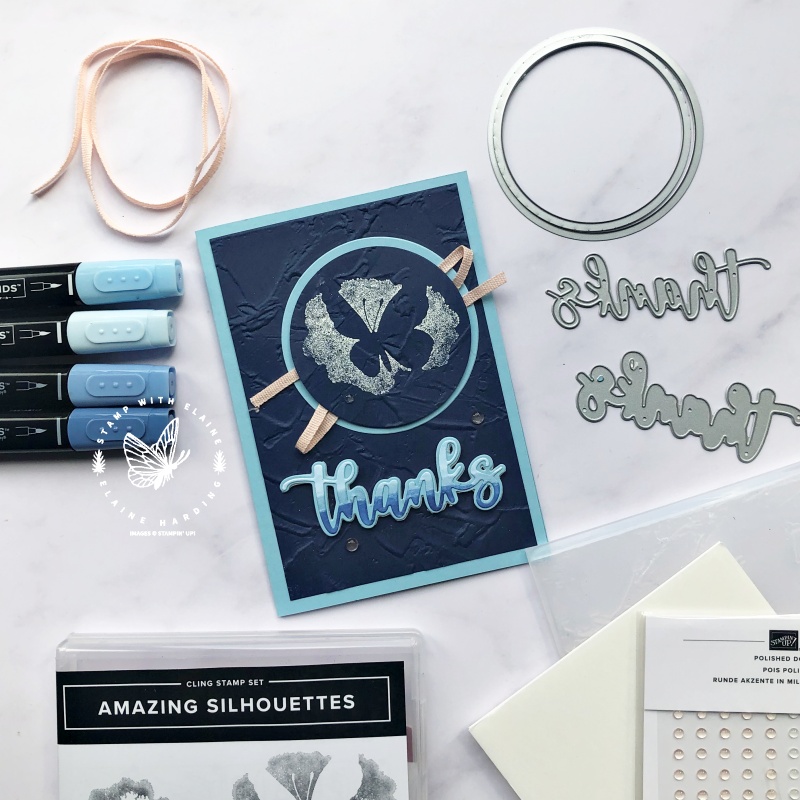
Card sample with butterfly silhouette
I didn’t demonstrate this in the video, but have included it in this post because I wanted to show you the gorgeous word dies. There is a shadow die for all the words in the Amazing Thanks die set. The dies for the shadow words are much wider so that the other thinner die which spells the same word can be laid on top.

How to stamp and emboss the butterfly
The butterfly was stamped with Versamark ink and white embossed on Night of Navy card stock. After I had stamped and embossed the butterfly, I die cut the butterfly with the smaller of the two largest layering circle dies, then reinserted it into the hole before embossing it with the Painted Texture 3D embossing folder. This way, it doesn’t flatten the embossing.
Mat layers
There are two mat layers. The Night of Navy mat layer was cut 5-1/2″ x 3-3/4″ (14 cm x 9 cm). I stamped, embossed, die cut the butterfly from this layer.
I die cut the largest circle in Balmy Blue as a mat layer for the butterfly to make it “pop”.
Lastly, I die cut the “thanks” shadow word mat layer. I also attached an adhesive sheet to the back of a strip of Basic White card stock before die cutting the finer lettering to go on top.
Ombre effect
I used Balmy Blue and Night of Navy combo Stampin’ Blends to create the ombre effect on the lettering by colouring the top third in the lightest colour, the middle third in the medium colour, and the bottom third in the darkest colour. It doesn’t matter which of the four blends you use as each colour comes in a pair with light and dark.
Video tutorial
Supply list
Listed below is the supply list. Just click on the picture to take you directly to the item in my online store.
Product ListHappy stampin’

- SHOP ONLINE – EARN 10% REWARDS ON ALL PURCHASES OVER £20
- PURCHASE A STARTER KIT : Get £155 worth of products for only £99. Choose from current catalogues and any specials available. Free Shipping. Read more
- Subscribe to my Video Tutorials – click here


