
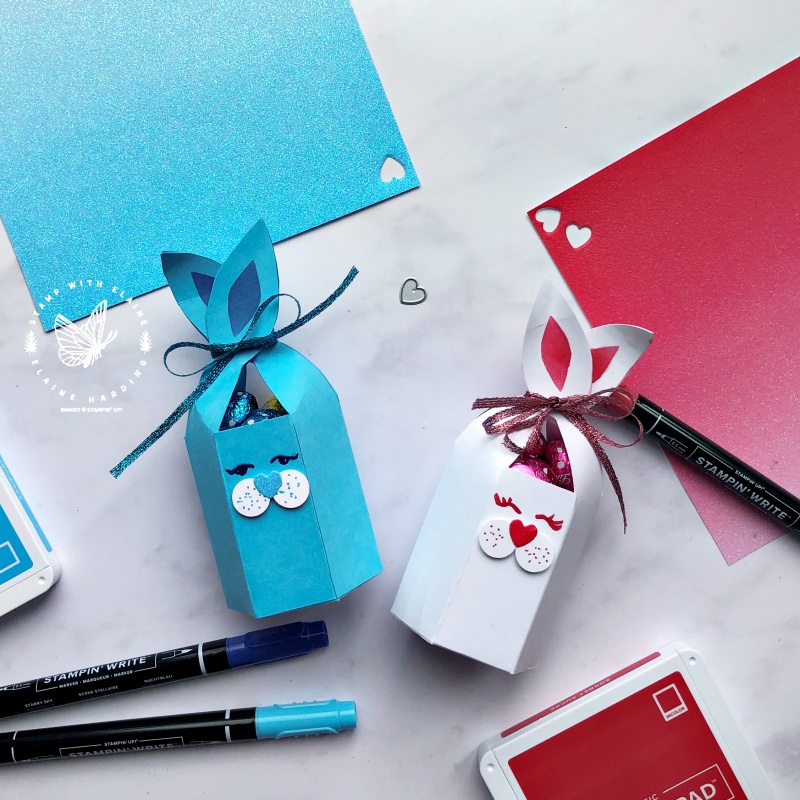
Cute easter treat box and a sneak peek at a couple of new In-Colours for 2022-2024. The pre-order was on April 1, and I paid for expedited shipping so that I could get my hands on my goodies ASAP. I didn’t have long to wait, it arrived lickety split before 9.00 am on Monday morning! Naturally I couldn’t wait to have a little play!
I have some clues coming soon for you to guess what the names are for the five new In-colours for 2022-2024 so I’m not going to reveal anything today. It was hard to resist making a little teaser for what lies ahead!
The blue one reminds me of a colour we used to have called Tempting Turquoise. Demonstrators were limited to three of the new In-colour A4 card stock packs during the pre-order period. I am waiting with bated breath for 3 May when the new 2022-2023 Annual Catalogue goes live to acquire the rest!
In the meantime I’ve incorporated two of the new In-Colours into my project for this Sunday. I’ve created so many hexagonal projects lately and today’s box is no exception. The bunny ears were drawn free hand and is integral with the panels as well as the hexagonal base.
How to create the template
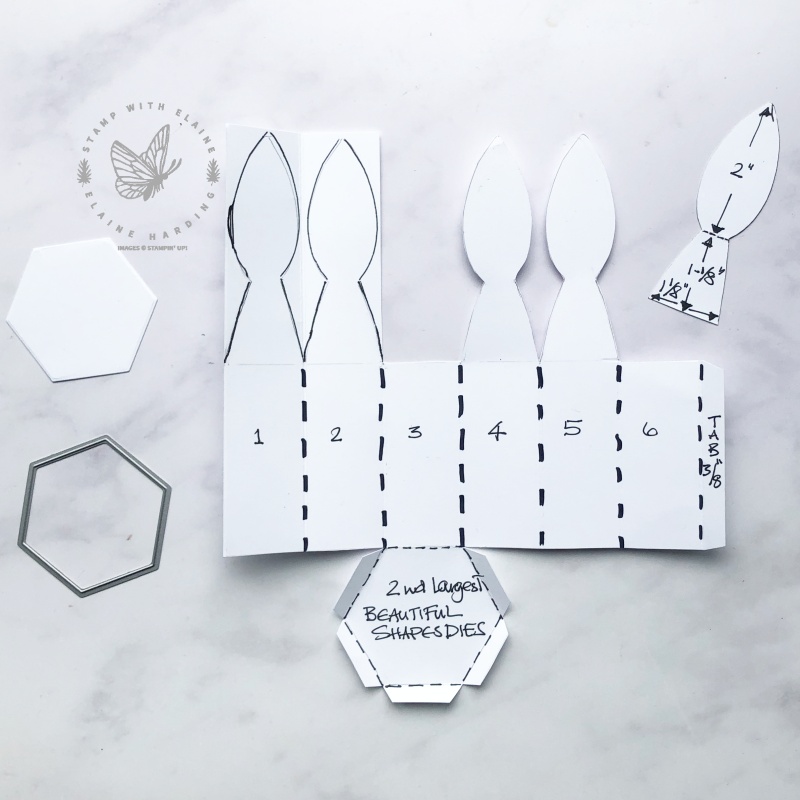
- Die cut a hexagon template with the next to largest hexagonal die from the Beautiful Shapes die set
- Bunny Box base : Cut a piece of card stock 8-1/8″ x 7-1/8″. On the short side score at 1-1/8″, 2-1/4″, 3-3/8″, 4-1/2″, 5-5/8″, 6-3/4″.
- Rotate card stock so the the long side is on top, score at 2-1/4″ and make a pencil mark at 4-7/8″ at the top and bottom and connect line.
- Orient card stock so that the 3/8″ tab is on the right and place your die cut hexagonal template on the 3rd panel in.
- Trace around the hexagon in pencil. Draw a second hexagon with all the sides parallel to the first to create tabs. Score along the pencil lines of the hexagon to make it easier to adhere to main box.
- Make a template for the bunny ears measuring a tad under 1-1/8″ in width. The height of the partial lower half of the ear is 1-1/8″ . From the 1-1/8″ point, draw a full ear 2″ in height. Once you’re happy with the shape, fussy cut it.
- Orient card stock so that the 3/8″ tab is on the right. Trace the bunny ear template on panels 1, 2, 4 and 5.
- Fussy cut around the ears on panels 1 and 2, straight across at panel 3. Fussy cut around ears on panels 4 and 5 and straight across panel 6 and the 3/8″ tab.
- Orient the card stock so that the long side is facing you with the hexagon on your right. Cut along 2-1/4″ score line along panel 1 and 2.
- Flip card stock over and cut along the 3/8″ tab, and panels 6, 5 and 4 skipping panel 3 which has the hexagon attached.
- Burnish all the score lines.
Box assembly
- Apply adhesive to the bottom edge of panels 1, 2, 4, 5 and 6 and on the reverse side of the 3/8″ tab.
- Adhere the hexagon tabs to panel 2 and 4 first. Easier to do if you stand the base of the box to a flat surface.
- Next adhere the hexagon tabs to panel 1 and 5 leaving the last one free.
- This step is a little tricky. Ensure that the last hexagon tab is tucked in so that it can be adhered to panel 6, but you need to adhere the 3/8″ tab to the inside of panel first.
- Once the 3/8″ tab has bonded to panel 1, you can attach the last hexagon tab to the inside of panel 6.
- Adhere bunny ears on panel 4 and 5 with a glue dot at the top. Repeat for the other pair on 1 and 2.
Creating the face
- Ensure the the tab where the box is joined is at the back.
- The front and back of the box has a straight edge. Gently bring both pairs of ears together and tie with ribbon or bakers twine. You can fill your box with treats first before doing this.
- Punch two 1/2″ circles for the cheeks, and a tiny heart for the nose and attach with dimensionals.
- Finally draw the eyes.
Optional : I created a mask with a post-it note so I could add colour inside the bunny ears with a blending brush or you can use a different colour card stock to achieve the same effect.
At the time of writing, I’m not able to add the Links to the supplies just yet, but will add them once the new Annual Catalogue goes live.

- SHOP ONLINE – EARN 10% REWARDS ON ALL PURCHASES OVER £20
- PURCHASE A STARTER KIT : Get £155 worth of products for only £99. Choose from current catalogues and any specials available. Free Shipping. Read more
- Subscribe to my Video Tutorials – click here