
I made this Shadow Box card with Stylish Sketches which you can earn for Free during Sale-a-bration. Sale-a-bration is a two-month event run by Stampin’ Up! during which you can earn free product for every purchase you make of £45 excluding shipping and handling.
The Grassy Grove bundle first came on the scene in the January-June 22 mini, but I resisted the temptation to buy it. When I saw that it had made it into the Annual Catalogue for 2022-23, I decided to get it. If you purchase this bundle, you’ll qualify for getting the Stylish Sketches stamp set Free.
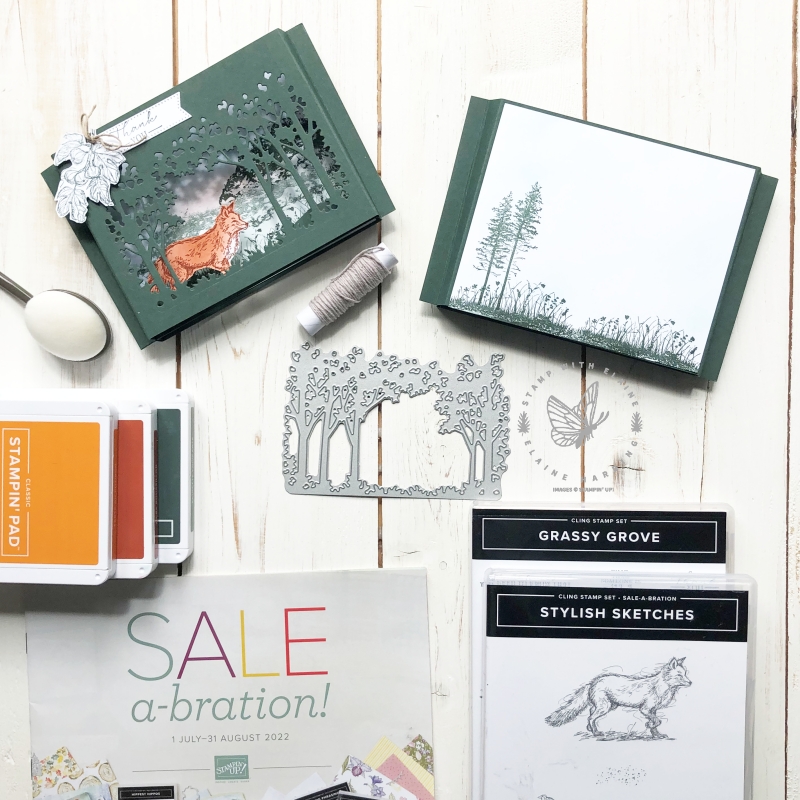
I particularly love the dies and it screamed “shadow box” card! The large tree canopy die is rather large and after some experimenting this is what I came up with.
Card details
- Cut 2 pieces Evening Evergreen : 4-1/8″ x 6-3/4″ (10.5 cm x 17 cm). Long side on top, score both pieces at 3/8″, 3/4″ (1 cm, 2 cm). Rotate c/s 180 degrees and score opposite side at 3/8″, 3/4″ (1 cm, 2 cm. These two pieces form the shadow box.
- Centre the large tree canopy die from Grove dies on one of the scored Evening Evergreen 4-1/8″ x 6-3/4″ (10.5 x 17 cm) card stock and die cut an aperture.
- Stamp the fox from Stylish Sketches in Cajun Craze, fussy cut. Use a blending brush to add colour, but leave the fox’s chest white.
- Also stamp the leaf and berry image in Evening Evergreen and fussy cut this too.
- From the Grassy Grove stamp set, stamp the sentiment “thank you” in Evening Evergreen and die cut with the Stylish Shapes Dies. Set aside.
- Cut 2 pieces Basic White : 4″ x 5-1/8″ (10 cm x 13 cm). One piece is for inside of the shadow box and the other is for the reverse side of shadow box. Create your backdrop scene with the Grassy Grove stamps and also for the back of the shadow box where you can address the adressee.
Bridging pieces
- Internal bridge piece : Cut 1 piece Evening Evergreen 1-1/2″ by 6″ (4 cm x 15.2 cm). Long side on top, score each end at 3/8″ (1 cm). Next, cut a piece of Evening Evergreen : 1-1/2″ x 5-1/4″ (4 cm x 13.3 cm). Stack the two pieces together, the shorter piece in between the score lines of the longer piece and randomly cut an undulating “hillock” freehand.
- Adhere the bottom of the paws of the fox to the left of front of the scored piece of “hillock”. Attach tear and tape on both scored ends.
- Now adhere the shorter “hillock” to the longer in order to sandwich the fox in between the two pieces.
- Before you attach this, adhere the Basic White backdrop you’ve stamped to the inside of the back of the Shadow Box.
- Remove tear and tape backing tape and adhere to the sides of the back of the shadow box piece.
Final touches
- Adhere the stamped 4″ x 5-1/8″ (10 cm x 13 cm) for addressee to the reverse side of back of shadow box piece.
- Apply tear and tape to the 3/8″ outer scored sections of back piece of shadow box.
- Remove backing tape and carefully align front of shadow box with the back to adhere it together.
- Repeat for the other side.
- Take your sentiment and cut off the left hand flag end. Ensure you leave space on the left for tucking in under the leaf image. Adhere it to top left of front of shadow box.
- Tie Bakers twine round stem of leaf and make a bow. If necessary, attach glue dot to back of Bakers twine bow to prevent it from unraveling.
- Attach dimensionals to the back of leaf and adhere to top left of card on top of sentiment.
Video Tutorial
Sigh, I struggle with trying to put into words how to create my cards. I’m never sure whether or not the instructions are clear. It’s so much easier just to have a visual! So here it is!
Supply list
Listed below is the supply list. Just click on the picture to take you directly to the item in my online store.
Product List")
")


- SHOP ONLINE – EARN 10% REWARDS ON ALL PURCHASES OVER £20
- PURCHASE A STARTER KIT : Get £155 worth of products for only £99. Choose from current catalogues and any specials available. Free Shipping. Read more
- Subscribe to my Video Tutorials – click here