
In episode 11 of 12 in my 12 week Christmas Countdown series, I am tackling gift wallets using the Christmas Banners Bundle. There’s nothing nicer than receiving monetary gifts which you package in gift wallets you’ve personalised for each person yourself.
Oftentimes, in this day and age, children’s expectations seem so much higher. Not everyone can afford to gift expensive toys or electronic games. It’s quite common practice to give a sum that we can budget for which the children can then put together to get that high ticket price item. I often purchase stocking filler type presents which I wrap separately to go with the gift wallet, so there’s an element of surprise.
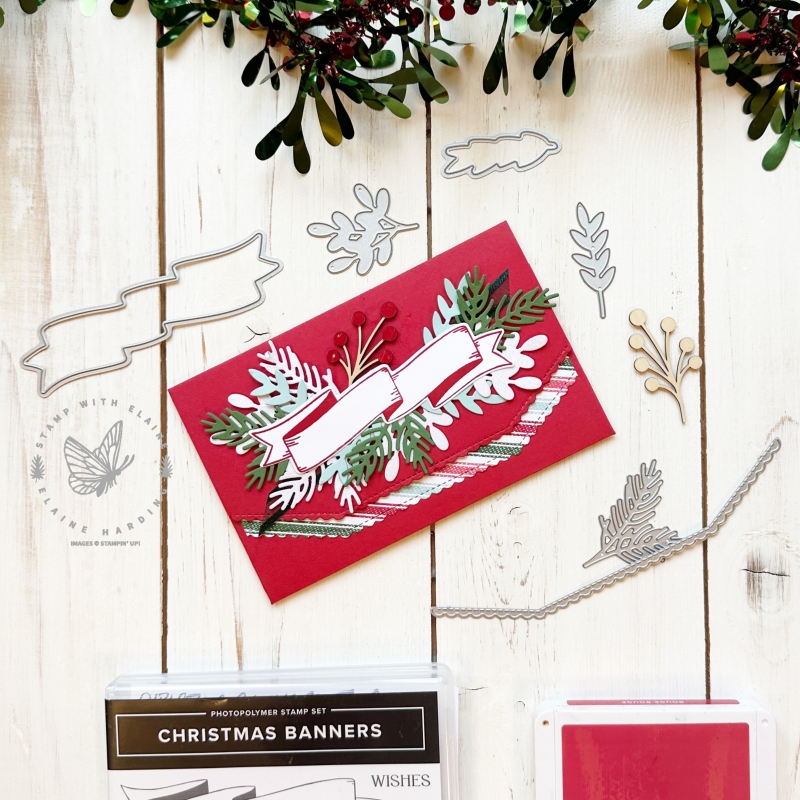
Instead of stamping a greeting on the banner, you could write the recipients name and add the christmas greeting inside the wallet. The banners are so pretty especially when the stamps mark out the ribbon like effects on the die cuts.
I die cut several different leaf elements from Garden Green and Pool Party card stock as well as the Real Red & White 6″x 6″ (15.2 x 15.2 cm) Glimmer paper and arranged them on the back of the banner. Treat it like it’s a floral arrangment, no hard and fast rule. In addition I used one of the Textural Elements made out of pressed wood which I coloured with a Real Red Stampin’ Write Marker.
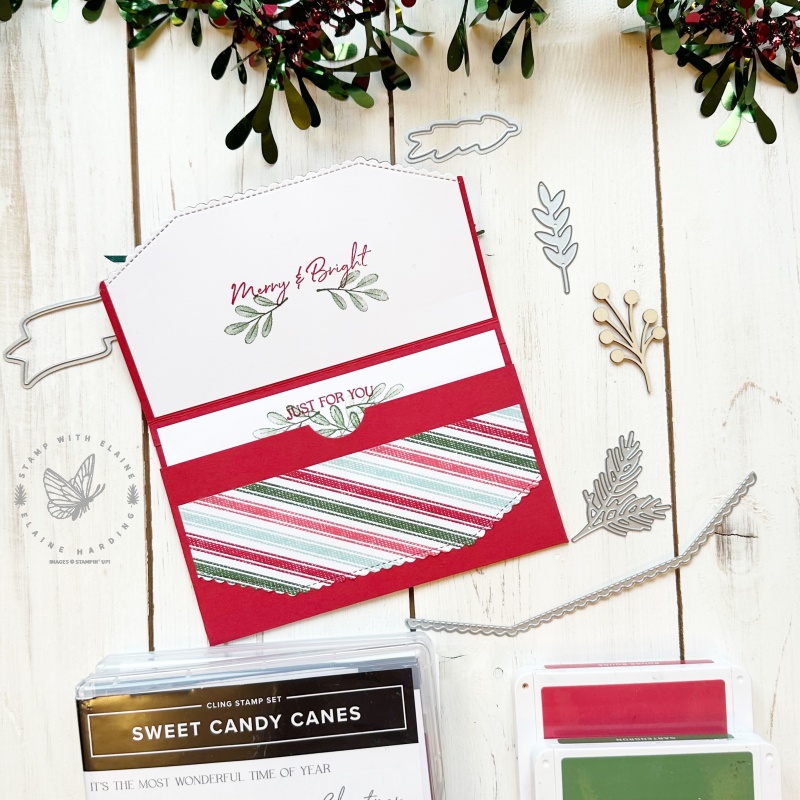
You can use any of the Christmas papers to decorate your wallet, any stamp set for stamping the inside, and any one of the basic border dies to create different looks. I’ve used a variety for mine from Santa Express stamps or papers to create ones for younger children.
Gift Wallet basics
For more trimming details, please refer to video.
- Gift wallet pocket – cut Real Red card stock 6-3/4″ x 6-3/4″ (17 cm x 17 cm). Score one side at 3″ (7.5 cm) and rotate it clockwise a quarter turn so that the shorter 3″ section is at the top. Mark the centre at 3/8″ (1 cm) then score each end at 3/8″(1 cm) for the finger hole.
- Envelop flap – 5-3/4″ x 3-1/2″ (14.5 cm x 9 cm). Cut 1 in the Real Red.
- For the inside of envelop flap – Basic White 5-3/4″ x 3-1/4″ (14.5 cm x 8 cm). May need trimming further.`
- Inside pocket – Basic White 5-3/4″ x 3″ (14.5 cm x 7.5 cm)
- DSP for pocket – 6″ x 2″ (15.2 cm x 5 cm)
- Your choice of coloured card stock to die cut all the leaf elements.
Video tutorial
Do watch the video because I showed some other samples I made. I didn’t manage to photograph these so you can see them in the video tutorial.
Supply list
Listed below is the supply list. Just click on the picture to take you directly to the item in my online store.
Product List")
")

 Designer Series Paper")
 Glimmer Paper")


 Open Weave Ribbon")

- SHOP ONLINE – EARN 10% REWARDS ON ALL PURCHASES OVER £20
- PURCHASE A STARTER KIT : Get £155 worth of products for only £99. Choose from current catalogues and any specials available. Free Shipping. Read more
- Subscribe to my Video Tutorials – click here