
Welcome to episode 3 of 12 in my 12 week Christmas Countdown series – a Slim card using Joy to You stamp set and the Christmas Pinecone dies, plus a bonus square card which was made from the remnant from cutting the Slim card.
The Christmas Pinecone dies first made their appearance on 3 August-December 2021 Mini catalogue and it carried over to the 2022-2023 Annual Catalogue. However, unfortunately the coordinating stamp set called “Christmas to Remember” has retired. I get such a kick out of being able to use stash that is “old” because sometimes you forget you have them so it’s nice to be reminded!
In September Stampin’ Up! added five new 12″x 12″ (30.5 x 30.5 cm) paper packs to their Online Exclusives collection. I’ve used two of them on this long slim card. Online exclusives are just that – you won’t find it in any catalogue. Be aware that the papers are only available while stocks last and once it’s gone, it won’t be visible on the website anymore.

I made two cards out of an A4 sheet. One is the long, slim one, and the other is a smaller square card. Isn’t it satisfying to know that nothing has gone to waste?
Similarly, I cut the DSP from a 12″x 12″ (30.5 x 30.5 cm) piece sized so there was little waste on that too. More details on this in the cutting guide below.
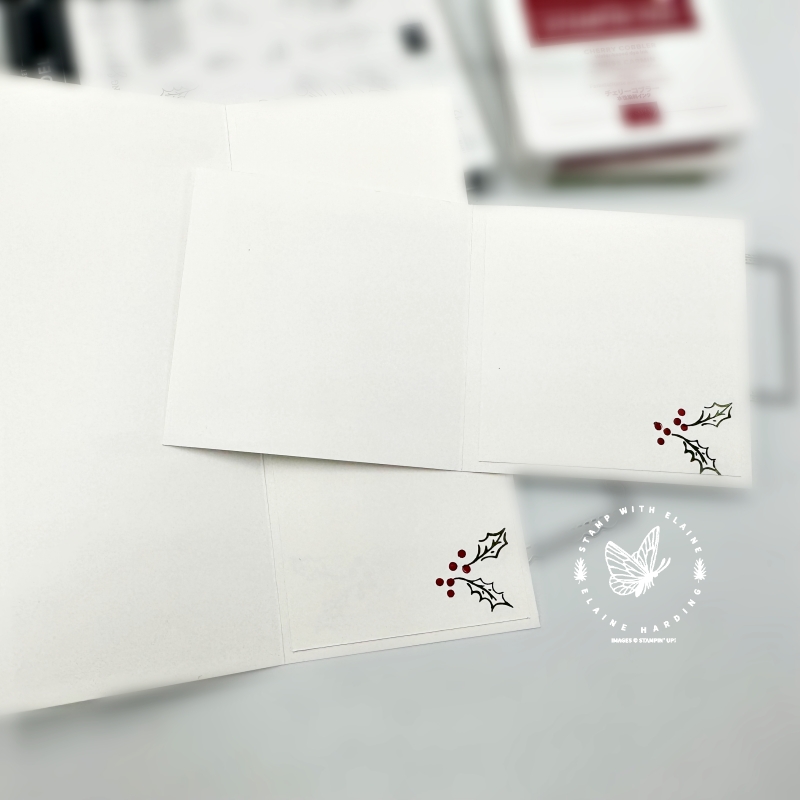
Long slim card
- Card Base : From Basic White Thick A4 sheet with long side on top cut a piece 7” x 8 ¼”. Short side on top, score at 3 ½” (18 cm x 21 cm – short side score at 9 cm)
- DSP mat layer #1 card front : Cut a piece at 3″ x 12″. Trim 3” x 7 ¾” (7.5 cm x 20 cm) for long slim card.
- Mat layer #2 – Die cut Gold Adhesive paper with Christmas Pinecones die
- Die cut Mat layer #3 in Basic White number 3 Scalloped Contour Dies
- Inside card : Basic White 3 ¼” x 8” (8.2 cm x 20.3 cm)
- From the remnant of DSP left after cutting the layers for the slim and square card, fussy cut 2 pairs of holly leaves.
- Use the Pearlised enamel effects (red) to add berries. Tip: ensure the dots aren’t dispensed too close together so that each will keep its shape otherwise they’ll all merge together while it is drying. Once you’ve applied the pearlised enamel effects set it aside to dry for at least half an hour or more or else you could smudge it.
Square card
- Card Base: From remaining Basic White Thick make Square card base – trim 4 ⅛” x 8 ¼” (10.5 cm x 21 cm). Long side on top, score at 4 ⅛” (10.5 cm)
- Mat layer #1 card front : Cherry Cobbler 3 ⅛”x 3 ⅛” (4 cm x 4 cm).
- Before gluing the Cherry Cobbler Mat Layer #1 to card front, stamp NOEL in Versamark and emboss in white embossing powder and die cut with Joy to Noel dies. Set aside.
- DSP Mat layer 2 : From remaining DSP trim to 3” x 3” (7.5 x 7.5 cm)
- Mossy Meadow Mat layer #3 : Mossy Meadow scrap die cut with next to largest Stylish Shapes square dies.
- Adhere NOEL to Mossy Meadow layer
- Inside card : Basic White 3 ¾” x 3 ¾” (9.5 x 9.5 cm)
Video tutorial
Supply list
Listed below is the supply list. Just click on the picture to take you directly to the item in my online store.
Product List")
")


 Specialty Designer Series Paper")
 Adhesive Backed Glimmer Paper")


- SHOP ONLINE – EARN 10% REWARDS ON ALL PURCHASES OVER £20
- PURCHASE A STARTER KIT : Get £155 worth of products for only £99. Choose from current catalogues and any specials available. Free Shipping. Read more
- Subscribe to my Video Tutorials – click here