
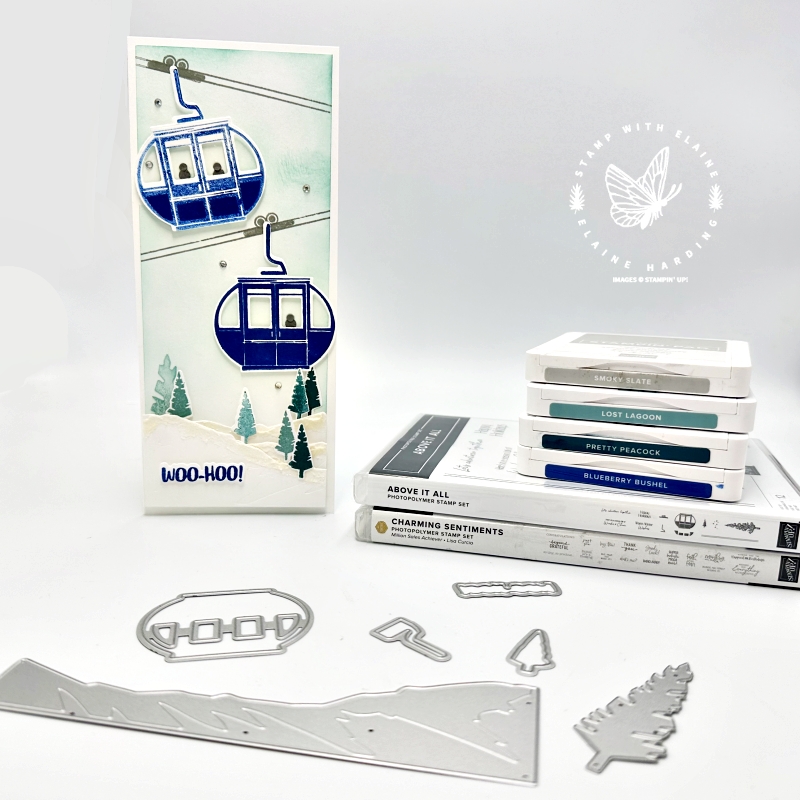
Hello and happy Sunday – today I’m showing you how you can make a card for any occasion even if you’re using a Christmas/winter themed stamp set. I also used the Charming Sentiments stamp set and the Sentiment Silhouette dies.
I hummed and hah-ed about this stamp set but eventually caved in. This stamp set was featured recently in a blog hop I participated in last week. This card is long and slim so that I could fit two gondolas in. Shhh! I’ll let you into a secret! The sky background was achieved by using blending brushes to add colour in Pool Party. When I was assembling the card, the upper gondola stuck out too far beyond the card so I had to re-position it. In the process, I tore a tiny piece of paper. A light bulb moment, I could cover it up by putting “people” in the gondola! Can you guess how I did that? Read on….I’ll let you in on the secret at the end of the post!
Cutting guide
- Card base : Basic White Thick 7″ x 8 ¼” (18 cm x 21 cm) folded in half
- Mat layer front of card : Basic White 3 ¼” x 8″ (8.5 cm x 20.5 cm)
- Scraps of Basic White to die cut 2 pieces of the snow bank with the snow bank die from Above It All Dies, and 2 gondolas, tiny trees and sentiment.
Instructions
- Blend Basic White mat layer all over in Pool Party with blending brush.
- Next die cut 2 pieces of the snow bank. Arrange and trim these to fit the Basic White Mat layer.
- Add Shimmery White paste to the tops of the snow banks and set aside to dry. When dry, adhere these in layers with dimensionals. The bottom layer is stuck directly to Mat layer. Only one dimensional height on the second layer. This second layer does not extend the whole width of the Mat layer. It falls short but is still concealed by third layer. Adhere a double stack of dimensionals where the second layer falls short onto the third layer and attach directly to mat layer.
- Stamp and die cut 6 little trees in Pretty Peacock and Lost Lagoon.
- Die cut the medium tree die in Basic White and add colour in Lost Lagoon with blending brush.
- Stagger and arrange trees randomly at the bottom in between the layers of snow banks as pictured.
Prepping the gondolas
- First Gondola : stamp gondola at full strength in Blueberry Bushel and die cut.
- Second Gondola : stamp second generation Blueberry Bushel to get a lighter shade. Then with the Highlight stamp, stamp this at full strength in the lower portion of gondola as pictured.
- Mechanical grips : stamp one at full strength, and stamp another without re-inking. Die cut both of these. Adhere to respective gondolas.
- Now you’ve constructed your gondolas, you can use these to gauge where to stamp the cable and the sheave wheels on your Mat layer in Smoky Slate.
- Attach mini dimensionals to the back of both gondolas and adhere in centre of sheave wheels.
Sentiment
Select a stamp set of your choice for the greeting, or you can use the ones in the Above it All stamp set. However, I wanted to be able to use this card for any occasion. It’s useful to make cards which are .non-specific. Life can get busy, and it’s good to have some cards in hand when you’re strapped for time and need one asap.
- Stamp “Woo-hoo” from the Charming Sentiments stamp set in Blueberry Bushel
- Die cut using the corresponding Sentiment Silhouette die.
- Apply mini dimensionals on back and adhere to Mat layer.
Adhere Mat Layer to Basic White Thick card base and lastly add some Rhinestone Basic Jewels. The inside of the card has been left blank so that you can use it for any occasion when the need arises, whether it be for a birthday, anniversary, or a holiday.
Did you guess how I covered up the tear? I used my crop-a-dile to punch a small grey circle, and a larger grey circle. Then I flattened them, applied adhesive through the windows of the gondola and glued the larger circle first, followed by the smaller circle. That covered up the tear, but the golden rule – odd numbers applies so I added two more “figures”!!!
Supply list
Listed below is the supply list. Just click on the picture to take you directly to the item in my online store.
Product List")
")


Have you finished your Christmas shopping yet? …. or are you last minute Sally? Thanks for visiting!

- SHOP ONLINE – EARN 10% REWARDS ON ALL PURCHASES OVER £20
- PURCHASE A STARTER KIT : Get £155 worth of products for only £99. Choose from current catalogues and any specials available. Free Shipping. Read more
- Subscribe to my Video Tutorials – click here