
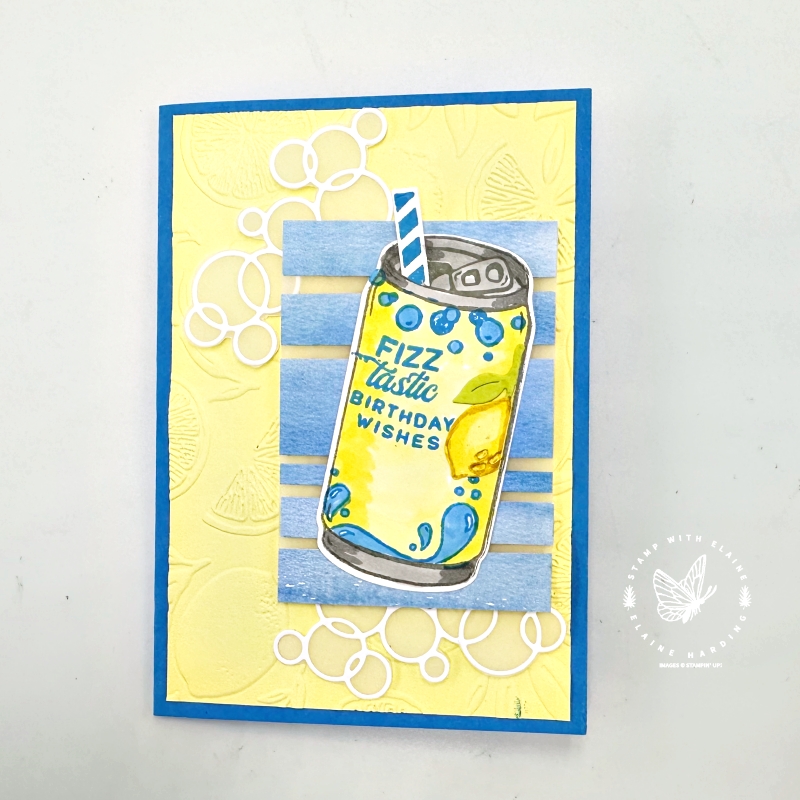
Birthday card for a Teenager. My youngest grandson just celebrated his 14th birthday. Teenagers like soda pop, right? So I made him a card with the Simply Sparkling Bundle and took my inspiration from Stampin’ Up!’s sample. I’m delighted that the Bright & Beautiful DSP is carrying over – a first for Stampin’ Up! because the papers usually get retired with every new catalogue.
Online exclusive
The Simply Sparkling Bundle is an online exclusive. It’s fairly recent, so hopefully it won’t run out of stock. If you look closely, I backed the die cut bubbles from the Simply Sparkling dies with vellum. Read on, and you’ll find out how I achieved this.
I stamped the can in Smokey Slate and used a combination of Stampin’ Blends in Smokey Slate, Lemon Lolly and Azure Afternoon to colour the different elements. The lemon and leaves and straw were die cut from the Simply Sparkling die set. I also used a craft knife to cut a slot through which I could insert the straw.
Retiring products
I have also used some products which are retiring. The Sweet Citrus Hybrid Embossing folder and Vellum card stock isn’t in the new Annual Catalogue for 2024-2025, which is disappointing. Often when items in the catalogue disappear it is because it hasn’t been in demand.
Inside card
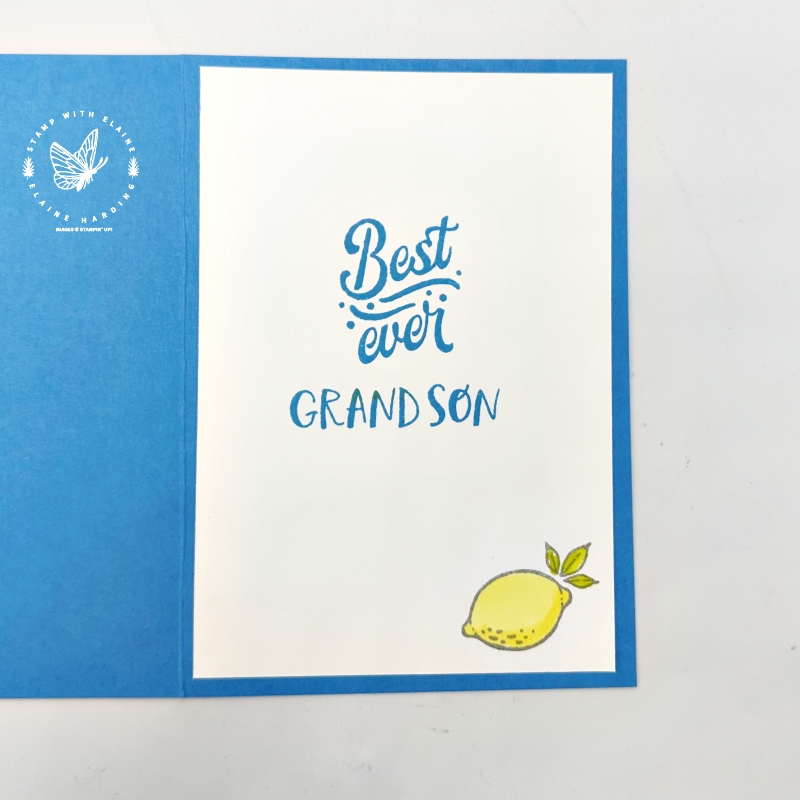
The “best ever” sentiment is from Simply Sparkling, but I wanted to add a personal touch so used the Best Family Ever photopolymer stamp set to stamp “grandson”. This set, I’m pleased to say, has carried over to the new Annual Catalogue for 2024-2025.
Cutting guide
- Card base : Azure Afternoon 5 ⅞” x 8 ¼” (14.5 cm x 21 cm) folded in half
- Mat layer #1 card front : Lemon Lolly 3 ¾” x 5 ½” (9.5 cm x 14 cm) embossed with Sweet Citrus Hybrid embossing folder.
- Vellum card stock Mat layer #2 : W 2 ½” x H 3 ½” (6.5 x 9 cm)
- *Cut the Azure Afternoon sheet from the Bright & Beautiful DSP to adhere to vellum by cutting into strips : Overall size W 2 ½” x H 2 ⅞” (6.5 cm x 7.5 cm) , then long side on top, cut in order for a continuous pattern at ½”, ⅜”, ¼”, ⅞”, ⅜” and remaining piece will measure ½” (1.5 cm, 1 cm, 0.5 cm, 2 cm, 1 cm and remaining piece will measure 1.5 cm)
- Basic White, Lemon Lolly, Lemon Lime Twist, card stock scraps to stamp and die cut can, lemon and leaves.
- Scrap of vellum for adhering to back of bubbles.
*Tip: Vellum Long side in horizontal position : DSP adhere the two ½” (1.5 cm) pieces at either end. Position the widest ⅞” (2 cm) piece in the middle but do not glue it down yet. Fit the ⅜” (1 cm) in the spaces left and the ¼” (0.5 cm) in the gap between the ⅞” (2 cm) and ½” end piece on the right.
Bubbles
- Attach an Adhesive sheet to the back of Basic White card stock large enough to die cut 2 sets of bubbles.
- Remove backing paper from Adhesive sheet and adhere each set of bubbles to a scrap of vellum.
- Fussy cut each set of bubbles by following the contour of the cluster of bubbles. There is no need to allow for a border.
Supply list
Listed below is the supply list. Just click on the picture to take you directly to the item in my online store.
Product List")
")

 Designer Series Paper")


I hope you enjoyed this project and will be inspired to make your own. Thanks for visiting and enjoy the rest of your Sunday.

- SHOP ONLINE – EARN 10% REWARDS ON ALL PURCHASES OVER £20
- PURCHASE A STARTER KIT : Get £155 worth of products for only £99. Choose from current catalogues and any specials available. Free Shipping. Read more
- Subscribe to my Video Tutorials – click here