
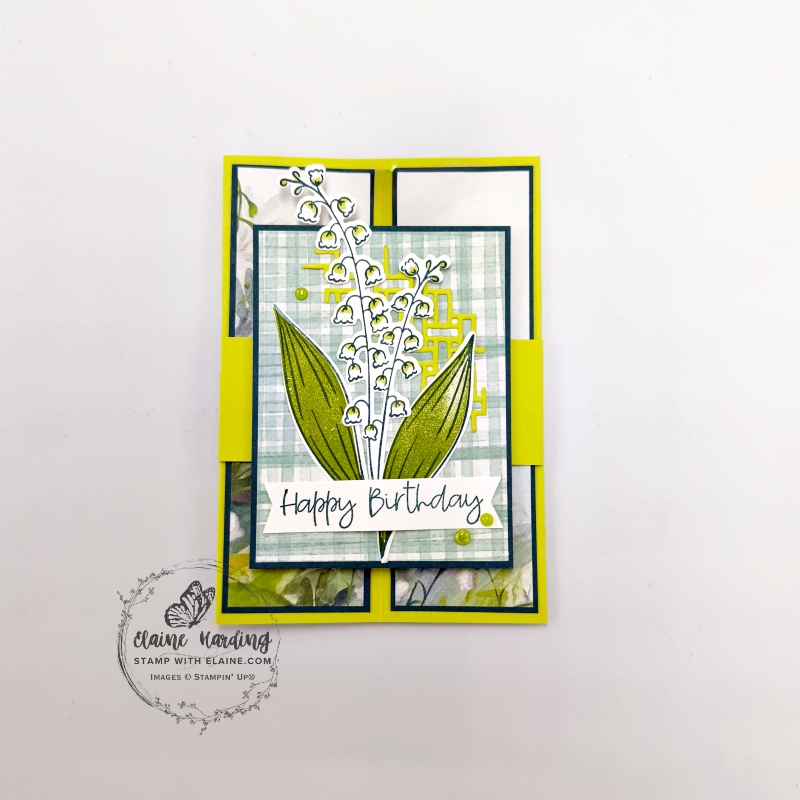
Pop up birthday card – Lily of the Valley. As promised, I’m back with a pop-up birthday card using other elements of the Lily of the Valley Bundle. I just couldn’t resist showing off the potential of that gorgeous Floral Spray 3D embossing folder in the suite collection! If you missed the post, you can see it HERE.
So today, here’s a fun fold Pop-up birthday card which is deceptively easy to do!
Cutting guide
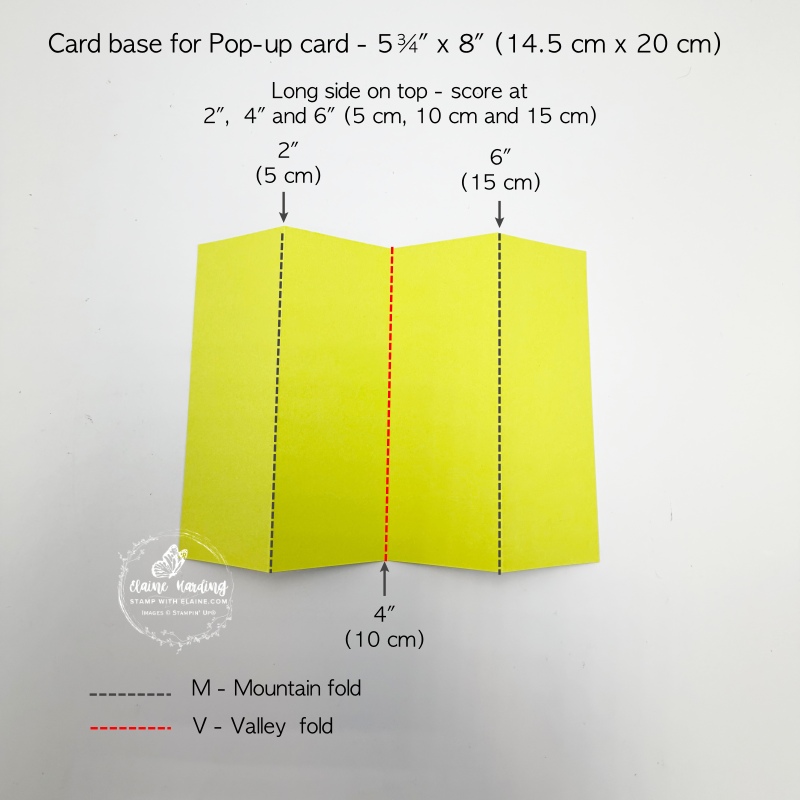
- Card Base : Granny Apple Green cut at 5 ¾” x 8″ (14.5 cm x 20 cm). Long side on top, score at 2″, 4″ and 6″ (5 cm, 10 cm, 15 cm).
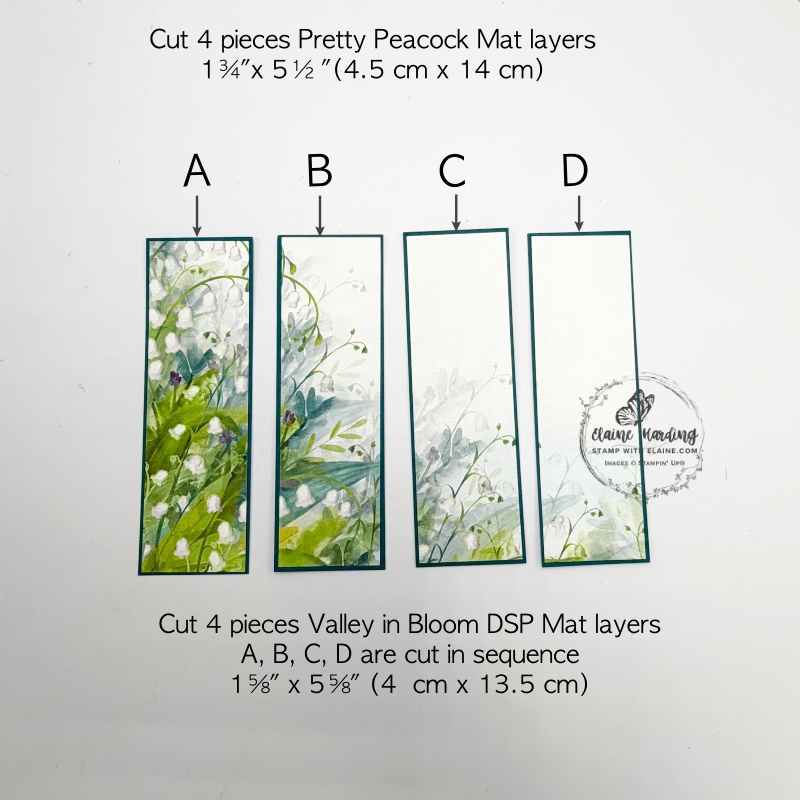
- Pretty Peacock mat layers : cut 4 pieces name A, B, C and D at 1 ¾” x 5 ½” (4.5 cm x 14 cm)
- Valley in Bloom DSP cut 4 pieces in sequence to create 1 continuous “scene” at 1 ⅝” x 5 ⅝” (4 cm x 13.5 cm)
Pop up mechanism
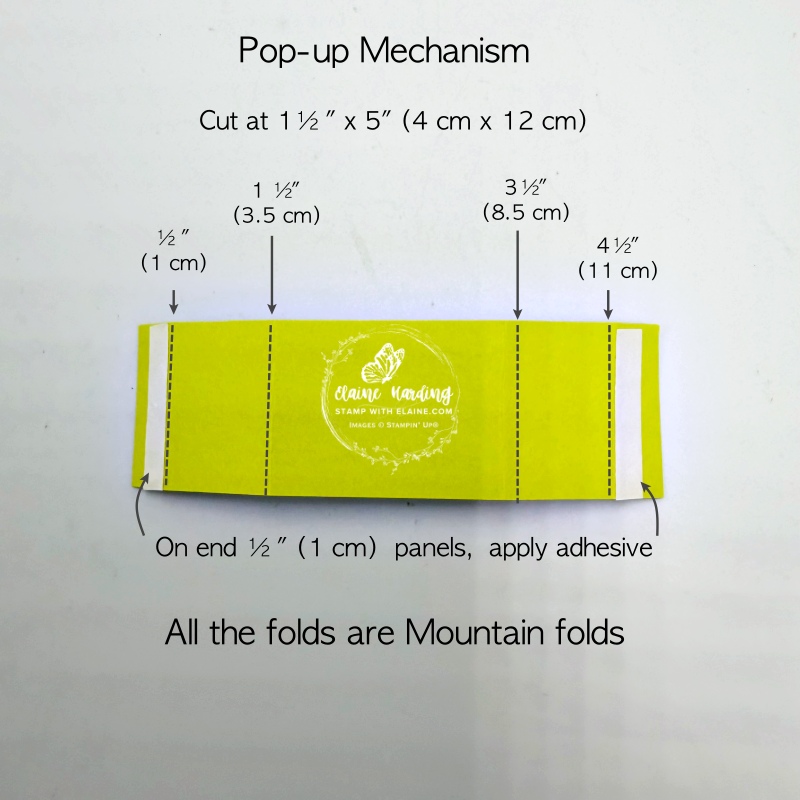
- Cut Pop-Up Mechanism at 1 ½” x 5″ (4 cm x 12 cm)
- Long side on top, score at ½”, 1 ½”, 3 ½” and 4 ½” (1 cm, 3.5 cm, 8.5 cm, 11 cm)
- Apply adhesive to both ½” (1 cm) end panels.
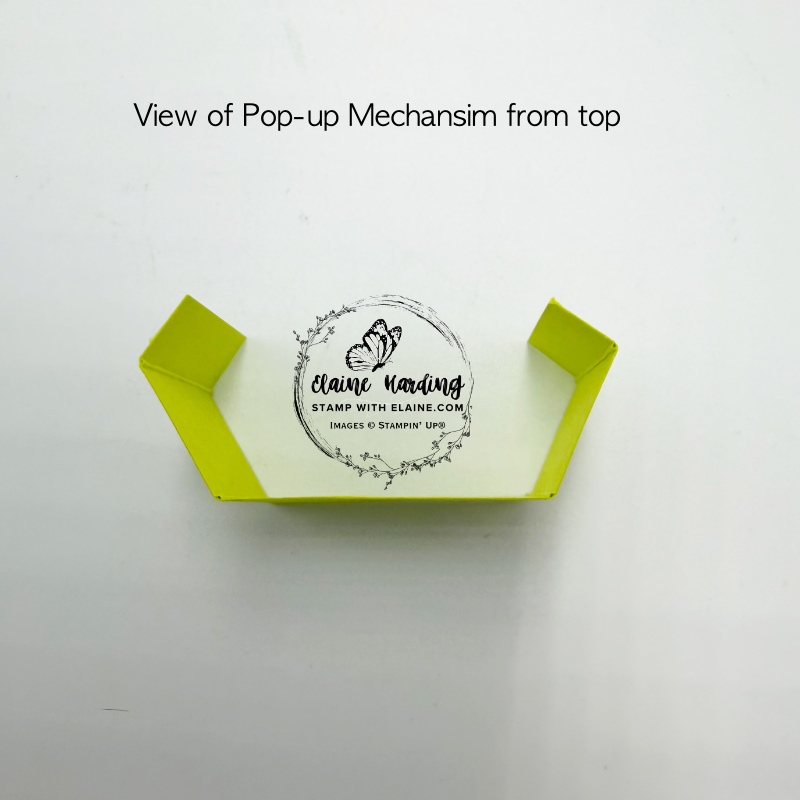
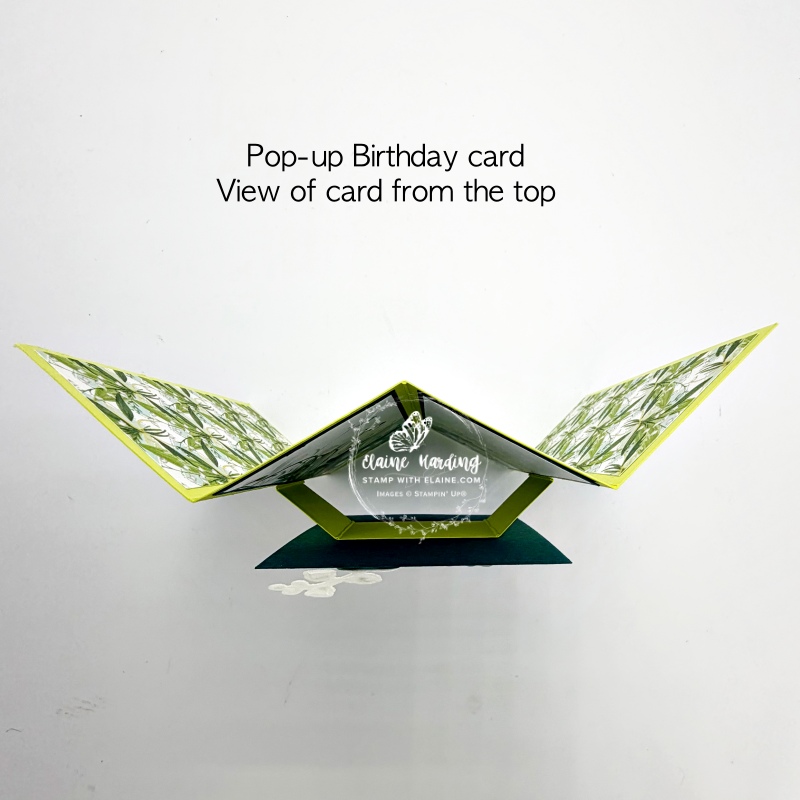
- Burnish mechanism – all the score lines are Mountain folds and should look like the picture on the right once folded.
Separate front panel and die cut elements
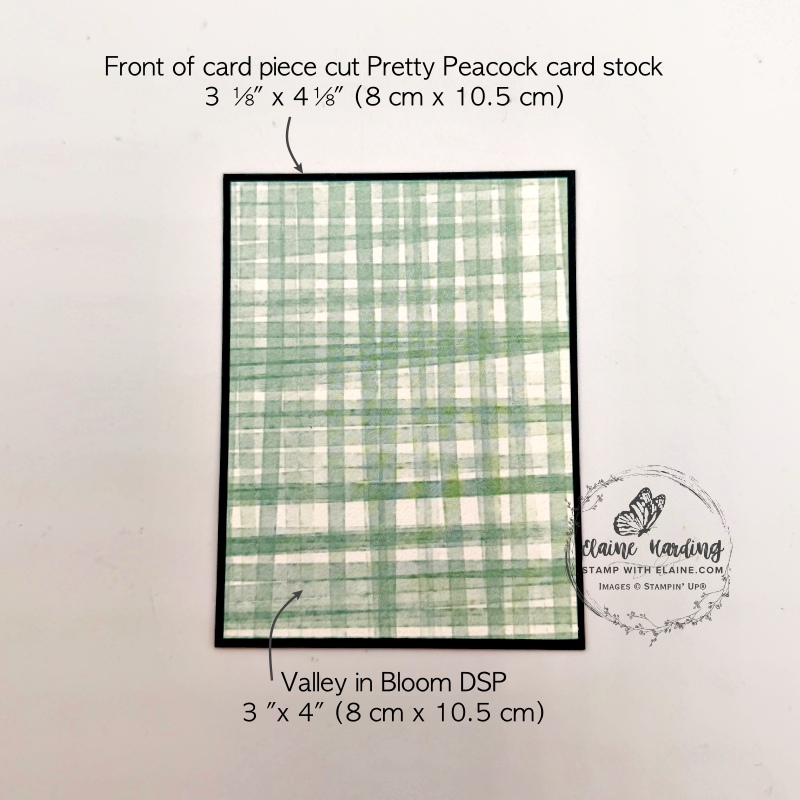
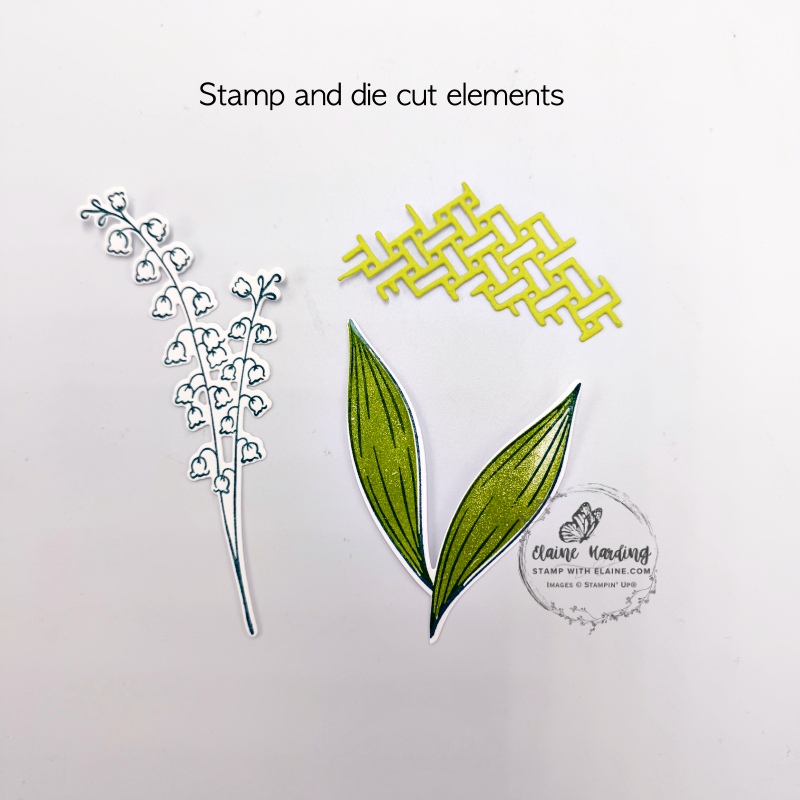
- Front of card Pretty Peacock mat layer : 3 ⅛” x 4 ⅛” (8 cm x 10.5 cm)
- Valley in Bloom DSP layer : 3″ x 4″ (8 cm x 10.5 cm)
- Stamp lily of valley floral image and linear leaf image in Pretty Peacock. Two-step stamp leaves to fill in colour with Granny Apple Green ink. Apply adhesive sheet to back of Granny Apple Green scrap. Die cut all the elements.
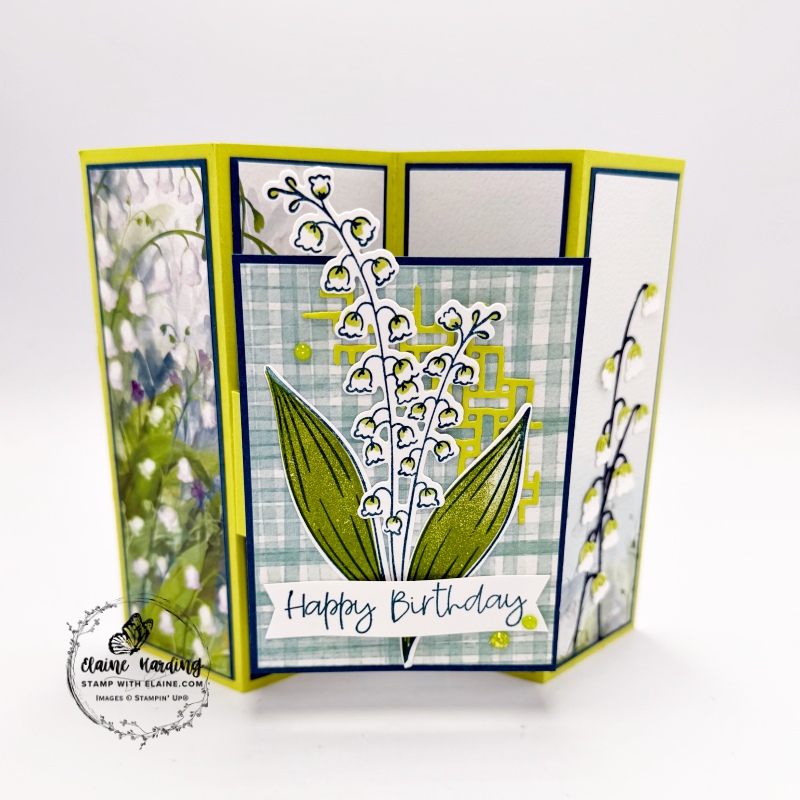
Assembling card
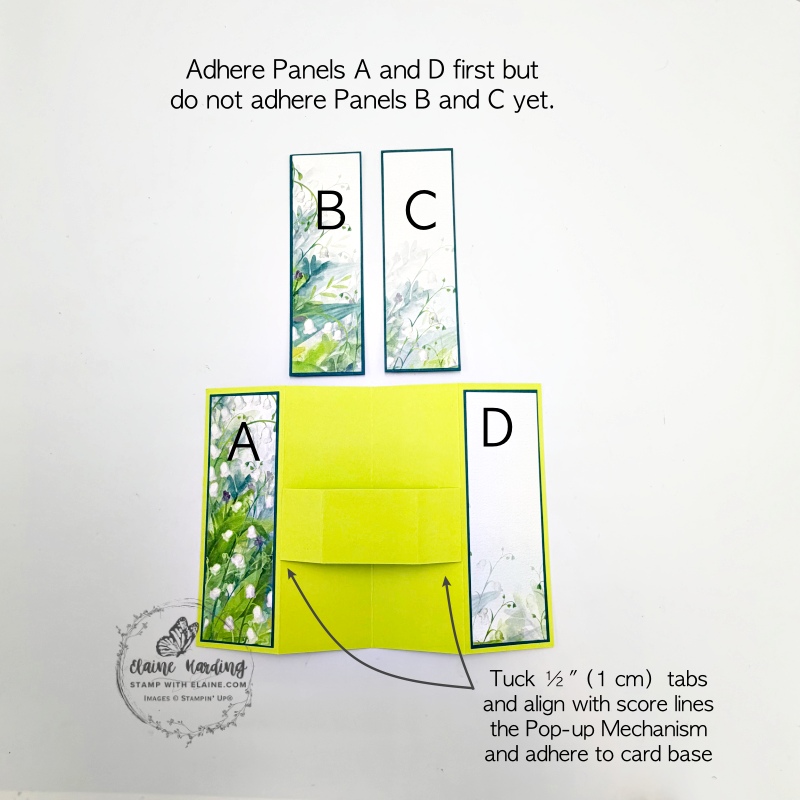
- Adhere Panels A and D on to card base as pictured.
- Remove backing tape and tuck ½” (1 cm) end tabs then align with 2″ and 6″ (5 cm and 15 cm) score lines and adhere to card base. Next insert Panels B and C underneath Pop-Up mechansim and adhere to corresponding panels leaving an even border on all 4 sides.
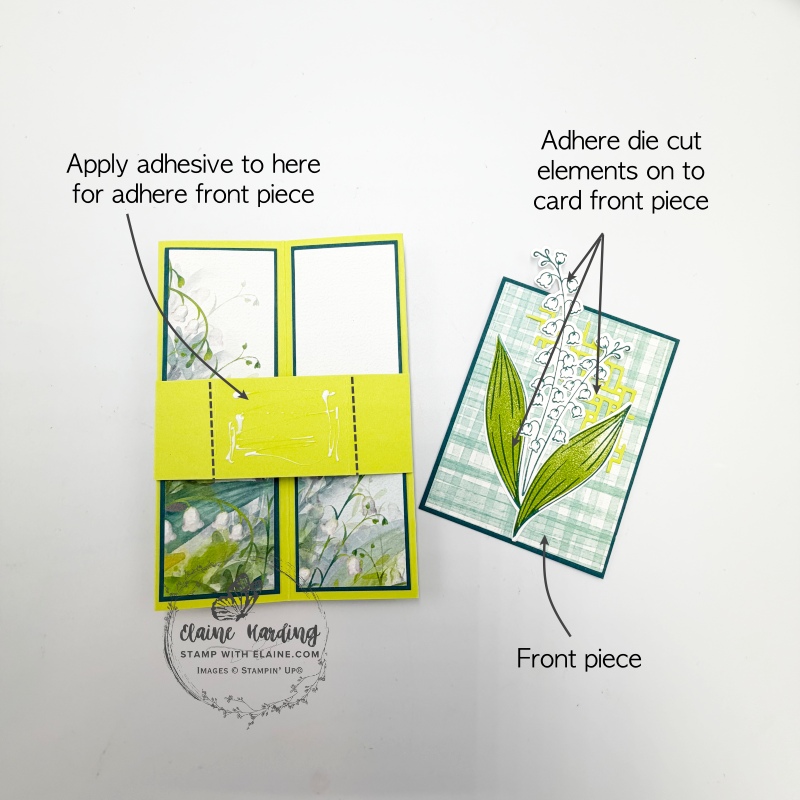
- Adhere die cut elements to front piece then tuck panel A and D behind (middle picture). This will fold flat. Apply adhesive to centre of pop-up mechanism.
Additional die cut elements
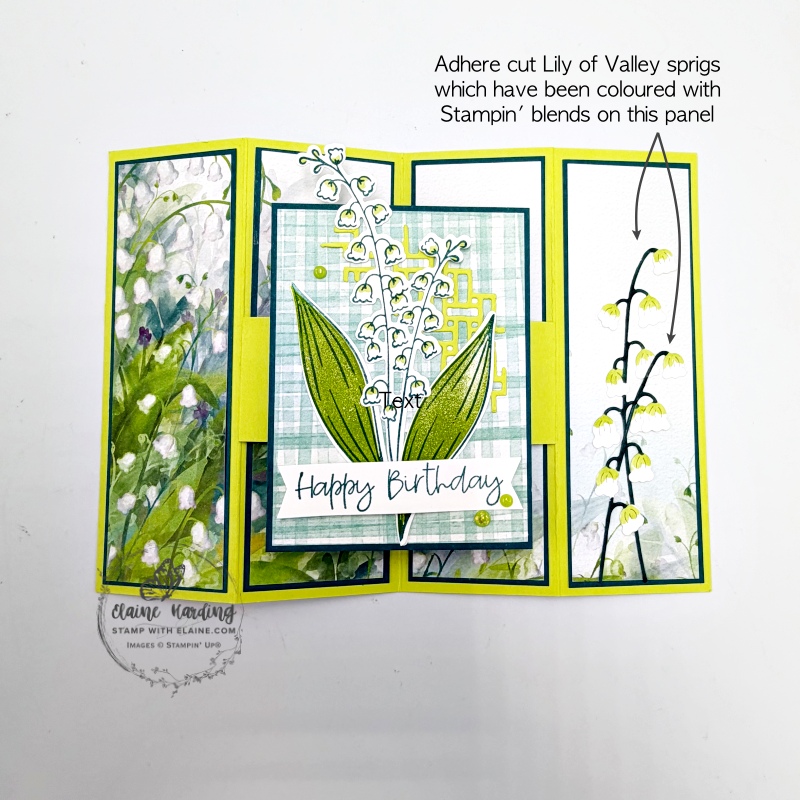
- Panel D has mostly blank space. If you don’t like the lack of detail, you could die cut a couple of Lily of Valley sprigs in Basic White.
- Colour the stems with Dark Pretty Peacock Stampin’ Blend and the heads of the trumpets in Light Granny Apple Green then adhere to panel D. (picture on the right)
Finishing touches to front of card
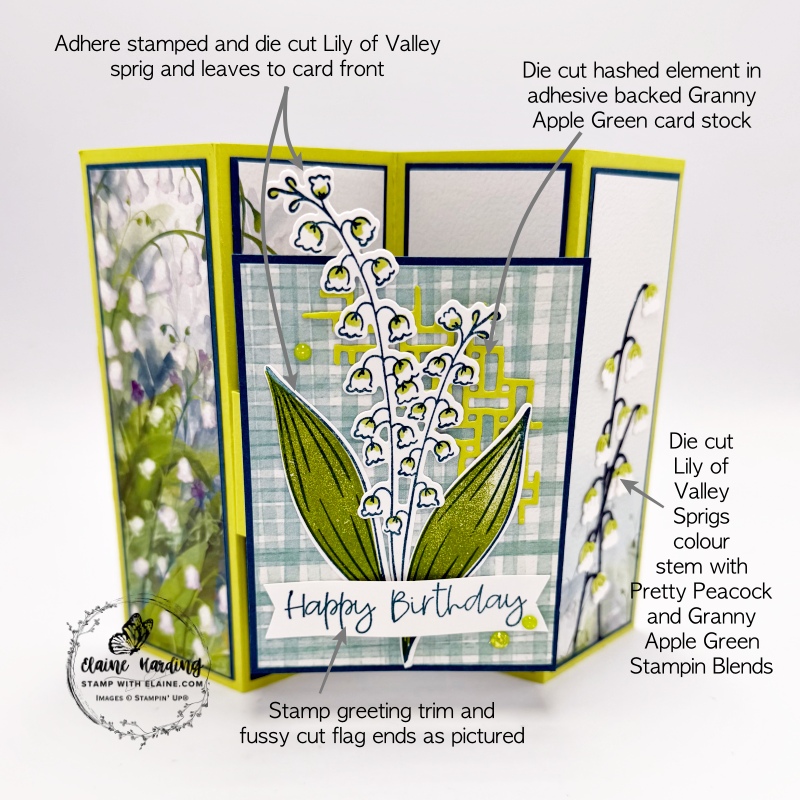
- Stamp birthday greeting on a scrap of Basic White, trim and cut flag ends and adhere toward bottom of floral arrangement.
- On panel D, I added two Lily of the Valley sprigs which were die cut in Basic White which were coloured with Stampin’ blends to add some interest.
- Add some Shimmering Dots accents.
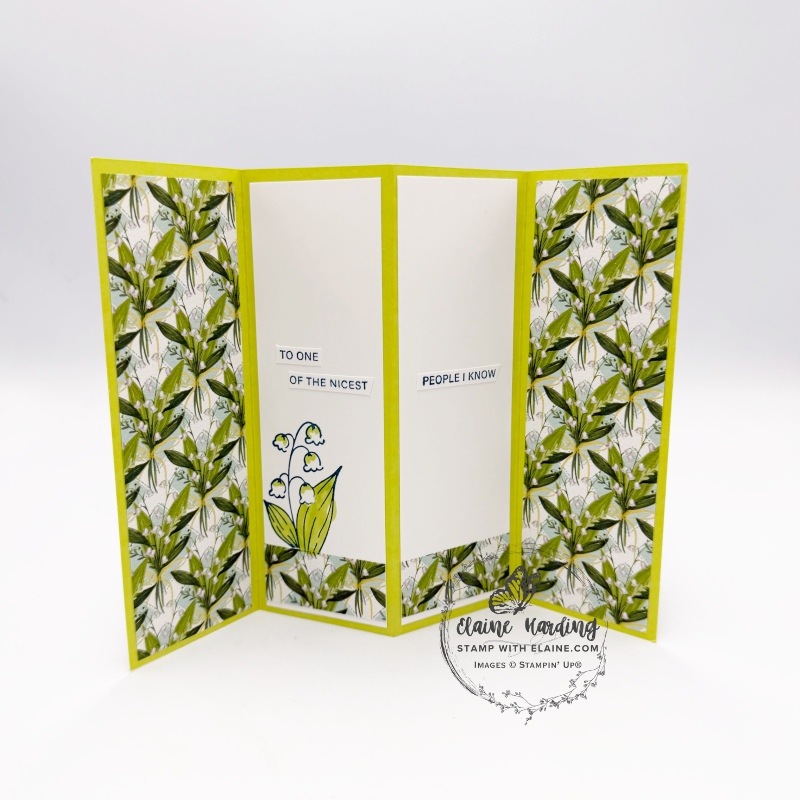
Back of card
Mat layers have been omitted on the back, otherwise it would make the card too bulky.
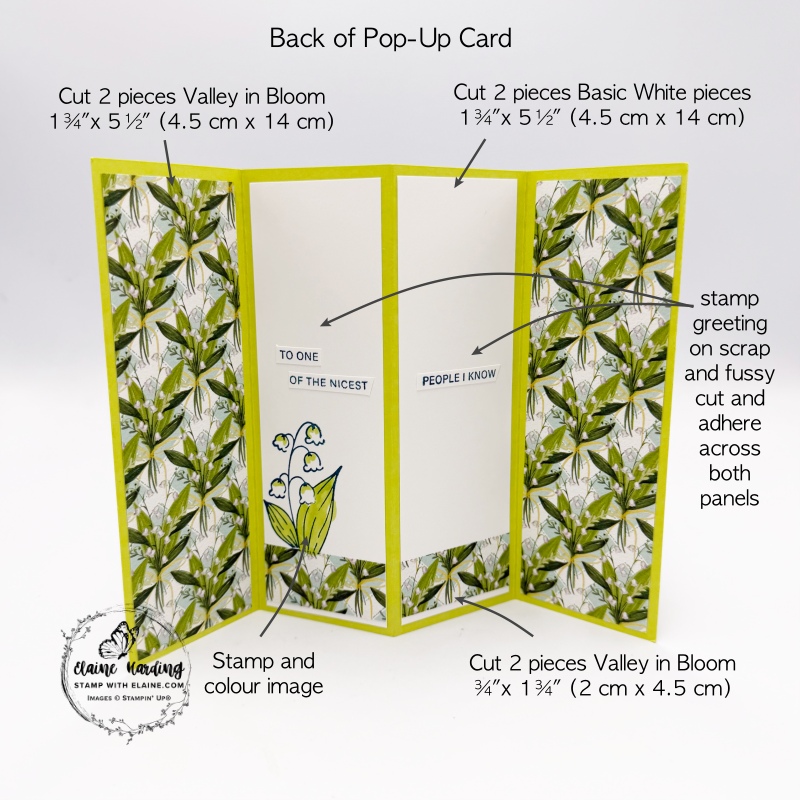
- Valley in Bloom DSP – cut 2 pieces different pattern 1 ¾” x 5 ½” (4.5 cm x 14 cm)
- Stamp small Lily of Valley image in Pretty Peacock ink.
- Colour leaves with Granny Apple Green light and tops of trumpets as well.
- Cut 2 pieces ¾” x 1 ¾” (2 cm x 4.5 cm) Valley in Bloom DSP to adhere to Basic White pieces.
- Basic White panels : Cut 2 pieces 1 ¾” x 5 ½” (4.5 cm x 14 cm). Adhere the small pieces of Valley in Bloom pieces to the bottom of the Basic White panels ⅛” from bottom edge.
- The greeting is too long to fit on the narrow panels. To overcome this simply stamp greeting twice on Basic White scrap. On one piece, trim the top line and split it “to one” and adhere on one line. Adhere “of the nicest” on another line.
- Remaining stamped greeting, trim and discard “to one of the nicest” part of the greeting and adhere the “people I know” part to the Basic White panel as shown to complete card.
Supply list
Listed below is the supply list. Just click on the picture to take you directly to the item in my online store.
Product List![Lily Of The Valley Bundle (English) [ 167943 ]](https://assets1.tamsnetwork.com/images/EC042017NF/167943s.jpg "Lily Of The Valley Bundle (English) [ 167943 ]")
![Adhesive Sheets [ 152334 ]](https://assets1.tamsnetwork.com/images/EC042017NF/152334s.jpg "Adhesive Sheets [ 152334 ]")
![Pretty Peacock A4 Cardstock [ 150886 ]](https://assets1.tamsnetwork.com/images/EC042017NF/150886s.jpg "Pretty Peacock A4 Cardstock [ 150886 ]")
![Granny Apple Green A4 Cardstock [ 147014 ]](https://assets1.tamsnetwork.com/images/EC042017NF/147014s.jpg "Granny Apple Green A4 Cardstock [ 147014 ]")
![Basic White A4 Cardstock [ 166781 ]](https://assets1.tamsnetwork.com/images/EC042017NF/166781s.jpg "Basic White A4 Cardstock [ 166781 ]")
![Granny Apple Green Stampin' Blends Combo Pack [ 154885 ]](https://assets1.tamsnetwork.com/images/EC042017NF/154885s.jpg "Granny Apple Green Stampin' Blends Combo Pack [ 154885 ]")
![Pretty Peacock Stampin’ Blends Combo Pack [ 161676 ]](https://assets1.tamsnetwork.com/images/EC042017NF/161676s.jpg "Pretty Peacock Stampin’ Blends Combo Pack [ 161676 ]")
![Granny Apple Green Stampin' Pad [ 147095 ]](https://assets1.tamsnetwork.com/images/EC042017NF/147095s.jpg "Granny Apple Green Stampin' Pad [ 147095 ]")
![Pretty Peacock Classic Stampin’ Pad [ 150083 ]](https://assets1.tamsnetwork.com/images/EC042017NF/150083s.jpg "Pretty Peacock Classic Stampin’ Pad [ 150083 ]")

- SHOP ONLINE – EARN 10% REWARDS ON ALL PURCHASES OVER £20
- PURCHASE A STARTER KIT : Get £155 worth of products for only £99. Choose from current catalogues and any specials available. Free Shipping. Read more
- Subscribe to my Video Tutorials – click here
Your card is so lovely. Thankyou for the instructions to make it. Much appreciated.
You’re very welcome, Lynne. Thank you for taking the time to leave a comment.