
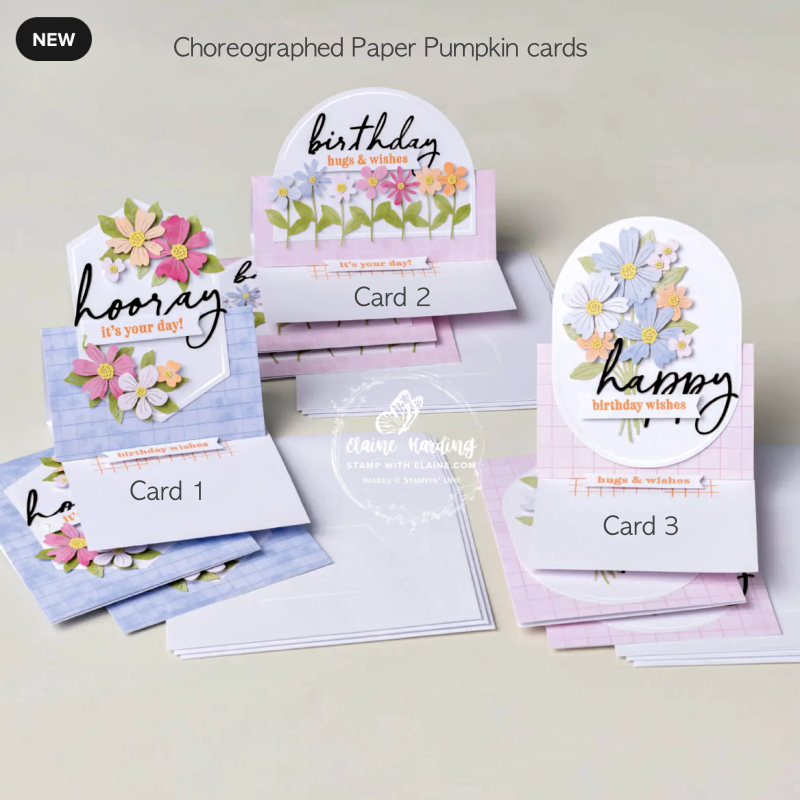
Altered Paper Pumpkin – Hooray for Birthdays. This is the July kit, but unfortunately it had been delayed and I didn’t received it till Saturday 8 August! Better late than never, they say so it was a race to get it done! Grab a cuppa – lots of card alternates and how to cut up your card bases to use as DSP!
The whole point of altering the cards is to make the supplies stretch. I try to stick to just adding card stock and some embellishments and not use extra dies, embossing folders etc. What I did add were some ink pads and Basic White Thick card stock for my card bases and envelopes. Where I ran out of card stock for the Paper Pumpkin kit card bases to use as DSP for my layers, I used the stamps and extra ink pads to create my own.
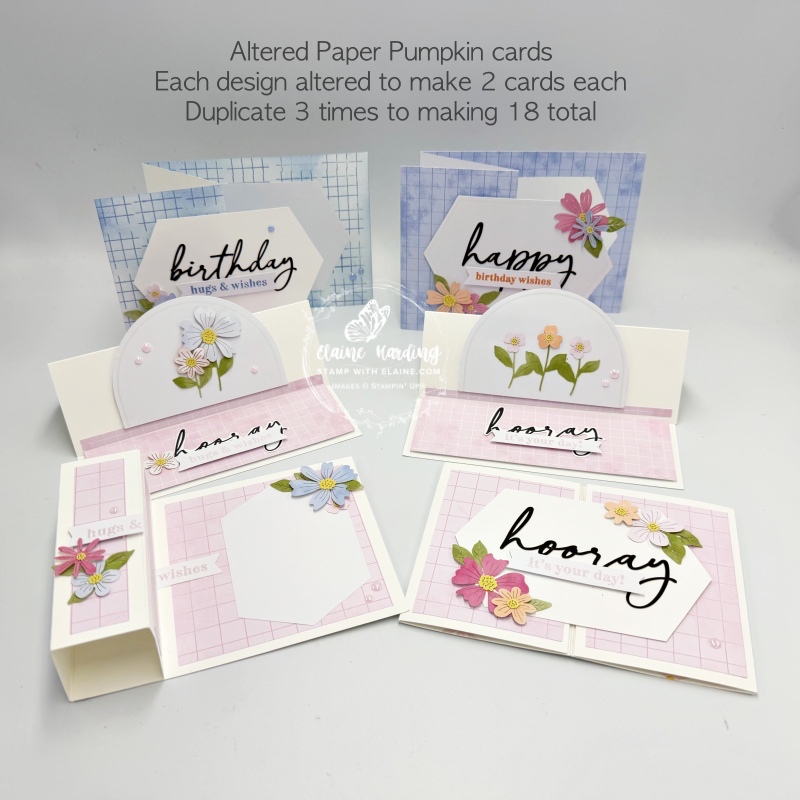
First altered card of Design Card 1 of kit card
I traced round the hexagonal label and cut 9 pieces out of Basic White card stock. You need 18 altogether, but 3 are the original hexagonals from the kit. You need 2 for each z-fold card.
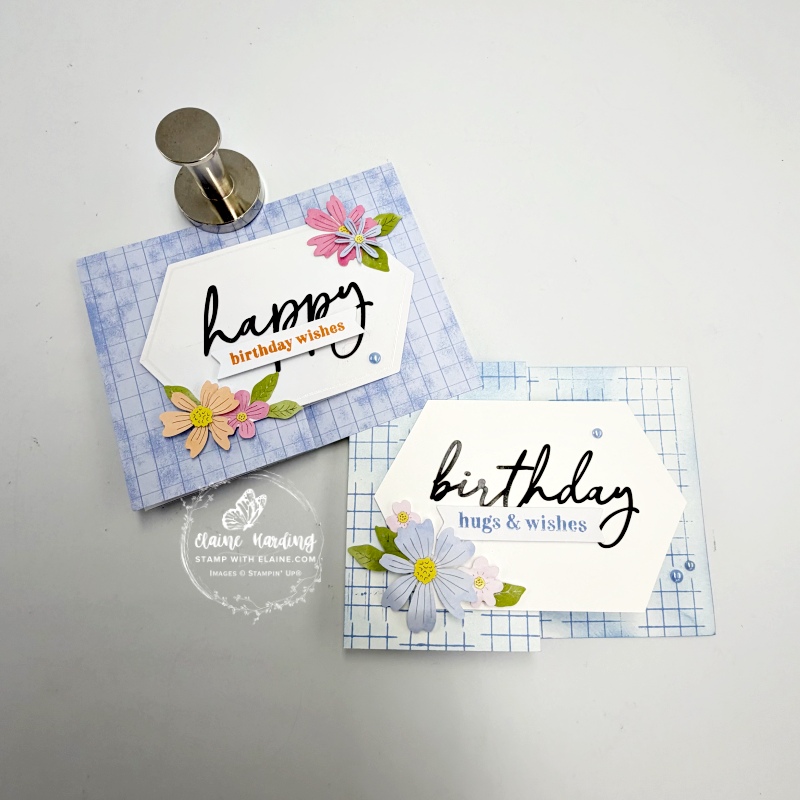
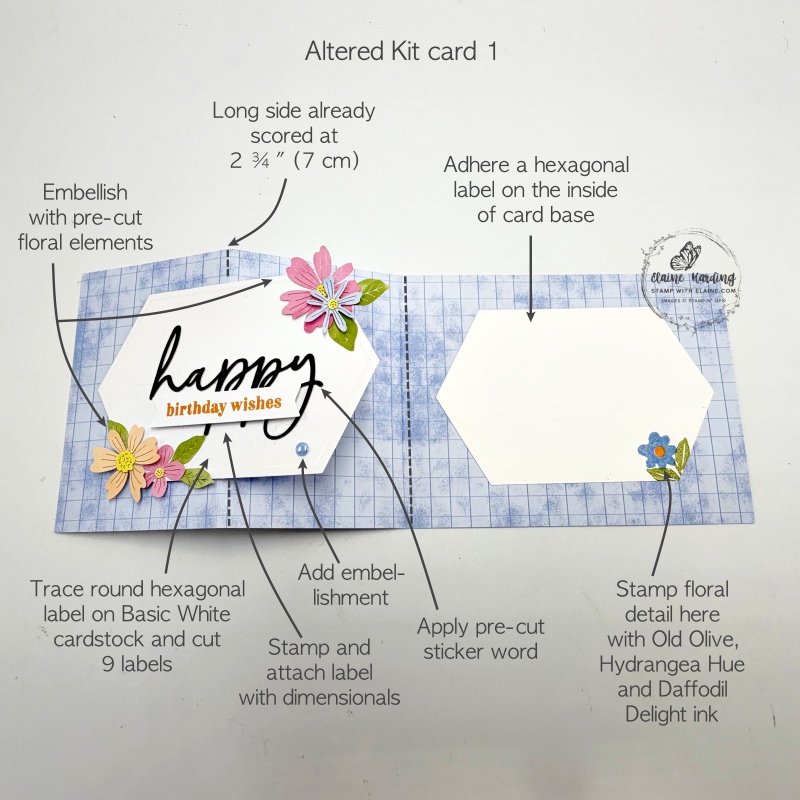
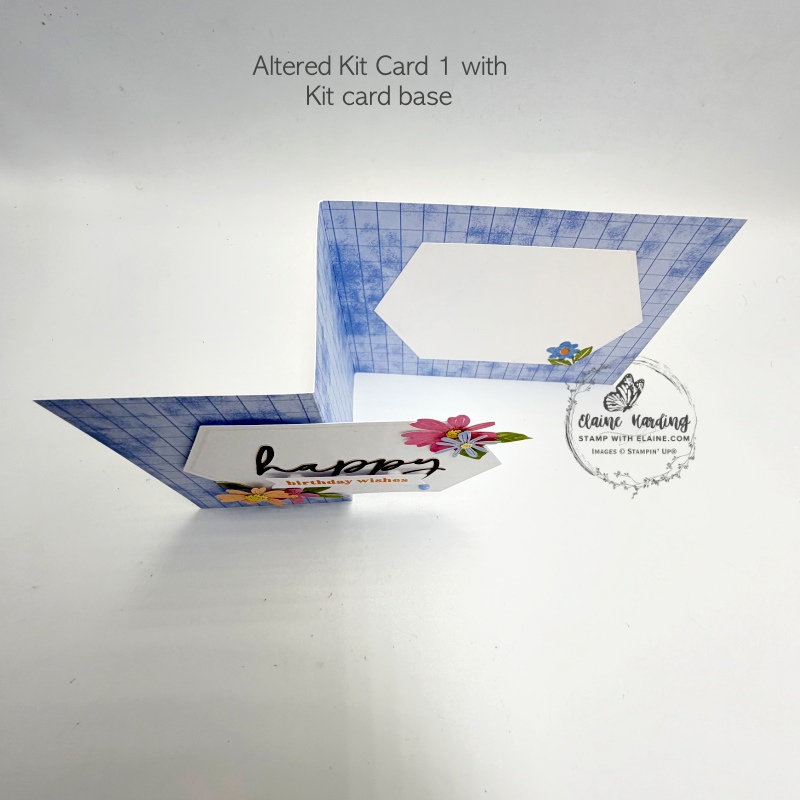
- Use the kit card base provided and orient it in landscape.
- From Basic White card stock, use kit hexagonal label as a template and trace 9 hexagonal shapes then cut them up to use on 6 cards of same design.
- Distribute the flowers for the one choreographed design to share between two cards for each of the 3 sets of Design 1 (6 cards in all).
- Attach pre-cut self-adhesive black word as shown, then stamp greeting on pre-cut tags as desired in coordinating inks Timid Tiger, Hydrangea Hue.
- Inside card – stamp in bottom right corner of Basic White hexagonal label a flower in Hydrangea Hue, flower centre in Daffodil Delight and leaves in Old Olive.
Second altered card for Design 1 Kit card – DIY card base using the stamps and Hydrangea Hue ink
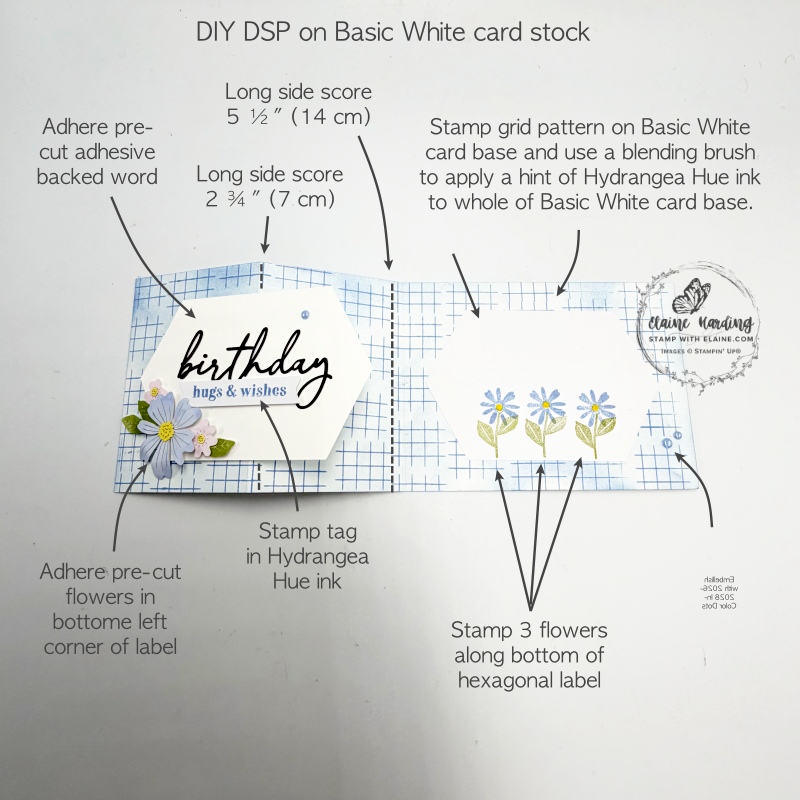
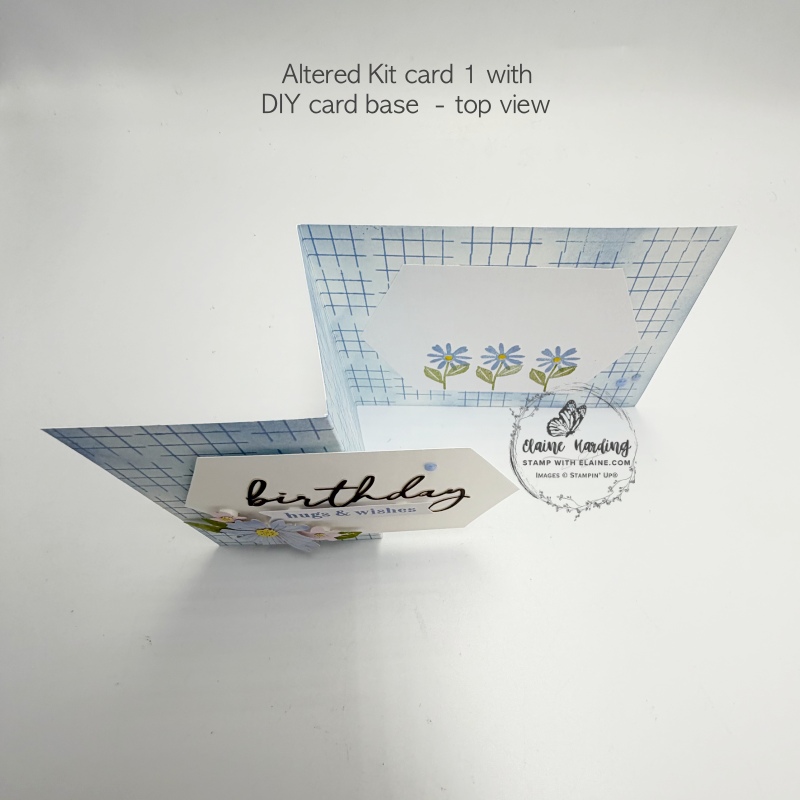
- Cut a Basic White Thick card base 4 ⅛” x 11″ (10.5 cm x 28 cm). On long side score at 2 ¾” and 5 ½” (7 cm and 14 cm)
- Hydrangea Hue ink : Use grid stamp and stamp all over card base in landscape orientation. Then use blending brush to lightly cover whole card with a hint of Hydrangea hue colour.
- Decorate label per picture instructions above on left.
- Stamp on one of the traced and cut Basic White labels with a trio of flowers as shown above and adhere to inside of card as pictured.
Design 3 of kit card with the Oval label – Altered Cards 1 & 2
Cut the oval label from the choreographed Design 3 of Kit card in half to make two cards. Create your own card bases with Basic White Thick card stock.
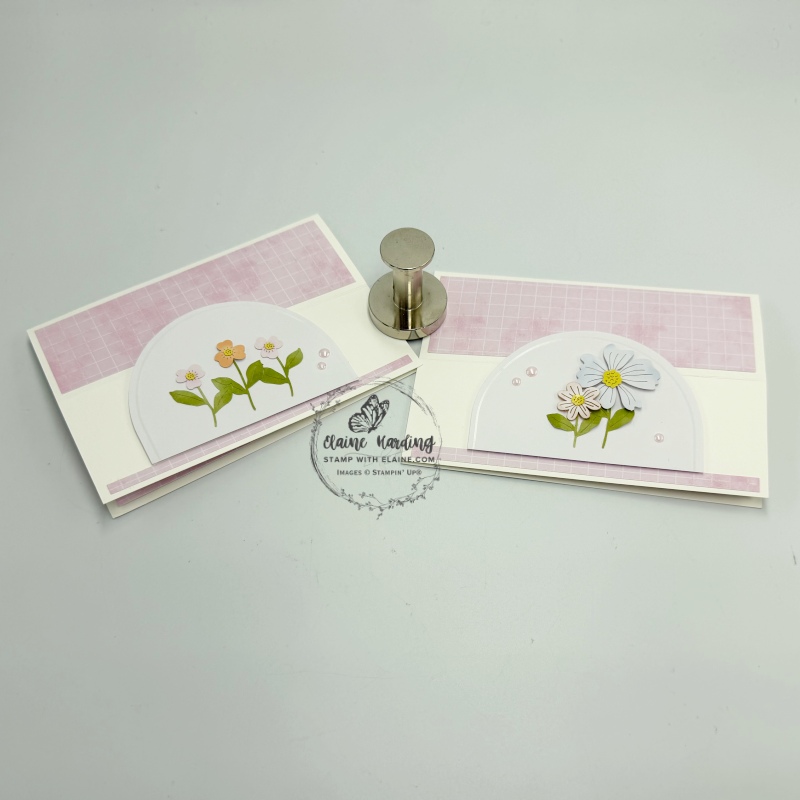
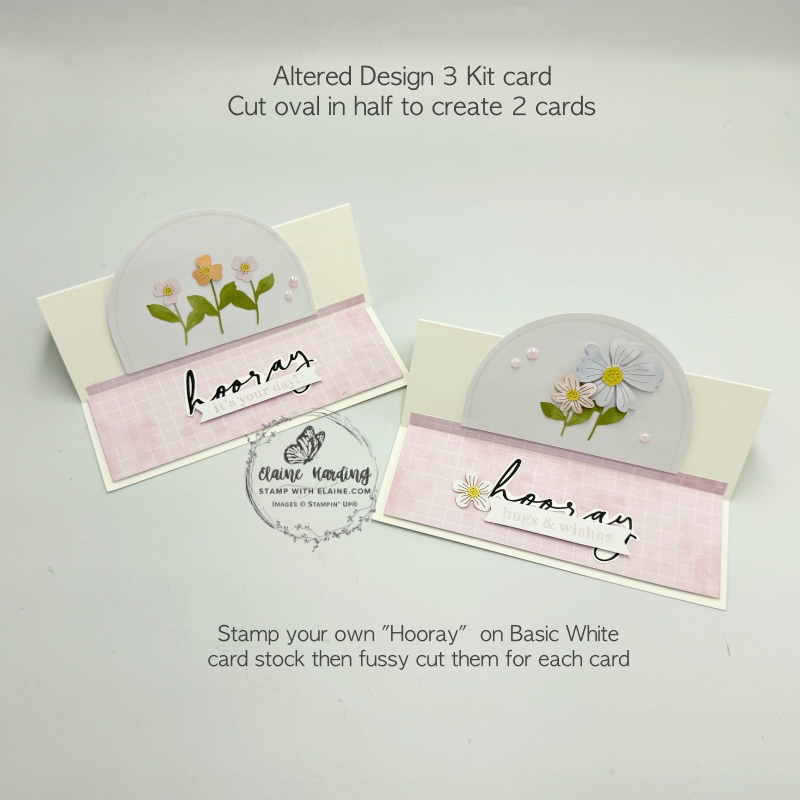
Cutting guide
- Card bases : Basic White Thick card stock – cut 2 pieces at 5 ¾” x 8 ¼” (14.5 cm x 21 cm). On long side score at 2-1/16″ and 4 ⅛” (5.25 cm and 10.5 cm).
- Cut Design 3 kit card base in half on the 5 ½”(14 cm) score line – you should have 2 pieces of equal size. Set aside.
- With the other half of Design 3 kit card base there is a score line at 2 ¾” (7 cm). On the short side, align left edge at 1 ⅞” (4.8 cm) and cut panel for inside card – this will be the stopper mechanism for the landscape easel card.
- Align remaining piece at ¼” to left of cutting groove and cut ¼” strip to adhere to front of easel card.
- With remaining piece, avoid score line and cut another piece measuring 1 ¾” x 5 ½” (4.5 cm x 14 cm). This piece is for adhering to the top panel of the front of the easel card.
- Cut the Oval label in half – offer the straight edge to the top of your trimmer and align left edge of oval at 2 ½” (6.35 cm). Reserve the other for your second card.
Assembling cut pieces
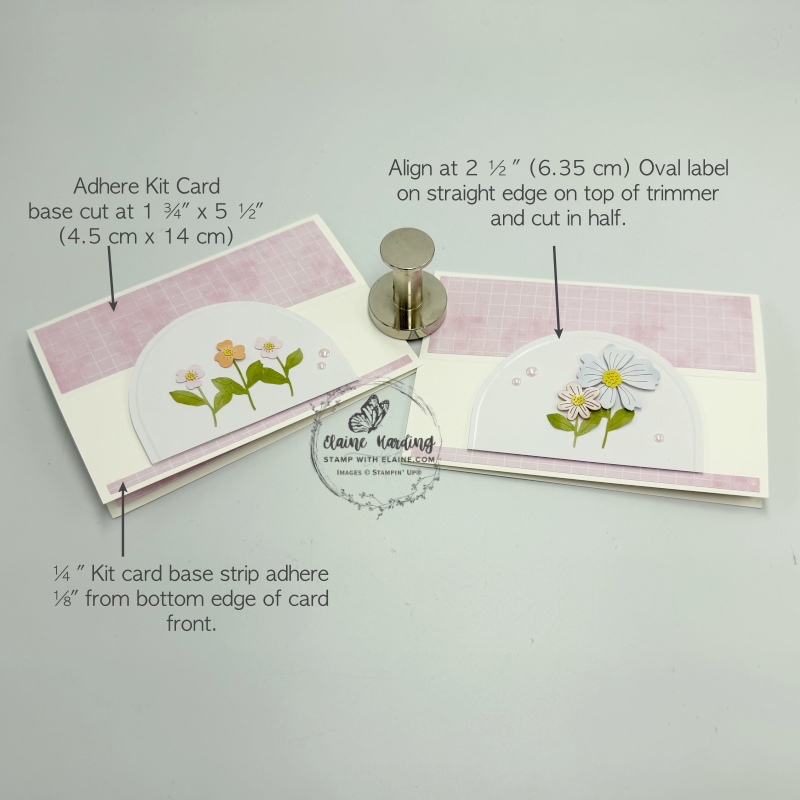
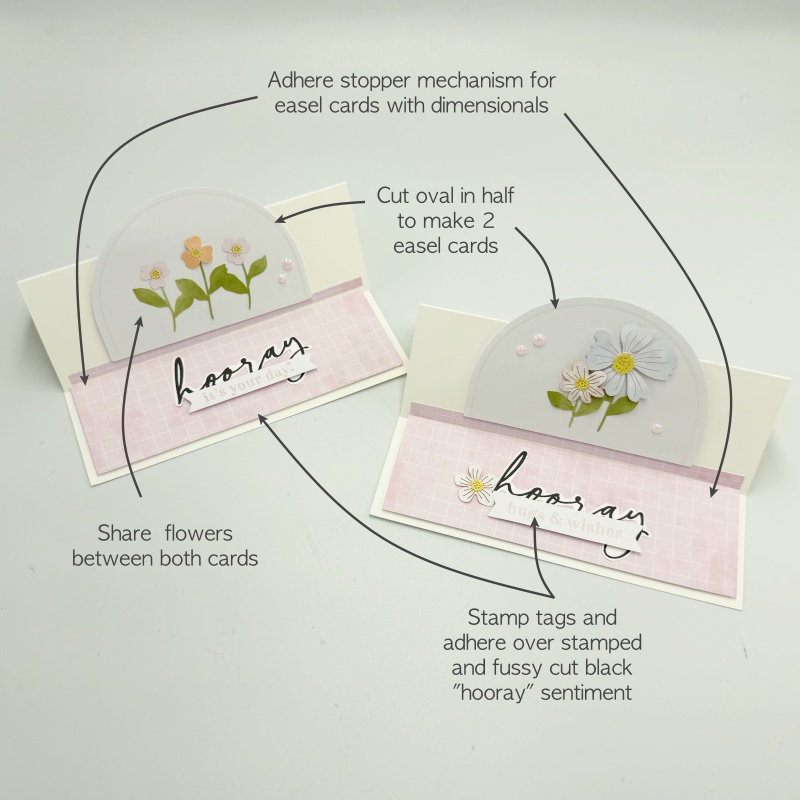
- Follow picture instructions for adhering layers as illustrated in both pictures.
- Share flowers for the creating the one choreographed kit card between the two altered cards.
How to cut leaf sprig
I went off piste for the leaves for these two cards – the sprig is from Design 2 of the choreographed kit card but I used it for the altered card of the Card 3 of the Kit Card Design instead.
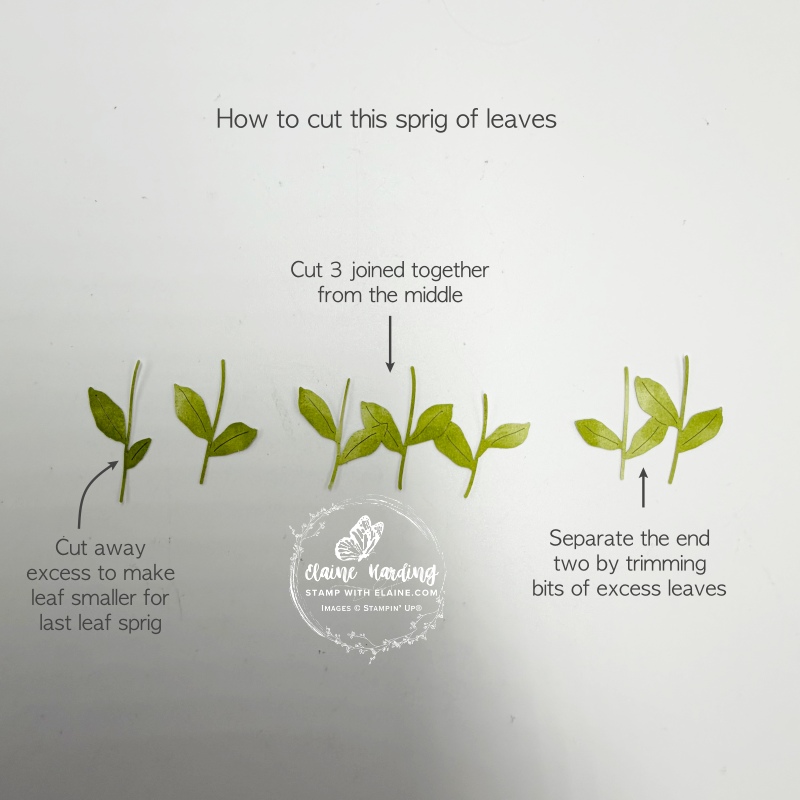
Assembling easel cards
- Follow picture instructions on how to cut this long leaf sprig. I only used two, but reserve the other in case you need them for other cards later.
- Use the 3 leaf one for easel card on the left and the 2 leaf one for the easel card on the right.
- Stamp the word “Hooray” in black ink and fussy cut. Adhere directly on to stopper panel on the inside of card as pictured.
- Put dimensionals on the back of the stopper panel for the easel portion of the card. Adhere with an even border on both sides and bottom of inside of card.
Choreographed Kit Card 2 – made 2 altered fun fold cards
I cut up the card base of this card to use as Designer Series Paper for 2 fun fold cards. I provided my own card bases in Basic White Thick card stock. One is a column card, and the other is an “M” shaped centre gatefold with floating hexagonal panel.
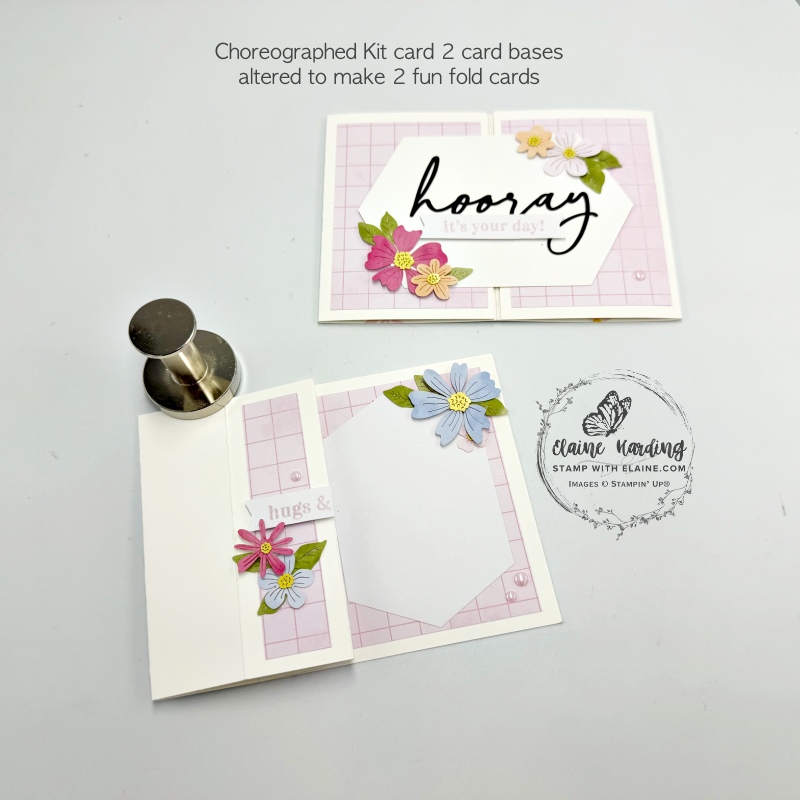
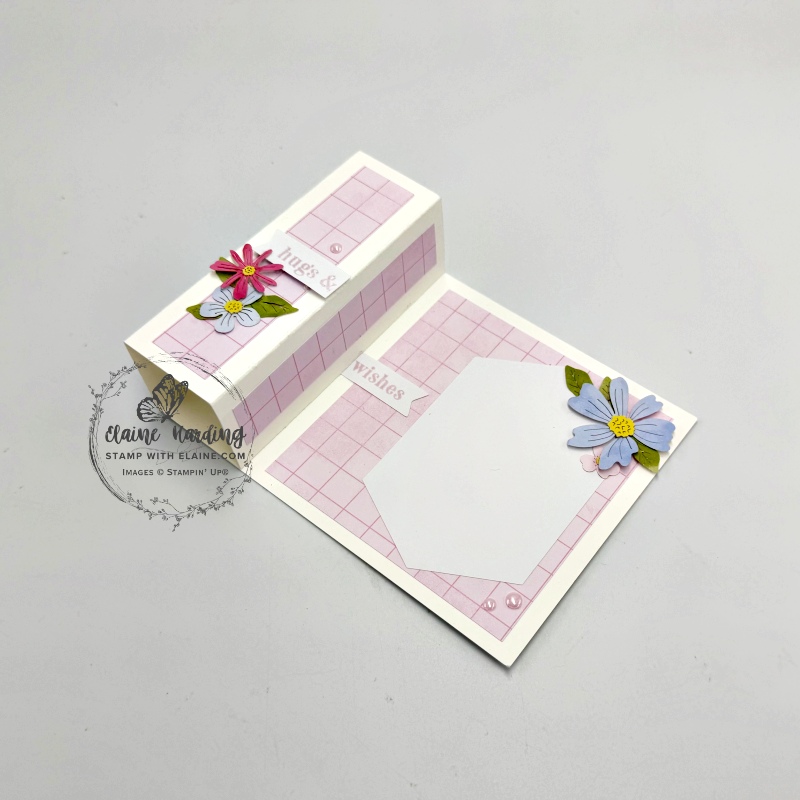
Column card
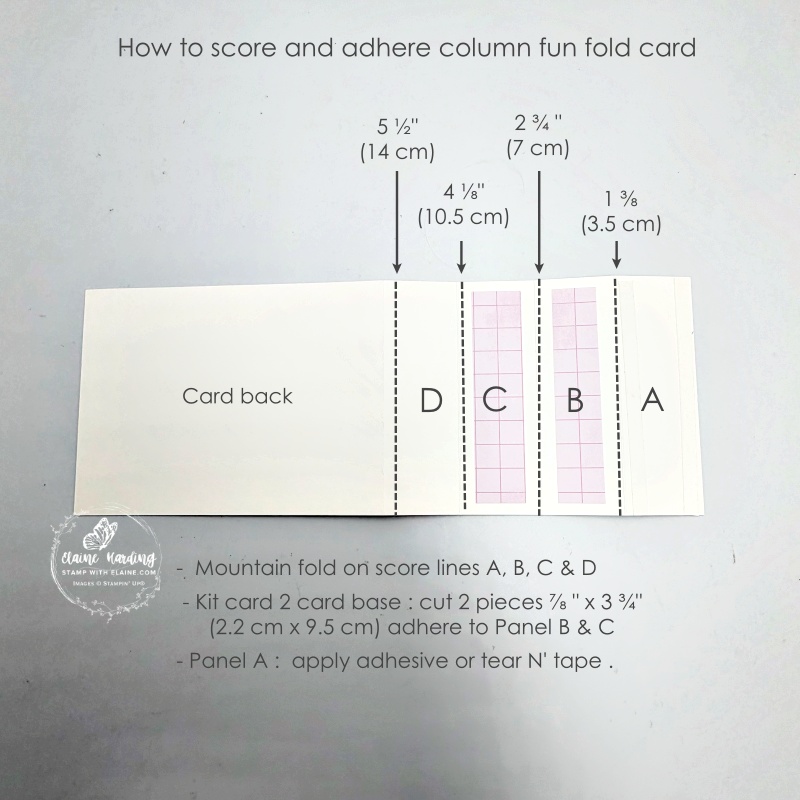
- Basic White Thick card base cut at 4 ⅛” x 11″ (10.5 cm x 28 cm). Long side on top score at 1 ⅜”, 2 ¾”, 4 ⅛” and 5 ½”(3.5 cm, 7 cm, 10.5 cm, 14 cm).
- Pink Kit card 2 card base : cut 2 pieces ⅞” x 3 ¾” and adhere to panels B & C
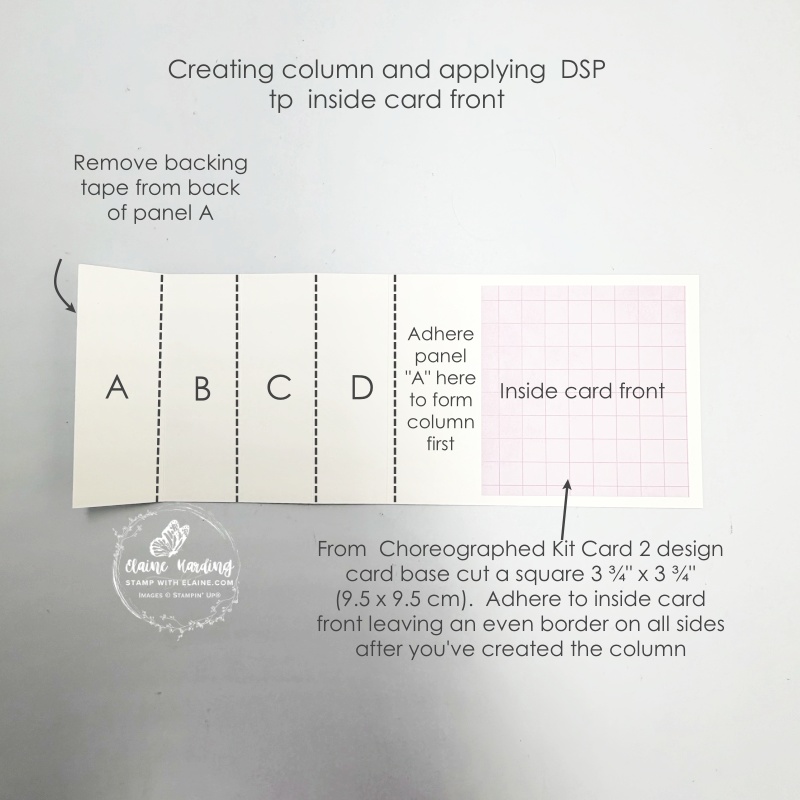
- Next remove backing tape from back of panel A and adhere to inside card front. It should form a square column.
Decorating column card
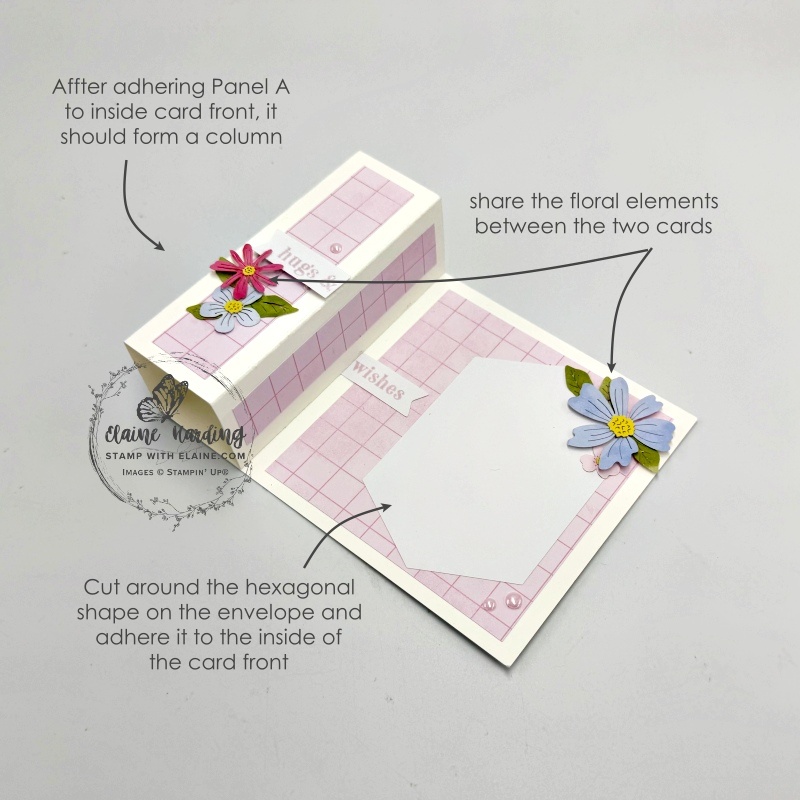
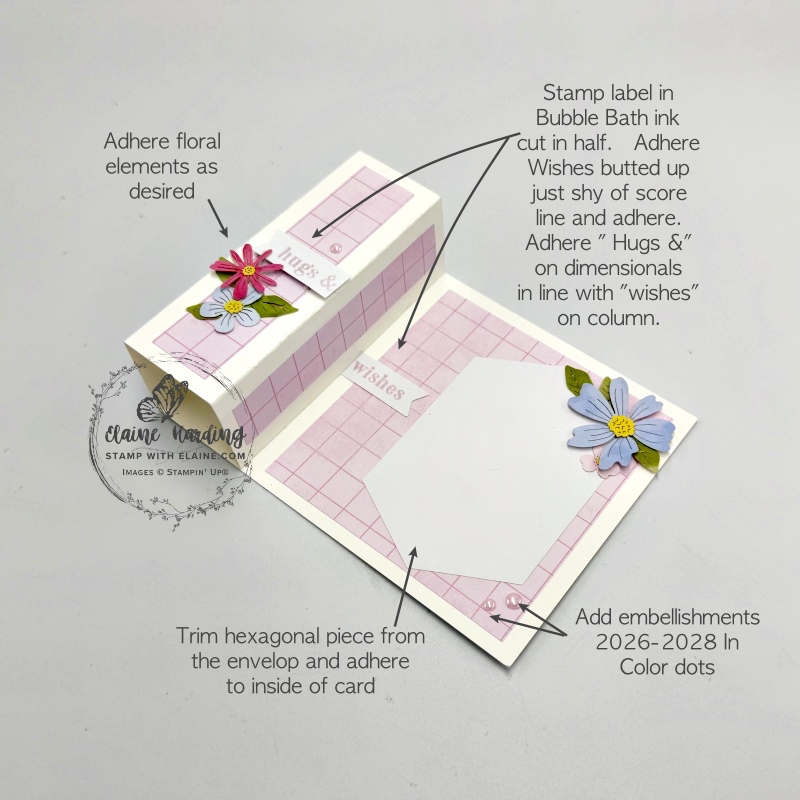
- Follow picture instructions to create the column for the column card.
- Cut the hexagonal shape from the envelop to use as a mat layer for addressing recipient.
- Stamp sentiment on tab and cut into 2 sections – adhere “wishes” to inside card just shy of scoreline.
- Adhere remaining piece on the column aligned with wishes with dimensionals.
- Share flowers between this altered card and reserve some for the other altered card.
Gatefold with floating panel – using Kit Card 2 card base as DSP
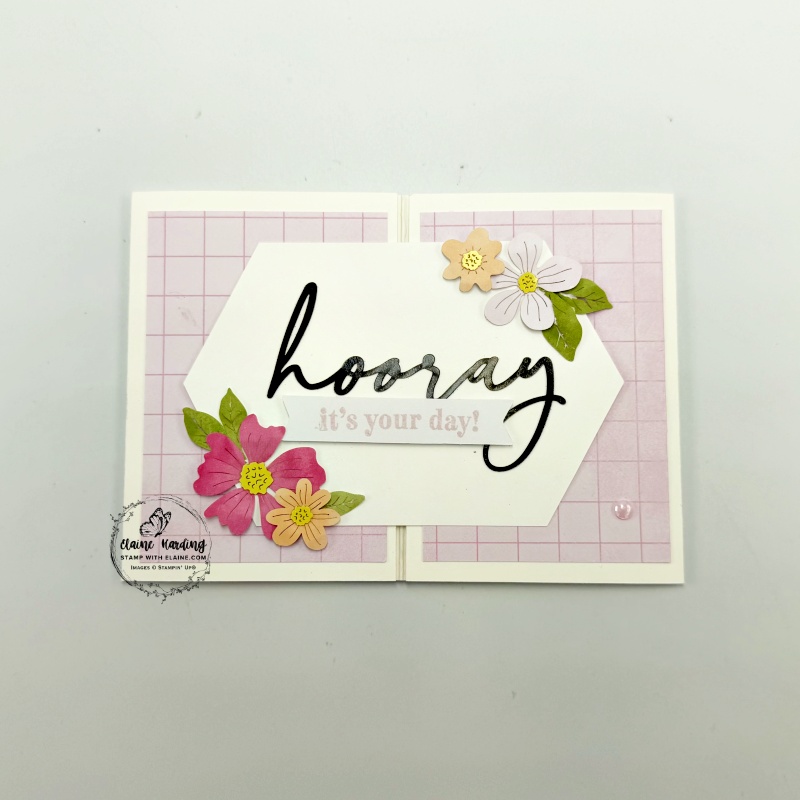
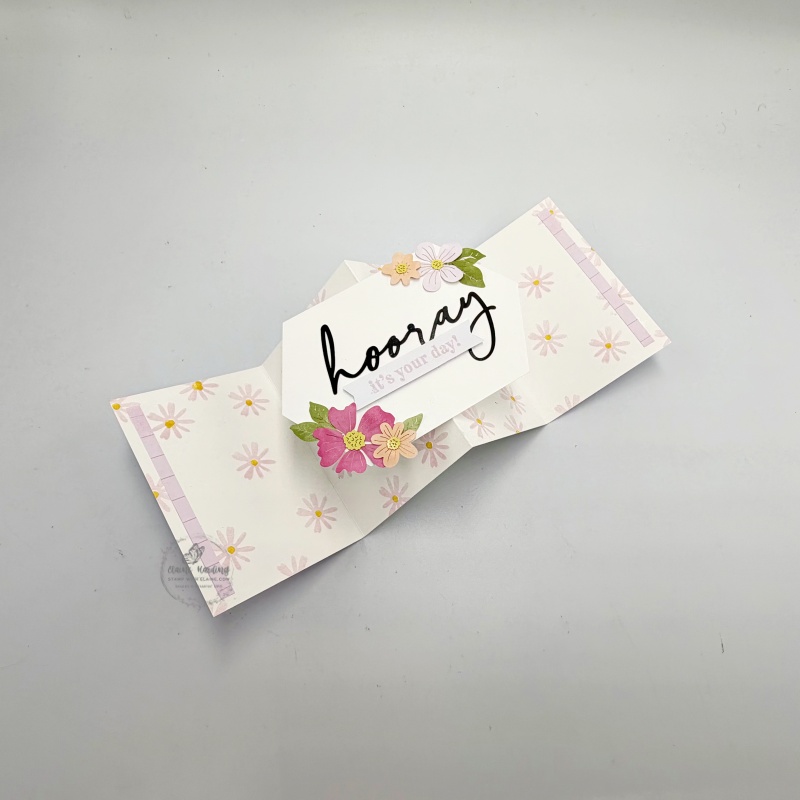
Card base and inside of card
- Card base : Basic White Thick cut at 4 ⅛” x 11 ½” (10.5 cm x 19 cm). Long side on top, score at 2 ⅞”, 5 ¾” then rotate card stock 180 degrees and score other side at 2 ⅞”. (7.3 cm, 14.5 cm – rotate card stock 180 degrees and score other side at 7.3 cm).
- Stamp on inside with the thin petal stamp in Bubble Bath randomly and stamp flower centres with Daffodil Delight.
- Decorate hexagonal label as pictured and set aside.
Front of card
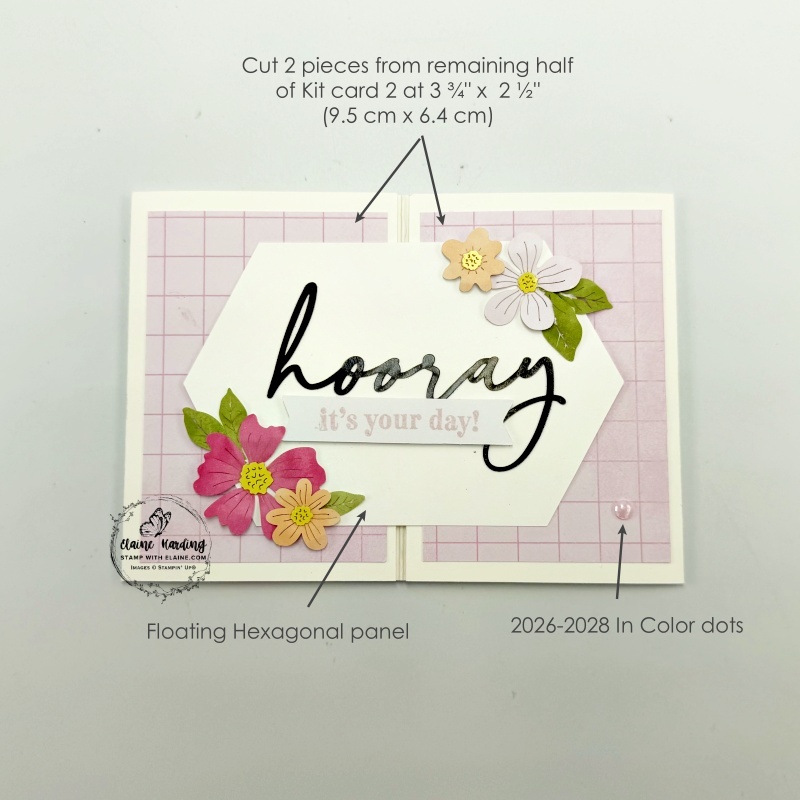
- From remaining half of Choreographed Kit card 2 card base, cut 2 pieces 3 ¾” x 2 ½” (9.5 cm x 6.4 cm)
- Flip card base over to front of card. Adhere each piece as pictured leaving an even border on all 4 sides of each panel when closed.
Floating panel mechanism
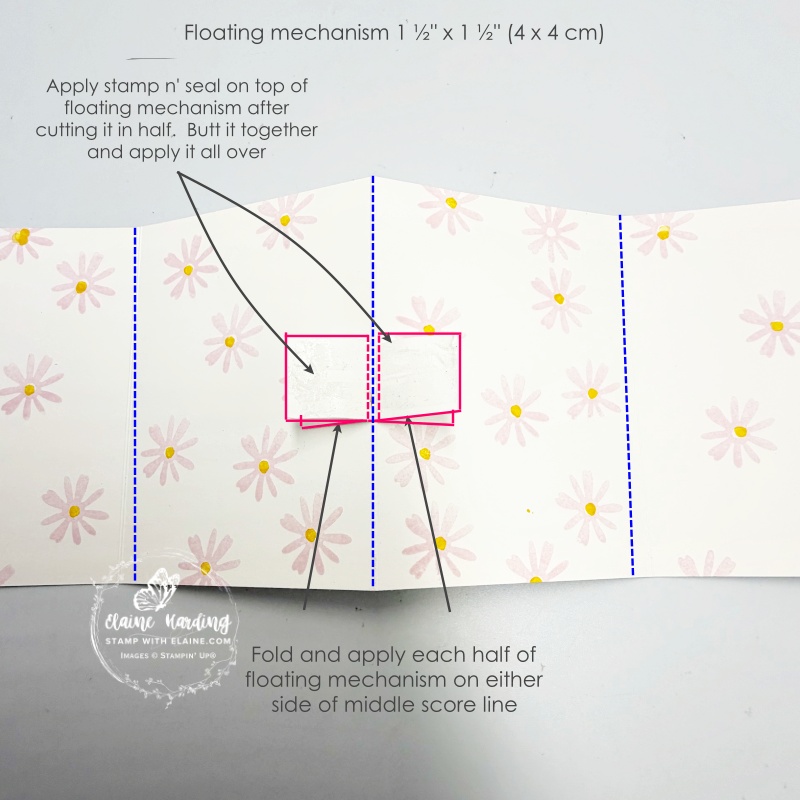
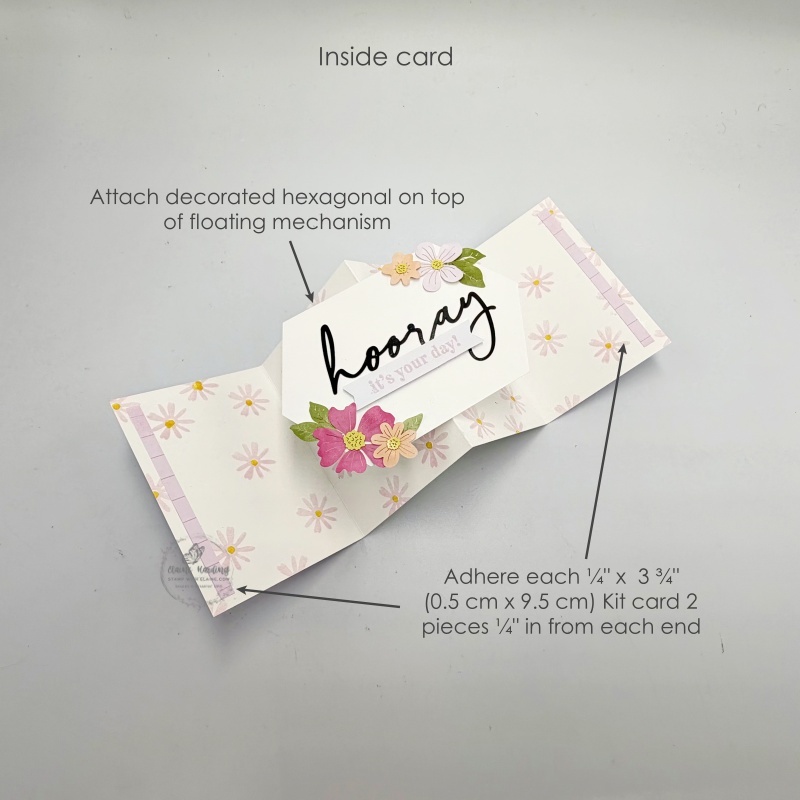
- Cut a piece of scrap Basic White card stock 1 ½” x 1 ½” (4 x 4 cm).
- Score at ¾” (2 cm).
- Rotate card stock so that score line is horizontal. Align at left edge at ¾” (2 cm) and cut in half.
- Butt the two pieces together and apply stamp n’ seal. Fold each half back and centre on card base and adhere either side of middle score line as pictured. Sticky side on top half should be face up and the other sticky side will stick to card base.
- Lay card flat and adhere decorated hexagonal panel on top of sticky floating mechanism to complete card.
I hope these cards have inspired you to stretch your supplies too. Thanks for stopping by!
Supply list
Listed below is the supply list. Just click on the picture to take you directly to the item in my online store.
Product List![Paper Pumpkin Subscription [ 166815 ]](https://assets1.tamsnetwork.com/images/EC042017NF/166815s.jpg "Paper Pumpkin Subscription [ 166815 ]")
![Paper Pumpkin 3 Month Subscription [ 166816 ]](https://assets1.tamsnetwork.com/images/EC042017NF/166816s.jpg "Paper Pumpkin 3 Month Subscription [ 166816 ]")
![Paper Pumpkin 6 Month Subscription [ 166817 ]](https://assets1.tamsnetwork.com/images/EC042017NF/166817s.jpg "Paper Pumpkin 6 Month Subscription [ 166817 ]")
![Paper Pumpkin 12 Month Subscription [ 166818 ]](https://assets1.tamsnetwork.com/images/EC042017NF/166818s.jpg "Paper Pumpkin 12 Month Subscription [ 166818 ]")
![Basic White A4 Thick Cardstock [ 159230 ]](https://assets1.tamsnetwork.com/images/EC042017NF/159230s.jpg "Basic White A4 Thick Cardstock [ 159230 ]")
![Bubble Bath A4 Cardstock [ 161727 ]](https://assets1.tamsnetwork.com/images/EC042017NF/161727s.jpg "Bubble Bath A4 Cardstock [ 161727 ]")
![Bubble Bath Classic Stampin' Pad [ 161664 ]](https://assets1.tamsnetwork.com/images/EC042017NF/161664s.jpg "Bubble Bath Classic Stampin' Pad [ 161664 ]")
![Daffodil Delight Classic Stampin' Pad [ 147094 ]](https://assets1.tamsnetwork.com/images/EC042017NF/147094s.jpg "Daffodil Delight Classic Stampin' Pad [ 147094 ]")
![Hydrangea Hue Classic Stampin' Pad [ 167677 ]](https://assets1.tamsnetwork.com/images/EC042017NF/167677s.jpg "Hydrangea Hue Classic Stampin' Pad [ 167677 ]")
![Old Olive Classic Stampin' Pad [ 147090 ]](https://assets1.tamsnetwork.com/images/EC042017NF/147090s.jpg "Old Olive Classic Stampin' Pad [ 147090 ]")
![Basic Black Hybrid Stampin' Pad [ 166648 ]](https://assets1.tamsnetwork.com/images/EC042017NF/166648s.jpg "Basic Black Hybrid Stampin' Pad [ 166648 ]")
![Blending Brushes [ 153611 ]](https://assets1.tamsnetwork.com/images/EC042017NF/153611s.jpg "Blending Brushes [ 153611 ]")
![Paper Trimmer [ 152392 ]](https://assets1.tamsnetwork.com/images/EC042017NF/152392s.jpg "Paper Trimmer [ 152392 ]")

- SHOP ONLINE – EARN 10% REWARDS ON ALL PURCHASES OVER £20
- PURCHASE A STARTER KIT : Get £155 worth of products for only £99. Choose from current catalogues and any specials available. Free Shipping. Read more
- Subscribe to my Video Tutorials – click here
