
Fun fold birthday card with Sunset Coast. Another sneak peek, this time from the Sunset Coast Suite collection. The thing that drew me toward this set were the vibrant Scenic Coast 6″ x 6″ (15.2 x 15.2 cm) Designer Series Papers (DSP). Stunning coastal sunsets featured on one side and versatile patterns on the other. Some sheets feature iridescent details that shift colour as you move them.
It includes coordinating stamps and dies that you can use to build detailed coastal scenes with sailboats, seashells, rock formations, and lighthouses. The sentiments are perfect for retirement, anniversary, or new adventure cards. So here’s what I made! Pretty minimilistic because the papers do all the talking! Ideal for the busy crafter if you’re strapped for time!
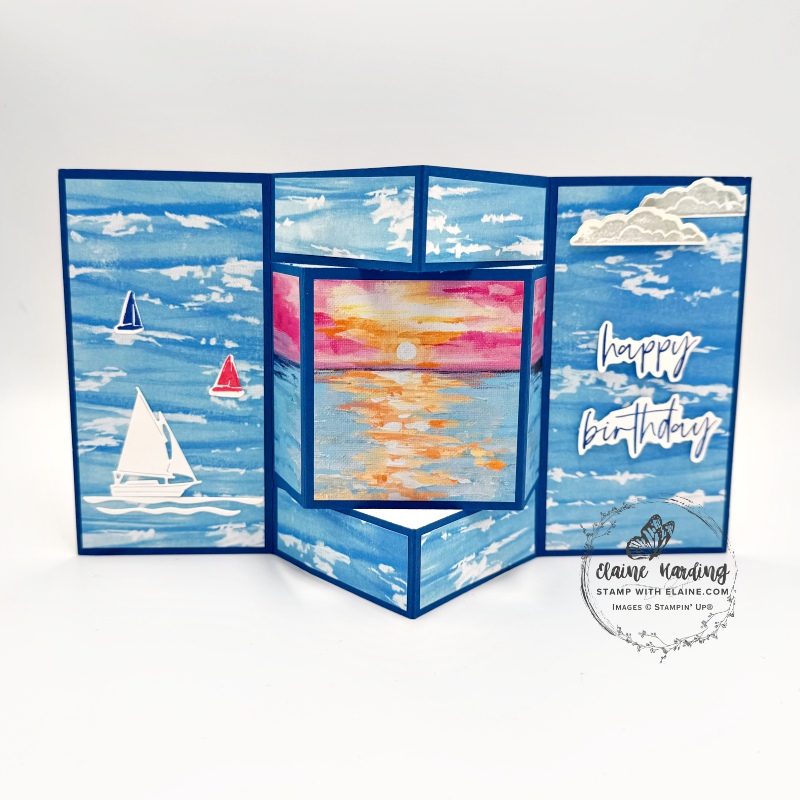
Inverted Bay window fun fold
The inverted Bay Window fold is easier than you think. There’s a picture to follow in the cutting guide. I’ve also used a stamp set called “Fabulous Sayings” which was January’s Product of the Month which is sadly no longer available. If you were fortunate enough to acquire it (with a qualifying order of £70 excluding shipping) for a mere £5.00 as a one time purchase, it is a useful addition to your stash and can be used for so many occasions.
Cutting guide
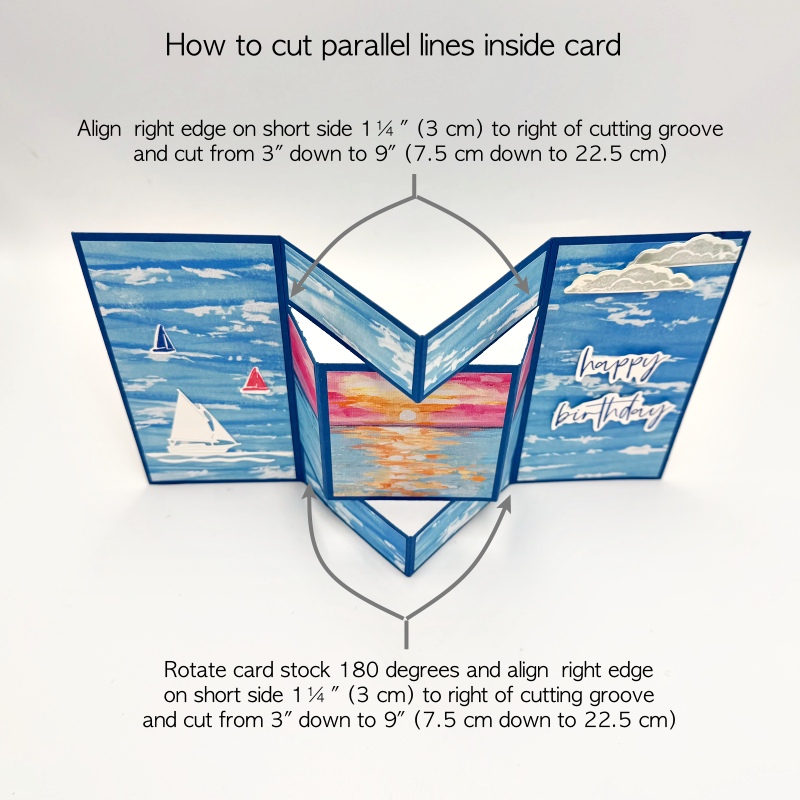
- Card base measures 12″ x 5 ¾” (30 cm x 14.5 cm). On the short side, align right edge at 1 ¼” (3 cm) to right of cutting groove and cut from 3″ down to 9″. In metric, align at 3 cm and cut from 7.5 cm down to 22.5 cm)
- Rotate card stock 180 degrees and repeat i.e., align right edge at 1 ¼” (3 cm) to right of cutting groove and cut from 3″ down to 9″. In metric, align at 3 cm and cut from 7.5 cm down to 22.5 cm).
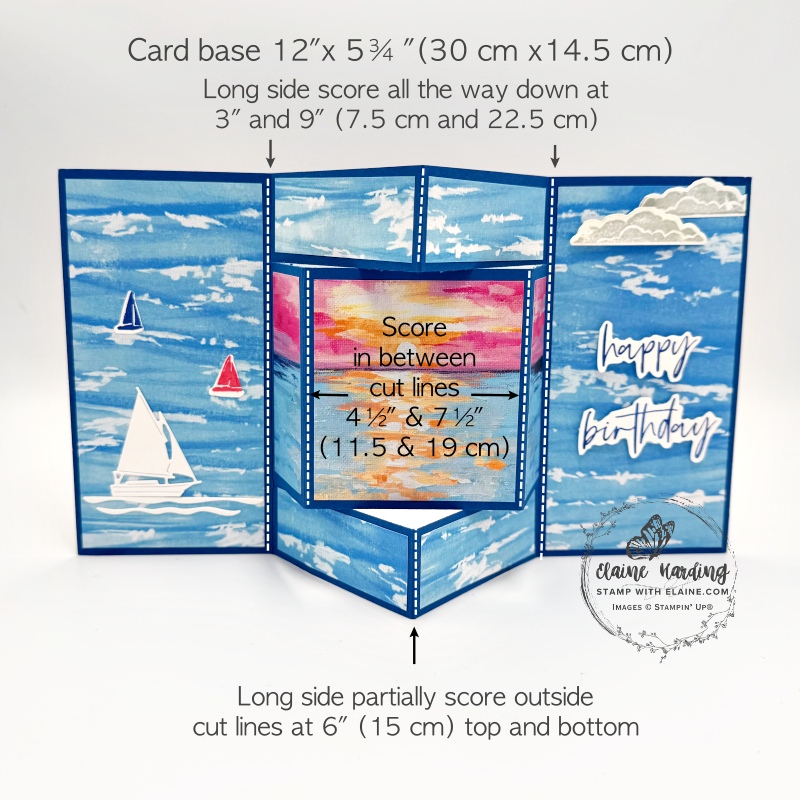
- On long side score all the way down at 3″ and 9″ (7.5 cm and 22.5 cm)
- Partially score between cut lines on long side at 4 ½” and 7 ½” (11.5 cm & 19 cm)
- Next partially score on long side outside cut lines at 6″ top and bottom (15 cm)
Cutting DSP pieces
If using a directional pattern paper, be wary of its orientation and cutting equal amounts on all sides to keep key feature central on the “D” panel. I used Scenic Coast 6″ x 6″ (15.2 x 15.2 cm) Designer Series Paper which will be available from May 5th, 2026.
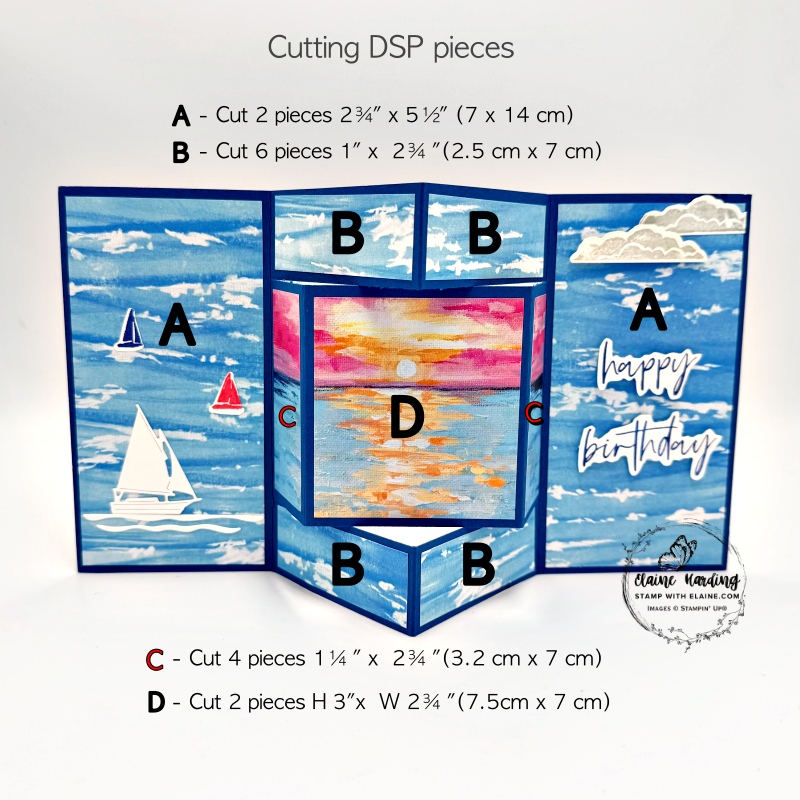
- Panels A card front – cut 2 pieces at 2 ¾” x 5 ½” (7 cm x 14 cm)
- “B” Panels for front and back – cut 8 pieces (4 for front and 4 for back) at 1 ” x 2 ¾”(2.5 cm x 7 cm)
- “C” Panels for front and back – cut 4 pieces (2 for front and 2 for back) at 1 ¼” x 2 ¾” (3.2 cm x 7 cm)
- “D” Panels for front and back – cut 2 pieces (1 for front and 1 for back) at H 3″ x W 2 ¾” (H 7.5 cm x W 7 cm)
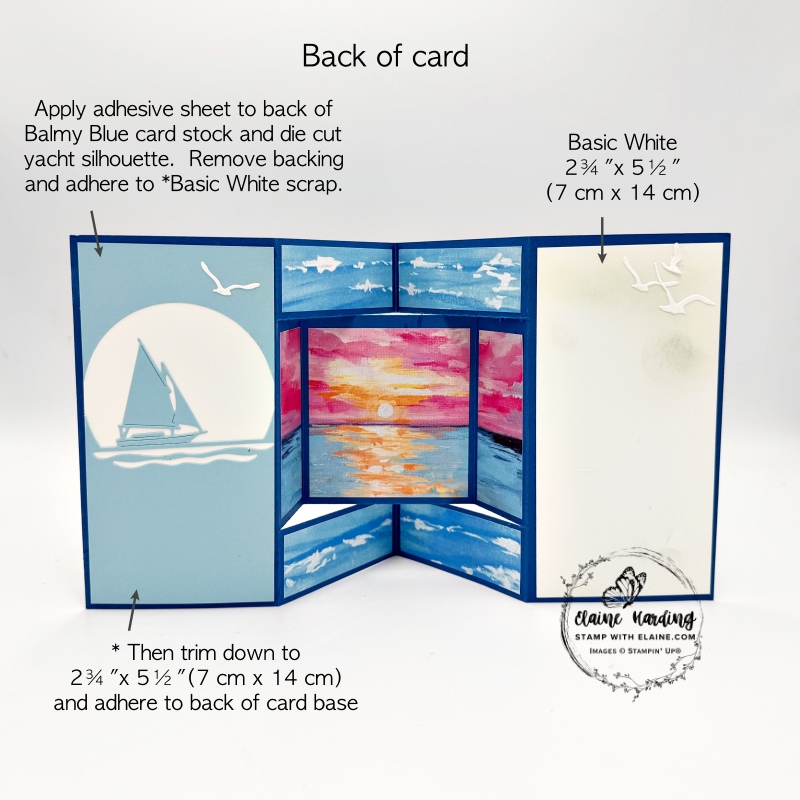
Back of card A panels
- Die cut yacht motif and sea out of Balmy Blue 3″ x 5 ¾” card stock which has adhesive sheet attached on back.
- Remove backing tape and adhere die cut yacht motif on Basic White scrap of similar size then trim both pieces to measure 2 ¾” x 5 ½” (7 cm x 14 cm) and adhere to back of left “A” panel as pictured above.
- Cut Basic White Panel A for right side at 2 ¾” x 5 ½” (7 cm x 14 cm). Use blending brush to lightly colour card stock with Cloud Cover stampin’ spot and adhere to right side Panel A as pictured.
Die cutting elements
- Apply adhesive sheet to back of scrap of Basic White and die cut seagulls. Also die cut yacht and “sea”.
- Stamp Basic White die cut clouds with Cloud Cover ink.
- Use Blueberry Bushel and Strawberry Slush ink to stamp the two tiny yachts and die cut with corresponding dies.
- Stamp “Happy birthday” from Fabulous Sayings stamp set and fussy cut.
Card Assembly
Front of card
- Burnish all score lines. Valley fold on 3″ (7.5 cm) score line. Mountain fold on 2 ¼”, 6″ and 7 ½” (11.5, 15, and 19 cm) score lines and Valley fold on 9″ (22.5 cm) score line.
- Adhere DSP to Panels “A”, “B”, “C” and “D” as pictured. Then adhere large white yacht and stamped Blueberry Bushell and Strawberry Slush yachts on panel “A” on left.
- Apply adhesive on back of one of the clouds and adhere as shown in top right corner on right side Panel “A”. Put dimensionals on back of 2nd cloud and stagger and adhere to left of first cloud.
- Put dimensionals on back of both words and stagger and adhere greeting as pictured above.
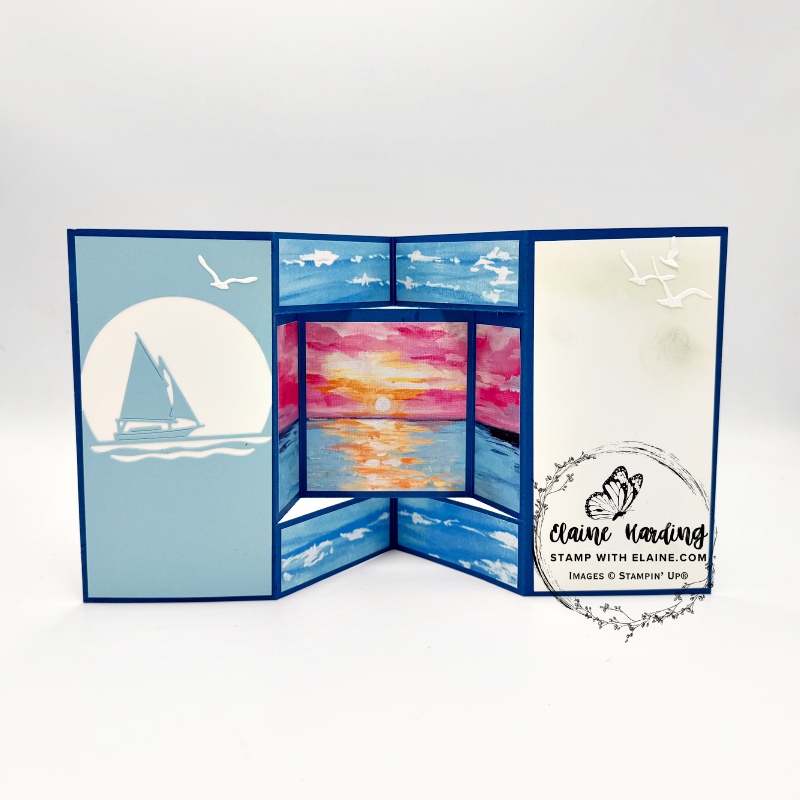
Back of card
- Apply adhesive sheet to back of Balmy Blue card stock. Die cut with yacht silhouette die, peel off backing and adhere to Basic White card stock of similar size. After adhering both pieces, trim to W 2 ¾” x H 5 ½” (W 7 cm x H 14 cm) and adhere to back of card as pictured.
- Adhere remaining DSP pieces to corresponding panels to mirror panels “B”, “C” and “D” on card front.
- Use blending brush to lightly add some colour in Cloud Cover to Basic White piece. Adhere sea gulls as pictured to finish.
As this is a sneak peek, I am not able to add supply links yet. These will be added when they are available.

- SHOP ONLINE – EARN 10% REWARDS ON ALL PURCHASES OVER £20
- PURCHASE A STARTER KIT : Get £155 worth of products for only £99. Choose from current catalogues and any specials available. Free Shipping. Read more
- Subscribe to my Video Tutorials – click here
Pingback: Kiddies birthday - Sweet Bugs - Stamp with Elaine