
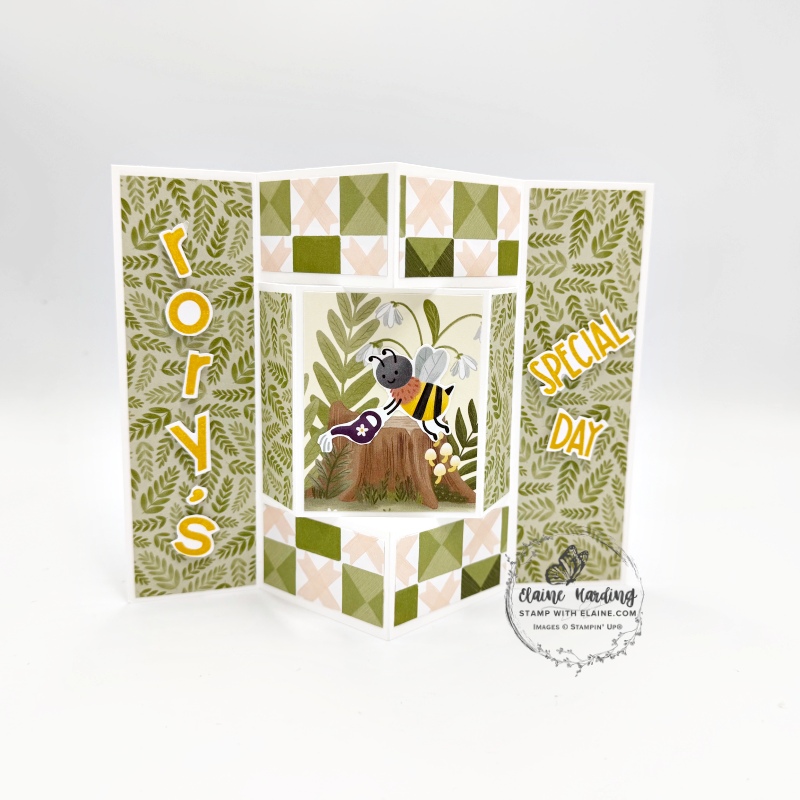
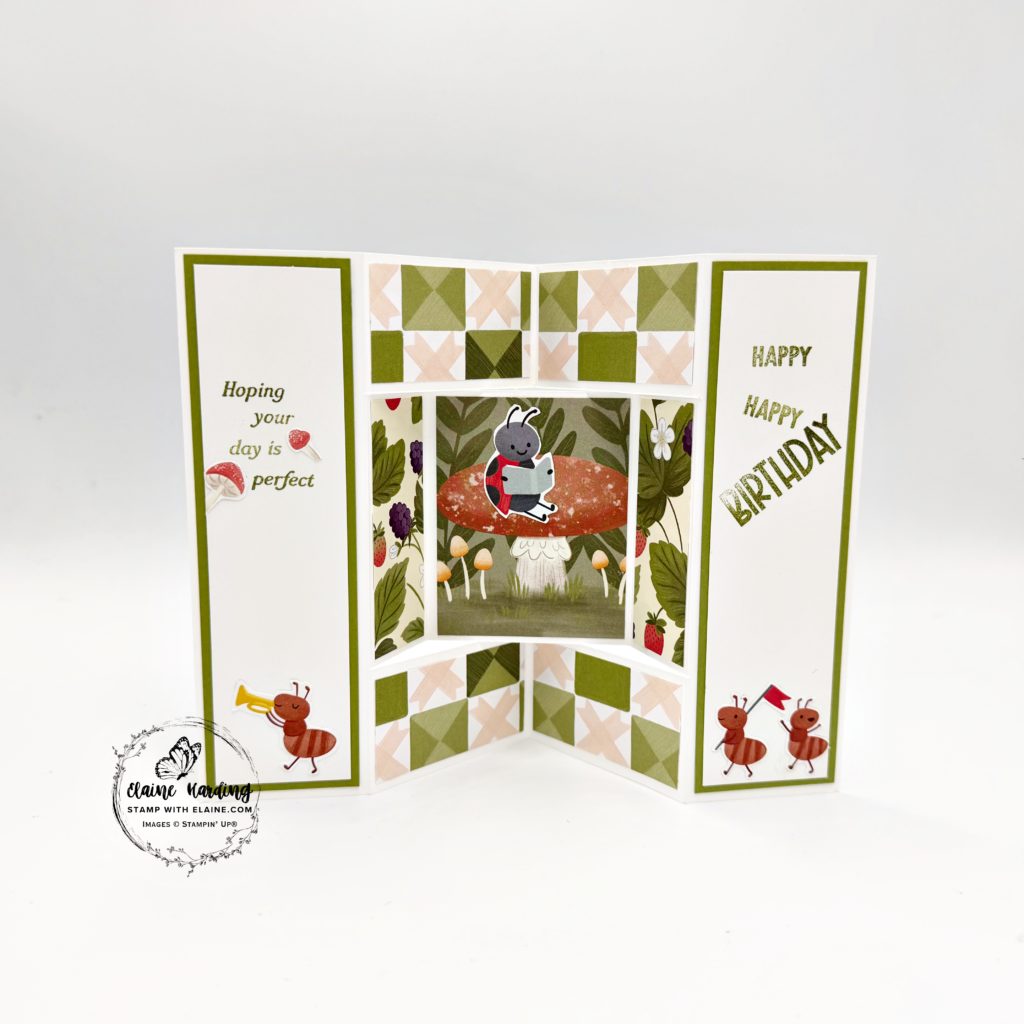
Kiddies birthday – Sweet Bugs. I made a smaller version of a fun fold card – an inverted bay window card so that it would fit in a C6 envelope. In a previous post, I made it from 12″x 12″ card stock which you can see HERE.
The papers are from the Cute as a Bug Suite collection which was in the January-May 2026 mini catalogue on pages 42-25. The Cute as a Bug 12″x 12″ (30.5 x 30.5 cm) DSP proved really popular and had to be restocked a couple of times. They feature lovely ladybugs, fluttering friends, picnic-perfect prints, and is sure to “bug” you in the best way.
Cutting guide
- Card base : Basic White 5 ¾”x 8 ¼”(14.5 cm x 21 cm). On long side score all the way from top to bottom at 1 ¾” and 6 ½” (4.5 cm and 16.5 cm) first. This will enable you to make your internal cuts.
- On short side, align right edge at 1 ¼” (3.5 cm) and cut between score lines at 1 ¾” down to 6 ½” (4.5 cm down to 16.5 cm)
- Rotate card stock 180 degrees and repeat. Align right edge at 1 ¼” (3.5 cm) and cut between score lines at 1 ¾” down to 6 ½” (4.5 cm down to 16.5 cm).
- Partially score between two cut lines at 3″ and 5 ¼” (7.5 cm and 13.5 cm)
- Outside cut lines score at 4 ⅛” top and bottom (10.5 cm)
Burnishing tips
The black dashed lines are Valley folds, the red dashed lines represent Mountain folds in between the cut lines and the blue dashed lines are Mountain folds on the external score lines.
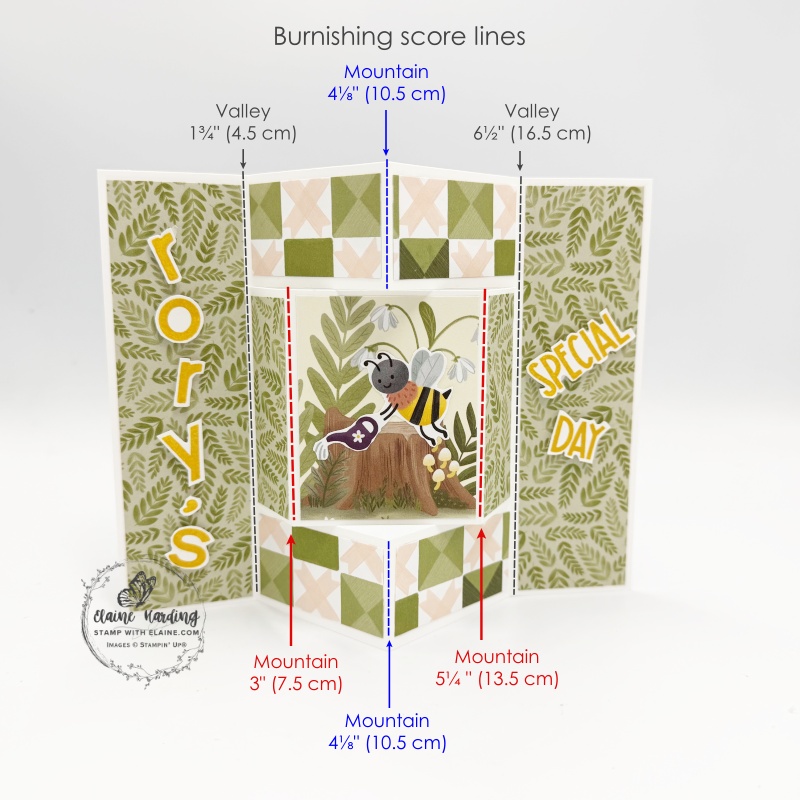
- 1 ¾” (4.5 cm) score line Valley fold.
- Partially scored lines in between cut lines and outside score lines at 3″, 4 ⅛” and 5 ¼ ” (7.5 cm, 10.5 cm and 13.5 cm) are all Mountain folds.
- 6 ½” (16.5 cm) score line is a Valley fold.
DSP Pieces
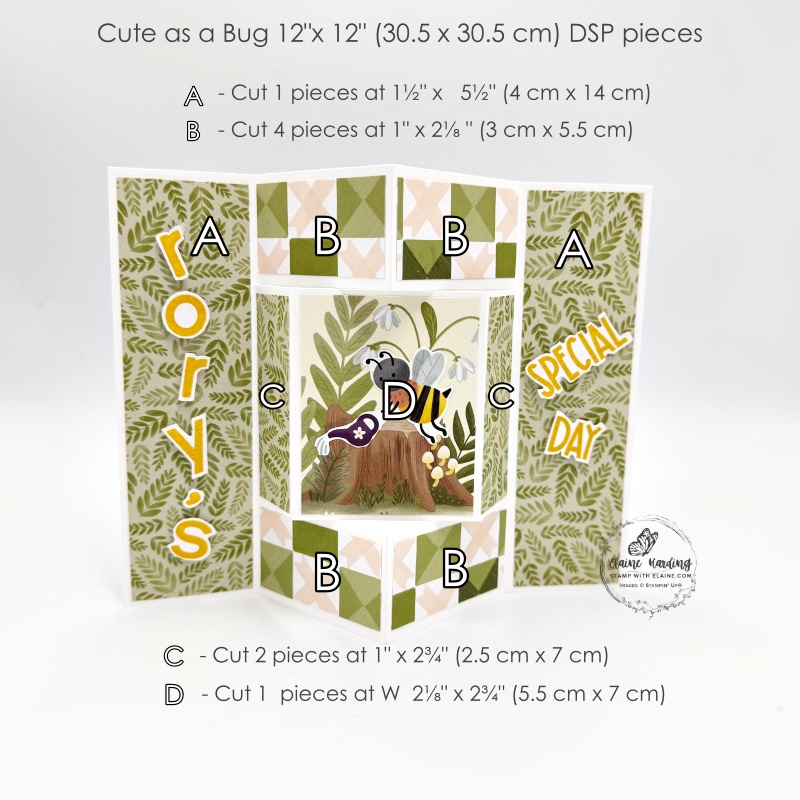
Front of card
- “A” panels – cut 2 pieces at 1 ½” x 5 ½”(4 cm x 14 cm)
- “B” panels – cut 4 pieces at 1″ x 2 ⅛” (3 cm x 5.5 cm)
- “C” panels – cut 2 pieces at 1″ x 2 ¾” (2.5 cm x 7 cm)
- “D” panel – cut 1 piece at W 2 ⅛” x H 2 ¾” (5.5 cm x 7 cm)
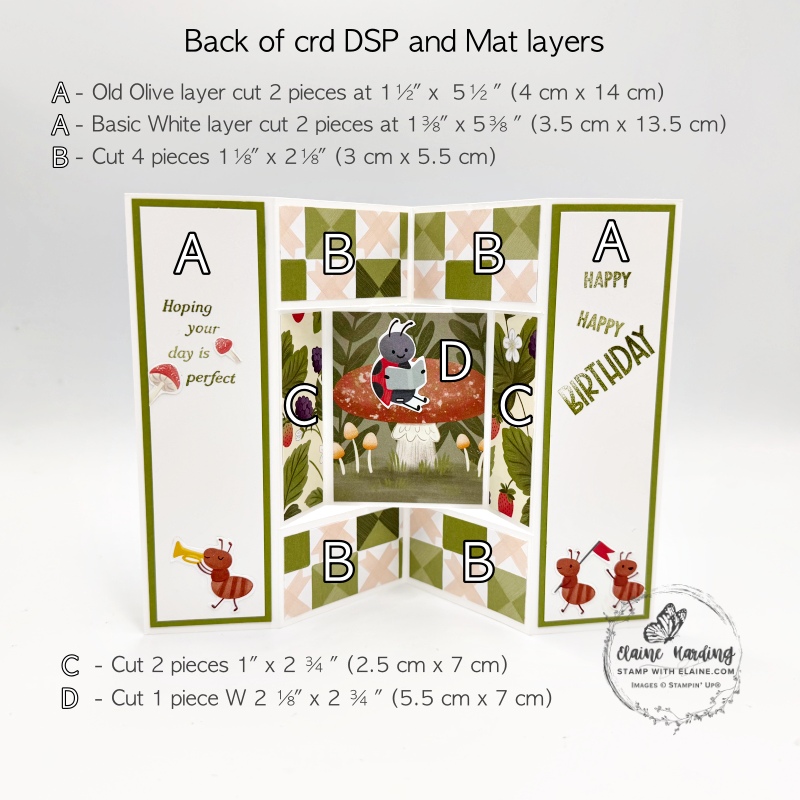
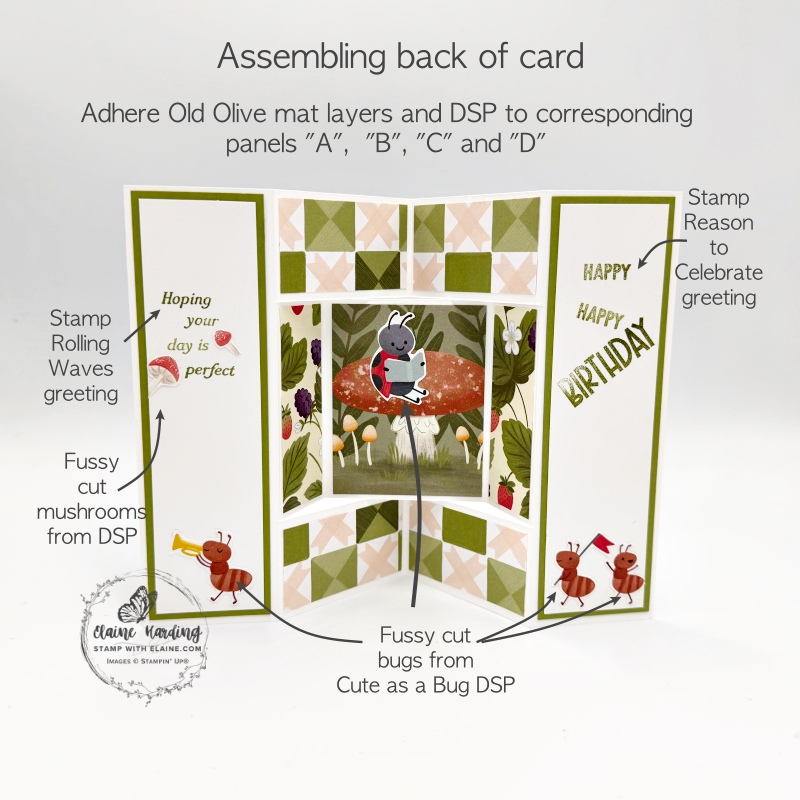
Back of card
- “A” panel Old Olive mat layer – cut 2 pieces at 1 ½” x 5 ½” (4 cm x 14 cm)
- Basic White layers “A” panel – cut 2 pieces at 1 ⅜” x 5 ⅜” (3.5 cm x 13.5 cm)
- “B” panels – cut 4 pieces at 1 ⅛” x 2 ⅛” (3 cm x 5.5 cm)
- “C” panels – cut 2 pieces at 1″ x 2 ¾” (2.5 cm x 7 cm)
- “D” panel – cut 1 piece at W 2 ⅛” x 2 ¾” (5.5 cm x 7 cm)
Assembling card
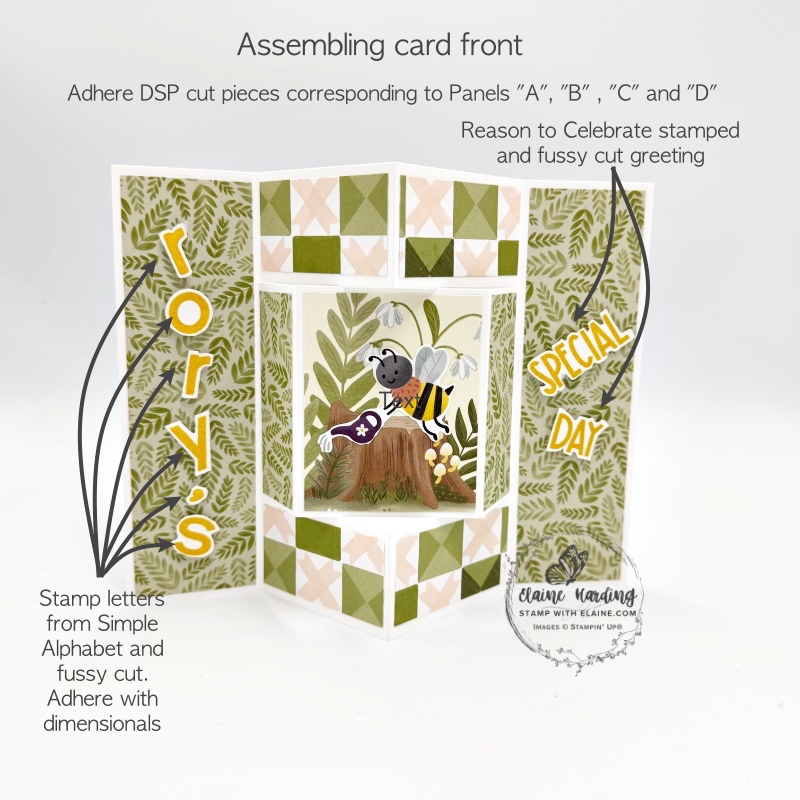
Front of card
- Adhere cut DSP pieces to corresponding panels “A”, “B”, “C” and “D”.
- On Basic White scrap, stamp letters from Simple Alphabet stamp set in Crushed Curry and fussy cut then adhere with dimensionals on left “A” panel.
- Stamp “Special Day” in Crushed Curry ink with Reason to Celebrate stamps and fussy cut. Adhere to right “A” panel with dimensionals.
Back of card
- Adhere Old Olive mat layers to left and right “A” panels. Also adhere corresponding DSP pieces to panels “B”, “C” and “D”/
- Left Basic White panel mask and stamp greeting from Rolling Waves stamp set in Old Olive.
- Fussy cut mushrooms and critters from DSP.
- Adhere mushrooms and the critter playing the trumpet on left “A” panel. Then adhere on top of Old Olive mat layer.
- Right Basic White “A” panel – stamp greeting from Reason to Celebrate in Old Olive then adhere the remaining fussy cut critters at bottom and adhere on top of Old Olive mat layer.
- Adhere fussy cut ladybird on top of large mushroom on panel “D”.
Supply list
Listed below is the supply list. Just click on the picture to take you directly to the item in my online store.
Product List![Simple Alphabet Photopolymer Stamp Set [ 167541 ]](https://assets1.tamsnetwork.com/images/EC042017NF/167541s.jpg "Simple Alphabet Photopolymer Stamp Set [ 167541 ]")
![Reason To Celebrate Photopolymer Stamp Set (English) [ 166905 ]](https://assets1.tamsnetwork.com/images/EC042017NF/166905s.jpg "Reason To Celebrate Photopolymer Stamp Set (English) [ 166905 ]")
![Rolling Waves Photopolymer Stamp Set [ 167142 ]](https://assets1.tamsnetwork.com/images/EC042017NF/167142s.jpg "Rolling Waves Photopolymer Stamp Set [ 167142 ]")
![Cute As A Bug 12" X 12" (30.5 X 30.5 Cm) Designer Series Paper [ 166994 ]](https://assets1.tamsnetwork.com/images/EC042017NF/166994s.jpg "Cute As A Bug 12\" X 12\" (30.5 X 30.5 Cm) Designer Series Paper [ 166994 ]")
![Basic White A4 Thick Cardstock [ 159230 ]](https://assets1.tamsnetwork.com/images/EC042017NF/159230s.jpg "Basic White A4 Thick Cardstock [ 159230 ]")
![Old Olive A4 Card Stock [ 106576 ]](https://assets1.tamsnetwork.com/images/EC042017NF/106576s.jpg "Old Olive A4 Card Stock [ 106576 ]")
![Basic White A4 Cardstock [ 166781 ]](https://assets1.tamsnetwork.com/images/EC042017NF/166781s.jpg "Basic White A4 Cardstock [ 166781 ]")
![Crushed Curry Classic Stampin' Pad [ 147087 ]](https://assets1.tamsnetwork.com/images/EC042017NF/147087s.jpg "Crushed Curry Classic Stampin' Pad [ 147087 ]")
![Old Olive Classic Stampin' Pad [ 147090 ]](https://assets1.tamsnetwork.com/images/EC042017NF/147090s.jpg "Old Olive Classic Stampin' Pad [ 147090 ]")
![Paper Trimmer [ 152392 ]](https://assets1.tamsnetwork.com/images/EC042017NF/152392s.jpg "Paper Trimmer [ 152392 ]")
![Simply Scored [ 122334 ]](https://assets1.tamsnetwork.com/images/EC042017NF/122334s.jpg "Simply Scored [ 122334 ]")

- SHOP ONLINE – EARN 10% REWARDS ON ALL PURCHASES OVER £20
- PURCHASE A STARTER KIT : Get £155 worth of products for only £99. Choose from current catalogues and any specials available. Free Shipping. Read more
- Subscribe to my Video Tutorials – click here