
June Product of the Month – called Wild Bunch. You can add this to your shopping cart for a mere one time purchase at £5.00 subject to a qualifying order of £70 excluding shipping and handling.
Stampin’ Up! is currently has FREE SHIPPING on all orders of £60 or more excluding shipping/handling placed between 11 – 13 June (more details in this post HERE), so why not add another £10 to your shopping cart and take advantage of the free shipping at the same time!
I also have a sneak peek – can you spot what it is?
Cutting guide
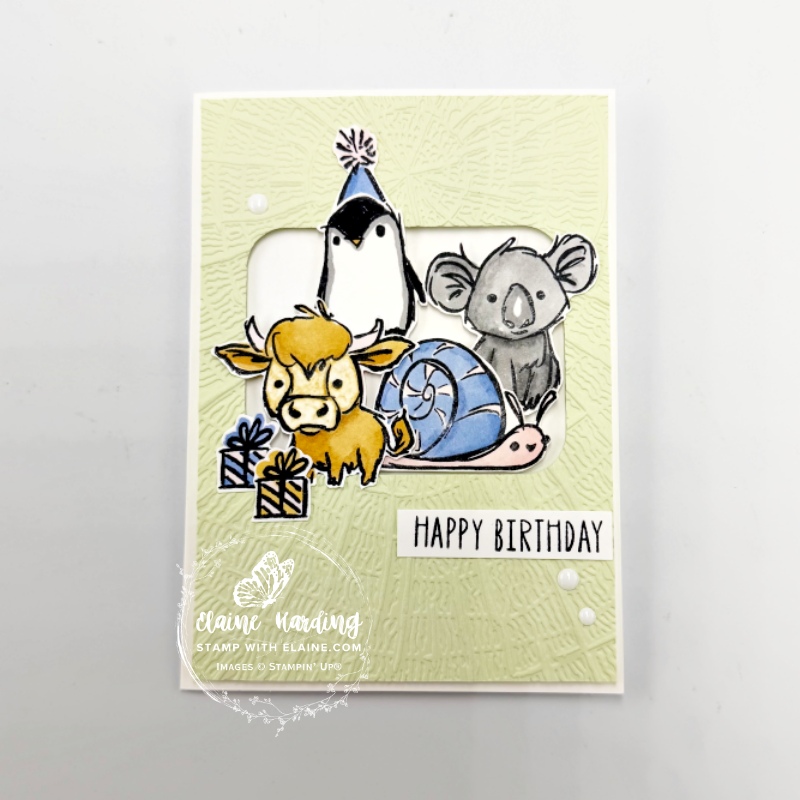
- Card base : Basic White cut at 5 ¾” x 8 ¼”(14.5 cm x 21 cm) folded in half.
- Soft Sea Foam layer : 3 ⅞” x 5 ½” (10 cm x 14 cm).
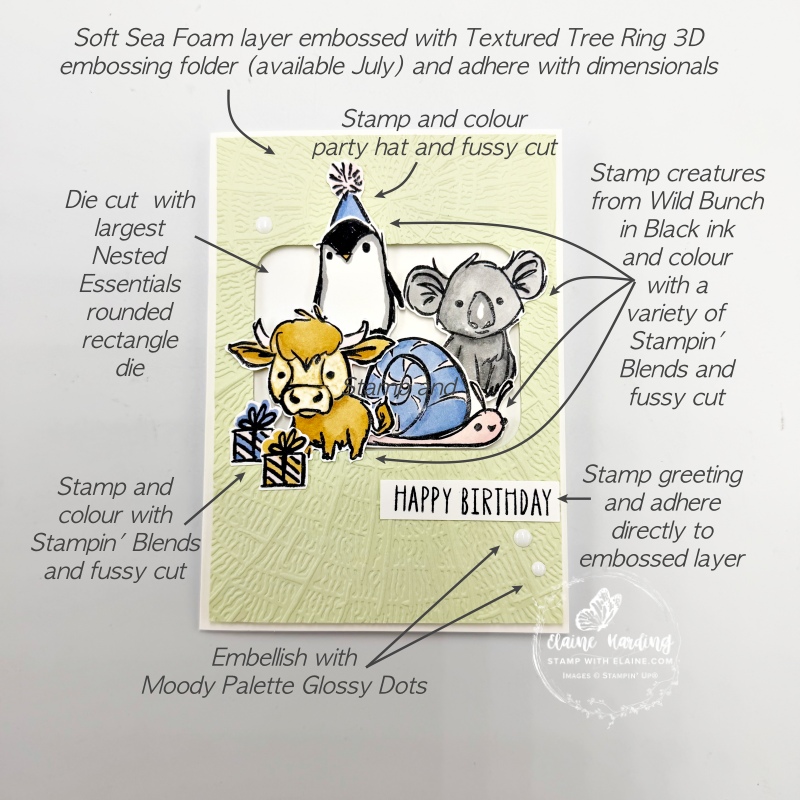
- Die cut aperture in Soft Sea Foam layer with largest rounded corner Nested Essentials die then emboss with the new Textured Tree Ring 3D embossing folder (available in July)
- On scrap of Basic White card stock, stamp penguin, koala, cow and snail, presents and party hat. Colour images with Stampin’ Blends. I used Basic Black, Smoky Slate, Golden Glow, Barely Blush and Hydrangea Hue and Tuxedo Black Memento ink (retired). Fussy cut images.
- Stamp greeting in black.
Inside Card
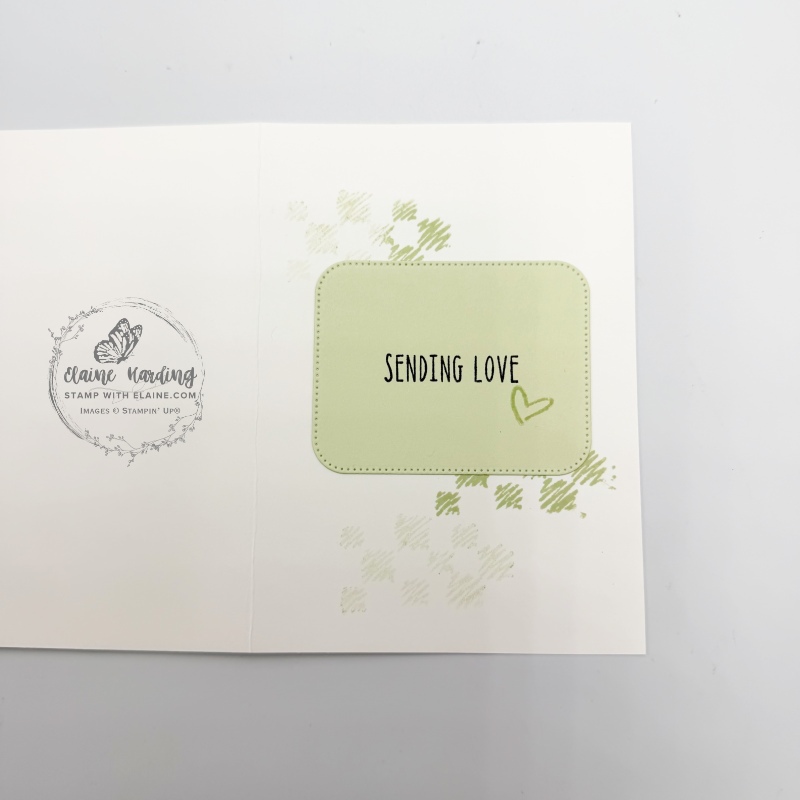
Re-purpose the die cut largest rounded corner rectangle cut from Soft Sea Foam layer and use it for the inside of the card.
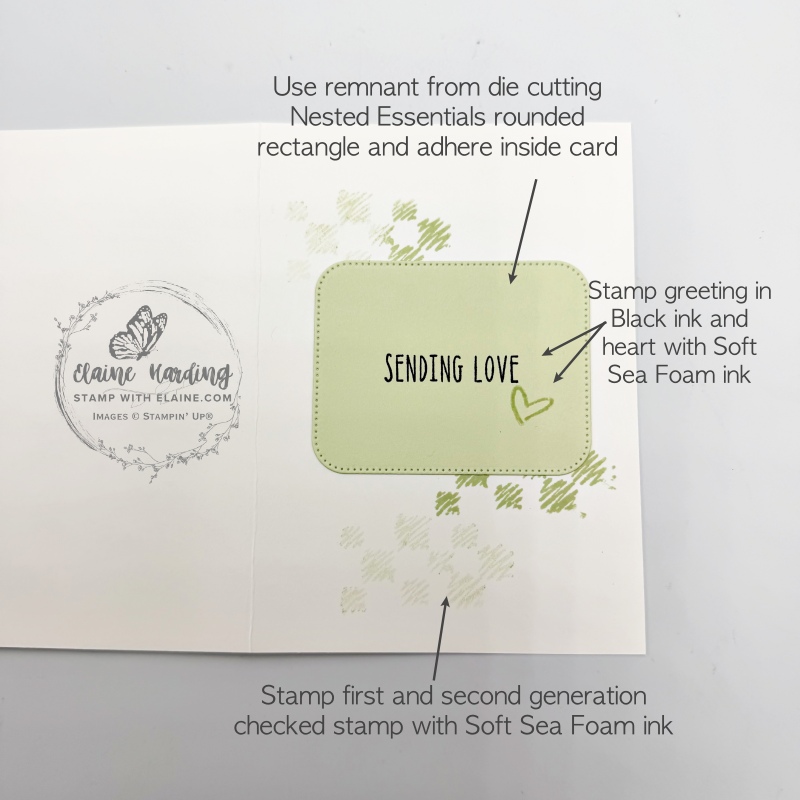
- Stamp first and second generation with Soft Sea Foam ink the checkered stamp.
- Adhere Soft Sea Foam remnant rounded Nested Essentials and adhere to inside of card as pictured.
- Use black ink to stamp greeting, and the heart in Soft Sea Foam ink.
Assembling front of card
- Apply dimensionals to the back of embossed Soft Sea foam piece and adhere to front of card base leaving an even border on all 4 sides.
- Put dimensionals on all the fussy cut creatures – arrange them and adhere inside aperture.
- Tuck party hat behind Penguin’s head and adhere to embossed piece.
- Arrange presents as shown and adhere in bottom left corner of aperture.
- Attach greeting and adhere directly to embossed piece as shown.
- Lastly attach a trio of Moody Palette Glossy dots.
I will add the Textured Tree Ring 3D embossing folder in the supply list once it becomes available in July.
Supply list
Listed below is the supply list. Just click on the picture to take you directly to the item in my online store.
Product List![Wild Bunch Photopolymer Stamp Set (English) [ 167987 ]](https://assets1.tamsnetwork.com/images/EC042017NF/167987s.jpg "Wild Bunch Photopolymer Stamp Set (English) [ 167987 ]")
![Nested Essentials Dies [ 161597 ]](https://assets1.tamsnetwork.com/images/EC042017NF/161597s.jpg "Nested Essentials Dies [ 161597 ]")
![Basic White A4 Cardstock [ 166781 ]](https://assets1.tamsnetwork.com/images/EC042017NF/166781s.jpg "Basic White A4 Cardstock [ 166781 ]")
![Soft Sea Foam A4 Cardstock [ 147012 ]](https://assets1.tamsnetwork.com/images/EC042017NF/147012s.jpg "Soft Sea Foam A4 Cardstock [ 147012 ]")
![Barely Blush Stampin’ Blends Combo Pack [ 167667 ]](https://assets1.tamsnetwork.com/images/EC042017NF/167667s.jpg "Barely Blush Stampin’ Blends Combo Pack [ 167667 ]")
![Basic Black Stampin' Blends Combo Pack [ 154843 ]](https://assets1.tamsnetwork.com/images/EC042017NF/154843s.jpg "Basic Black Stampin' Blends Combo Pack [ 154843 ]")
![Golden Glow Stampin’ Blends Combo Pack [ 167682 ]](https://assets1.tamsnetwork.com/images/EC042017NF/167682s.jpg "Golden Glow Stampin’ Blends Combo Pack [ 167682 ]")
![Hydrangea Hue Stampin’ Blends Combo Pack [ 167666 ]](https://assets1.tamsnetwork.com/images/EC042017NF/167666s.jpg "Hydrangea Hue Stampin’ Blends Combo Pack [ 167666 ]")
![Smoky Slate Stampin' Blends Combo Pack [ 154904 ]](https://assets1.tamsnetwork.com/images/EC042017NF/154904s.jpg "Smoky Slate Stampin' Blends Combo Pack [ 154904 ]")
![Soft Sea Foam Classic Stampin' Pad [ 147102 ]](https://assets1.tamsnetwork.com/images/EC042017NF/147102s.jpg "Soft Sea Foam Classic Stampin' Pad [ 147102 ]")
![Tuxedo Black Memento Ink Pad [ 132708 ]](https://assets1.tamsnetwork.com/images/EC042017NF/132708s.jpg "Tuxedo Black Memento Ink Pad [ 132708 ]")
![Moody Palette Glossy Dots [ 167180 ]](https://assets1.tamsnetwork.com/images/EC042017NF/167180s.jpg "Moody Palette Glossy Dots [ 167180 ]")

- SHOP ONLINE – EARN 10% REWARDS ON ALL PURCHASES OVER £20
- PURCHASE A STARTER KIT : Get £155 worth of products for only £99. Choose from current catalogues and any specials available. Free Shipping. Read more
- Subscribe to my Video Tutorials – click here