
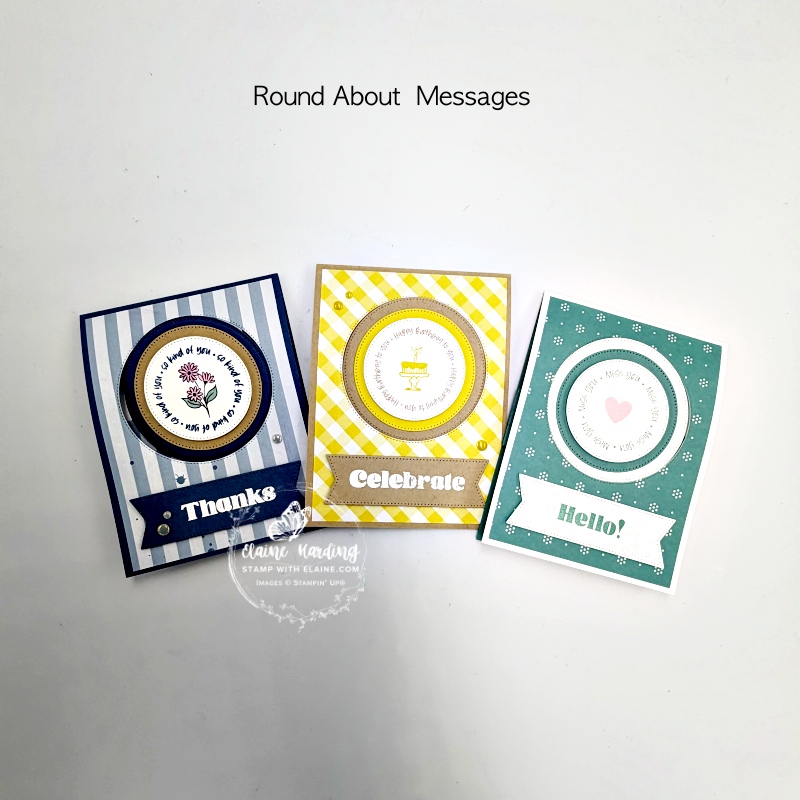
Pop out card – Round About Messages. This is a stand alone stamp set in the September-December 2026 catalogue on page 44. It coordinates with the 2″ (5.1 cm) circle punch on page 60.
The Round About Messages Stamp Set features everyday greetings arranged in circular designs, with extra words that can sit inside the open shapes or stand on their own. Small icons fit neatly in the centres or scatter easily across your project, giving cards, tags, and backgrounds a playful look that feels fresh and thoughtfully put together.
Pop out card
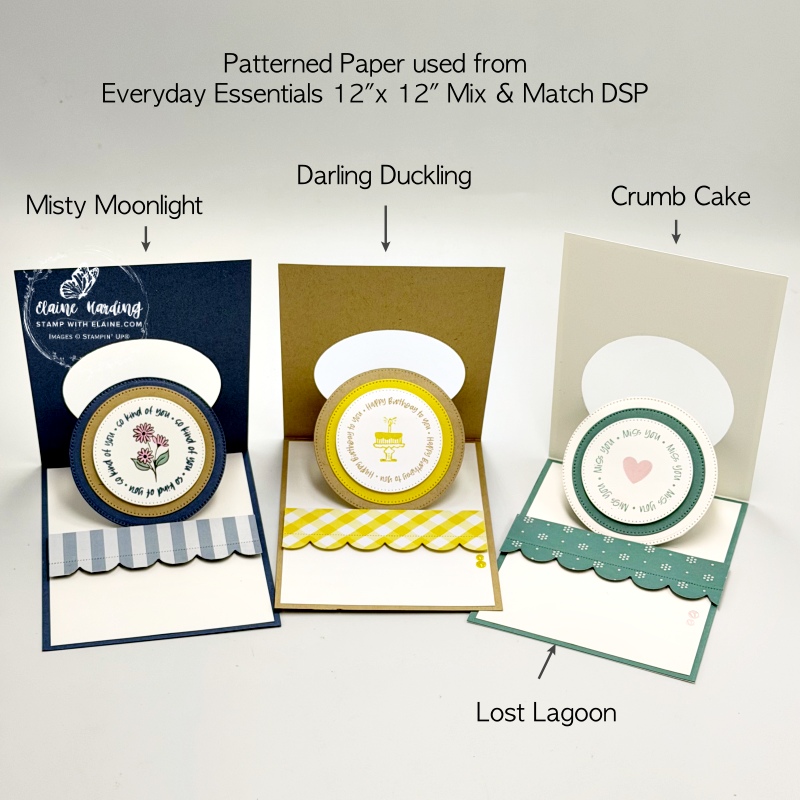
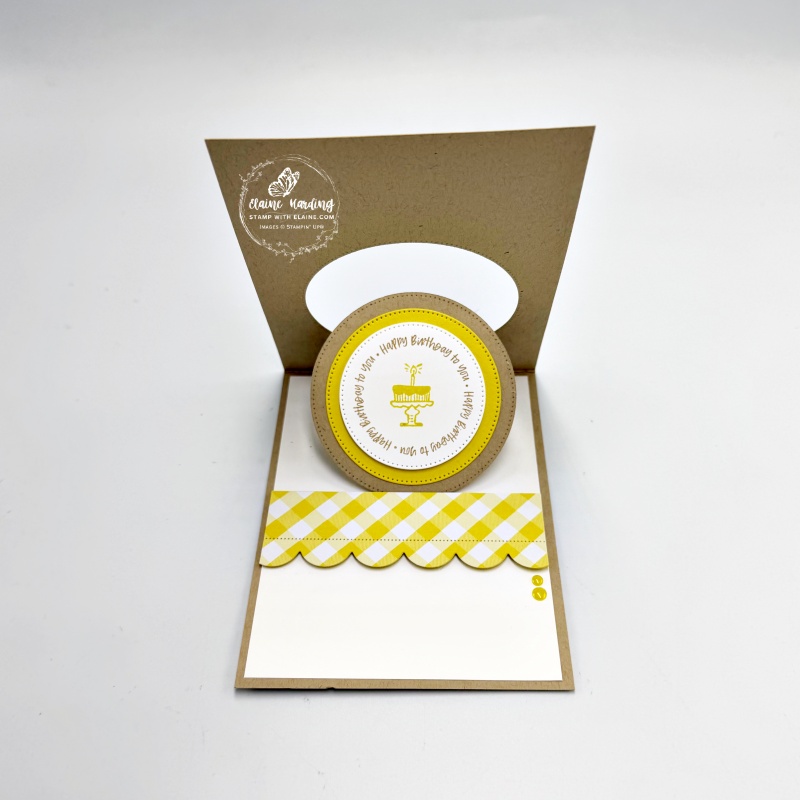
I made mine as a “pop-out” card. When closed it looks like a standard card. However, when you open it, the front of the card lifts to leave the circle pop out into an easel like formation and is propped up by the stopper inside the card. The stopper is from the new “Home for Christmas” bundle – great for scrapbooking with. I especially liked the scallop border die.
You can see a masculine version HERE which I made back in June 2022!
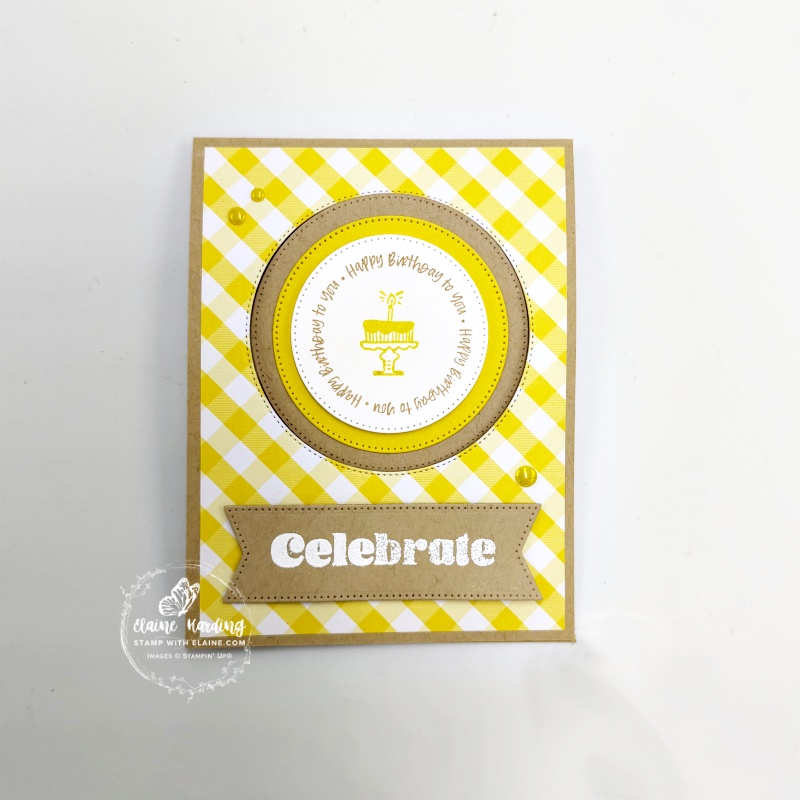
I will show you how I made the Crumb Cake/Darling Duckling one listed below, but the process is the same for the other two. Simply switch card base colours and DSP to coordinate with respective cards.
Cutting guide
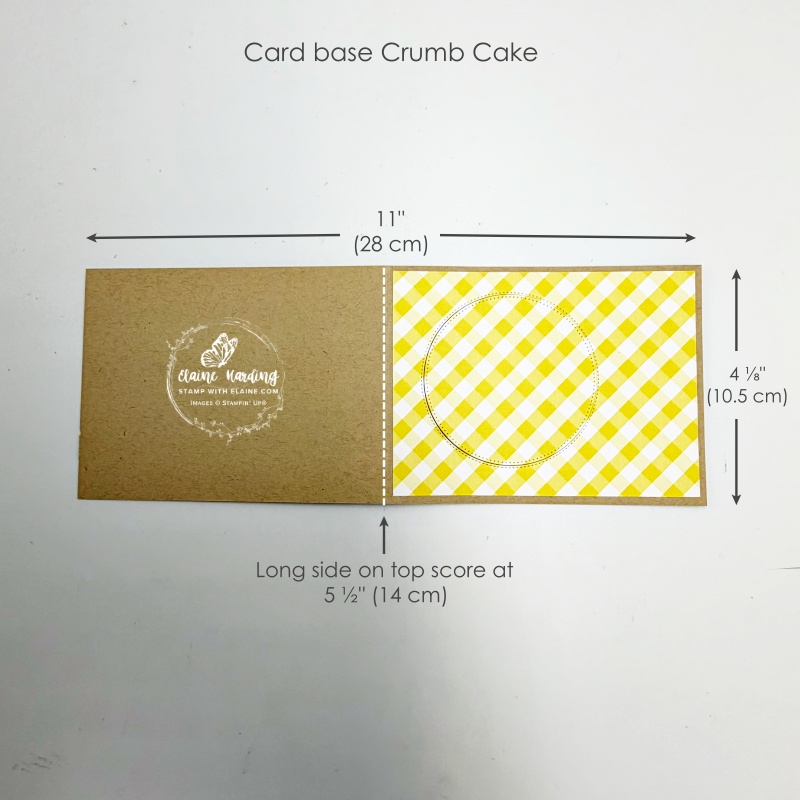
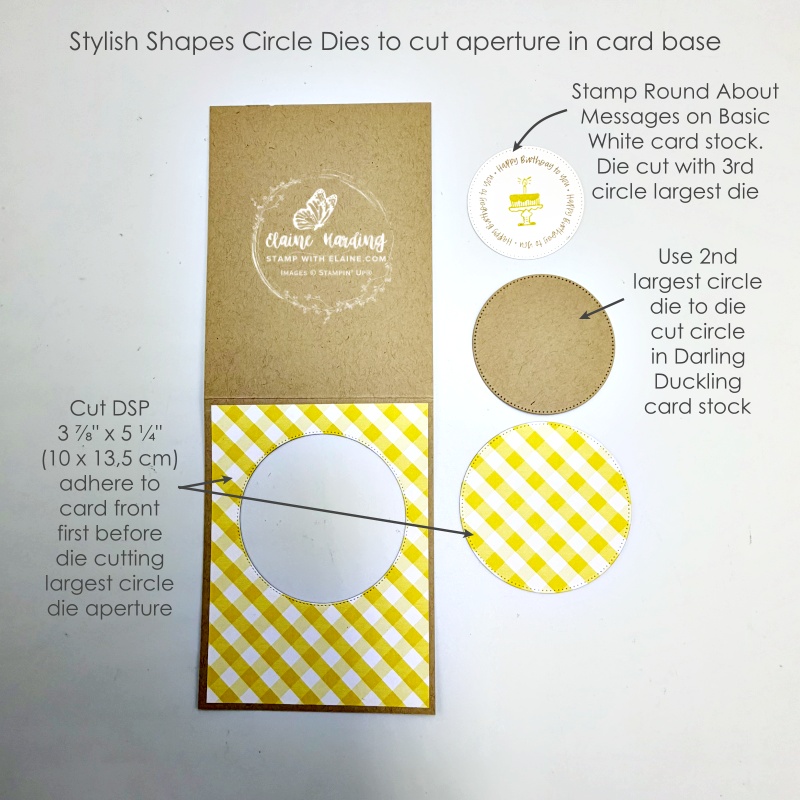
- Card base : Crumb Cake cut at 11″ x 4 ⅛” (28 cm x 10.5 cm) folded in half.
- Adhere DSP cut at 3 ⅞” x 5 ¼” (10 cm x 13.5 cm) to front of card first leaving an even border on all 4 sides.
- Place largest Stylish Shapes circle die centred at the top and equidistant on both sides.
- Die cut a Darling Duckling circle with 2nd larges circle die.
- Stamp birthday message in Crumb Cake ink and the cake in the centre with Darling Duckling ink. Die cut with 3rd largest circle die. Set aside for later.
Pop out Mechanism and Easel Mechanism
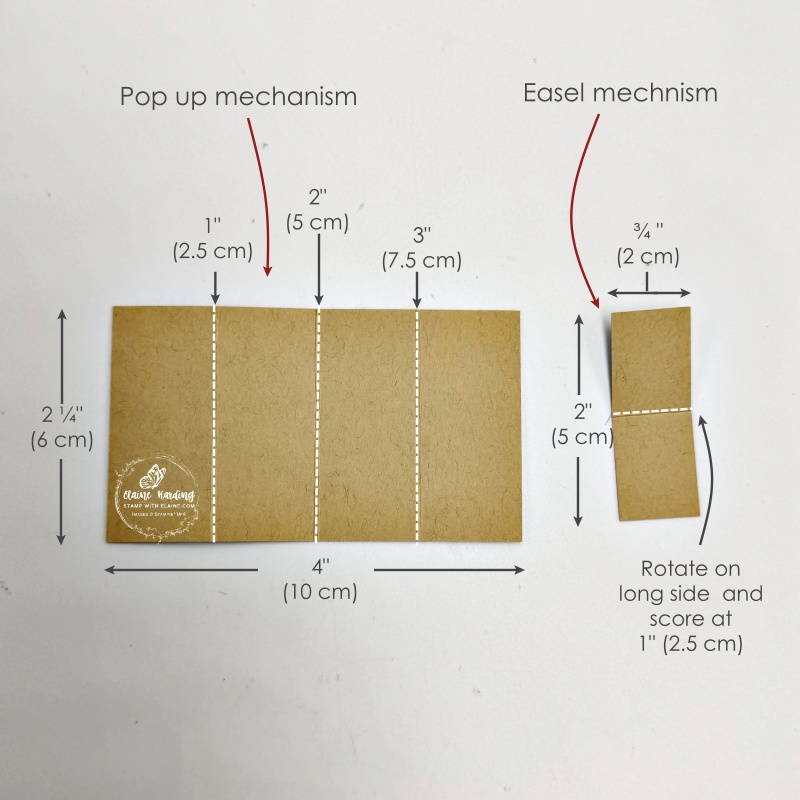
- Pop out Mechanism : Crumb Cake cut at 2 ¼” x 4″ (6 cm x 10 cm). Long side on top score at 1″, 2″, 3″ (2.5 cm, 5 cm, 7.5 cm). Burnish score lines well.
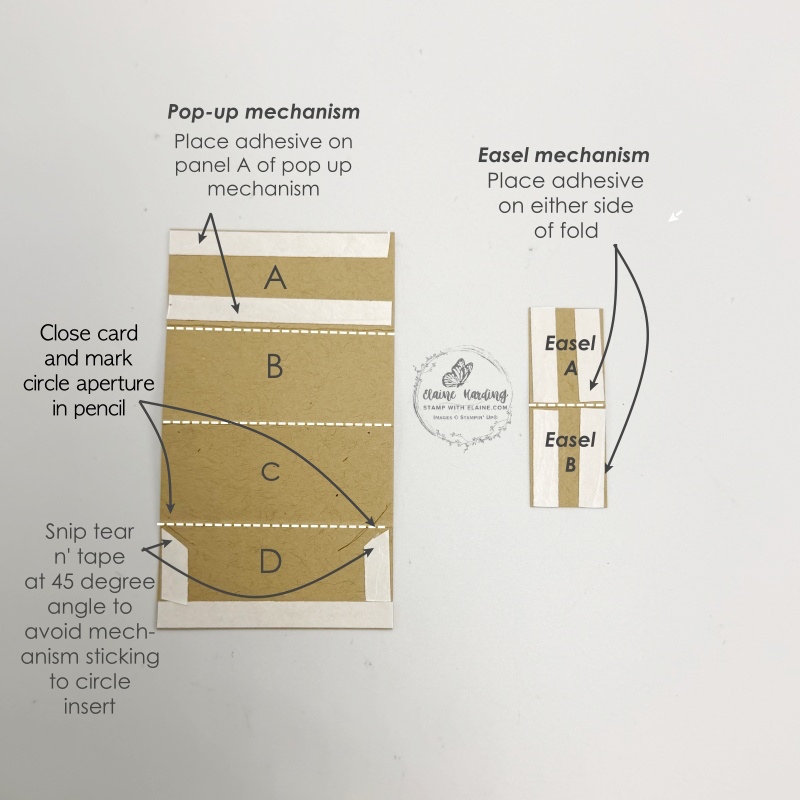
- Apply adhesive on the Pop out Mechanism following picture instructions on right.
- Easel Mechanism : Crumb cake ¾” x 2″ (2 cm x 5 cm). Long side on top score at 1″ (2.5 cm).
- Apply adhesive on Easel Mechanism following picture instructions on the right.
Adhering Pop Up Mechanism
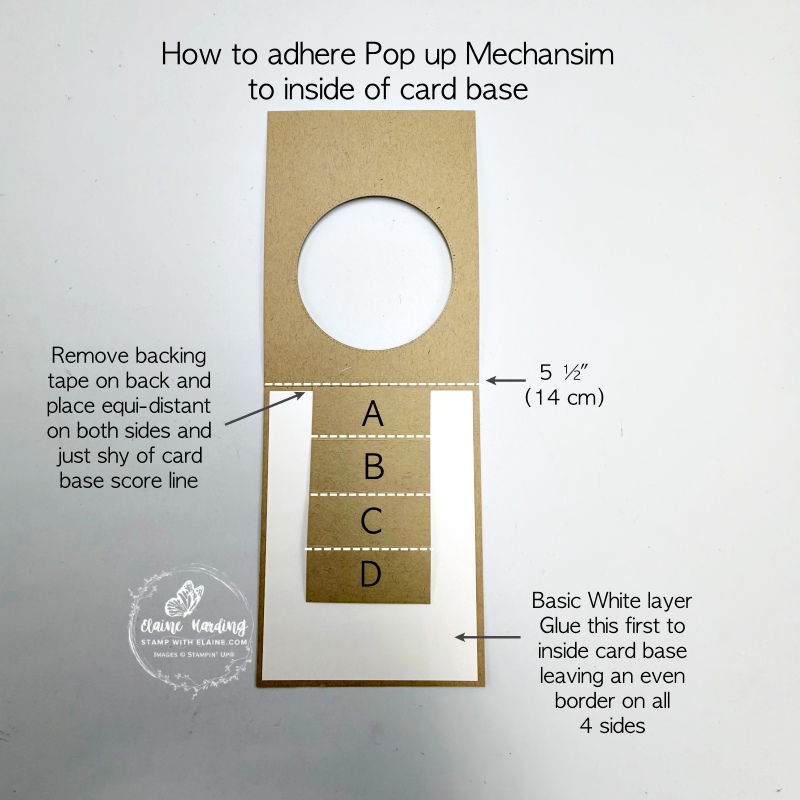
- Flip Pop Up mechanism over and orient on short side so that the score lines run horizontally and the tear n’ tape is face down. Attach top panel “A” equidistant from each side and just shy of 5 ½” (14 cm) card base score line (picture on left).
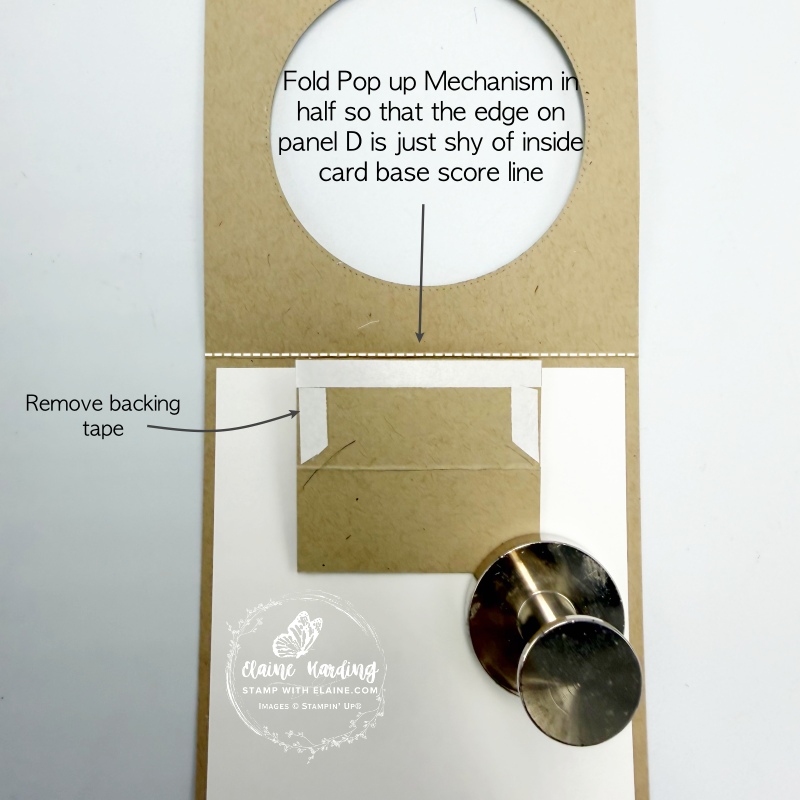
- Fold on the score line between panel “B” and “C” in half so the tear n’ tape on the back of panel “D” is now on top and just shy of card base’s score line (middle picture).
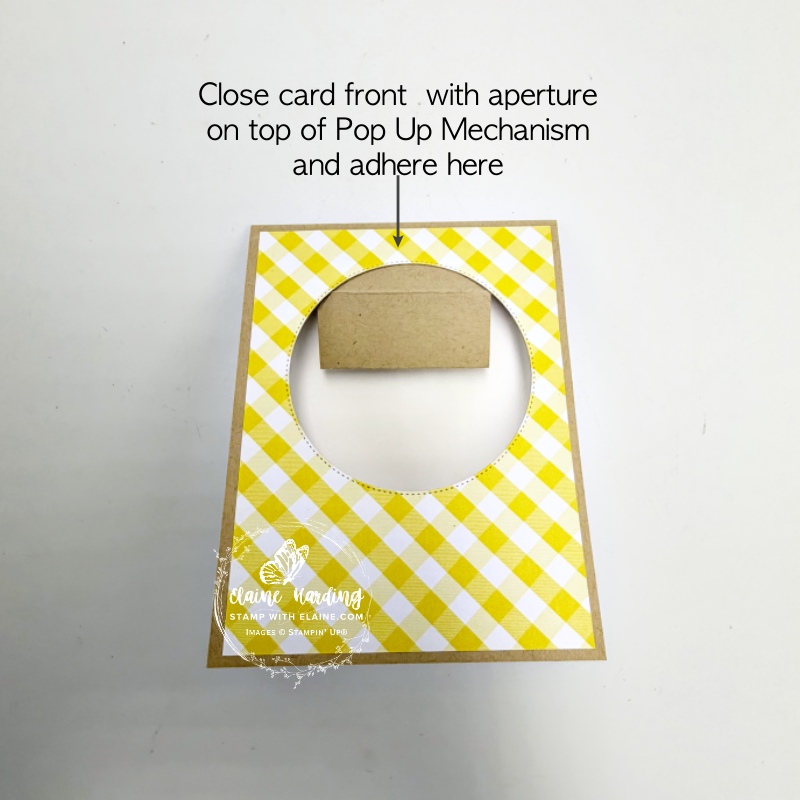
- Remove backing tape and close card front with aperture on top of Pop Up mechanism and adhere (picture on right).
Adhering Easel Mechanism and circular insert
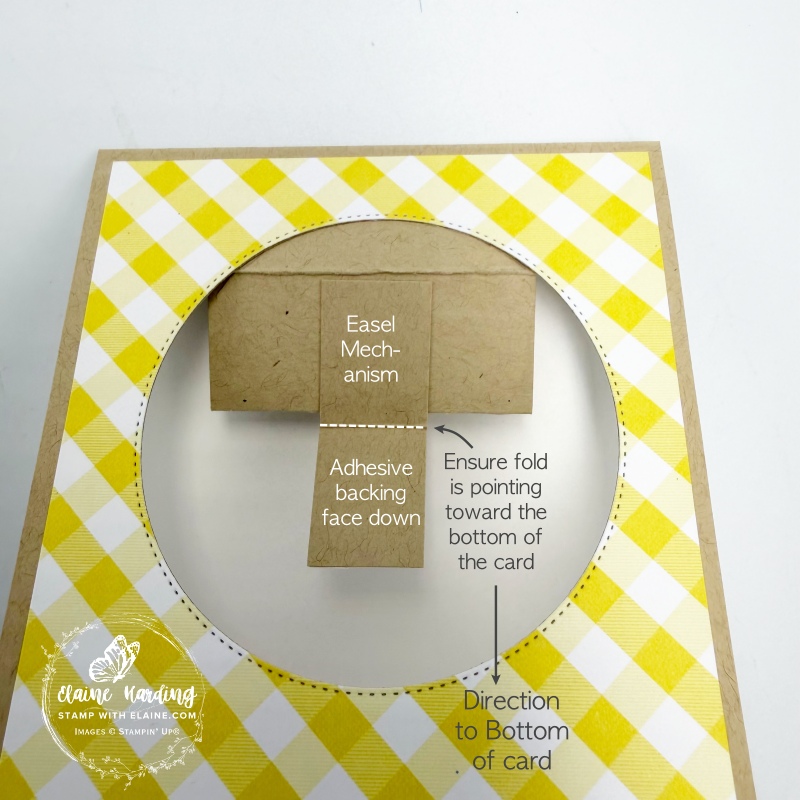
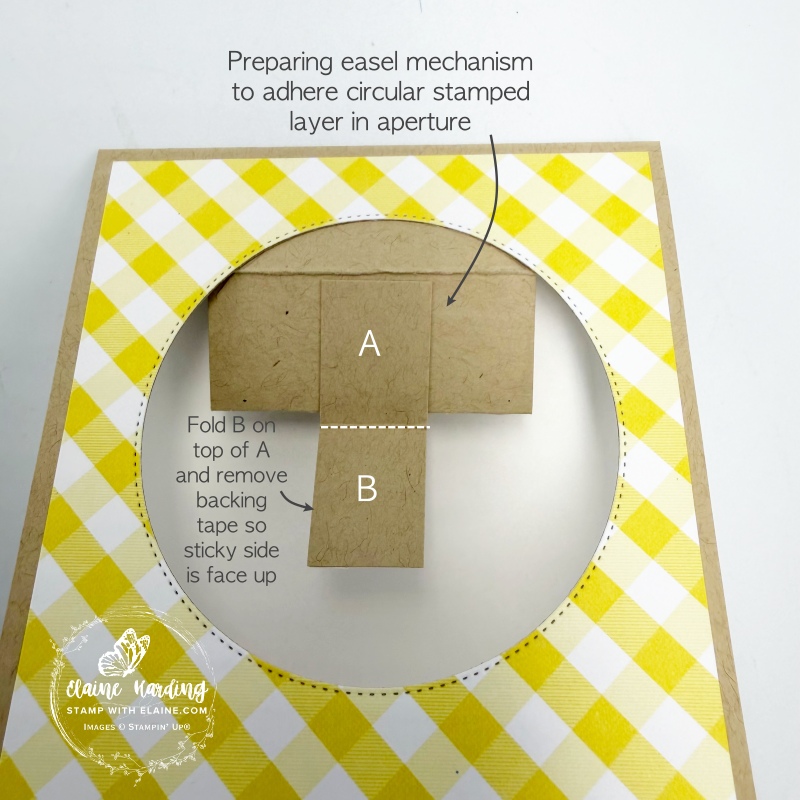
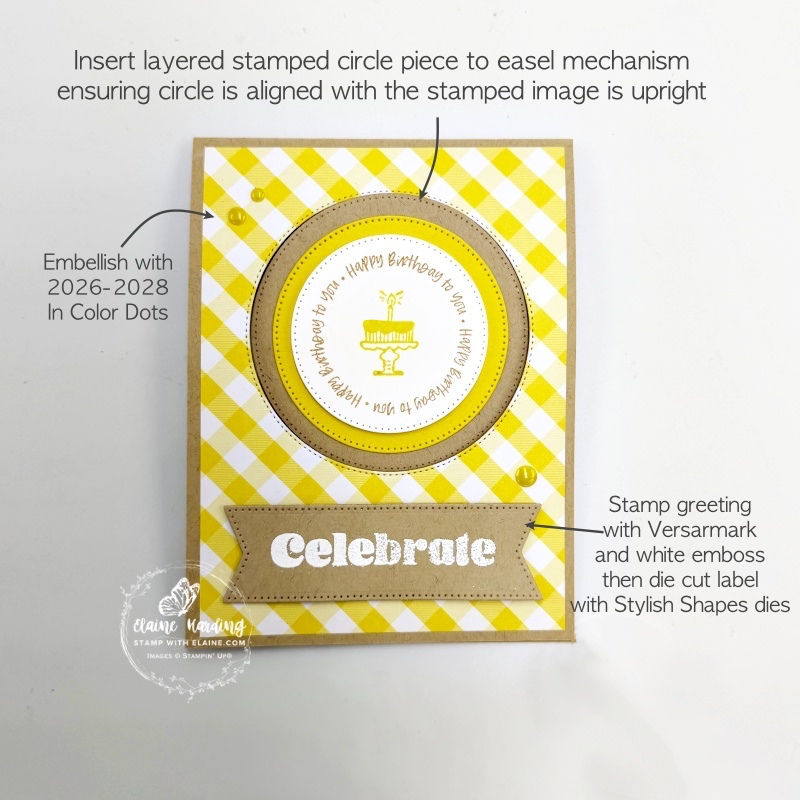
- There is tear n’ tape on the underside of the easel mechanism. Remove backing tape, centre it on the Pop Up mechanism as pictured with the fold pointing toward bottom of card as pictured.
- Fold B on top of A. Remove backing tape (middle picture).
- Insert layered stamped circle piece to easel mechanism ensuring circle is aligned and that the stamped image is upright.
- White emboss “Celebrate” on Crumb Cake card stock and use Stylish Shapes label die to cut label.
- Embellish with 2026 -2028 In Color Dots.
Inside card base
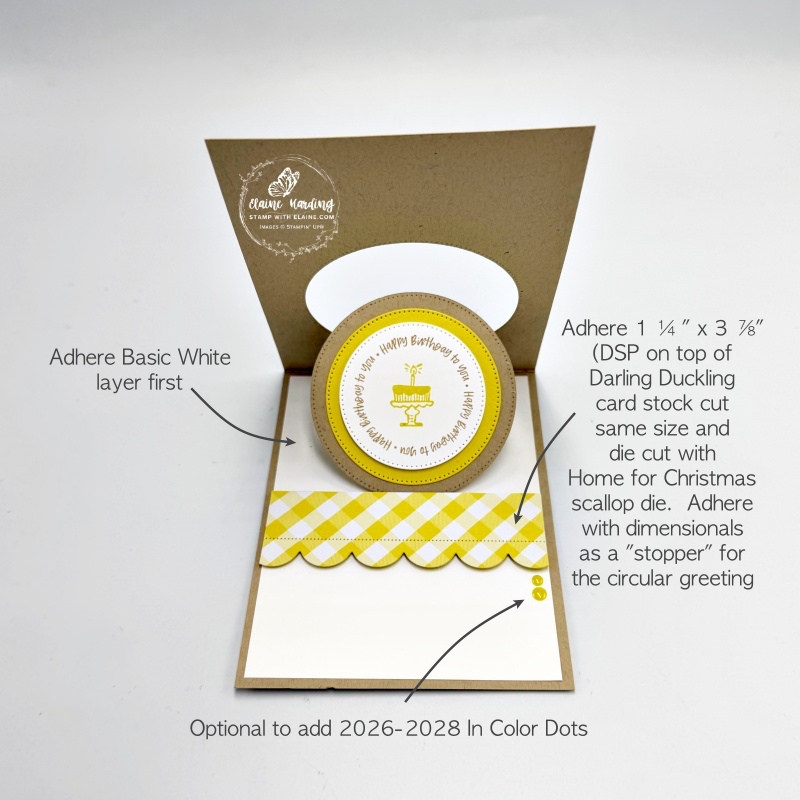
- Adhere Basic White layer inside card base with an even border on all 4 sides.
- Apply dimensionals to back of scalloped border stopper layer – align with both edges about half way up and adhere to inside card base as the easel stopper.
- Optional – add 2026-2028 In Color Dots if so desired.
Supply list
Listed below is the supply list. Just click on the picture to take you directly to the item in my online store.
Product List![Home For Christmas Bundle (English) [ 168509 ]](https://assets1.tamsnetwork.com/images/EC042017NF/168509s.jpg "Home For Christmas Bundle (English) [ 168509 ]")
![Home For Christmas Photopolymer Stamp Set (English) [ 168502 ]](https://assets1.tamsnetwork.com/images/EC042017NF/168502s.jpg "Home For Christmas Photopolymer Stamp Set (English) [ 168502 ]")
![Home For Christmas Dies [ 168508 ]](https://assets1.tamsnetwork.com/images/EC042017NF/168508s.jpg "Home For Christmas Dies [ 168508 ]")
![Round About Messages Photopolymer Stamp Set (English) [ 168410 ]](https://assets1.tamsnetwork.com/images/EC042017NF/168410s.jpg "Round About Messages Photopolymer Stamp Set (English) [ 168410 ]")
![Stylish Shapes Dies [ 159183 ]](https://assets1.tamsnetwork.com/images/EC042017NF/159183s.jpg "Stylish Shapes Dies [ 159183 ]")
![Everyday Essentials Mix & Match 12" X 12" (30.5 X 30.5 Cm) Designer Series Paper [ 167702 ]](https://assets1.tamsnetwork.com/images/EC042017NF/167702s.jpg "Everyday Essentials Mix & Match 12\" X 12\" (30.5 X 30.5 Cm) Designer Series Paper [ 167702 ]")
![Basic White A4 Cardstock [ 159228 ]](https://assets1.tamsnetwork.com/images/EC042017NF/159228s.jpg "Basic White A4 Cardstock [ 159228 ]")
![Crumb Cake A4 Card Stock [ 121685 ]](https://assets1.tamsnetwork.com/images/EC042017NF/121685s.jpg "Crumb Cake A4 Card Stock [ 121685 ]")
![Darling Duckling A4 Cardstock [ 165294 ]](https://assets1.tamsnetwork.com/images/EC042017NF/165294s.jpg "Darling Duckling A4 Cardstock [ 165294 ]")
![Lost Lagoon A4 Cardstock [ 133686 ]](https://assets1.tamsnetwork.com/images/EC042017NF/133686s.jpg "Lost Lagoon A4 Cardstock [ 133686 ]")
![Misty Moonlight A4 Cardstock [ 153086 ]](https://assets1.tamsnetwork.com/images/EC042017NF/153086s.jpg "Misty Moonlight A4 Cardstock [ 153086 ]")
![Bubble Bath Classic Stampin' Pad [ 161664 ]](https://assets1.tamsnetwork.com/images/EC042017NF/161664s.jpg "Bubble Bath Classic Stampin' Pad [ 161664 ]")
![Crumb Cake Classic Stampin' Pad [ 147116 ]](https://assets1.tamsnetwork.com/images/EC042017NF/147116s.jpg "Crumb Cake Classic Stampin' Pad [ 147116 ]")
![Darling Duckling Classic Stampin' Pad [ 165277 ]](https://assets1.tamsnetwork.com/images/EC042017NF/165277s.jpg "Darling Duckling Classic Stampin' Pad [ 165277 ]")
![Lost Lagoon Classic Stampin' Pad [ 161678 ]](https://assets1.tamsnetwork.com/images/EC042017NF/161678s.jpg "Lost Lagoon Classic Stampin' Pad [ 161678 ]")
![Misty Moonlight Classic Stampin' Pad [ 153118 ]](https://assets1.tamsnetwork.com/images/EC042017NF/153118s.jpg "Misty Moonlight Classic Stampin' Pad [ 153118 ]")
![Basic Black Hybrid Stampin' Pad [ 166648 ]](https://assets1.tamsnetwork.com/images/EC042017NF/166648s.jpg "Basic Black Hybrid Stampin' Pad [ 166648 ]")
![Bubble Bath Stampin’ Blends Combo Pack [ 161675 ]](https://assets1.tamsnetwork.com/images/EC042017NF/161675s.jpg "Bubble Bath Stampin’ Blends Combo Pack [ 161675 ]")
![Lost Lagoon Stampin’ Blends Combo Pack [ 161680 ]](https://assets1.tamsnetwork.com/images/EC042017NF/161680s.jpg "Lost Lagoon Stampin’ Blends Combo Pack [ 161680 ]")
![Versamark Pad [ 102283 ]](https://assets1.tamsnetwork.com/images/EC042017NF/102283s.jpg "Versamark Pad [ 102283 ]")
![Basics Wow! Embossing Powder [ 165679 ]](https://assets1.tamsnetwork.com/images/EC042017NF/165679s.jpg "Basics Wow! Embossing Powder [ 165679 ]")
![Embossing Additions Tool Kit [ 159971 ]](https://assets1.tamsnetwork.com/images/EC042017NF/159971s.jpg "Embossing Additions Tool Kit [ 159971 ]")
![Heat Tool - Uk Plug [ 129054 ]](https://assets1.tamsnetwork.com/images/EC042017NF/129054s.jpg "Heat Tool - Uk Plug [ 129054 ]")
![2025–2027 In Color™ Flat Pearls [ 165192 ]](https://assets1.tamsnetwork.com/images/EC042017NF/165192s.jpg "2025–2027 In Color™ Flat Pearls [ 165192 ]")
![2026–2028 In Color™ Dots [ 167546 ]](https://assets1.tamsnetwork.com/images/EC042017NF/167546s.jpg "2026–2028 In Color™ Dots [ 167546 ]")

- SHOP ONLINE – EARN 10% REWARDS ON ALL PURCHASES OVER £20
- PURCHASE A STARTER KIT : Get £155 worth of products for only £99. Choose from current catalogues and any specials available. Free Shipping. Read more
- Subscribe to my Video Tutorials – click here