
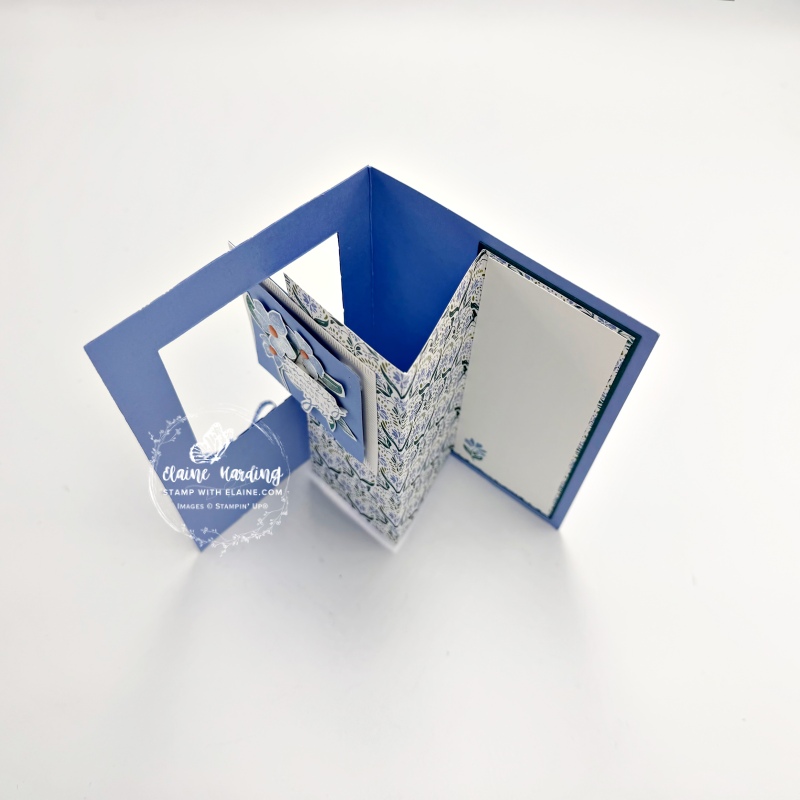
Fun fold updated – Tile Garden. I have a fresh new look for the same fun fold which I made HERE way back in 2019. Back in those days my YouTube channel had a different name. I can’t remember when I changed it, but currently the YouTube channel is called stampwithelaine.
At last the new September-December 2026 catalogue has launched and I’m featuring the Tile Garden Bundle which pairs a versatile stamp set of sentiments and florals with coordinating square dies. I love the fact that the square dies have different border details just like the circle dies do from Spotlight on Nature.
Before we get to the card there’s lots of news – two new kits available – Floral Promenade Kit (English) and the Merry Manor Kit.
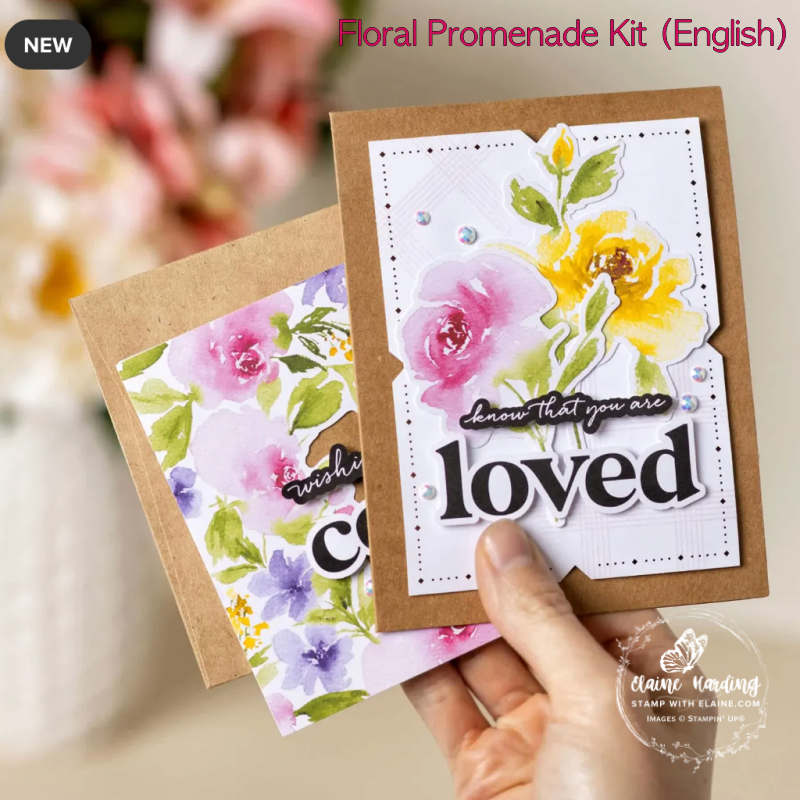
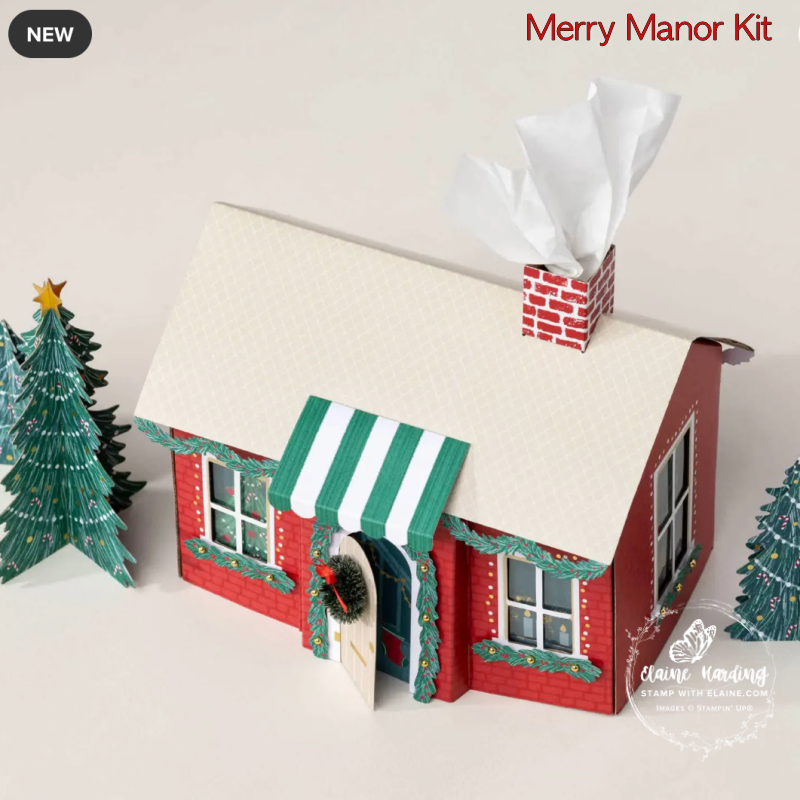
View NEW September online exclusives pdf HERE
View Virtual Card Retreat from 2-3 October 2026 flyer HERE
NEW! Available while stocks last – 12 Days of Creativity Advent Calendar
Make this festive season magical with the 12 Days of Creativity Advent Calendar. Every day of this calendar contains items that you can craft with all year long, including never-before-seen dies, paper, embellishments, and more. These products are exclusive to the calendar and can’t be purchased separately. And did we mention that these make great gifts? If someone you know is looking for the perfect present for the crafter in their life, encourage them to check out this exclusive product. But don’t wait because we only have a limited number of calendars!
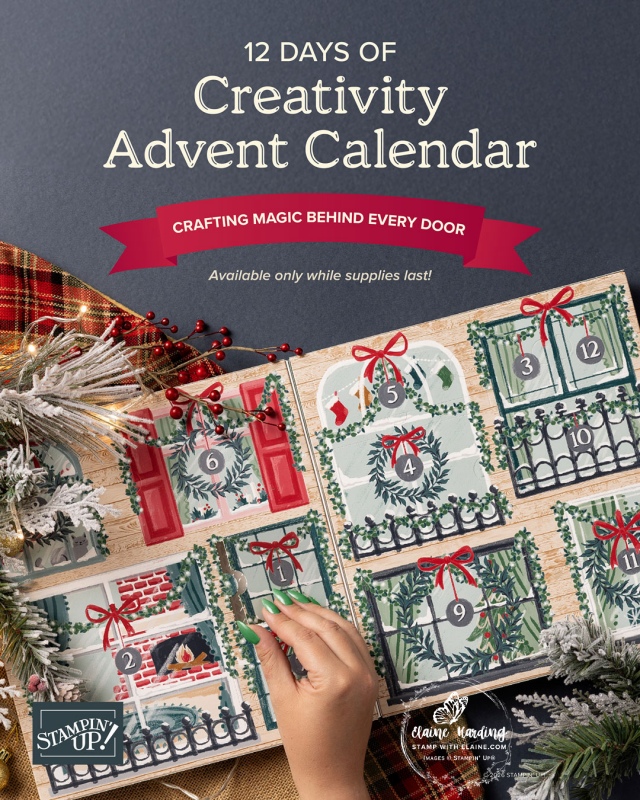
- Item: 12 Days of Creativity Advent Calendar (168589)
- Price: 121 € | £93 (FYI: For only 121 € | £93, this calendar comes with 158 € | £121 worth of exclusive products)
- Includes: Exclusive dies, paper, colouring tools, cards and envelopes, embellishments, and more—plus, a bonus stamp set!
- Ordering Begins: 1 September 2026
We had something similar last year and I loved it! I’m looking forward to receiving mine this year! It’s definitely on my Santa’s wish list! Now to the card.
Eyelet Blooms Die
This was April’s Product of the Month – if you purchased it way back then, and still have it, here’s an idea of how you can use it. It wasn’t until after I’d created the card that I realised it is no longer available. If you don’t have it, then you can substitute it with any embossing folder, a suggestion would be the Lazy Daisy 3D embossing folder.
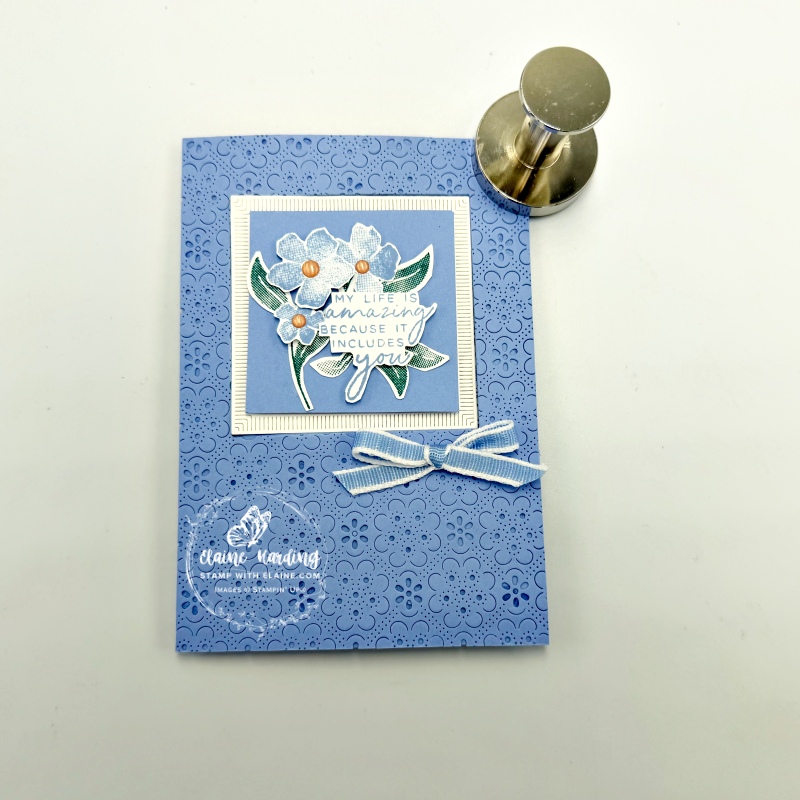
Cutting guide
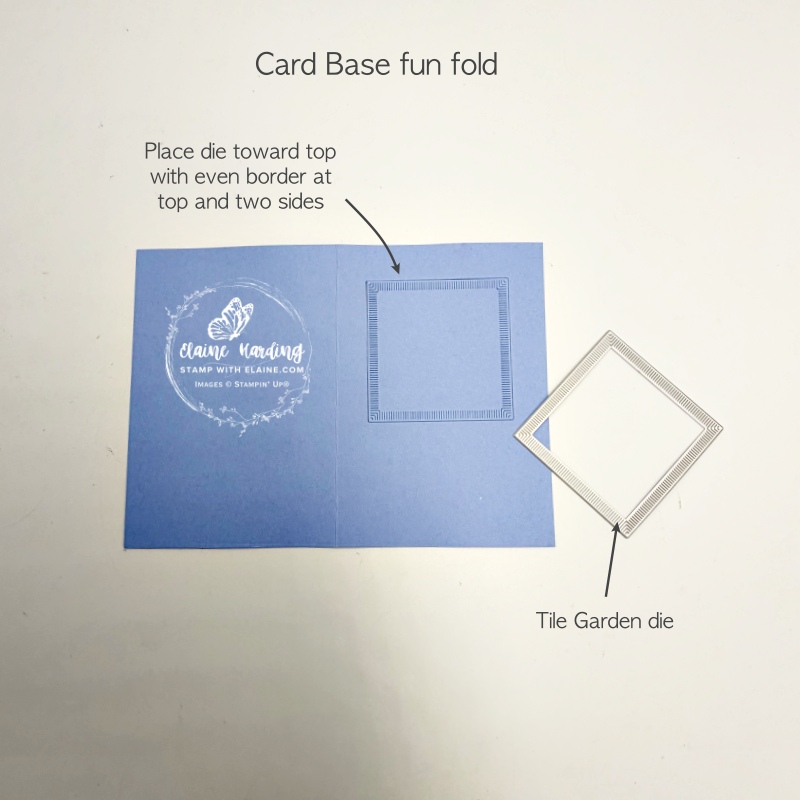
- Card base : Hydrangea Hue 5 ¾” x 8″ (14.5 cm x 20 cm)
- 2nd largest Tile Garden die with straight edge border – Place die toward top with even edge from top and two sides and cut an aperture.
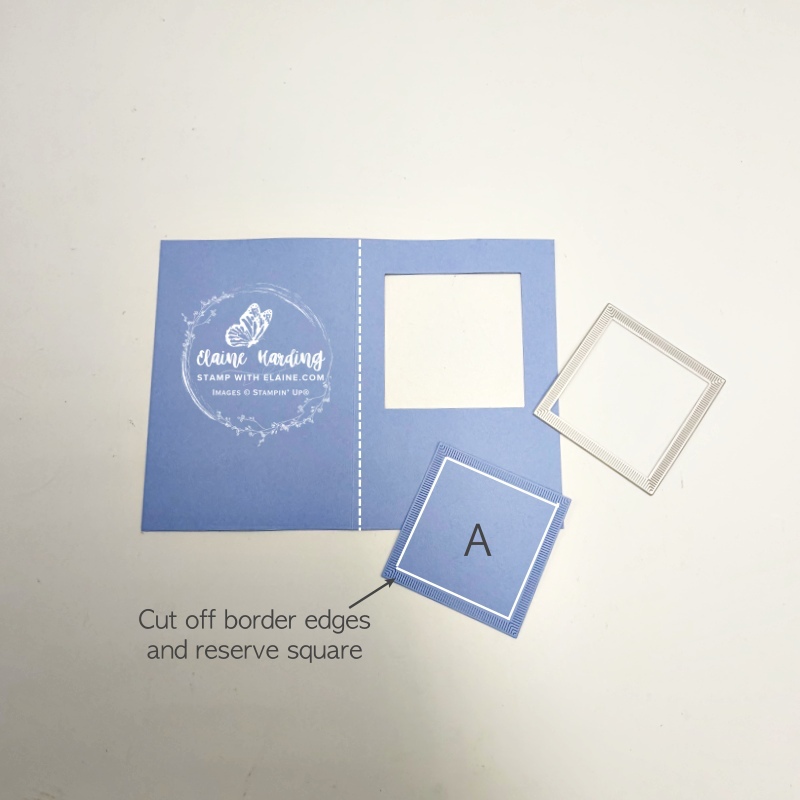
- Cut a second piece of Hydrangea Hue 4″ x 5 ¾” (10 cm x 14.5 cm). Align with front of card and use the piercing tool to mark each corner of the aperture on the flip side. Use these as markers and place die within these holes and die cut an aperture. Reserve square. Also cut one out of Basic White card stock.
- Once you’ve cut off the border edges on the Hydrangea Hue square “A” it should measure 2 ¼” x 2 ¼” (5.5 cm x 5.5 cm). Reserve piece “A” for later. This will be mounted on top of the Basic White insert on front of card.
Inside card DSP layer
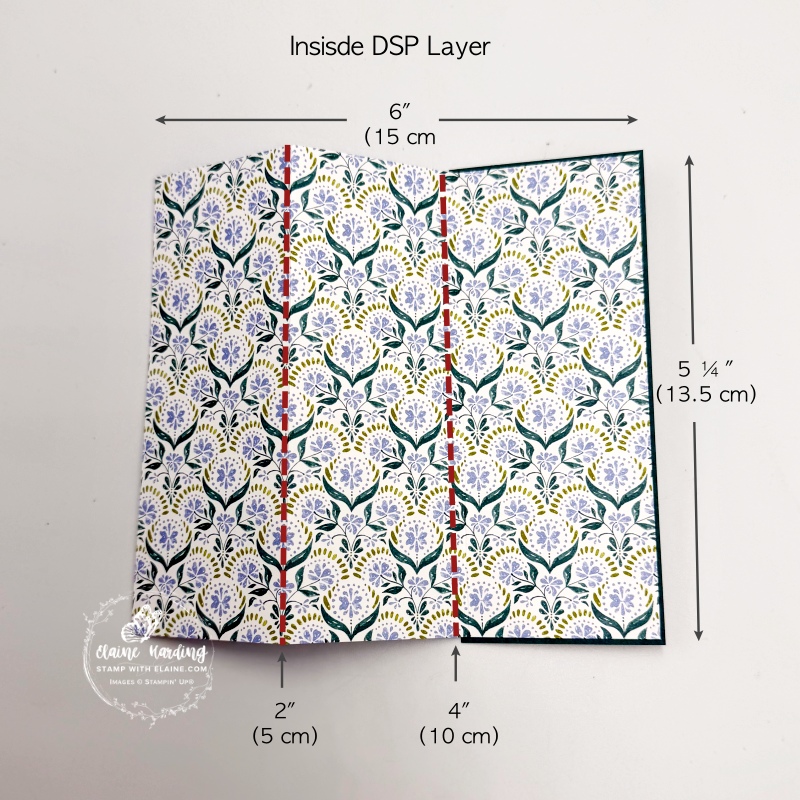
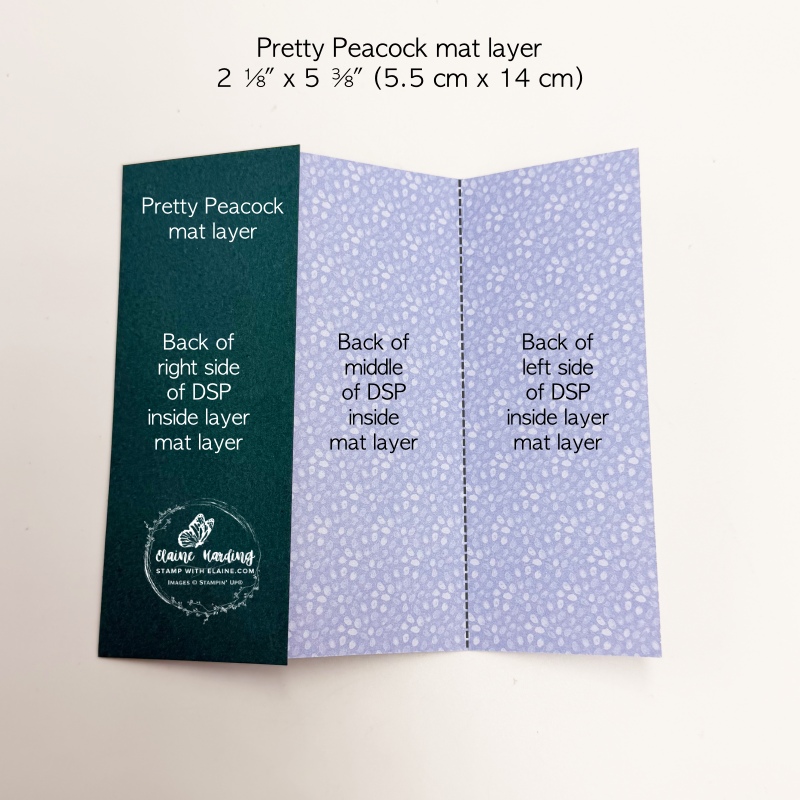
- Cut Mosaic Garden DSP at 6″ x 5 ¼”(15 cm x 13.5 cm). On long side score at 2″, 4″ (5 cm, 10 cm)
- Pretty Peacock mat layer – cut at 2 ⅛” x 5 ⅜” (5.5 cm x 14 cm). Adhere to back of right side panel of DSP.
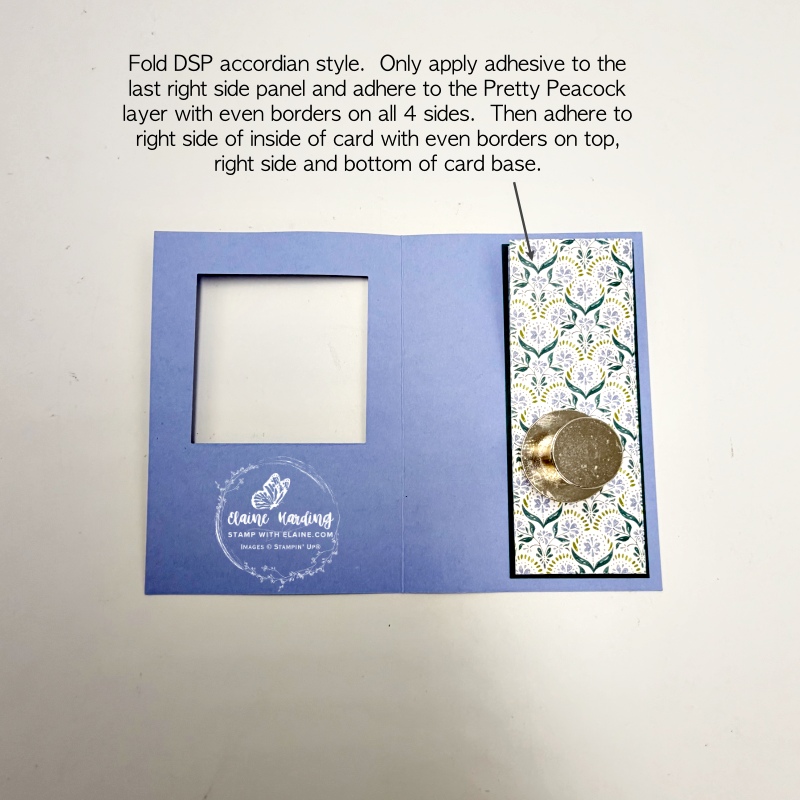
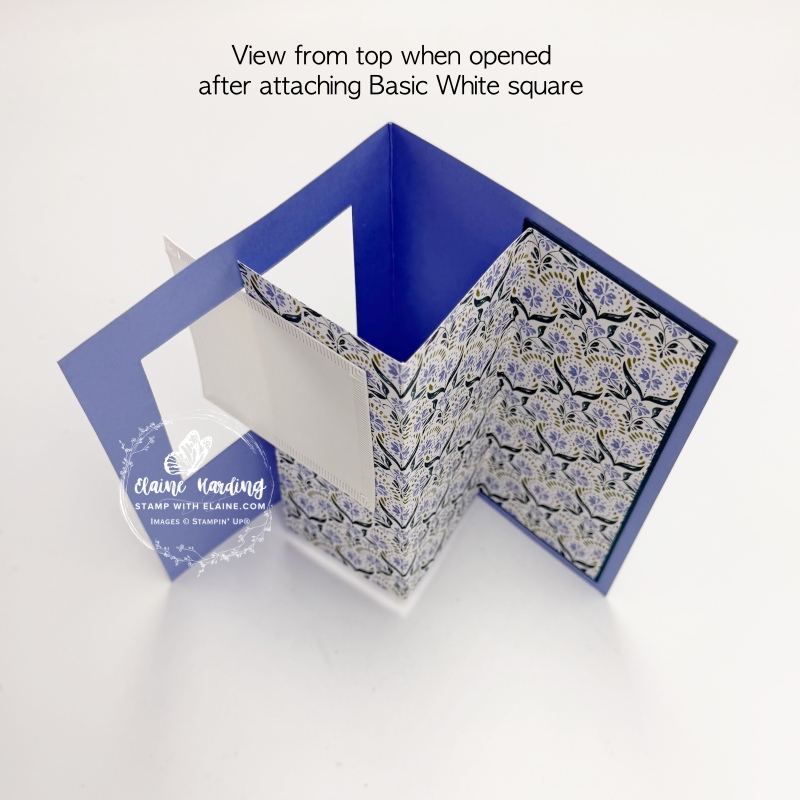
- Fold DSP in accordian style (picture on the right). Only apply adhesive to the last right hand panel and adhere to Pretty Peacock layer leaving an even border on all 4 sides.
- Apply adhesive to back of Pretty Peacock mat layer and adhere to card base on right side leaving an even border on 3 sides – top, right side and bottom.
Attaching White Square
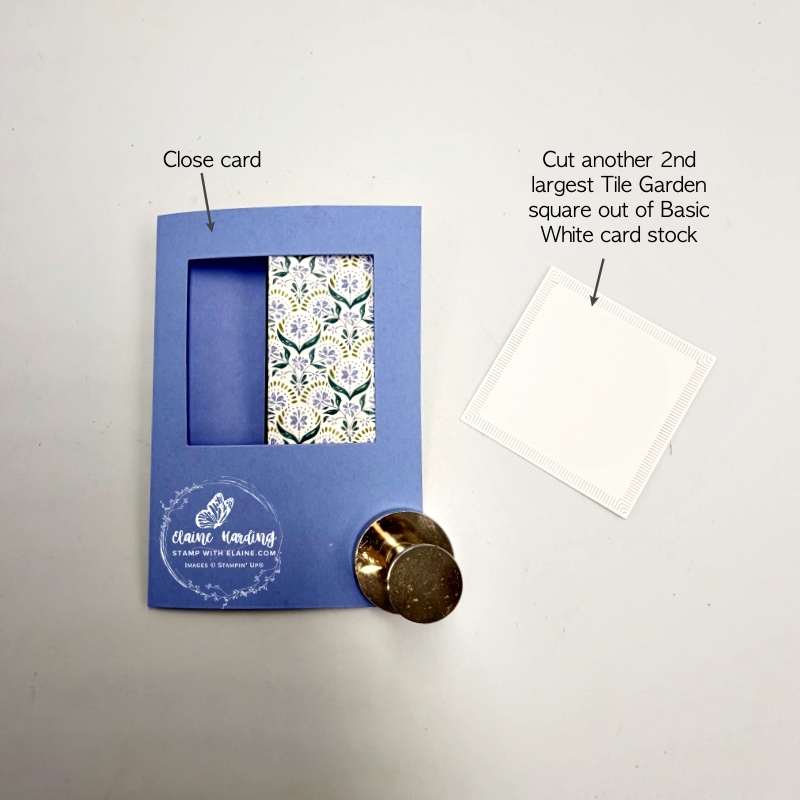
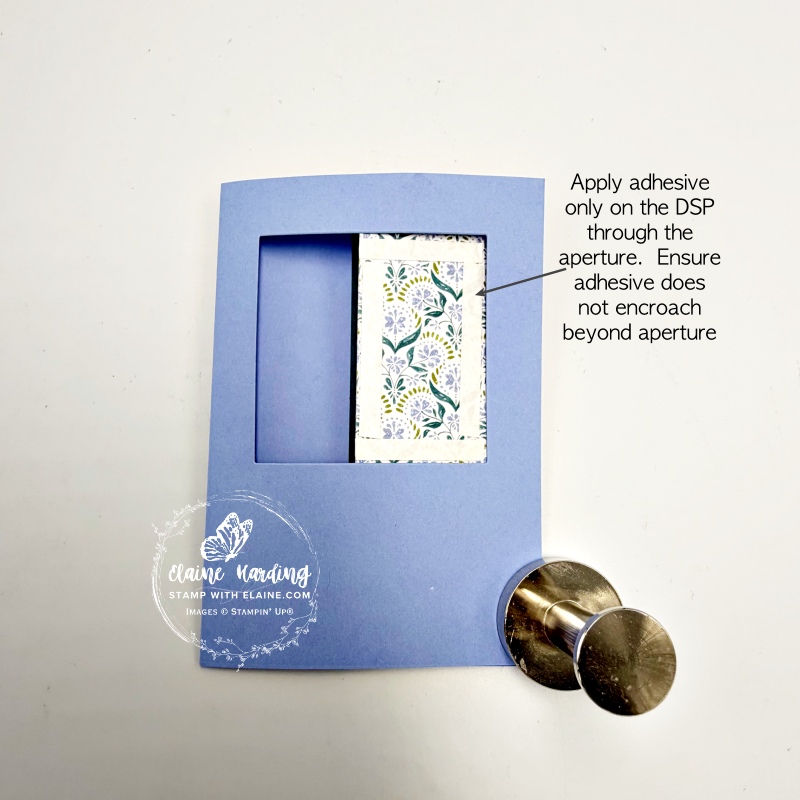
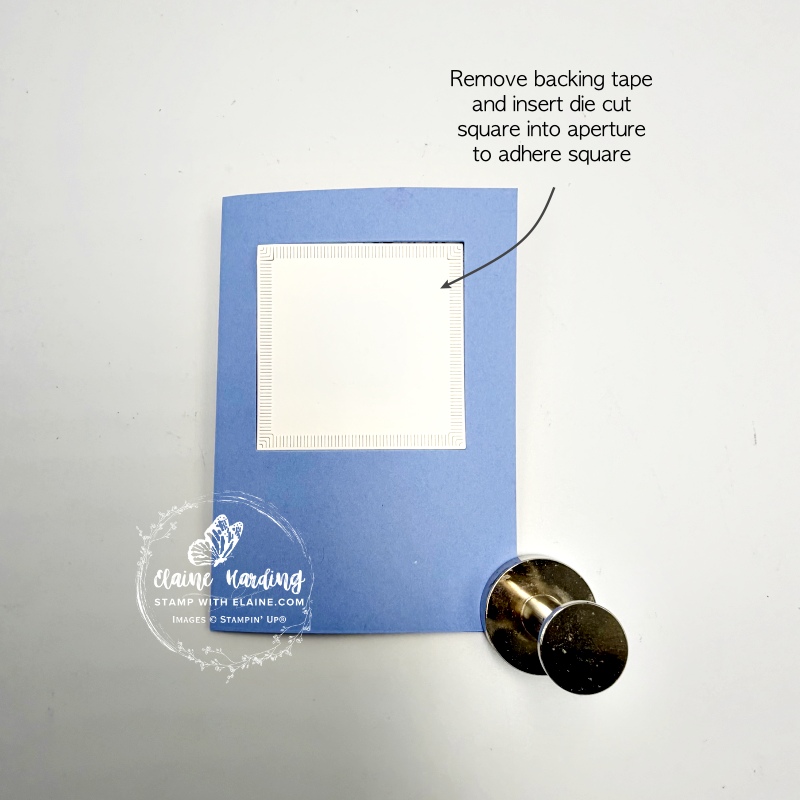
- Leave DSP inside folded as pictured above and close front of card with square aperture on top.
- Apply tear n’ tape as shown in middle picture. If you opt to use Tombow or a multi-purpose glue, ensure you don’t get any glue near the edges beyond aperture.
- Insert the die cut Basic White square inside the aperture to adhere it to DSP.
Decorative elements on Hydrangea Hue “A” square
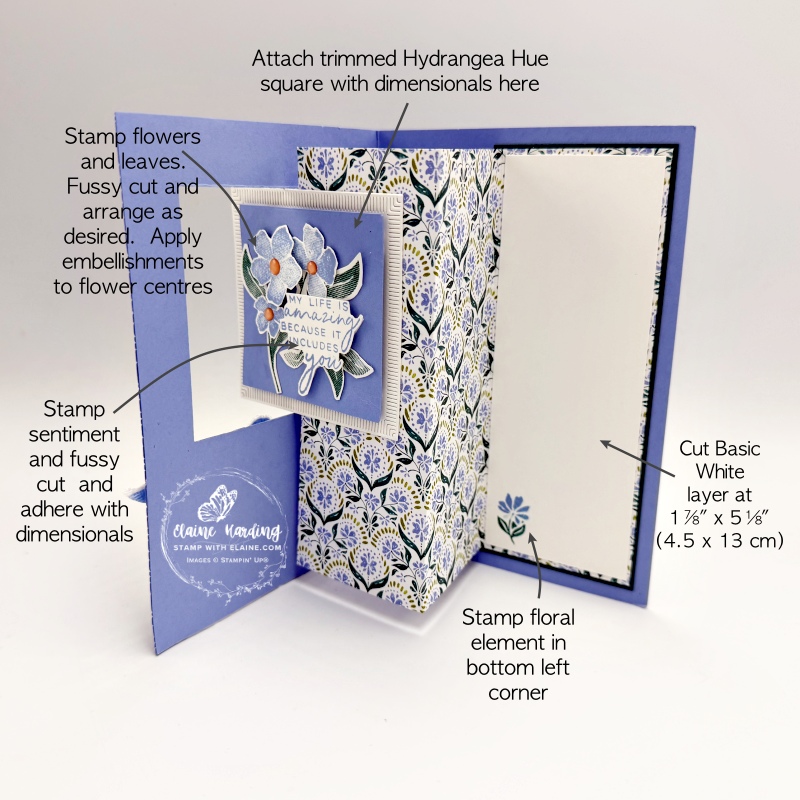
- Stamp and fussy cut the Large, Medium and Small flowers with Hydrangea Hue ink on Basic White scrap card stock. Also stamp leaves with Pretty Peacock. Fussy cut and arrange on the Hydrangea Hue square pictured above and marked as “A”. Adhere largest flower with a dimensional. Tuck the remaining flowers and leaves beneath flowers before adhering with a tiny dot of glue.
- Also stamp greeting with Hydrangea Hue ink on Basic White scrap and fussy cut. Apply dimensionals to the back and adhere on top of flowers.
- Apply dimensionals to back of “A” and adhere on top of Basic White square leaving an even border on all 4 sides.
- Attach Garden Glossy Dots in the flower centres.
Preparing the Hydrangea Hue Eyelets Bloom card front layer
Initially I had stamped the front of the card with the different sized flower heads but I didn’t like it. Looking through my stash, I found the Eyelets Bloom Die which was Product of the Month in April. It’s no longer available but you can substitute it with an alternative embossing folder.
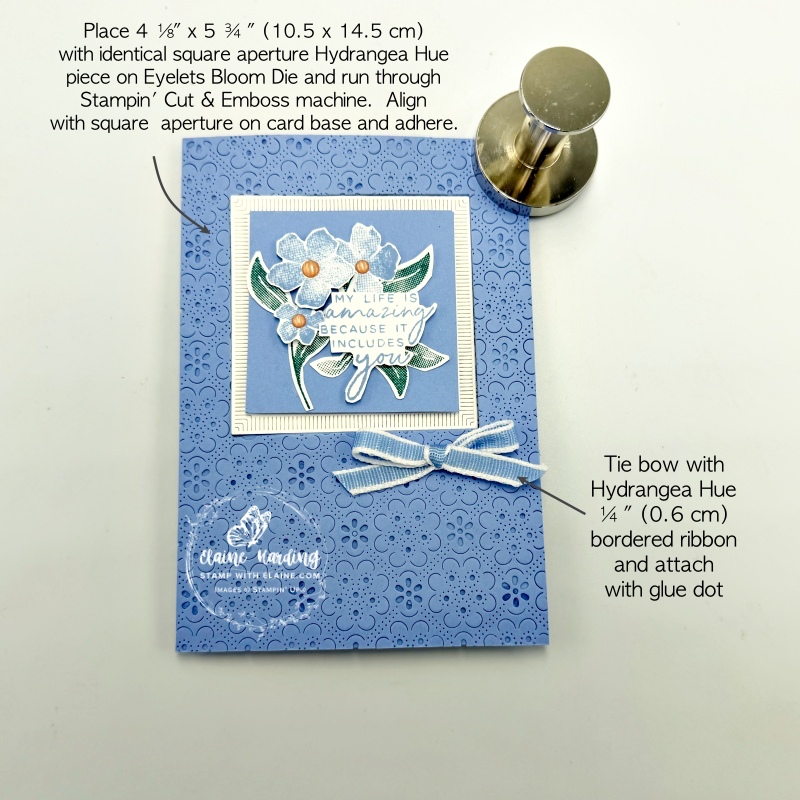
- Cut a square aperture per instructions under the Cutting Guide heading above to mirror the square on the card base card front.
- Place this piece on Eyelets Bloom Die and run it through the machine. Carefully remove it from die with the mini spatula on the Take Your Pick tool. Apply adhesive on back, align with square aperture and edges of card front and adhere.
- Finally, tie a bow with the Hydrangea Hue ¼” (0.6 cm) bordered ribbon and adhere with glue dots below the right bottom of square aperture.
Supply list
Listed below is the supply list. Just click on the picture to take you directly to the item in my online store.
Product List![Tile Garden Bundle (English) [ 168574 ]](https://assets1.tamsnetwork.com/images/EC042017NF/168574s.jpg "Tile Garden Bundle (English) [ 168574 ]")
![Tile Garden Dies [ 168573 ]](https://assets1.tamsnetwork.com/images/EC042017NF/168573s.jpg "Tile Garden Dies [ 168573 ]")
![Tile Garden Photopolymer Stamp Set (English) [ 168567 ]](https://assets1.tamsnetwork.com/images/EC042017NF/168567s.jpg "Tile Garden Photopolymer Stamp Set (English) [ 168567 ]")
![Basic White A4 Cardstock [ 166781 ]](https://assets1.tamsnetwork.com/images/EC042017NF/166781s.jpg "Basic White A4 Cardstock [ 166781 ]")
![Hydrangea Hue A4 Cardstock [ 167688 ]](https://assets1.tamsnetwork.com/images/EC042017NF/167688s.jpg "Hydrangea Hue A4 Cardstock [ 167688 ]")
![Pretty Peacock A4 Cardstock [ 150886 ]](https://assets1.tamsnetwork.com/images/EC042017NF/150886s.jpg "Pretty Peacock A4 Cardstock [ 150886 ]")
![Hydrangea Hue Classic Stampin' Pad [ 167677 ]](https://assets1.tamsnetwork.com/images/EC042017NF/167677s.jpg "Hydrangea Hue Classic Stampin' Pad [ 167677 ]")
![Pretty Peacock Classic Stampin’ Pad [ 150083 ]](https://assets1.tamsnetwork.com/images/EC042017NF/150083s.jpg "Pretty Peacock Classic Stampin’ Pad [ 150083 ]")
![Hydrangea Hue 1/4" (6.4 Mm) Bordered Ribbon [ 168578 ]](https://assets1.tamsnetwork.com/images/EC042017NF/168578s.jpg "Hydrangea Hue 1/4\" (6.4 Mm) Bordered Ribbon [ 168578 ]")
![2026–2028 In Color™ Dots [ 167546 ]](https://assets1.tamsnetwork.com/images/EC042017NF/167546s.jpg "2026–2028 In Color™ Dots [ 167546 ]")

- SHOP ONLINE – EARN 10% REWARDS ON ALL PURCHASES OVER £20
- PURCHASE A STARTER KIT : Get £155 worth of products for only £99. Choose from current catalogues and any specials available. Free Shipping. Read more
- Subscribe to my Video Tutorials – click here
