
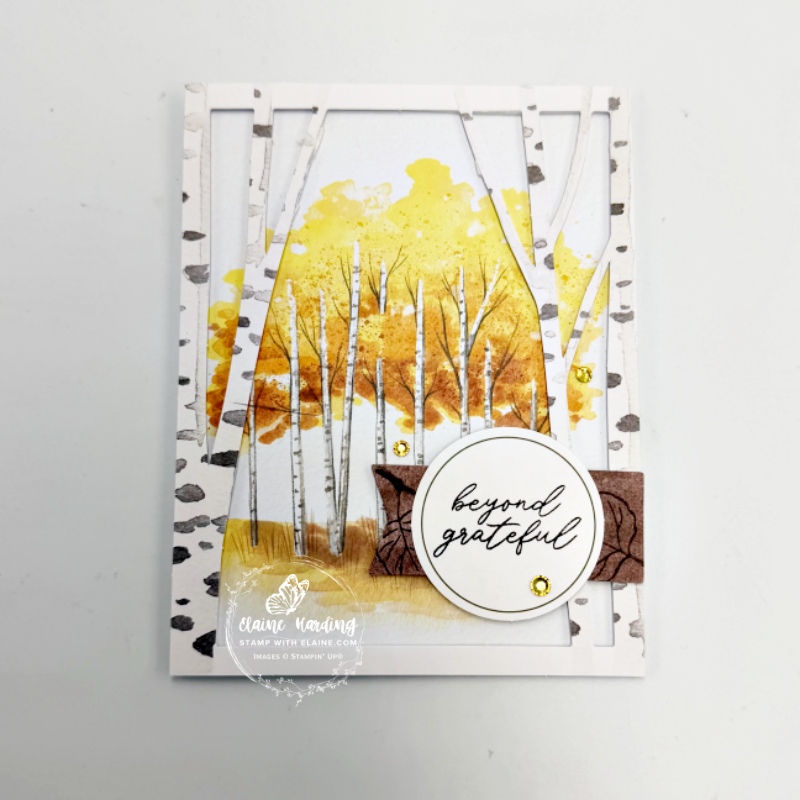
Altered Paper Pumpkin – Aspens of Gratitude. There are two choreographed designs in September’s Paper Pumpkin Kit – Aspens of Gratitude. There are supplies to make 10 cards, 5 each of each design. I made the choreographed version of each of the designs. Today’s one is the portrait design.
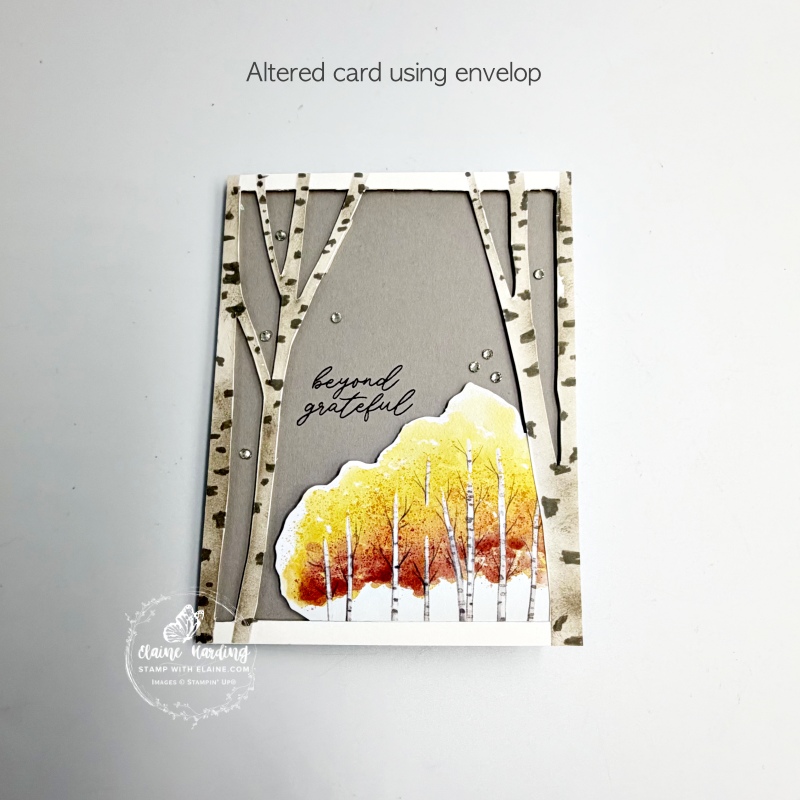
The card on the left picture is the Kit card design and the cards in the middle are my altered versions and I made a third using the envelop and tree frame. So grab a cuppa because we’ve got 3 cards to cover.
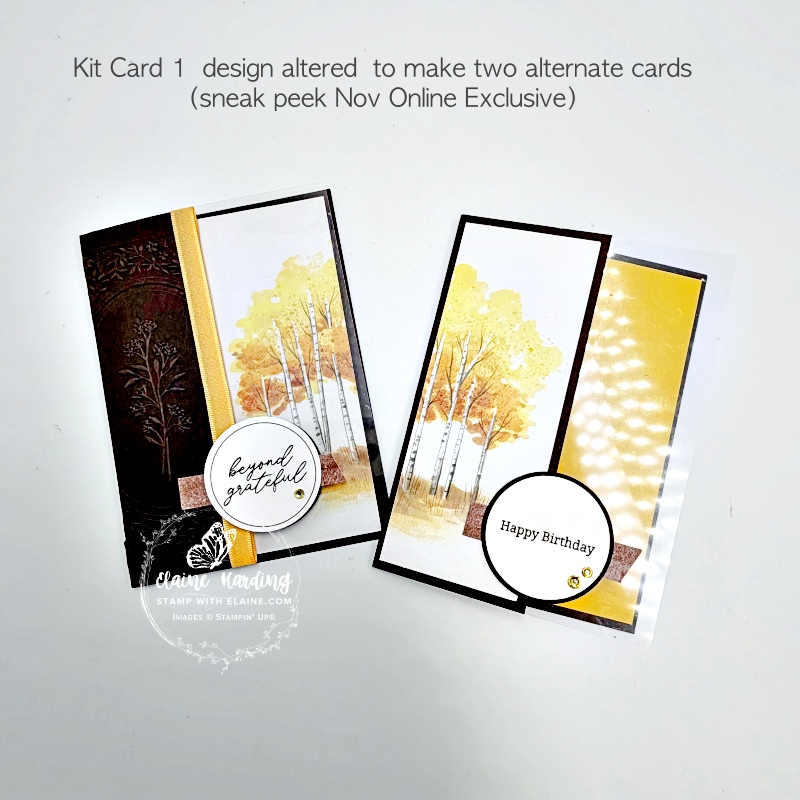
First altered card
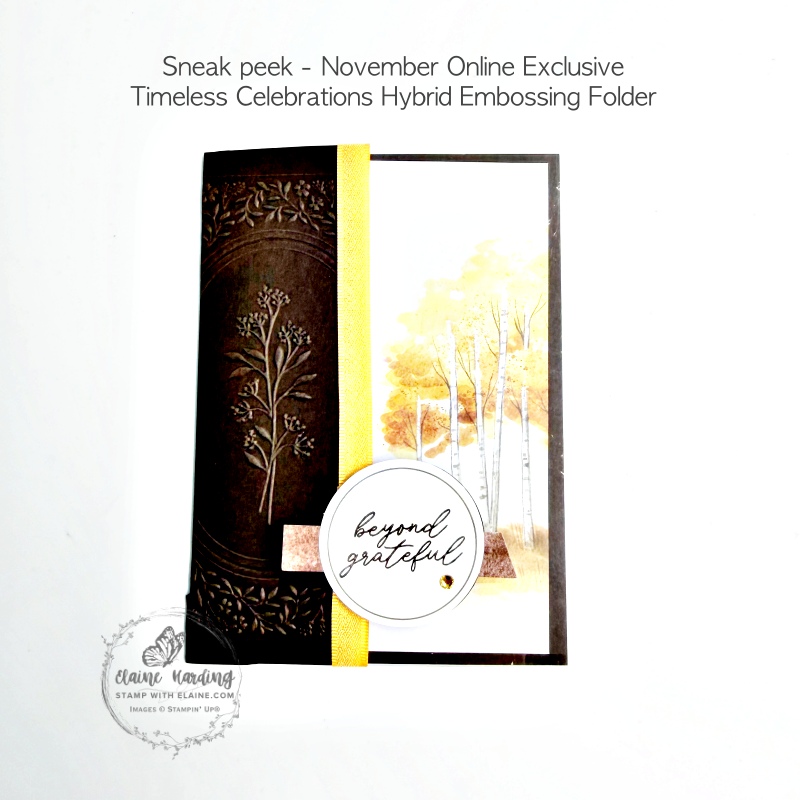
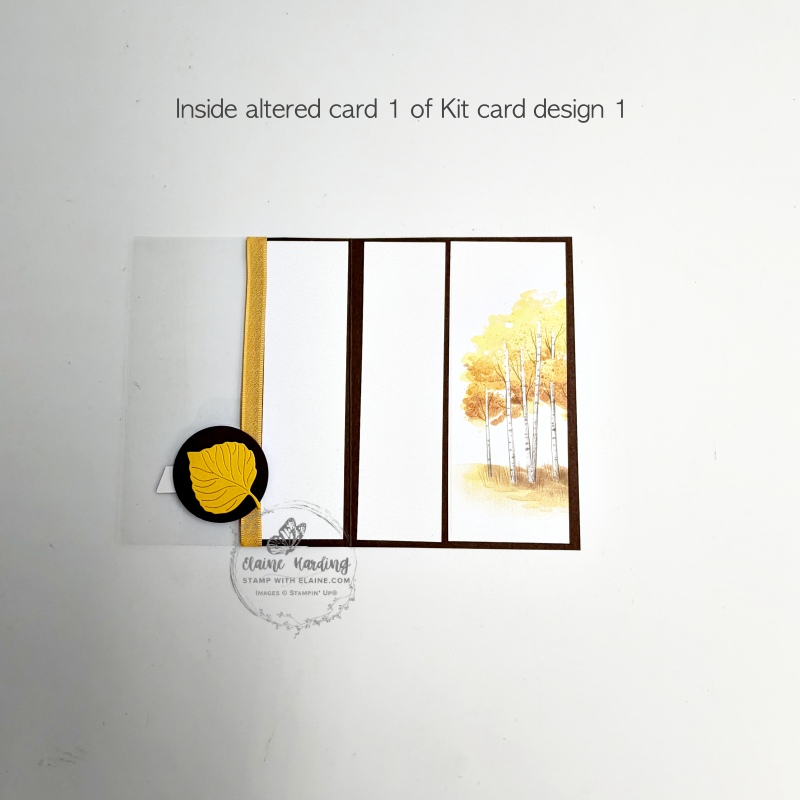
Cutting guide altered card 1
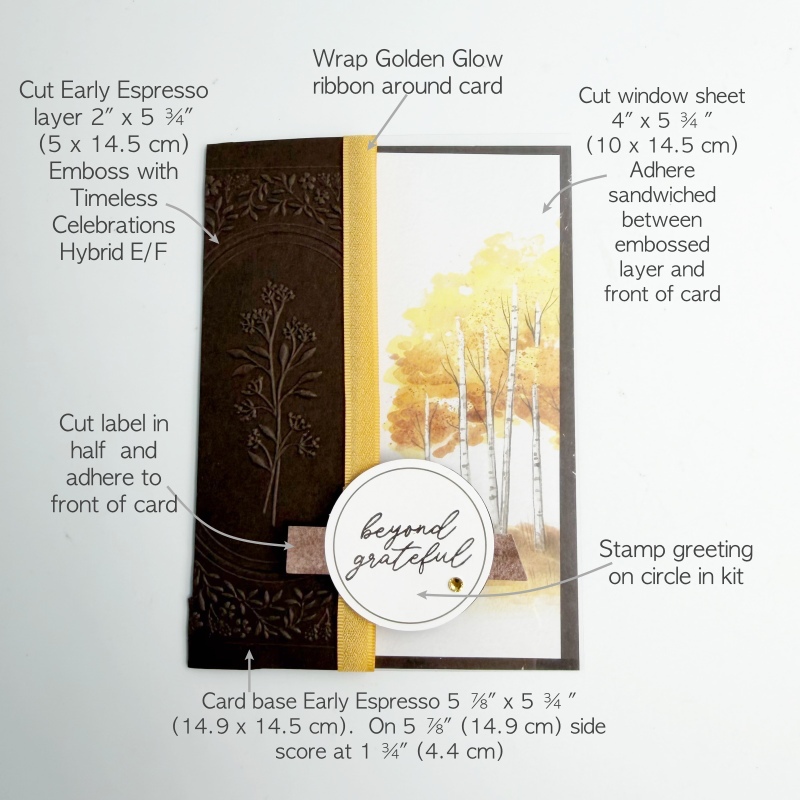
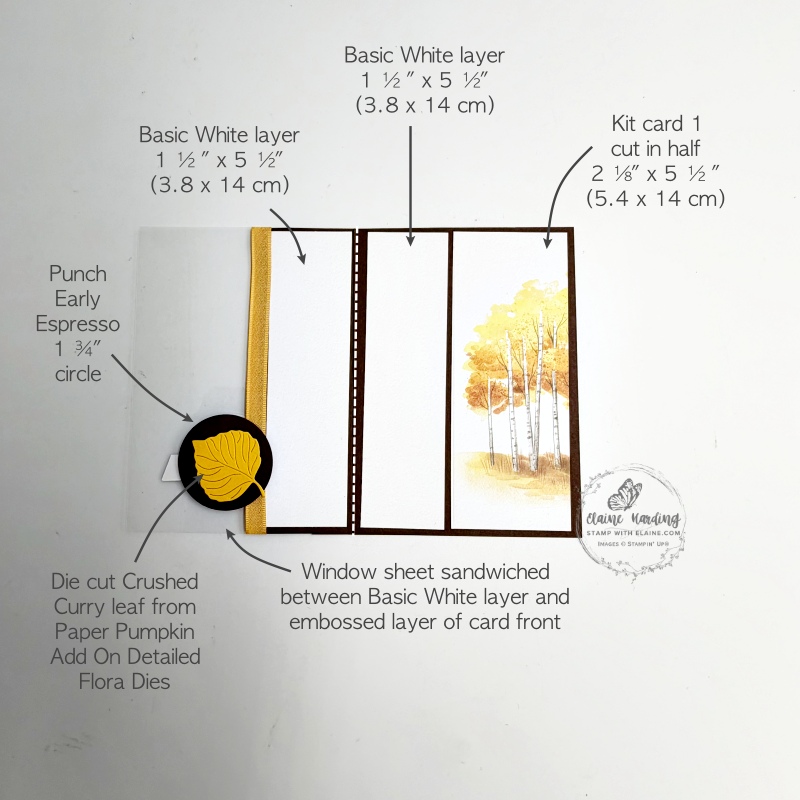
Card Front
- Card base : Early Espresso cut at 5 ⅞” x 5 ¾” (14.9 cm x 14.5 cm). On 5 ⅞” (14.9 cm) side score at 1 ¾” (4.4 cm)
- Cut Early Espresso 2″ x 5 ¾” (5 cm x 14.5 cm). Emboss this piece with new November Online exclusive Timeless Celebration Hybrid Embossing folder.
- Window Sheet – cut 4″ x 5 ¾” (10.2 cm x 14.5 cm). Attach with adhesive to front flap before adhering the embossed Early Espresso.
- Cut kit label in half. Set aside for the moment.
- Stamp sentiment on kit label. Set aside.
Inside card
- Cut 2 pieces Basic White layers at 1 ½” x 5 ½” (3.8 x 14 cm)
- Kit Card Design 1 card front – cut in half at 2 ⅛” x 5 ½” (5.4 cm x 14 cm)
- Punch Early Espresso 1 ¾” circle.
- Die cut leaf in Crushed Curry from the Paper Pumpkin Add On Detailed Flora Dies.
Assembling Card 1
- Apply adhesive to 1 1/4″ (4.4 cm) card front flap. Align window sheet with right edge of inside of card and adhere to flap.
- Align embossed Early Espresso piece with right edge and top and bottom of front flap before adhering on top of window sheet.
- Next adhere the one of the 1 ½” x 5 ½” Basic White layers to the left panel on inside front of card leaving an even border on all 4 sides as shown in picture on right.
- Adhere remaining 1 ½” x 5 ½” Basic White layer to the inside right panel next to score line.
- Apply adhesive on back of Kit card, align right edge, top and bottom with even borders on all 3 sides to the right side of inside of card base as pictured.
Attaching label
- Wrap Golden Glow ribbon around front and back of card to cover join of window sheet and embossed front of card. Adhere ribbon ends with tear n’ tape where the label will be placed.
- Only apply adhesive to left of brown kit card label right side up (when label is turned upside down, this will be on the right) and adhere to front of card.
- Apply adhesive to strip and adhere stamped circle sentiment centred on label on the front.
- Now switch to inside of front of card. Apply adhesives and align the punched 2″ (5 cm) Early Espresso circle with circle on front of card and adhere on top of window sheet.
- Lastly add a gem as shown on picture.
Second altered card
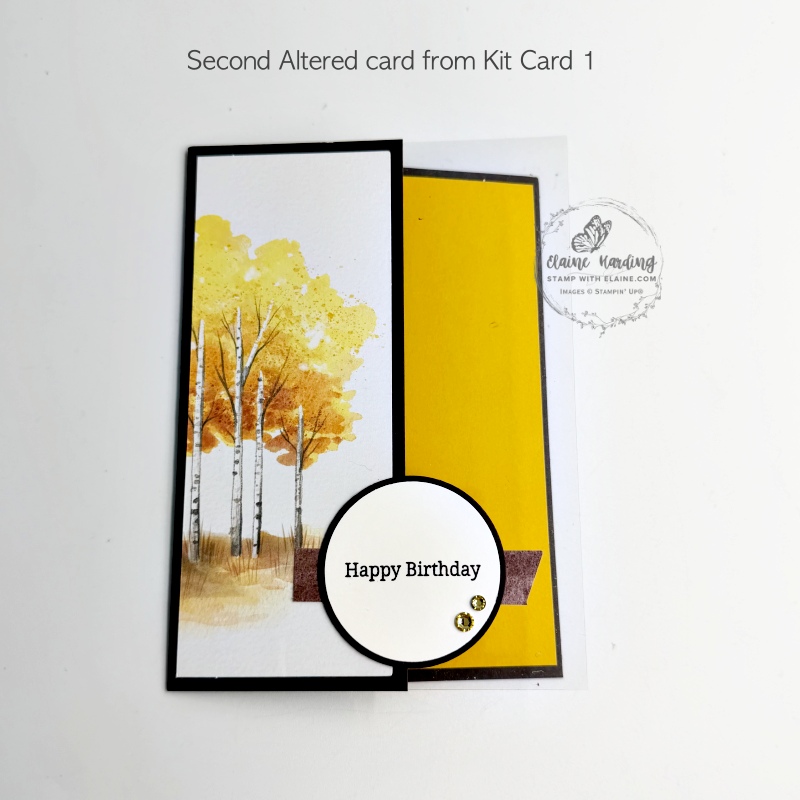
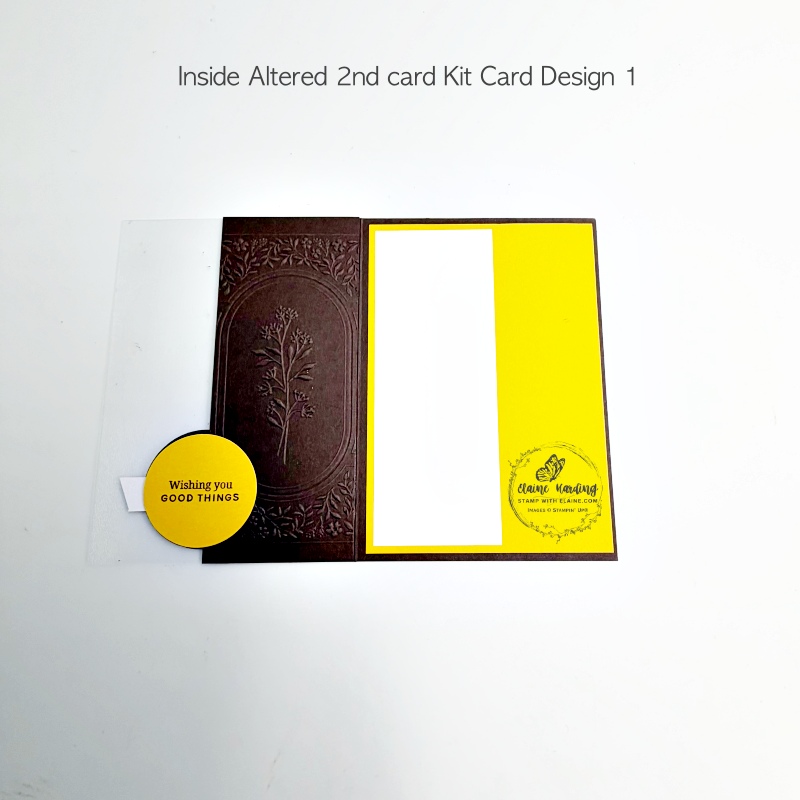
Cutting Guide for Altered card 2
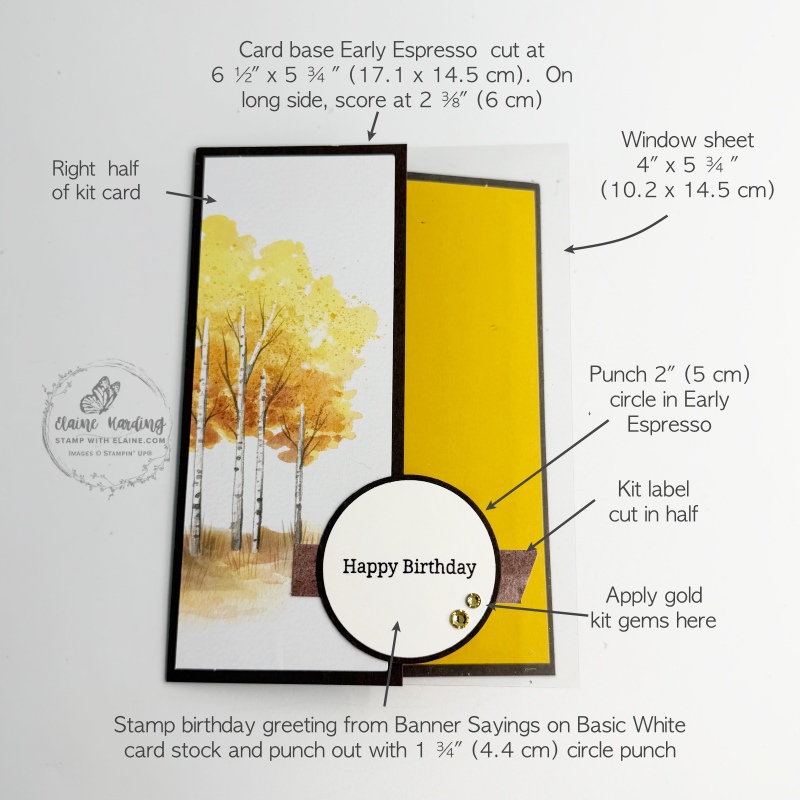
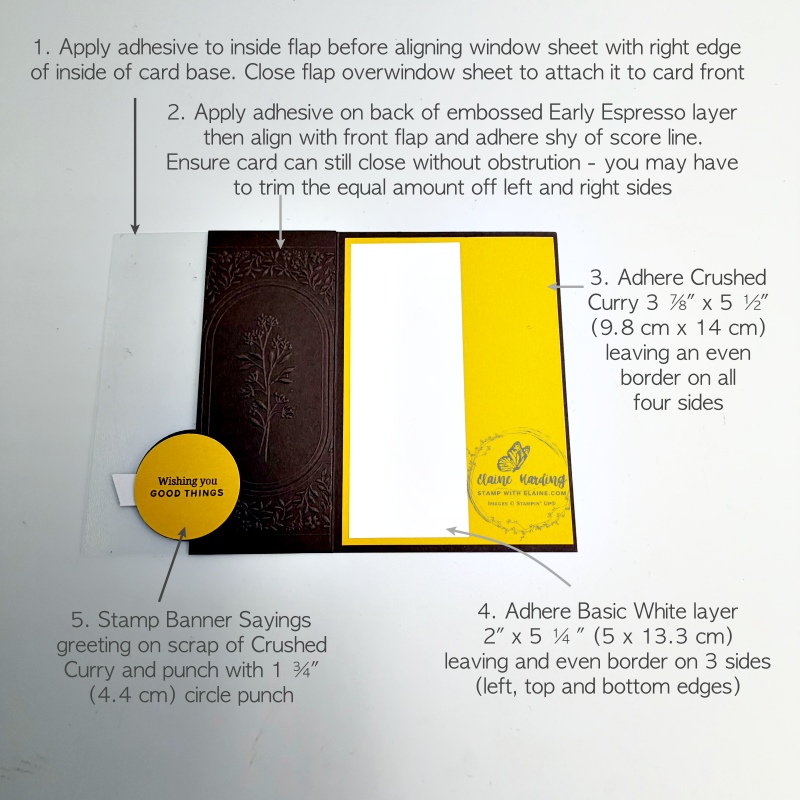
Card front
- Card base Early Espresso cut at 6 ½” x 5 ¾” (17.1 cm x 14.5 cm). On long side score at 2 ⅜” (6 cm)
- Cut window sheet at 4″ x 5 ¾” (10.2 x 14.5 cm)
- Use right half of Kit Card Design 1 piece.
- Punch out a 1 ¾” (4.4 cm) Basic White circle to stamp birthday greeting from Banner Sayings stamp set.
- Early Espresso scrap – punch out a 2″ (5 cm) circle.
- Use other half of brown kit label.
Inside card
- Early Espresso cut at 2 ½” x 5 ¾” (6.4 x 14.5 cm) and embossed with Timeless Celebration Hybrid Embossing folder.
- Crushed Curry layer 3 ⅞” x 5 ½” (9.8 x 14.5 cm)
- Basic White layer 2″ x 5 ¼” (5 cm x 13.3 cm)
- Punch a Crushed Curry 1 ¾” circle for sentiment.
Assembling card 2
- Adhere right half of Kit Card Design 1 to front flap leaving an even border on all 4 sides.
- Apply adhesive on half of Kit card brown label which will attach to front flap.
- Centre and adhere stamped sentiment Basic White circle on to 2″ (5 cm) Early Espresso circle then centre and adhere on top of Kit card brown label as pictured. Add embellishments to circle as pictured.
- Inside of card – open flap and apply adhesive to inside flap.
- Align window sheet with top, bottom and right edge of inside of card and close flap over window sheet to attach to front of card.
- Adhere embossed Early Espresso piece to inside flap, aligning it with edge of front flap so that it doesn’t show when card is closed. You may have to trim equal amounts on right and left edges to ensure card flap closes without obstruction.
Inside right & label
- Adhere Crushed Curry piece to inside right of card base leaving an even border on all 4 sides.
- Basic White piece – adhere to left on top of Crushed Curry layer leaving an even border on 3 sides – left edge, top and bottom.
- Centre the stamped 1 ¾” Crushed Curry label with the Early Espresso circle visible from behind window sheet and adhere to back of window sheet.
Third card made with envelop
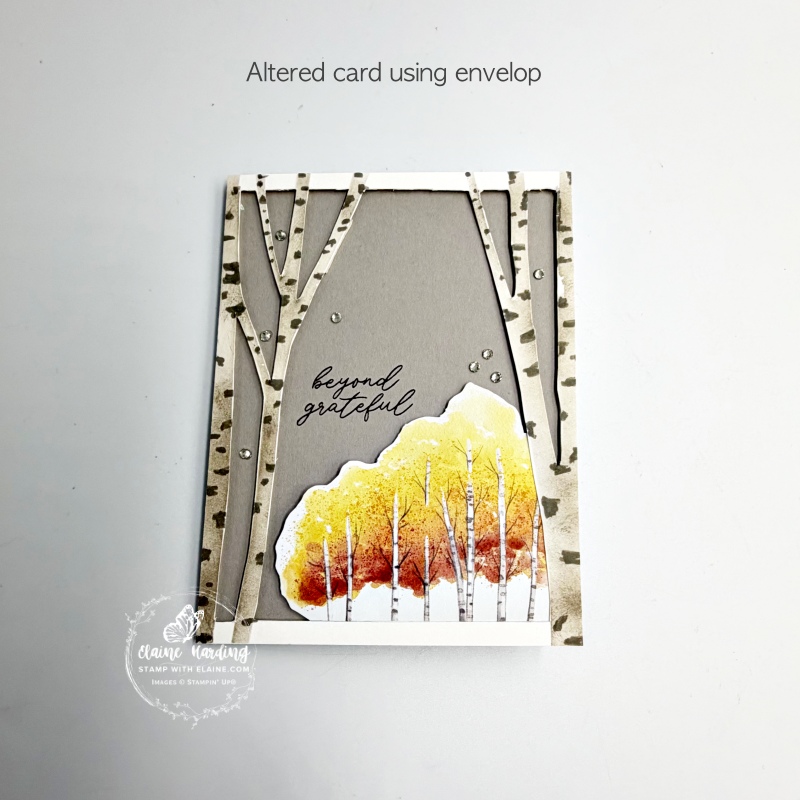
Cutting guide for card made with Envelope
Card front
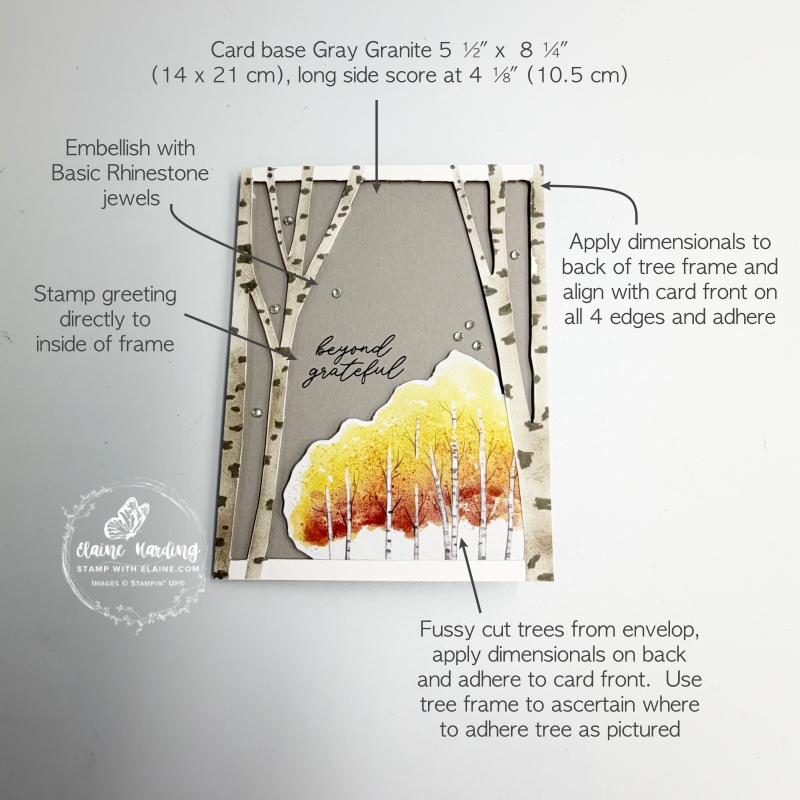
- Card base Gray Granite cut at 5 ½” x 8 ¼” (14 x 21 cm). Long side score at 4 ⅛” (10.5 cm)
- Fussy cut Aspen trees from envelop.
Inside card
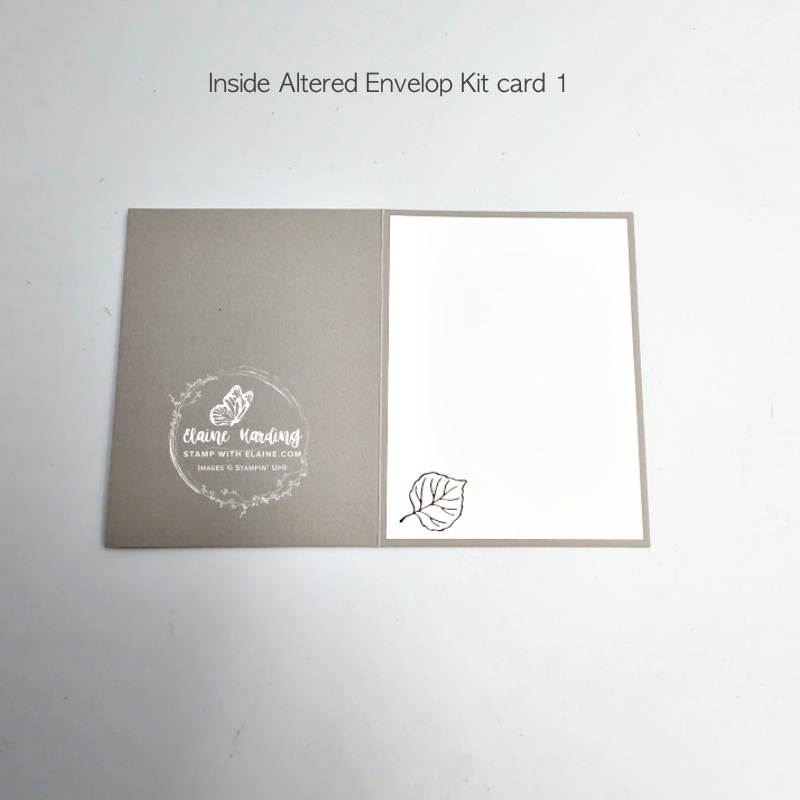
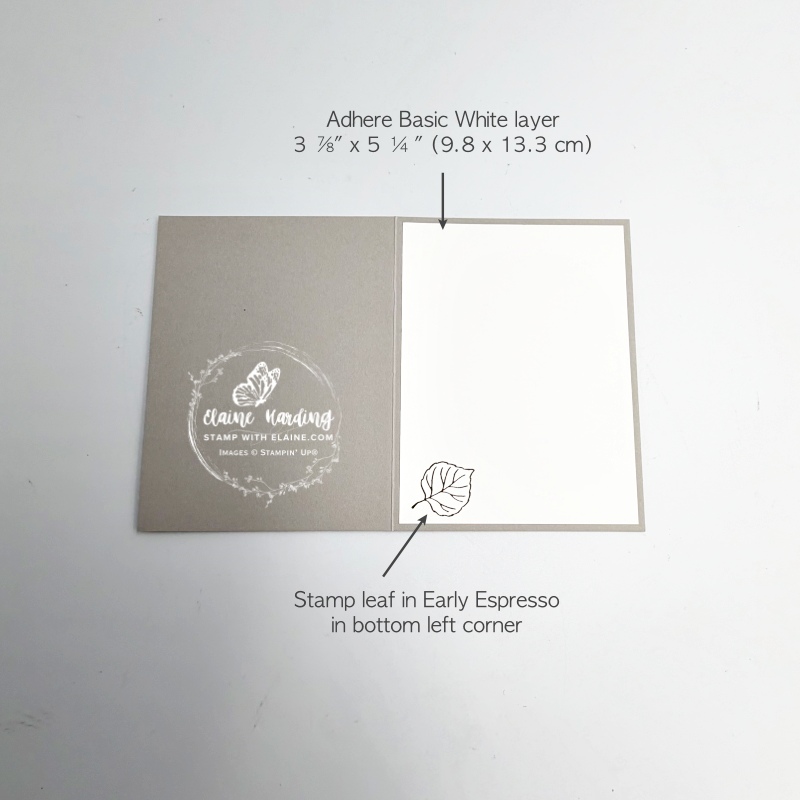
- Cut Basic White layer 3 ⅞” x 5 ¼” (9.8 x 13.3 cm)
Assembling card
- Apply dimensionals to back of Kit Card 1 design tree frame.
- Adhere dimensionals to back of fussy cut Aspen Tree image. Use the Kit Card 1 design tree frame to gauge where to adhere Aspen Tree image – you want as much of the image to be seen and not hidden behind tree frame. Once happy with postion, remove backing and adhere to front of card.
- Remove backing from dimensionals on tree frame, align with top, bottom left and right edges and adhere to card front as pictured.
- Stamp greeting inside tree frame.
- Apply several Basic Rhinestone jewels as pictured.
- Adhere Basic White layer to inside of card leaving an even border on all 4 sides.
- Stamp leaf in bottom left corner to complete card.
Supply list
Listed below is the supply list. Just click on the picture to take you directly to the item in my online store.
I will add the Timeless Celebrations Hybrid Embossing Folder when it becomes available in November.
Product List![Detailed Flora Dies (English) [ 168664 ]](https://assets1.tamsnetwork.com/images/EC042017NF/168664s.jpg "Detailed Flora Dies (English) [ 168664 ]")
![Banner Sayings Photopolymer Stamp Set (English) [ 167044 ]](https://assets1.tamsnetwork.com/images/EC042017NF/167044s.jpg "Banner Sayings Photopolymer Stamp Set (English) [ 167044 ]")
![Banner Sayings Bundle (English) [ 167051 ]](https://assets1.tamsnetwork.com/images/EC042017NF/167051s.jpg "Banner Sayings Bundle (English) [ 167051 ]")
![1-3/4" (4.4 Cm) Circle Punch [ 119850 ]](https://assets1.tamsnetwork.com/images/EC042017NF/119850s.jpg "1-3/4\" (4.4 Cm) Circle Punch [ 119850 ]")
![2" (5.1 Cm) Circle Punch [ 133782 ]](https://assets1.tamsnetwork.com/images/EC042017NF/133782s.jpg "2\" (5.1 Cm) Circle Punch [ 133782 ]")
![Paper Pumpkin Subscription [ 166815 ]](https://assets1.tamsnetwork.com/images/EC042017NF/166815s.jpg "Paper Pumpkin Subscription [ 166815 ]")
![Paper Pumpkin 3 Month Subscription [ 166816 ]](https://assets1.tamsnetwork.com/images/EC042017NF/166816s.jpg "Paper Pumpkin 3 Month Subscription [ 166816 ]")
![Paper Pumpkin 6 Month Subscription [ 166817 ]](https://assets1.tamsnetwork.com/images/EC042017NF/166817s.jpg "Paper Pumpkin 6 Month Subscription [ 166817 ]")
![Paper Pumpkin 12 Month Subscription [ 166818 ]](https://assets1.tamsnetwork.com/images/EC042017NF/166818s.jpg "Paper Pumpkin 12 Month Subscription [ 166818 ]")
![Basic White A4 Cardstock [ 166781 ]](https://assets1.tamsnetwork.com/images/EC042017NF/166781s.jpg "Basic White A4 Cardstock [ 166781 ]")
![Early Espresso A4 Card Stock [ 121686 ]](https://assets1.tamsnetwork.com/images/EC042017NF/121686s.jpg "Early Espresso A4 Card Stock [ 121686 ]")
![Card Stock A4 Crushed Curry [ 131288 ]](https://assets1.tamsnetwork.com/images/EC042017NF/131288s.jpg "Card Stock A4 Crushed Curry [ 131288 ]")
![Rhinestone Basic Jewels [ 144220 ]](https://assets1.tamsnetwork.com/images/EC042017NF/144220s.jpg "Rhinestone Basic Jewels [ 144220 ]")
![Golden Glow 3/8" (1 Cm) Bordered Ribbon [ 167548 ]](https://assets1.tamsnetwork.com/images/EC042017NF/167548s.jpg "Golden Glow 3/8\" (1 Cm) Bordered Ribbon [ 167548 ]")

- SHOP ONLINE – EARN 10% REWARDS ON ALL PURCHASES OVER £20
- PURCHASE A STARTER KIT : Get £155 worth of products for only £99. Choose from current catalogues and any specials available. Free Shipping. Read more
- Subscribe to my Video Tutorials – click here
