
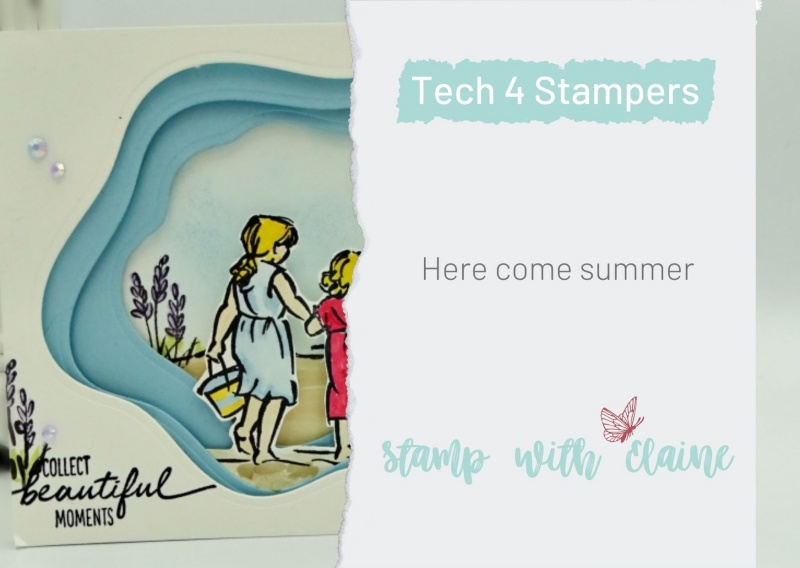
Goodness gracious, May whisked by and it’s time for another blog hop so I created this Diorama card for Summer for June’s Tech 4 Stampers Blog Hop. Thank you to the lovely Sara Sayers who set the theme “Here comes Summer” for this month’s challenge.

The Build & Bloom Stampers Blog hop (formerly Tech 4 Stampers)is a monthly subscription group run by Louise Sims. She mentors and enables members to understand IT jargon and equips them with a fountain of Technical knowledge to build or manage their own websites. It takes the mystery out of “tech” and I’ve certainly grown in confidence thanks to her expertise, patience and guidance. Not only that, I’ve met and made new friends with my fellow “Techs” and love the camaraderie within the group.
Combining Old with New
Oftentimes, we overlook the old when we have so many nice new toys to play with. So, I decided for this month’s challenge I would combine something old with something new to fulfill the brief.
My old is the “Beautiful Moments” stamp set. I love those sketches particularly of the two little girls holding hands and carrying buckets in the other. To me, that definitely evokes thoughts of summer – buckets and spades, the beach and the sea! The new is this fantastic set of Layering Diorama dies.
It is common practice to use half an A4 sheet cut 8-1/4″ x 5-7/8″, fold it in half and orient it in landscape to create a “tent” fold. When you stand a tent fold up, it has a tendency to slide and flop over time. To prevent that, I use this method for landscape cards. I cut the card base out of Basic White (thick) so that it measures 4-1/8″ x 11-3/4″ and fold it in half. The orientation is already in landscape without having to use the “tent” fold and stands up perfectly.
To create the layers, I cut 2 pieces in Basic White and 2 pieces in Balmy Blue the same size as the card front. The Layering Diorama dies did the rest. Each layer was cut with a smaller die than the previous layer to create the diorama effect.
Constructing the layered card fronts
On the first layer – I stamped the mother and daughter image first, then lay the next to largest die on top and only partially die cut the aperture. I then fussy cut the silhouettes so that you can see through to the other layers.
Second & Third Layers – The little girls were stamped on some Basic White scrap, fussy cut and adhered behind the first Balmy Blue diorama layer. This was then attached to the second Balmy Blue layer.
Fourth Layer -The final scene was stamped with Tuxedo Black Memento ink on the second piece of Basic White. The sky was created with a blending brush in Balmy Blue. The sand and floral image were coloured in with Stampin’ Blends.
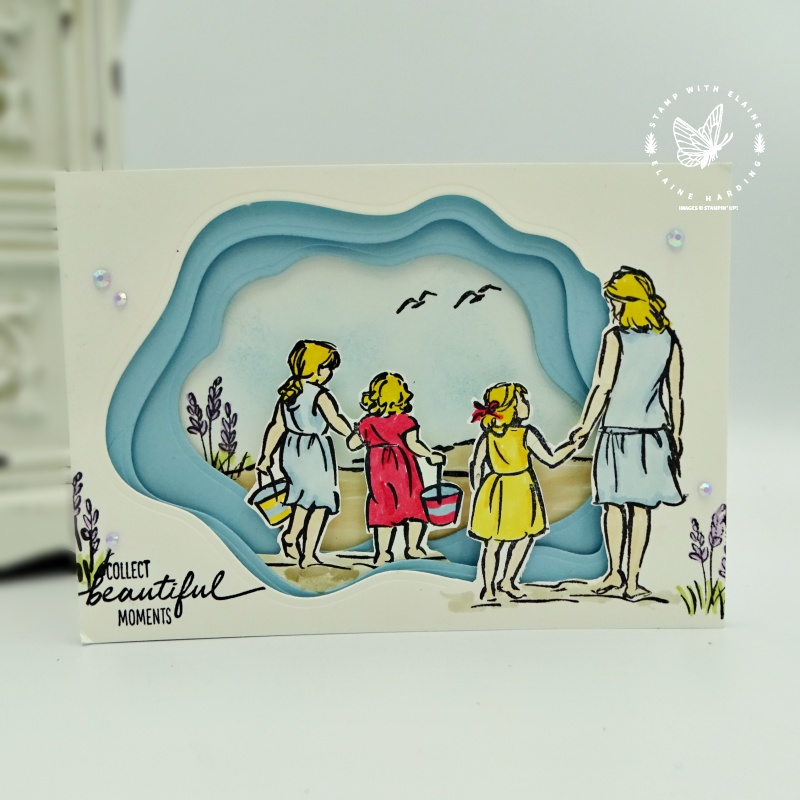
I added some jewels on the top layer as a finishing touch.

As the front was so “busy”, I kept the inside simple, but added a Balmy Blue mat layer in order to balance out the “top heavy” card front. I omitted stamping any sentiments so that the card can be used for any occasion.
If you’d like to see another diorama card using these Layering Diorama with a different stamp set “Friends are like seashells” click HERE .
List of supplies:
Product List


- SHOP ONLINE – EARN 10% REWARDS ON ALL PURCHASES OVER £20
- PURCHASE A STARTER KIT : Get £155 worth of products for only £99. Choose from current catalogues and any specials available. Free Shipping. Read more
- Subscribe to my Video Tutorials – click here
What a pretty card Elaine. Plus great minds again!!! Thanks for hopping with us again this month.x
Thank you Sara, and thank you for coming up with such a lovely theme for June!
Lovely card. Reminds me of happy family holidays. Thank you.
Thank you Sue, it does, indeed.
Those Diorama dies are definitely a sleeper, I love your beach scene and you are always so inspirational Elaine.
Thank you, you’re very kind.
Such a pretty summer’s card Elaine and a great way to showcase the diaroma dies xx
Thank you Carrie. I ‘ve had lots of fun with these dies!