
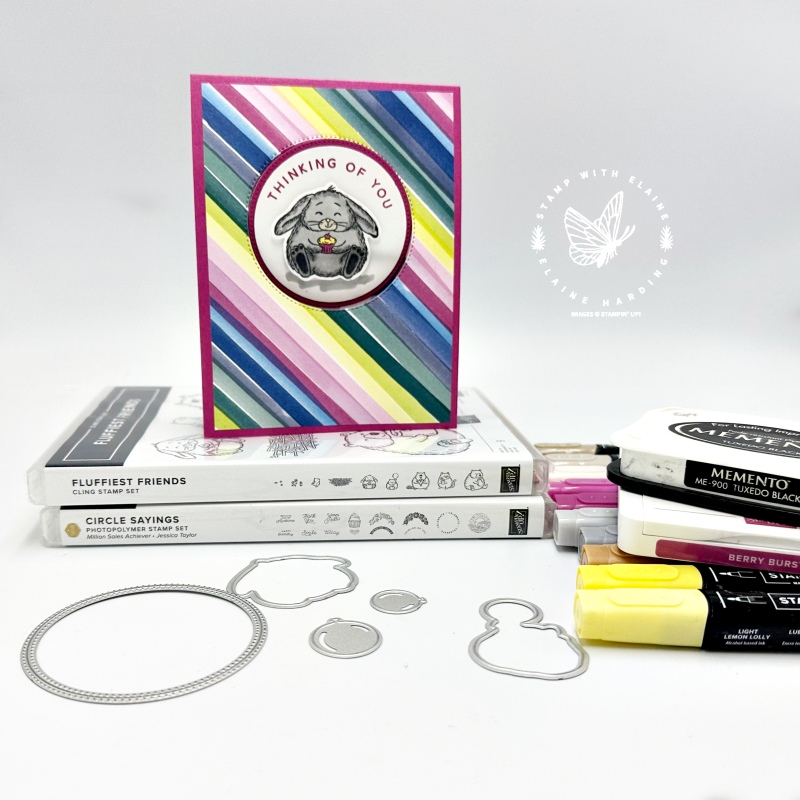
Happy Sunday – Fluffiest Friends unveiled – a fun fold surprise which is quick and simple to make. It’s shorter than my normal cards in order to make the pop-up mechanism work.
I’ve had the Bright & Beautiful 6″x 6″ papers for ages. They are part of the Bright & Beautiful Suite Collection in the 2023-2024 Annual Catalogue. I didn’t get the Beautiful Balloons stamp set or the Beautiful Balloon dies, only the papers. I’m normally a “pastel” girl, but as winter draws in, I needed something bright to cheer me up!
Truth be known, I dismissed the Fluffiest Friends online exclusive during pre-order, but when they had the free shipping promotion, I thought I’d put a small order in and I’m so glad I did. These little critters are growing on me and while I was colouring them in, they made me smile!
Cutting guide
- Card base : Berry Burst cut at 4 ⅛” x 11” (10.5 cm x 28 cm)
- Bright & Beautiful DSP card front : 3 ⅞” x 5 ¼” (10 cm x 13.5 cm)
- Pop up mechanism inside card : Basic White 3 ¾” x 9 ¼” (9.5 cm x 23.5 cm). Long side on top score at 2″, 4″, 6″ (5 cm, 10.2 cm, 15.2 cm)
- Mat layer #1 : Berry Burst cut 2 pieces 1 ¾” x 3 ½” (4.5 cm x 9 cm)
- Bright & Beautiful Mat layers 2 pieces, different patterns : 1 ⅝” x 3 ⅜” (4 cm x 8.5 cm)
- Scraps of Basic White to punch out 2 ⅜” circle, stamp the rabbit and hamster with balloon.
- Scraps of Berry Burst and Bubble Bath card stock
Instructions
Card front
- Adhere DSP that measures 3 ⅞” x 5 ¼” (10 cm x 13.5 cm) to front of card base. Take card base and only apply adhesive on the perimeter of the rectangle only because you need to use the die cut a circle later.
- Use the 2nd largest circle from Stylish Shapes Dies to cut a circle through card base and DSP in the top third of card front. Ensure the top, and both sides have equidistant margins. Set aside the Berry Burst circle and reserve the DSP one for another project in the future.
Pop up mechanism

- Take the Pop Up Basic White mechanism piece [3 ¾” x 9 ¼” (9.5 cm x 23.5 cm)] and lay it out so that the long side is facing you. The pre-scored 2″, 4″ and 6″ panels should be on the left. Adhere Berry Burst Mat layers on the 4″ and 6″ panel (see pic). The 2″ panel should be left white as this will be adhered to the back of the card front.
- Next adhere the different Bright & Beautiful Mat layers on top of the Berry Burst mat layers.
- Position the 3 ¼” x 3 ¾” section to the inside of the card base leaving an even border on all 3 sides and adhere it.
- Fold the Pop up mechanism down so that the white 2″ section is exposed and touches the score line of the card base.
- Apply adhesive to the sides and along the width, take care not to get any glue in the circle aperture. Keep the Pop up mechanism lying flat and close the card (bringing front of card down on top of pop up mechanism). Wait for it to bond.
- On a scrap of Basic White, stamp the hamster with balloon image in Tuxedo Black Memento ink. Colour in the hamster and balloon with Stampin’ Blends in Crumb Cake and Lemon Lolly combos and Light Pecan Pie.
- Die cut one large balloon in Bubble Bath, and one small balloon in Berry burst.
- Apply adhesive to back of balloons and stagger and adhere to the hamster.
- Adhere hamster and balloons to the bottom right of the inside of the card.
Prepare circle feature
- Punch out a 2 ⅜” circle from Basic White Scrap.
- Stamp sentiment from Circle Sayings in Berry Bust on 2 ⅜” circle.
- On scraps of Basic White, stamp the rabbit and hamster with balloon with Tuxedo Black Memento ink.
- Colour in the rabbit with Stampin’ Blends in Smoky Slate, Crumb Cake, Lemon Lolly and Berry Burst.
- Apply adhesive only to the lower half of circle on the portion where you can see the DSP and carefully insert Berry Burst Stylish Shapes dies cut circle in.
- Finally adhere 2 ⅜” stamped Basic White circle on top of the Berry Burst circle leaving an even border all round.
- Attach dimensionals to back of die cut rabbit and attach to Basic White circle underneath sentiment.
Supply list
Listed below is the supply list. Just click on the picture to take you directly to the item in my online store.
Product List
")

 Designer Series Paper")


Enjoy the rest of your weekend! Hope you all had a good Thanksgiving!

- SHOP ONLINE – EARN 10% REWARDS ON ALL PURCHASES OVER £20
- PURCHASE A STARTER KIT : Get £155 worth of products for only £99. Choose from current catalogues and any specials available. Free Shipping. Read more
- Subscribe to my Video Tutorials – click here