
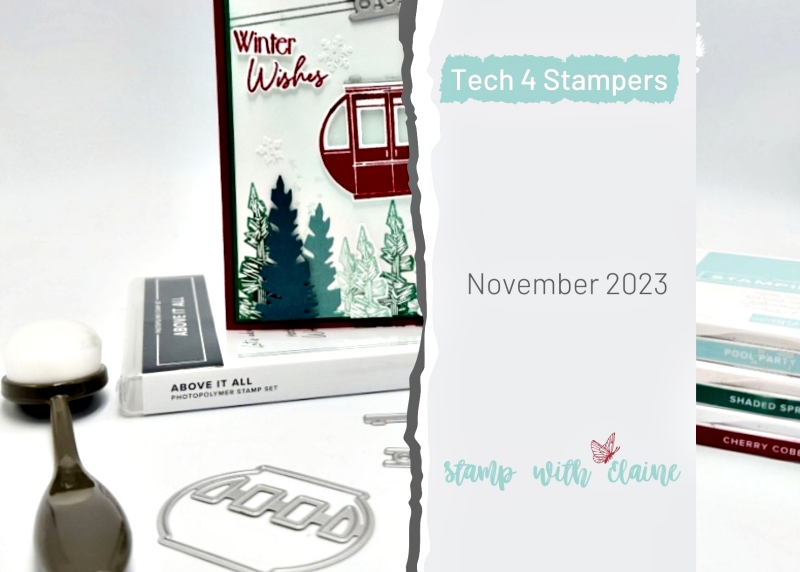
In November there is a red & green theme for Tech 4 Stampers Blog Hop. As Christmas approaches it stands to reason that this is an obvious choice for a colour challenge. I thought to myself, easy peasy, but then got Creator’s block! Despite having a decent stash of Christmas stamps, Christmas papers nothing was forthcoming until I eventually espied a sample in the Mini Catalogue with the Above it All stamps and dies.
The Catalogue itself is a great source of inspiration, and it certainly baled me out this time! Whenever you draw a blank and don’t know what to do, the Catalogue is your bible!

The Build & Bloom Stampers Blog hop (formerly Tech 4 Stampers)is a monthly subscription group run by Louise Sims. She mentors and enables members to understand IT jargon and equips them with a fountain of Technical knowledge to build or manage their own websites. It takes the mystery out of “tech” and I’ve certainly grown in confidence thanks to her expertise, patience and guidance. Not only that, I’ve met and made new friends with my fellow “Techs” and love the camaraderie within the group.
So this is my version – I’ve tweaked it, of course and I chose a rich red with Cherry Cobbler and Shaded Spruce. Hope you like it!

Card cutting guide
- The card base is ½ A4 sheet of Cherry Cobbler folded in half, in Europe & IE this is : 5 ⅞” x 8 ¼” (14.9 cm x 21 cm)
- Cut 2 mat layers #1 in Shaded Spruce ⅛” smaller than the card front. In Europe & IE this measures 3 ⅞” x 5 ⅝” (9.8 cm x 14.3 cm)
- Mat layer #2 in Basic White – cut 2 pieces 3 ¾” x 5 ½” (9.5 cm x 14 cm)
- Scraps of Basic White for stamping/die cutting gondola, greeting and trees
- Smoky Slate scrap to die cut the mechanical grip for the gondola
- Lost Lagoon and Pretty Peacock scraps for die cutting silhouette of trees
Instructions on card assembly
Card front
- Use a blending brush to lightly apply Pool Party all over the Basic White Mat layer #2 card front for the sky
- Then stamp the cable in Smoky Slate at the top of the card, and another cable in the opposite direction without re-inking and at the same time intersecting the previously stamped full strength cable.
Preparing Gondola and mechanical grip
Next step is to prepare the Gondola in order to establish where you should stamp the trees.
- Die cut 4 pieces of the mechanical grip in Smoky Slate. Stack and glue this together. Then adhere it over the stamped cable.
- Cut a small piece of window sheet.
- Prepare the gondola – stamp one in Cherry Cobbler and die cut. Also die cut a second gondola in Basic White.
- Sandwich the window sheet between the gondolas to cover the apertures for the windows on the gondola. Trim off excess window sheet.
- Attach mini dimensionals to the lower half on the back of the gondola and adhere the top to the Somky Slate mechanical grip.
Stamping the trees
- Stamp the trees at the bottom third of card stamping off and repeat stamping without re-inking.
- On scrap of Basic White, stamp one tree by stamping off once, then another without re-inking for a lighter shade. Die cut these and set aside.
- Die cut one tree in Pretty Peacock and one tree in Lost Lagoon.
- Arrange the trees and adhere to bottom of card front.
- Stamp and fussy cut “Winter Wishes” with Cherry Cobbler ink.
- Ink up snowflake stamp and stamp some snow in Pool Party, and without re-inking, stamp a second flurry of snow to the left of card above the trees.
- Adhere a trio of adhesive-backed Snowflake Assortment as shown in photo.
- Adhere Basic White stamped piece to Shaded Spruce mat layer and adhere both pieces to Cherry Cobbler card base leaving an even border all round.
- Attach mini dimensionals to the lower half of the gondola, and adhere the top with Tombow to the Smoky Slate mechanical grip. By doing this first, you then have an idea where to stamp your trees.
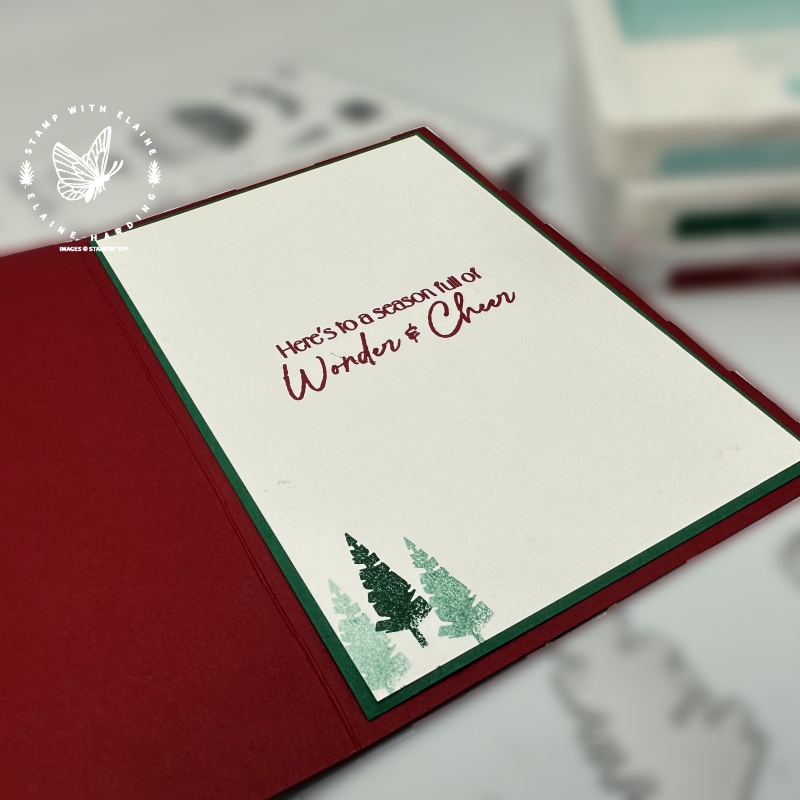
Inside card
- Ink up smallest tree stamp in Shaded Spruce and stamp 3 trees in bottom left corner without re-inking.
- Stamp greeting in Cherry Cobbler in the centre of card.
- Adhere the stamped Basic White layer to Shaded Spruce Mat Layer and then adhere both of these to inside of card base.
Supply list
Listed below is the supply list. Just click on the picture to take you directly to the item in my online store.
Product List")


Thanks for visiting. I would love to know what you think of my project and would appreciate it if you could leave a comment. To visit the next person on the list and see their fabulous creations, simply click on the link below or before my name depending who you visited initially. Happy hopping!

- SHOP ONLINE – EARN 10% REWARDS ON ALL PURCHASES OVER £20
- PURCHASE A STARTER KIT : Get £155 worth of products for only £99. Choose from current catalogues and any specials available. Free Shipping. Read more
- Subscribe to my Video Tutorials – click here
Lovely card Elaine. I don’t have that stamp set – yet!