
Altered Paper Pumpkin – Bikes & Blooms. Happy Sunday peeps! Where did July go? It’s almost the end of the month and I’m really late getting my altered Paper Pumpkin – Bikes & Blooms content out! I think it was June’s Paper Pumpkin but it was really late getting here so there’s been a knock on effect! The silver lining is that a shiny new toy has arrived on the scene! Stampin’ Hot Foil System with specially designed stamps and dies unique to the Stampin’ Up! brand.
Guess what? I incorporated hot foiling for my Altered Paper Pumpkin – Bikes & Blooms cards! This post is long so grab a cuppa. If you own this kit and haven’t made yours up yet, here’s some inspiration. You can make the cards up as choreographed or alter them as I have done.
Altered cards Part 1
The kit card green card bases were cut in half and were used as mat layers. Each half was trimmed to 3 ⅞” x 5 ½” (10 cm x 14 cm) .One was used in portrait, and the other in landscape. All the kit card card bases are printed front and back, so I treat them as layers of card stock.
Card #1 – Green card base cut in half Portrait
The first altered card below is has been hot foiled with the Echoes of Details Hot Foil dies with the new Stampin’ Hot Foil System. I added my own Basic White thick card bases.
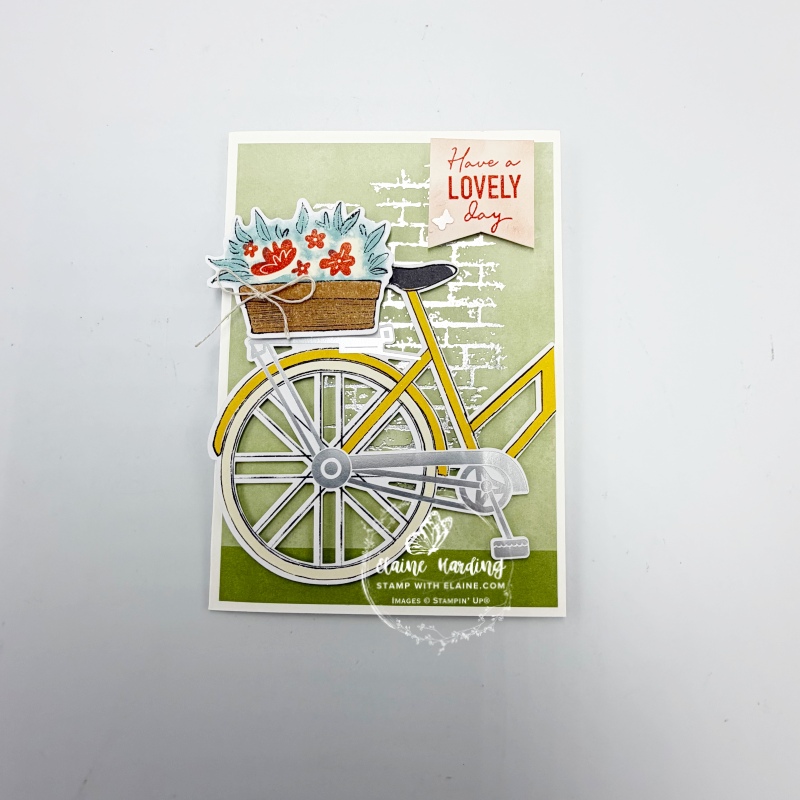
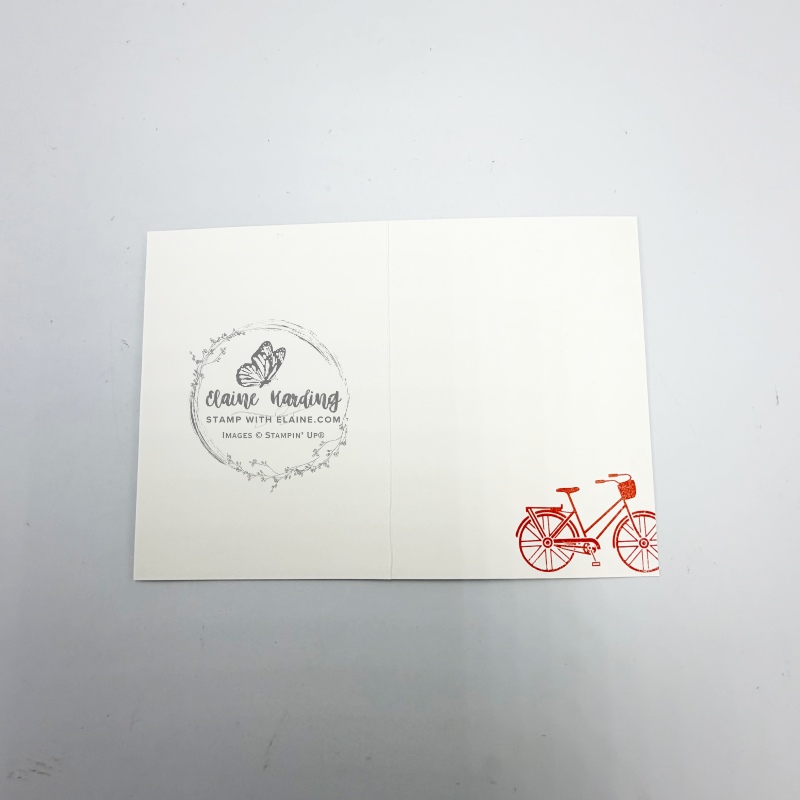
Portrait Brick foiled background card
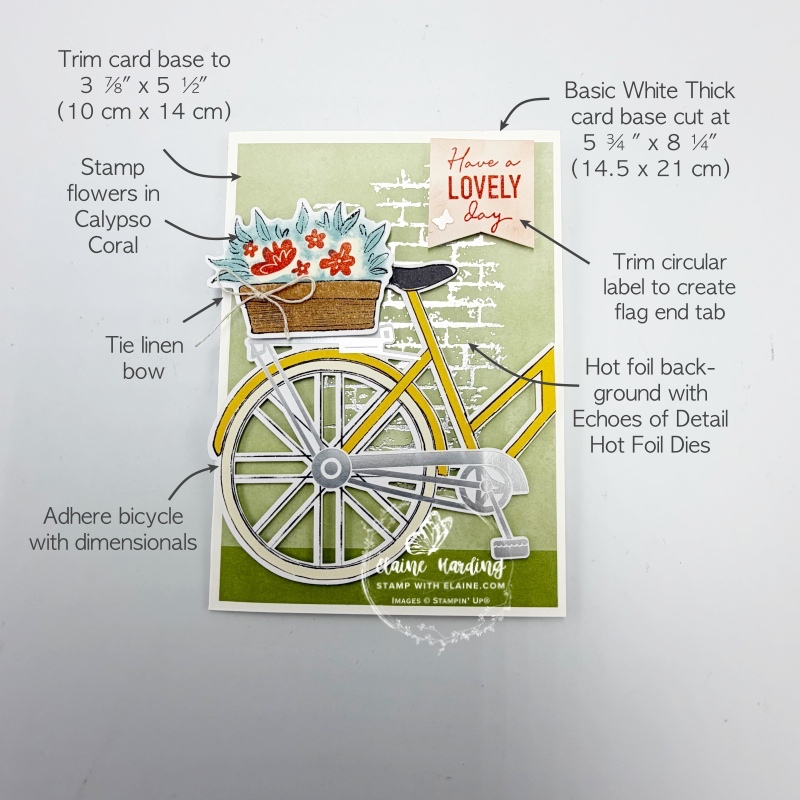
Cutting guide
- Standard Basic White card base cut at 5 ¾” x 8 ¼” (14.5 cm x 21 cm) folded in half.
- Trim the kit card front to 3 ⅞” x 5 ½” (10 cm x 14 cm) and use Echoes of Details Hot Foil dies to create the brick foiled background and adhere to card front leaving an even border on all 4 sides.
- Refer to picture instructions above for the front of card.
- Inside card – Simply stamp the bicycle in Calypso Coral.
Second card – Other half of kit Green card base landscape card
I used the Add On Paper Pumpkin dies called Wonderful Scenes Dies which can be used for 3 consecutive Pumpkin Kits. The Wonderful Scenes one was for the Lakeside Retreat Paper Pumpkin Kit, the Sparkling Celebrations Paper Pumpkin Kit, and the Bikes & Blooms Paper Pumpkin Kit.
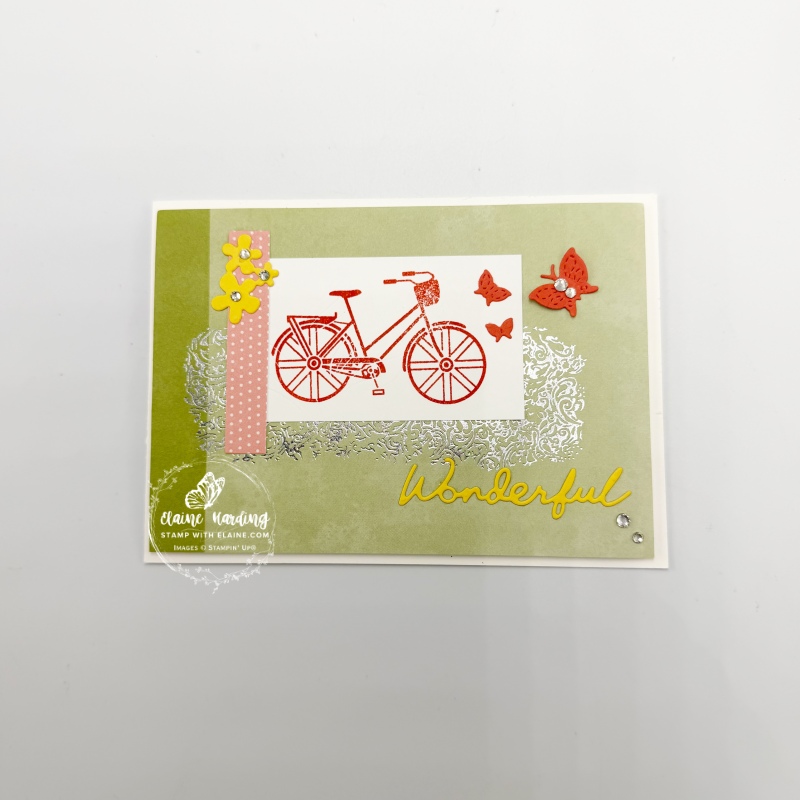
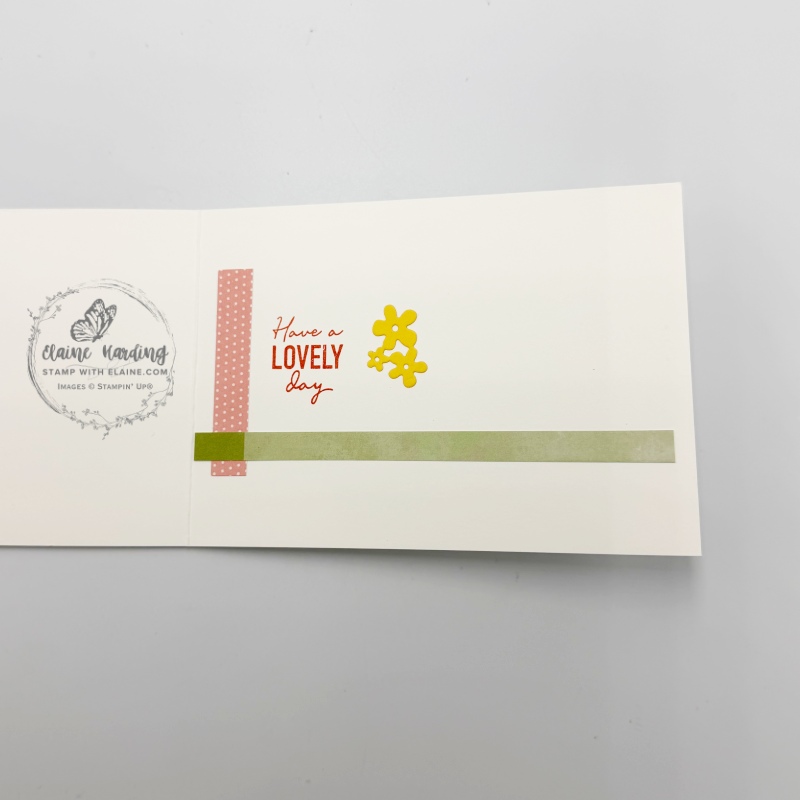
Cutting guide
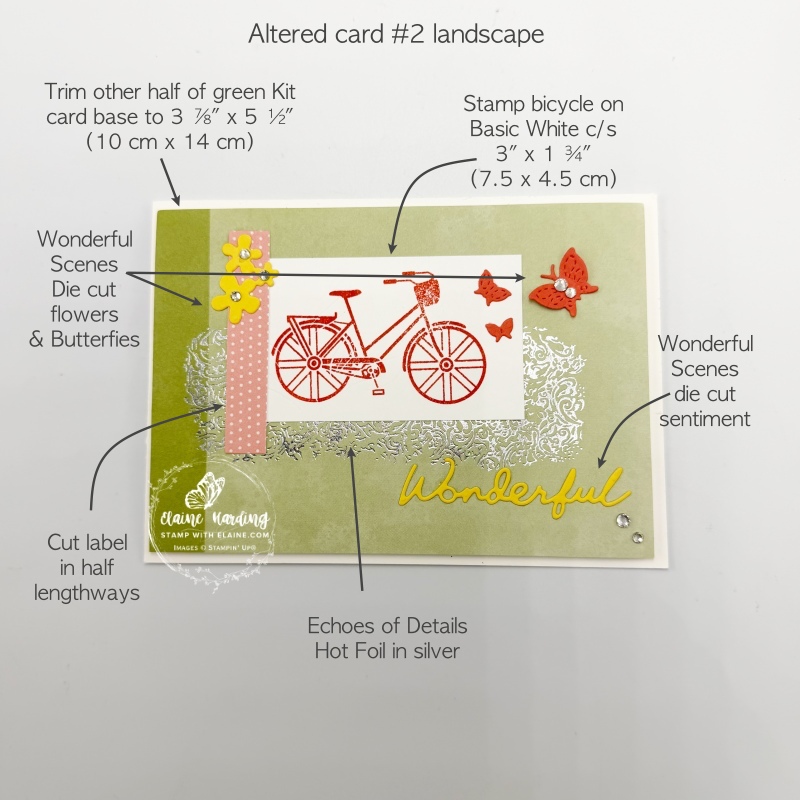
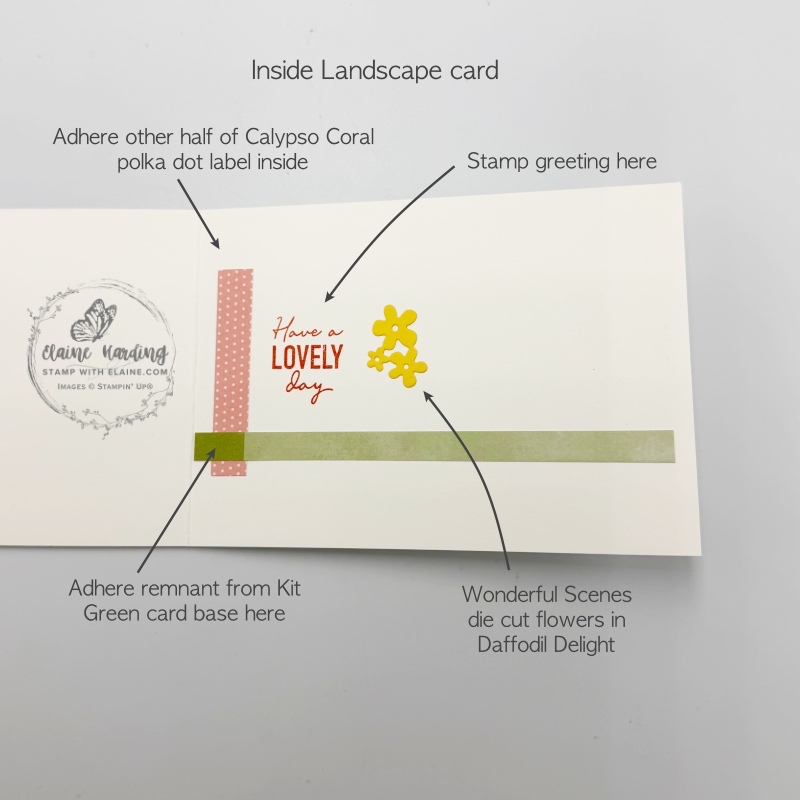
- Card base Basic White Thick cut at 4 ⅛” x 11 ½” (10.5 cm x 29 cm). Long side score at 5 ¾” (14.5 cm)
- Trim 2nd half of Kit card base to 3 ⅞” x 5 ½” (10 cm x 14 cm). Hot foil in silver with Echoes of Details Hot Foil Dies.
- Cut Calypso Coral polka dot label in half.
- Die cut flowers, sentiment with Daffodil Delight card stock scraps and the butterflies with Calypso Coral scraps.
- Stamp on Basic White scrap the bicycle and trim to 3″ x 1 ¾” (7.5 cm x 4.5 cm)
- Embellish with Rhinestone Basic jewels.
- Decorate inside of card per picture instructions.
Third altered card : Fun fold
Use part of an envelop to create a fun fold. Extra Basic White card stock needed to die cut a circle for the inside front of the card. Also die cut a circle out of an envelop to create a place to address recipient (refer to picture on the right).
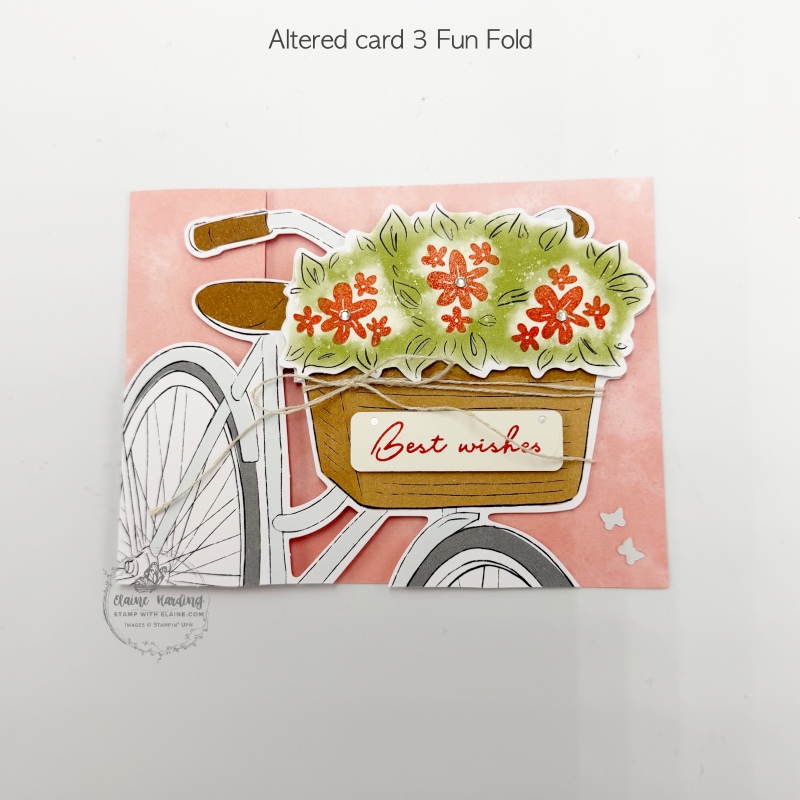
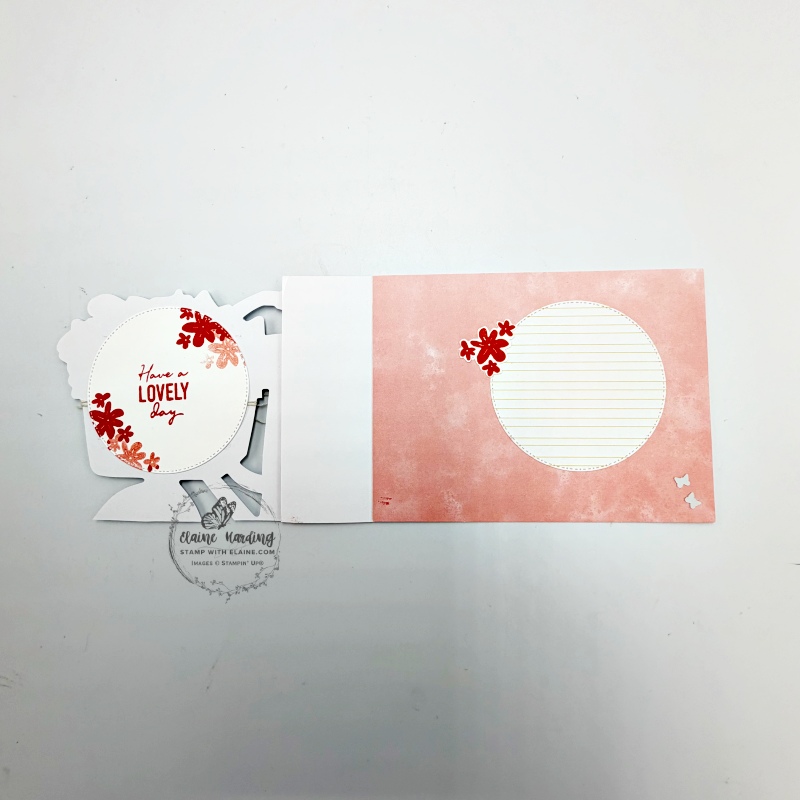
Cutting guide
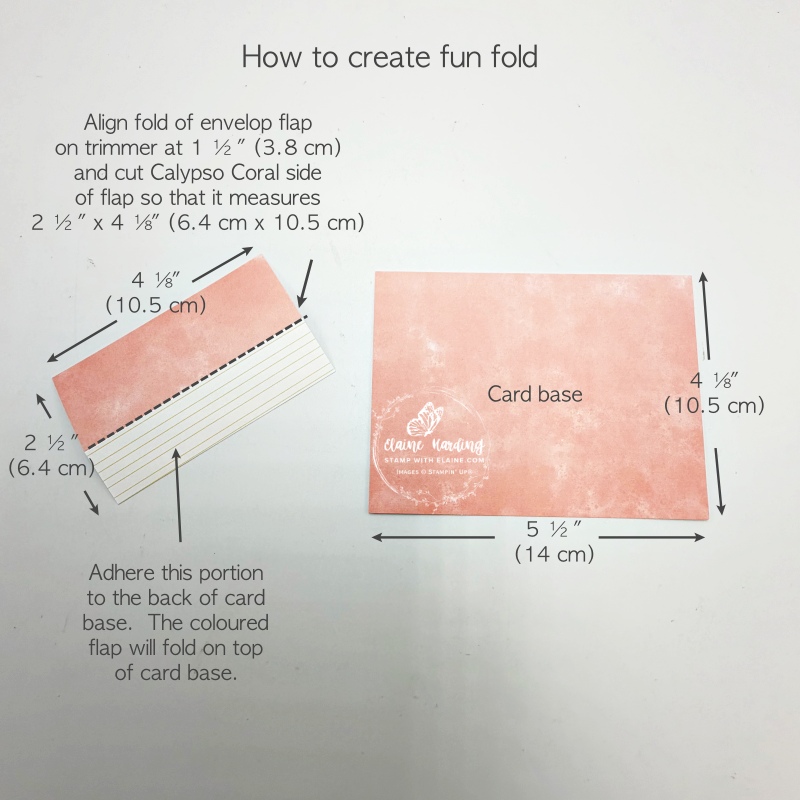
- Align score line of envelop flap on trimmer at 1 ½” (3.8 cm). Cut Calypso Coral side of flap so that it measures 2 ½” x 4 ⅛” (6.4 x 10.5 cm)
- Trim the Calypso Coral card base to 4 ⅛” x 5 ½” (10.5 x 14 cm). Place line pattern of flap face down. Apply adhesive to flip side of line pattern flap then butt up card base just shy of score line and align it with top and bottom edges of envelop flap. Close Calypso Coral side of flap over the top to secure fold (refer to picture on right).
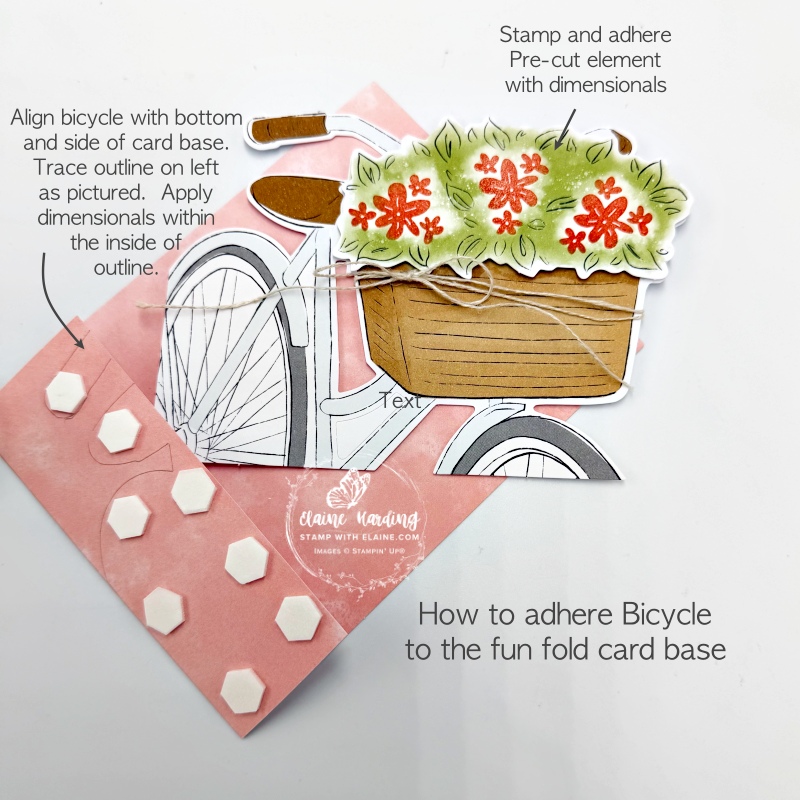
- Align bicycle to left edge and bottom of card base and trace around bicycle shape. Apply dimensionals inside the outline.
- Remove backing and adhere bicycle after you’ve stamped on the pre-cut elements and tied the linen bow around basket.
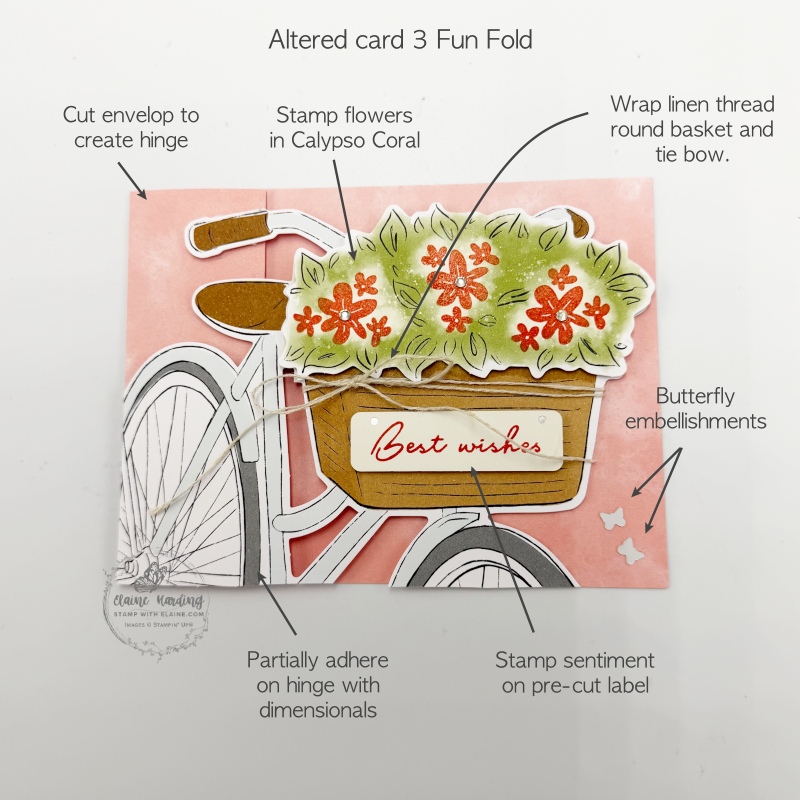
Decorating front of card
Used some of the pre-cut pop-outs from kit.
- Follow picture instructions to prep bicycle for adhering to hinge flap on left
- Stamp best wishes on one of the labels and adhere to front of basket.
- Use kit card butterfly embellishments in bottom right corner
- Add Rhinestone Basic Jewels to centre of larger flowers.
Inside fun fold card
Add on Detailed Flora Dies were used for the inside of card.
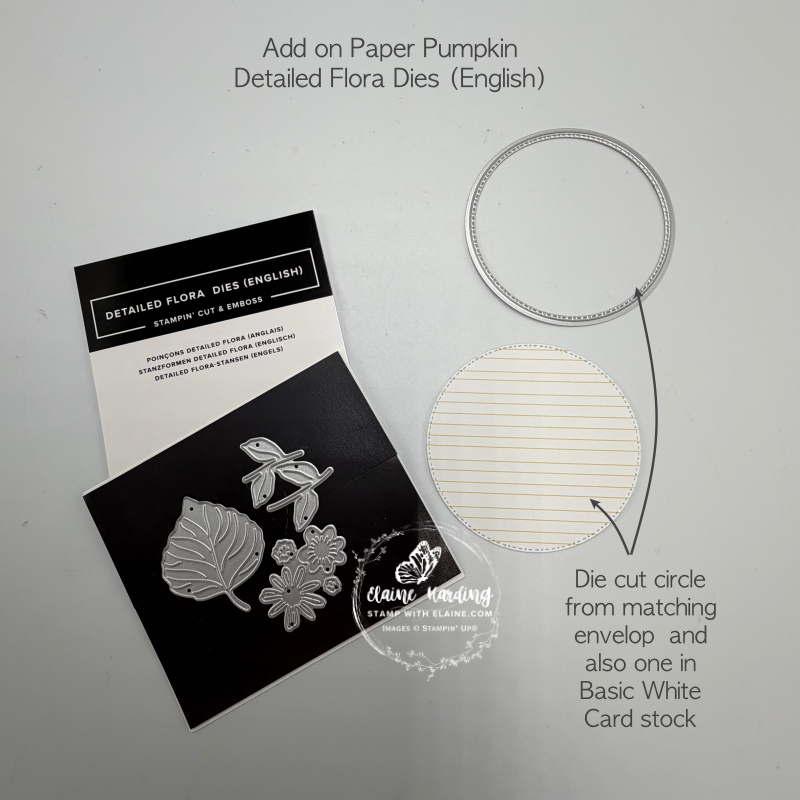
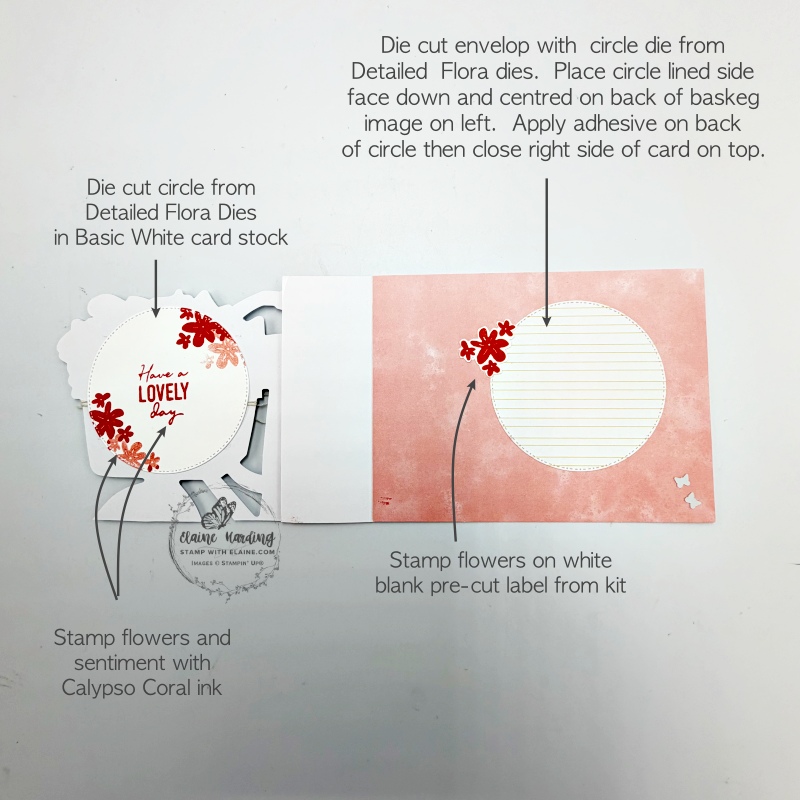
- Use the circle die from the Add on Detailed Flora Dies for Paper Pumpkin kits to cut a circle from the envelop, and one in Basic White.
- Place die cut lined circle and mark the straight lines on back of basket. Also mirror marks on reverse side of circle and flip over so that the linear pattern is face down. Use those marks to line up the lines. Apply adhesive on back of lined circle and close card over the top. Doing it this way ensures the basket covers the circle and you won’t see the circle underneath when you close the card. It also keeps those lines straight as pictured above.
- Stamp and adhere Basic White piece over the back of basket as pictured.
- On the pre-cut floral label, stamp some flowers and adhere top left of lined circle as shown to complete card.
Fourth card – Easel card
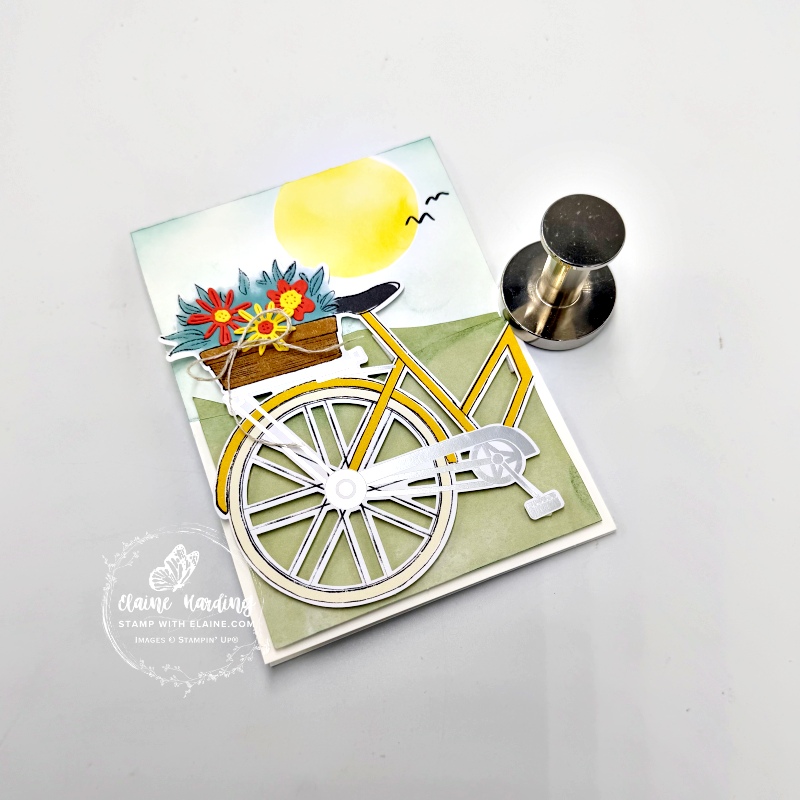
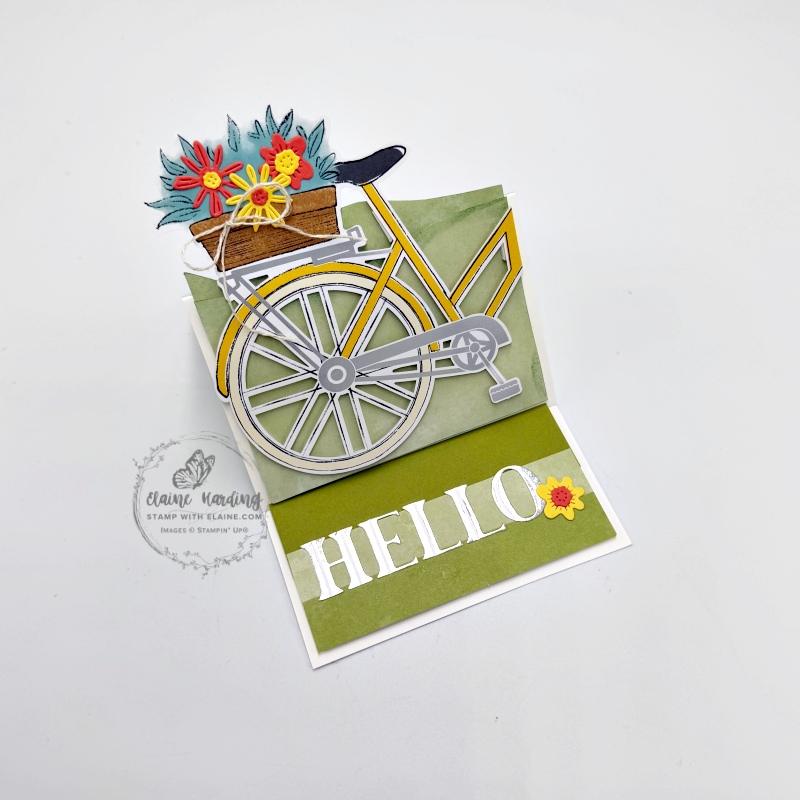
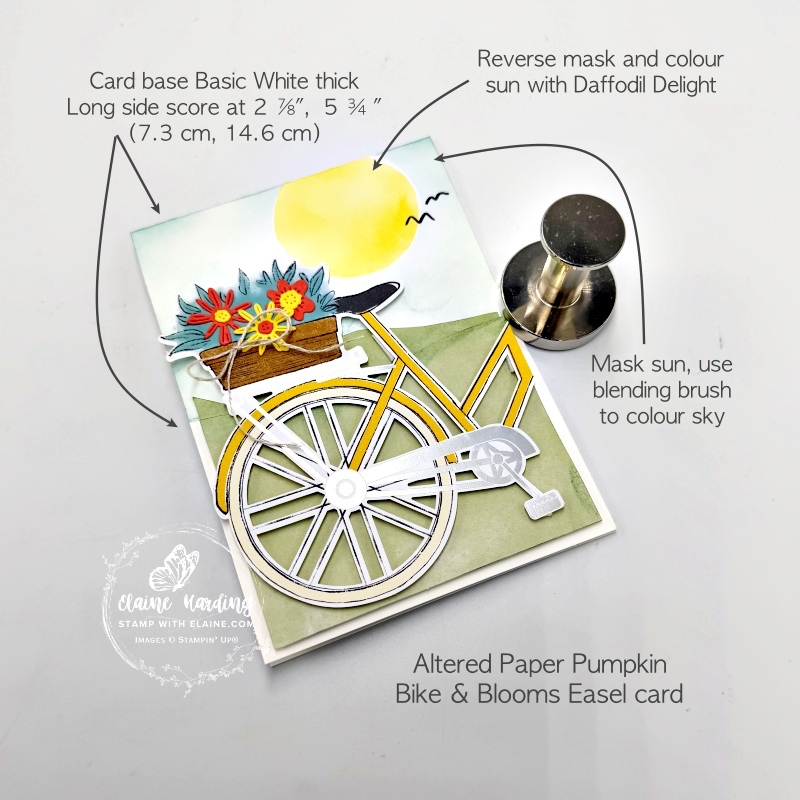
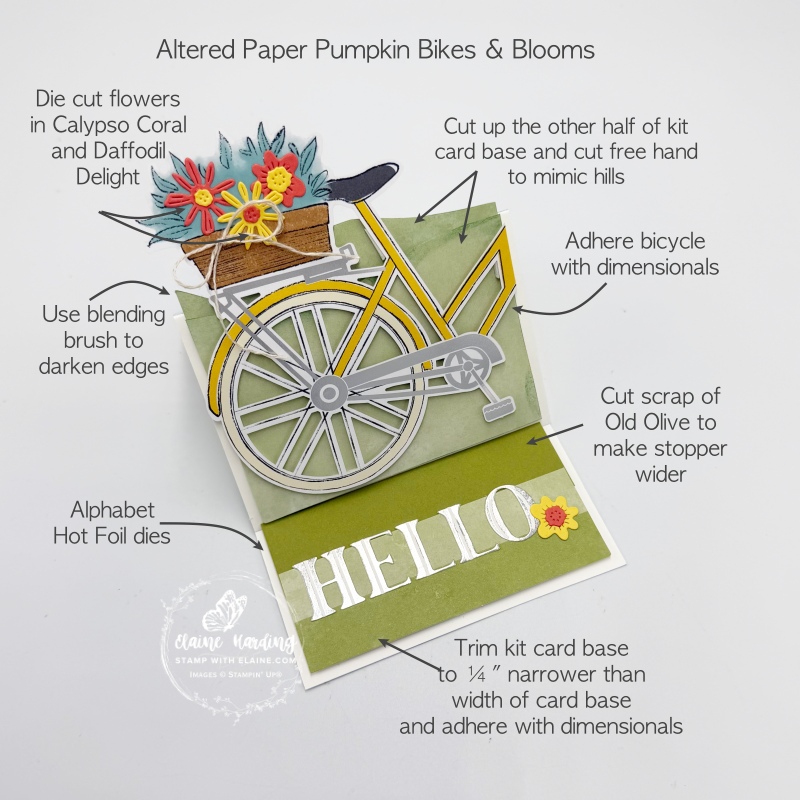
I added my own Basic White card base. The front of the easel card was folded in half to create the backdrop for an easel card and the “hill” layers and the stopper have been cut from ½ a kit card base. A “stopper” is created on the inside of the card where the “Hello” greeting is so that the easel can be propped up as pictured on the right.
Additional supplies
I used the Luxe Alphabet and Numbers Hot Foil dies to spell “hello” on the stopper part of the card. There is also a new Add On for the next 3 Paper Pumpkin kits called Detailed Flora Dies which will work with the Hooray for Birthdays Paper Pumpkin Kit, Kindred Greetings Paper Pumpkin Kit and the Aspens of Gratitude Paper Pumpkin Kit.
Cutting guide
- Card base : Basic White Thick cut at 4 ⅛” x 11 ½” (10.5 cm x 29.2 cm). Long side on top, score at 2 ⅞” and 5 ¾” (7.3 cm and 14.6 cm).
- Use the circular label in the kit as a mask for the sun. With a blending brush, lightly add Lost Lagoon ink on the upper half of the front of the card base to represent the sky.
- From a piece of copy paper, trace the circular label and cut inside the lines. Reverse mask so that the sky portion is covered and the “sun” is exposed so that you can use a blending brush to add Daffodil Delight ink to colour in the sun.
- Trim the two-tone and at 1 1/4″ x 3 7/8″ and set aside. Then trim remaining piece at 2 ¾” x 3 ⅞”. Cut free hand a hill shape on the larger piece. Also trim free hand the smaller remaining piece to tuck behind with dimensionals. (see picture on right)
- Die cut 2 sets of flowers from Detailed Flora dies in Daffodil Delight and Calypso Coral and swap flower centres around as pictured above.
Stopper mechanism
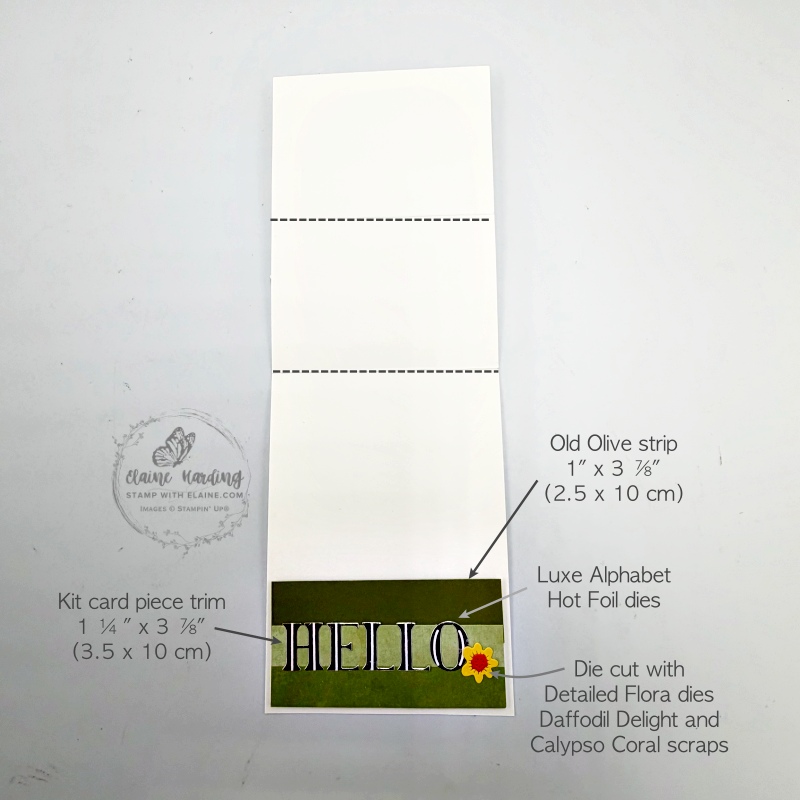
- Trim the two coloured portion of the Kit card at 1 ¼” (3.5 cm) to use as a stopper. Cut a piece of Old Olive 1″ x 3 ⅞” (2.5 cm x 10 cm). Apply dimensionals to both pieces.
- Align two coloured portion to bottom of inside of easel card base with an even border at the bottom and two sides.
- Tuck Old Olive piece underneath two tone piece so that it is the same height (approximately ⅝” (1.6 cm).
- Hot Foil Silver letters with Luxe Alphabet Hot Foil dies and adhere as pictured.
- Die cut with Daffodil Delight and Calypso Coral scraps flower from Detailed Flora dies.
I have a couple more, but this post is long enough so I’ll leave them for another day. Hope you’ve enjoyed these and it will inspire you to create your own.
Stampin’ Hot Foil System
This is a new tool by Stampin’ Up! with special Hot Foil Dies. If you missed the post introducing the machine and information all about it, here’s a video to explain how the system works. Please be aware this machine is designed to fit Stampin’ Up!’s larger Stampin’ Cut & Emboss machine and was tested with their own line of products. It would render the 1 year warranty on the Stampin’ Hot Foil System null and void if you use it on non-Stampin’ Up! machines which may not fit.
Also be sure you’re ordering the machine with the right plug for your market. Foils and dies have to be purchased separately.
If you purchase the Stampin’ Hot Foil System before Jan 4, 2027, it will also include the Metallic Magic Craft Class for free. The class will cost £28.00 to purchase when the free class offer ends.
Supply list
Listed below is the supply list. Just click on the picture to take you directly to the item in my online store.
Product List![Uk/Ie Stampin' Hot Foil System & Craft Class [ 170011 ]](https://assets1.tamsnetwork.com/images/EC042017NF/170011s.jpg "Uk/Ie Stampin' Hot Foil System & Craft Class [ 170011 ]")
![Echoes Of Detail Hot Foil Dies [ 170048 ]](https://assets1.tamsnetwork.com/images/EC042017NF/170048s.jpg "Echoes Of Detail Hot Foil Dies [ 170048 ]")
![Luxe Alphabet & Numbers Hot Foil Dies [ 170044 ]](https://assets1.tamsnetwork.com/images/EC042017NF/170044s.jpg "Luxe Alphabet & Numbers Hot Foil Dies [ 170044 ]")
![Silver Stampin' Hot Foil Rolls [ 170067 ]](https://assets1.tamsnetwork.com/images/EC042017NF/170067s.jpg "Silver Stampin' Hot Foil Rolls [ 170067 ]")
![Detailed Flora Dies (English) [ 168664 ]](https://assets1.tamsnetwork.com/images/EC042017NF/168664s.jpg "Detailed Flora Dies (English) [ 168664 ]")
![Rhinestone Basic Jewels [ 144220 ]](https://assets1.tamsnetwork.com/images/EC042017NF/144220s.jpg "Rhinestone Basic Jewels [ 144220 ]")
![Bikes & Blooms Paper Pumpkin Refill (English) [ 171466 ]](https://assets1.tamsnetwork.com/images/EC042017NF/171466s.jpg "Bikes & Blooms Paper Pumpkin Refill (English) [ 171466 ]")
![Paper Pumpkin Subscription [ 166815 ]](https://assets1.tamsnetwork.com/images/EC042017NF/166815s.jpg "Paper Pumpkin Subscription [ 166815 ]")
![Paper Pumpkin 3 Month Subscription [ 166816 ]](https://assets1.tamsnetwork.com/images/EC042017NF/166816s.jpg "Paper Pumpkin 3 Month Subscription [ 166816 ]")
![Paper Pumpkin 6 Month Subscription [ 166817 ]](https://assets1.tamsnetwork.com/images/EC042017NF/166817s.jpg "Paper Pumpkin 6 Month Subscription [ 166817 ]")
![Paper Pumpkin 12 Month Subscription [ 166818 ]](https://assets1.tamsnetwork.com/images/EC042017NF/166818s.jpg "Paper Pumpkin 12 Month Subscription [ 166818 ]")
![Basic White A4 Thick Cardstock [ 159230 ]](https://assets1.tamsnetwork.com/images/EC042017NF/159230s.jpg "Basic White A4 Thick Cardstock [ 159230 ]")
![Daffodil Delight A4 Card Stock [ 121680 ]](https://assets1.tamsnetwork.com/images/EC042017NF/121680s.jpg "Daffodil Delight A4 Card Stock [ 121680 ]")
![Old Olive A4 Card Stock [ 106576 ]](https://assets1.tamsnetwork.com/images/EC042017NF/106576s.jpg "Old Olive A4 Card Stock [ 106576 ]")
![Calypso Coral A4 Card Stock [ 124392 ]](https://assets1.tamsnetwork.com/images/EC042017NF/124392s.jpg "Calypso Coral A4 Card Stock [ 124392 ]")

- SHOP ONLINE – EARN 10% REWARDS ON ALL PURCHASES OVER £20
- PURCHASE A STARTER KIT : Get £155 worth of products for only £99. Choose from current catalogues and any specials available. Free Shipping. Read more
- Subscribe to my Video Tutorials – click here

Pingback: Altered Paper Pumpkin - Bikes and Blooms 2 - Stamp with Elaine