
New Hot Foil System. Introducing one of the hottest items in crafting—the new Stampin’ Hot Foil System. The new hot foil system metallic magic starts with Stampin’ Hot Foil Rolls, specially-made Hot Foil dies, and the Stampin’ Hot Foil System that works with our Stampin’ Cut & Emboss Machine (sold separately).
The heat of the platform transfers the foil using hot foil dies designed specifically for this system, allowing you to add dazzling details to paper and more. (IMPORTANT NOTE: Cutting dies are not designed to be used with hot foiling. You cannot die cut using foiling dies. Doing so risks damaging the dies and the system.)
Please note that the Stampin’ Hot Foil System has only been tested with Stampin’ Up’s own Stampin’ Cut & Emboss Machine. If you use any other die cutting platform, it will make the warranty on your new Stampin’ Hot Foil System null and void.
Important note : Depending on which market you’re ordering from, please make sure you’re ordering the appropriate plug for your market – EU has a different plug from UK/IE and vice versa. Ordering a machine also includes Stampin’ Up!’s Metallic Magic Craft Class which will teach you how to use the machine. Everyone who purchases the Stampin’ Hot Foil System & Craft Class (UK: 170011; continental Europe: 170010) until 4 January 2027, will automatically get access to the Metallic Magic Craft Class. They will not need to purchase the class separately
Stampin’ Hot Foil System by Stampin’ Up!
Watch this short video of our new Stampin’ Hot Foil System!
Stampin’ Hot Foil System Tutorial
This video explains the new Hot Foil System in detail by leading Stampin’ Up! experts!
Hot Foil Bundles
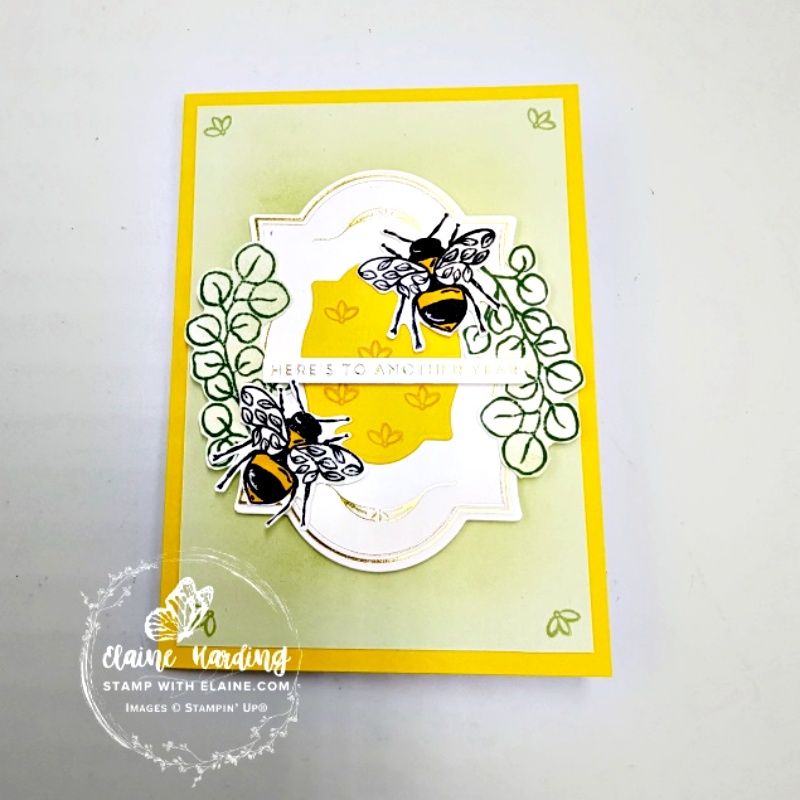
This is the card I chose to make and it is from the Flourishes & Frames bundle. The sentiments are from the Sweetly Sentimental bundle and is mentioned in the video above. Special markers in the die makes positioning of the cutting die on top of the hot foiled sentiments afterwards a cinch. You have multiple foiled sentiments for several cards to use at your leisure.
On the front of the card, the mat layer is cut from Soft Sea Foam card stock and I used a blending brush to add Soft Sea Foam ink as a background, followed by the hot foiled label, stamped and fussy cut leaf sprigs as well as the bees to add interest. The corners were stamped with the coordinating Flourishes & Frames stamp set.
Cutting guide
Card base and front
- Card base : Daffodil Delight 5 ¾” x 8 ¼” (14.5 cm x 21 cm) folded in half.
- Soft Sea Foam card front layer : 3 ¾” x 5 ⅜” (9.5 cm x 13.5 cm)
- Hot foil with gold foil largest label hot foil die with Hot Foiling system. Remove foil and die cut with corresponding largest label cutting die using the normal sandwich i.e., platform 1> platform 2 >platform 3 >foiled label > cutting die > platform 3.
- Create foiled sentiments with the Sweetly Sentimental hot foil dies and die cut them afterwards.
- Die cut 2nd smallest Flourish & Frame label die in Daffodil Delight
- Scrap of Basic White: Stamp leaves in Peaceful Pine ink, colour with blending brush with Soft Sea Foam ink and fussy cut.
- Stamp bees with black ink and colour body with Daffodil Delight and wings with Soft Sea Foam Stampin’ Blends then fussy cut.
- In the four corners, stamp the little flower with Soft Sea Foam ink.
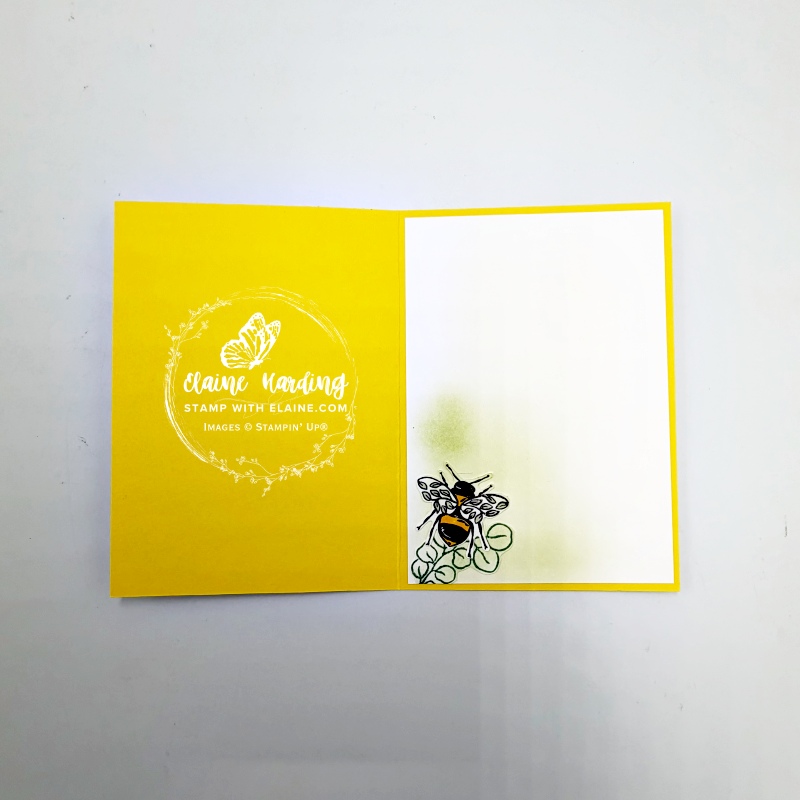
Inside card
- Basic White : 3 ⅞” x 5 ½” (10 cm x 14 cm). Add Soft Sea Foam colour with Blending Brush in bottom left corner.
- Stamp leaf with Peaceful Pine in bottom left corner.
- On scrap of Basic White, stamp bee with black ink and colour with Stampin’ Blends in Daffodil Delight and Soft Sea Foam, fussy cut and adhere on top of leaf.
Supply list
Listed below is the supply list. Just click on the picture to take you directly to the item in my online store.
Product List![Uk/Ie Stampin' Hot Foil System & Craft Class [ 170011 ]](https://assets1.tamsnetwork.com/images/EC042017NF/170011s.jpg "Uk/Ie Stampin' Hot Foil System & Craft Class [ 170011 ]")
![Butterfly Flight Bundle [ 170065 ]](https://assets1.tamsnetwork.com/images/EC042017NF/170065s.jpg "Butterfly Flight Bundle [ 170065 ]")
![Flourish & Frames Bundle [ 170061 ]](https://assets1.tamsnetwork.com/images/EC042017NF/170061s.jpg "Flourish & Frames Bundle [ 170061 ]")
![Gold Stampin' Hot Foil Rolls [ 170066 ]](https://assets1.tamsnetwork.com/images/EC042017NF/170066s.jpg "Gold Stampin' Hot Foil Rolls [ 170066 ]")
![Daffodil Delight A4 Card Stock [ 121680 ]](https://assets1.tamsnetwork.com/images/EC042017NF/121680s.jpg "Daffodil Delight A4 Card Stock [ 121680 ]")
![Soft Sea Foam A4 Cardstock [ 147012 ]](https://assets1.tamsnetwork.com/images/EC042017NF/147012s.jpg "Soft Sea Foam A4 Cardstock [ 147012 ]")
![Basic White A4 Cardstock [ 166781 ]](https://assets1.tamsnetwork.com/images/EC042017NF/166781s.jpg "Basic White A4 Cardstock [ 166781 ]")
![Tuxedo Black Memento Ink Pad [ 132708 ]](https://assets1.tamsnetwork.com/images/EC042017NF/132708s.jpg "Tuxedo Black Memento Ink Pad [ 132708 ]")
![Soft Sea Foam Stampin' Blends Combo Pack [ 154902 ]](https://assets1.tamsnetwork.com/images/EC042017NF/154902s.jpg "Soft Sea Foam Stampin' Blends Combo Pack [ 154902 ]")
![Daffodil Delight Stampin' Blends Combo Pack [ 154883 ]](https://assets1.tamsnetwork.com/images/EC042017NF/154883s.jpg "Daffodil Delight Stampin' Blends Combo Pack [ 154883 ]")
![Peaceful Pine Classic Stampin Pad [ 167679 ]](https://assets1.tamsnetwork.com/images/EC042017NF/167679s.jpg "Peaceful Pine Classic Stampin Pad [ 167679 ]")
![Soft Sea Foam Classic Stampin' Pad [ 147102 ]](https://assets1.tamsnetwork.com/images/EC042017NF/147102s.jpg "Soft Sea Foam Classic Stampin' Pad [ 147102 ]")
![Blending Brushes [ 153611 ]](https://assets1.tamsnetwork.com/images/EC042017NF/153611s.jpg "Blending Brushes [ 153611 ]")

- SHOP ONLINE – EARN 10% REWARDS ON ALL PURCHASES OVER £20
- PURCHASE A STARTER KIT : Get £155 worth of products for only £99. Choose from current catalogues and any specials available. Free Shipping. Read more
- Subscribe to my Video Tutorials – click here

Pingback: Altered Paper Pumpkin - Bikes & Blooms 1 - Stamp with Elaine
Pingback: Thank You card - Garden Silhouette hot foil - Stamp with Elaine