
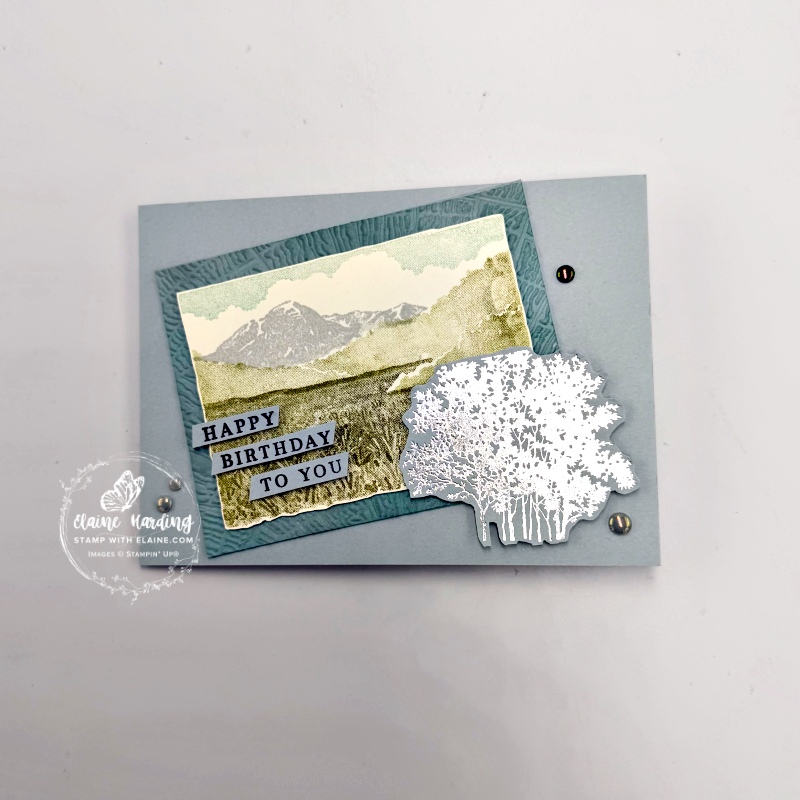
Masculine birthday card. August seems to be such a busy month for birthdays and anniversaries for me. Since I have the Shimmering Scenes bundle still on my desk, I made another card using it but with a masculine vibe. Muted colours, no frills and minimal layers.
Cutting guide
Card front
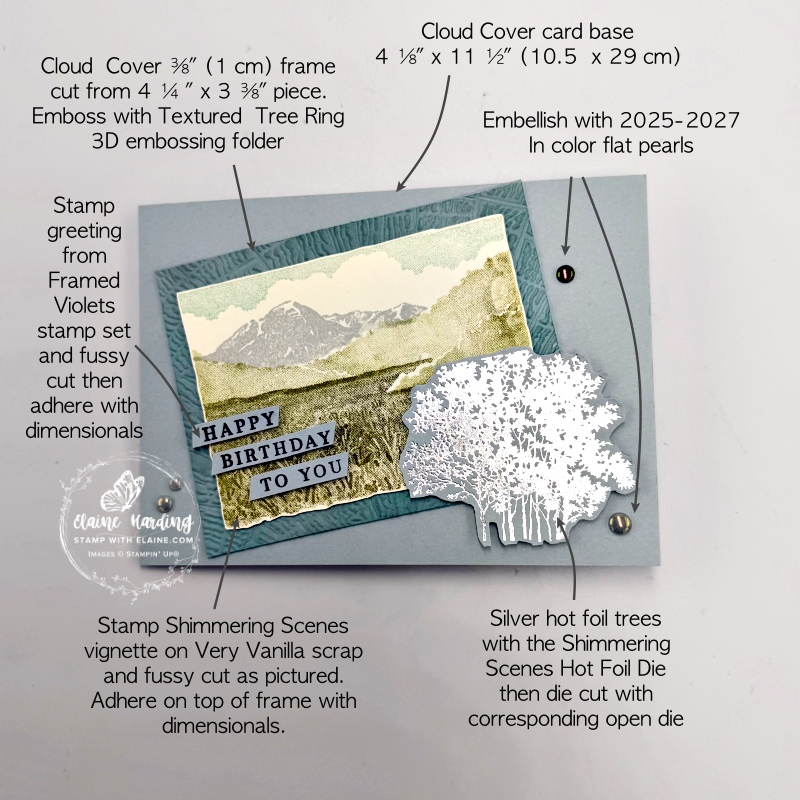
- Card base : Cloud Cover cut at 4 ⅛” x 11 ½” (10.5 cm x 29 cm) folded in half.
- Cut 2 pieces Cloud Cover at 4 ¼” x 3 ⅜” (10.8 cm x 8.5 cm). Cut a ⅜” (1 cm) frame on all 4 sides.
- Emboss one of the frames with the Textured Tree Ring 3D embossing folder.
- Adhere this embossed frame on top of the plain one. Use a blending brush and apply Cloud Cover ink to darken the frame as pictured above on the left.
- Stamp Shimmering Scenes vignette. I stamped foreground with Old Olive first generation, the second stamp with second generation Old Olive ink, the 3rd stamp with Cloud cover, and the 4th with Pool Party ink. Fussy cut leaving a narrow Very Vanilla border around the entire scene.
- Apply dimensionals on the back of Very Vanilla vignette and adhere on top of frame at an angle as pictured.
Hot foil in silver Shimmering Scenes trees
If you’ve never hot foiled before, there is a section below created by Stampin’ Up! to show you how.
- Hot foil in silver on Cloud Cover card stock and die cut with corresponding open die.
- Apply dimensionals outside frame and adhere hot foiled tree as pictured.
Framed Violets stamp
- Stamp birthday greeting with Secret Sea ink.
- Fussy cut greeting and apply dimensionals on back and adhere to left of vignette as pictured.
- To finish front of card, add an odd number of 2025-2027 In Color flat pearls.
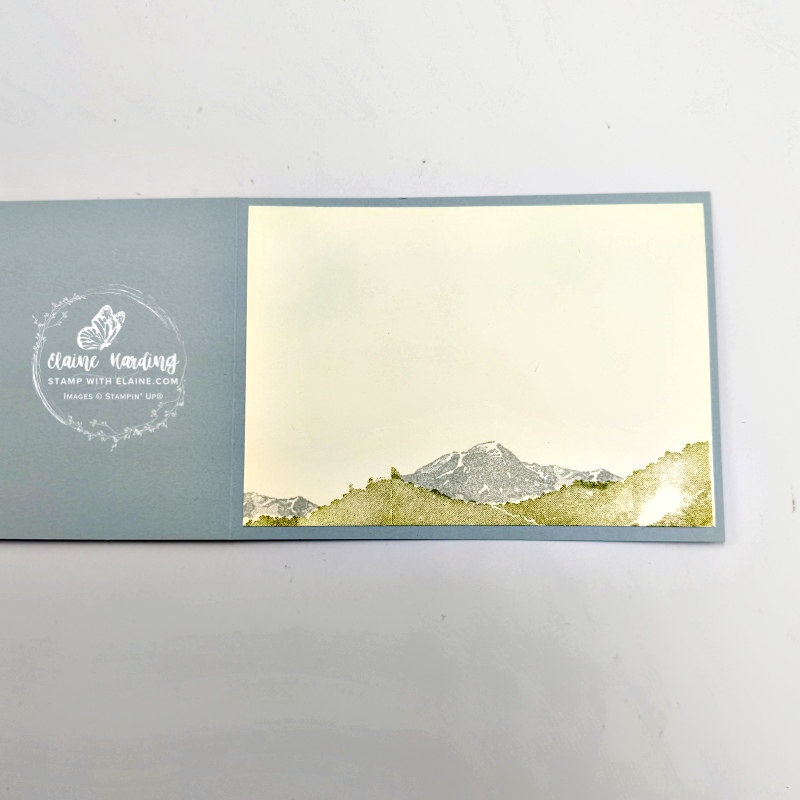
Inside card
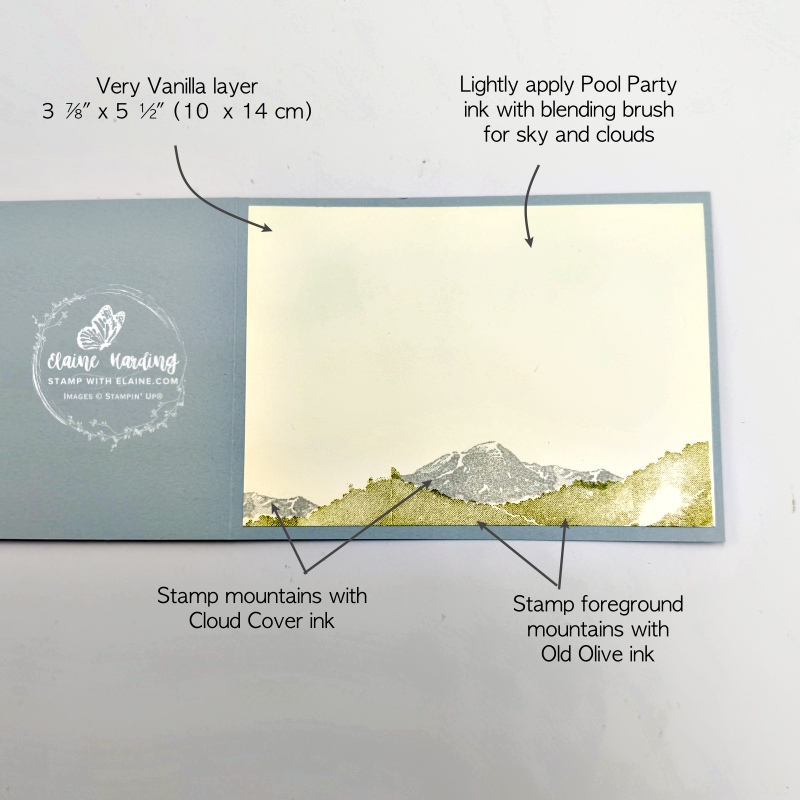
- Cut Very Vanilla layer at 3 ⅞” x 5 ½” (10 x 14 cm)
- Stamp the mountains as shown with Old Olive ink.
- Fill in back of snowcapped mountains with Cloud Cover ink.
- Use a blending brush to lightly add colour to the sky with Pool Party ink.
- Adhere to inside of card leaving an even border on all 4 sides.
Stampin’ Hot Foil System
This is a new tool by Stampin’ Up! with special Hot Foil Dies. If you missed the post introducing the machine and information all about it, here’s a video to explain how the system works. Please be aware this machine is designed to fit Stampin’ Up!’s larger Stampin’ Cut & Emboss machine and was tested with their own line of products. It would render the 1 year warranty on the Stampin’ Hot Foil System null and void if you use it on non-Stampin’ Up! machines which may not fit.
Also be sure you’re ordering the machine with the right plug for your market. Foils and dies have to be purchased separately.
If you purchase the Stampin’ Hot Foil System before Jan 4, 2027, it will also include the Metallic Magic Craft Class for free. The class will cost £28.00 to purchase when the free class offer ends.
.
Supply list
Listed below is the supply list. Just click on the picture to take you directly to the item in my online store.
Product List![Uk/Ie Stampin' Hot Foil System & Craft Class [ 170011 ]](https://assets1.tamsnetwork.com/images/EC042017NF/170011s.jpg "Uk/Ie Stampin' Hot Foil System & Craft Class [ 170011 ]")
![Stampin' Cut & Emboss Machine [ 149653 ]](https://assets1.tamsnetwork.com/images/EC042017NF/149653s.jpg "Stampin' Cut & Emboss Machine [ 149653 ]")
![Silver Stampin' Hot Foil Rolls [ 170067 ]](https://assets1.tamsnetwork.com/images/EC042017NF/170067s.jpg "Silver Stampin' Hot Foil Rolls [ 170067 ]")
![Shimmering Scenes Bundle [ 170717 ]](https://assets1.tamsnetwork.com/images/EC042017NF/170717s.jpg "Shimmering Scenes Bundle [ 170717 ]")
![Framed Violets Bundle (English) [ 168194 ]](https://assets1.tamsnetwork.com/images/EC042017NF/168194s.jpg "Framed Violets Bundle (English) [ 168194 ]")
![Framed Violets Photopolymer Stamp Set (English) [ 168187 ]](https://assets1.tamsnetwork.com/images/EC042017NF/168187s.jpg "Framed Violets Photopolymer Stamp Set (English) [ 168187 ]")
![Framed Violets Dies [ 168193 ]](https://assets1.tamsnetwork.com/images/EC042017NF/168193s.jpg "Framed Violets Dies [ 168193 ]")
![Textured Tree Ring 3 D Embossing Folder [ 168220 ]](https://assets1.tamsnetwork.com/images/EC042017NF/168220s.jpg "Textured Tree Ring 3 D Embossing Folder [ 168220 ]")
![2025–2027 In Color™ Flat Pearls [ 165192 ]](https://assets1.tamsnetwork.com/images/EC042017NF/165192s.jpg "2025–2027 In Color™ Flat Pearls [ 165192 ]")
![Very Vanilla A4 Cardstock [ 166785 ]](https://assets1.tamsnetwork.com/images/EC042017NF/166785s.jpg "Very Vanilla A4 Cardstock [ 166785 ]")
![Cloud Cover A4 Cardstock [ 165293 ]](https://assets1.tamsnetwork.com/images/EC042017NF/165293s.jpg "Cloud Cover A4 Cardstock [ 165293 ]")
![Cloud Cover Classic Stampin' Ink Refill [ 165279 ]](https://assets1.tamsnetwork.com/images/EC042017NF/165279s.jpg "Cloud Cover Classic Stampin' Ink Refill [ 165279 ]")
![Uninked Stampin' Spots [ 141822 ]](https://assets1.tamsnetwork.com/images/EC042017NF/141822s.jpg "Uninked Stampin' Spots [ 141822 ]")
![Pool Party Classic Stampin' Pad [ 147107 ]](https://assets1.tamsnetwork.com/images/EC042017NF/147107s.jpg "Pool Party Classic Stampin' Pad [ 147107 ]")
![Old Olive Classic Stampin' Pad [ 147090 ]](https://assets1.tamsnetwork.com/images/EC042017NF/147090s.jpg "Old Olive Classic Stampin' Pad [ 147090 ]")
![Blending Brushes [ 153611 ]](https://assets1.tamsnetwork.com/images/EC042017NF/153611s.jpg "Blending Brushes [ 153611 ]")

- SHOP ONLINE – EARN 10% REWARDS ON ALL PURCHASES OVER £20
- PURCHASE A STARTER KIT : Get £155 worth of products for only £99. Choose from current catalogues and any specials available. Free Shipping. Read more
- Subscribe to my Video Tutorials – click here
