
Negative copper foiled Lustrous Leaves. Hot on the heals of the autumnal card with Lustrous Leaves, I’ve used the Reverse Hot Foil Die to create the negative copper foiled leaves from Lustrous Leaves. Unfortunately, the Lustrous Leaves bundle does not have any stamps, so I used the Radiant Sunflowers Bundle from the Sunflower Fields Suite Collection on pages 26-27 in the newly launched September-December 2026 catalogue to add a greeting.
The positive foiled copper leaves which you can see HERE required a two-step method. First you foil, then use decorative masks to add colour to the open linear images. The negative leaves do not require this step because the whole of the copper foil transfers to the card stock and the lines of the leaves have no foil on them. Before we get to the card – here’s a news flash!
News flash! – Save 15% on Select Stamps while stocks last

Have you been waiting for the perfect opportunity to add the latest stamp sets to your collection? Well, we’ve got some great news! From 16 to 18 September, you can get select stamp sets at 15% off! Grab stamps that have been on your wish list or use this opportunity to explore new stamp styles. Act fast—this stamp-tacular sale only lasts for three days!
The 15% discount will apply to select stamp sets, which are only available while supplies last. See and shop all qualifying stamp sets in the online store.
Stampin’ Hot Foil System
If you’re new to Stampin’ Up!’s Hot Foiling system, scroll down to bottom of post to see the video Stampin’ Up! on how the Hot Foil System works as well as the Reverse Hot Foil die.
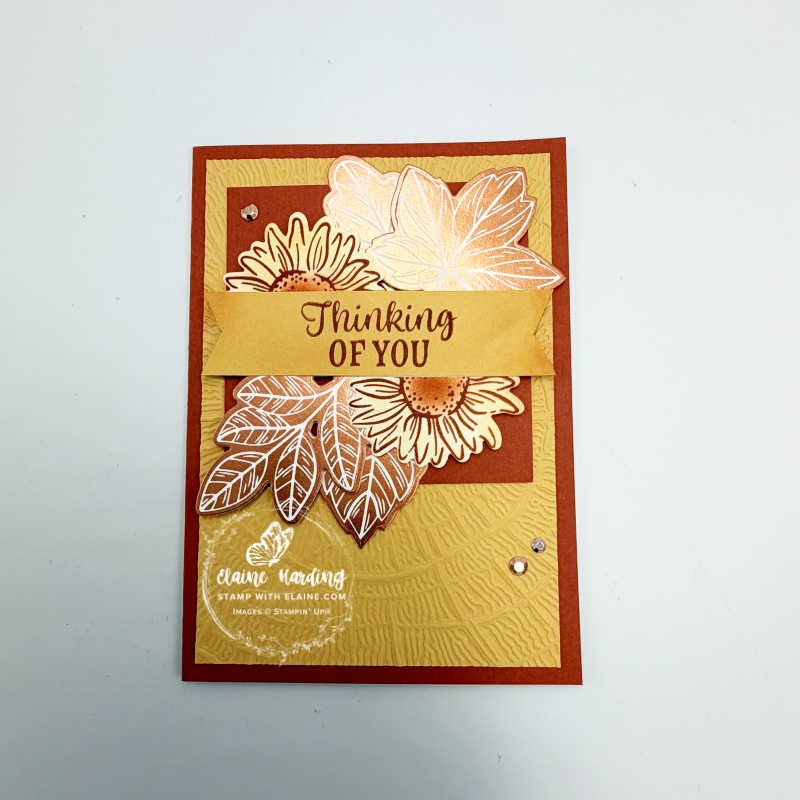
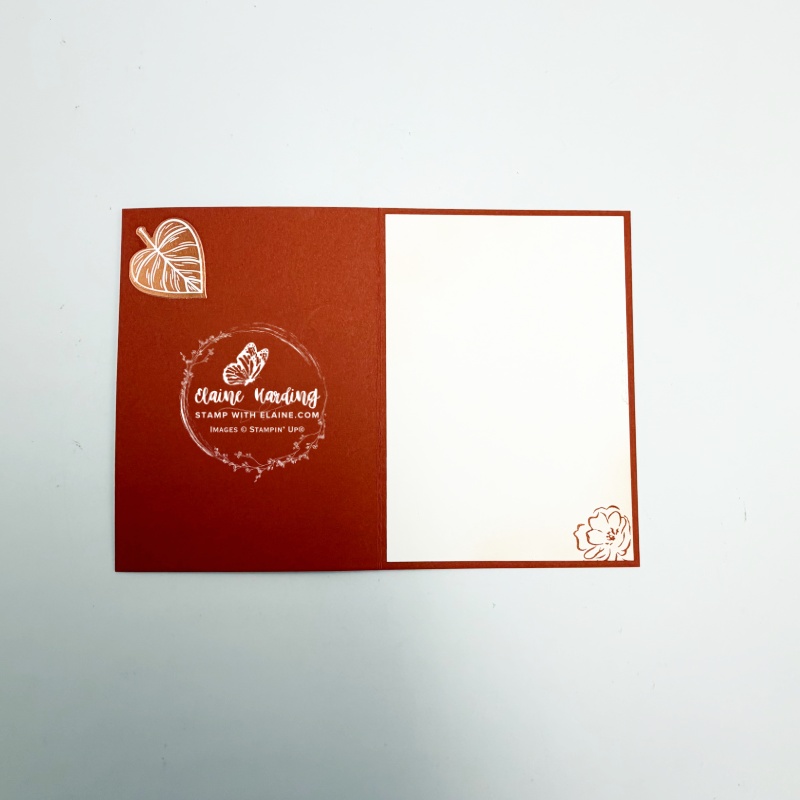
Negative of Copper foiled Lustrous Leaves
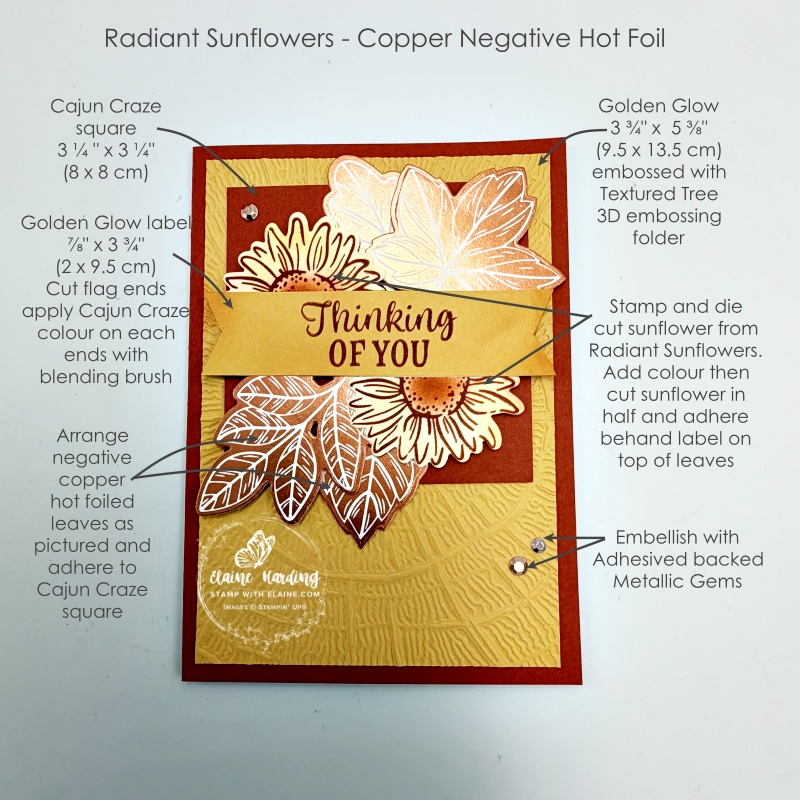
Front of card
- Card base cut at 5 ¾” x 8 ¼” (14.5 cm x 21 cm) folded in half.
- Golden Glow card stock cut at 3 ¾” x 5 ¼” (9.5 cm x 13.5 cm) embossed with Textured Tree Ring 3D embossing folder. Adhere to card front leaving an even border on all 4 sides.
- Cajun Craze square cut at 3 ¼” x 3 ¼” (8 x 8 cm) – adhere to embossed piece leaving an even border at top and two sides.
- Use piece of foil from copper foiled Lustrous Leaves on Reverse Hot Foil die to create the negative images of leaves then die cut them with Lustrous Leaves die. Apply dimensionals to leaves, arrange and adhere to Cajun Craze square as pictured.
- Stamp and die cut Sunflower from Radiant Sunflowers bundle. Use blending brush to apply Golden Glow colour to petals, and cajun craze to flower centre. Die cut with coordinating die from Radiant Sunflowers, then cut sunflower in half.
- Cut label from Golden Glow scrap ⅞” x 3 ¾” (2 cm x 9.5 cm) and stamp “thinking of you” then cut flag ends on each end. Use blending brush to add a touch of colour on flag ends. Attach each sunflower half as pictured to back of label.
- Centre and adhere on top of leaves as pictured.
- Embellish with Adhesive Backed Metallic Gems
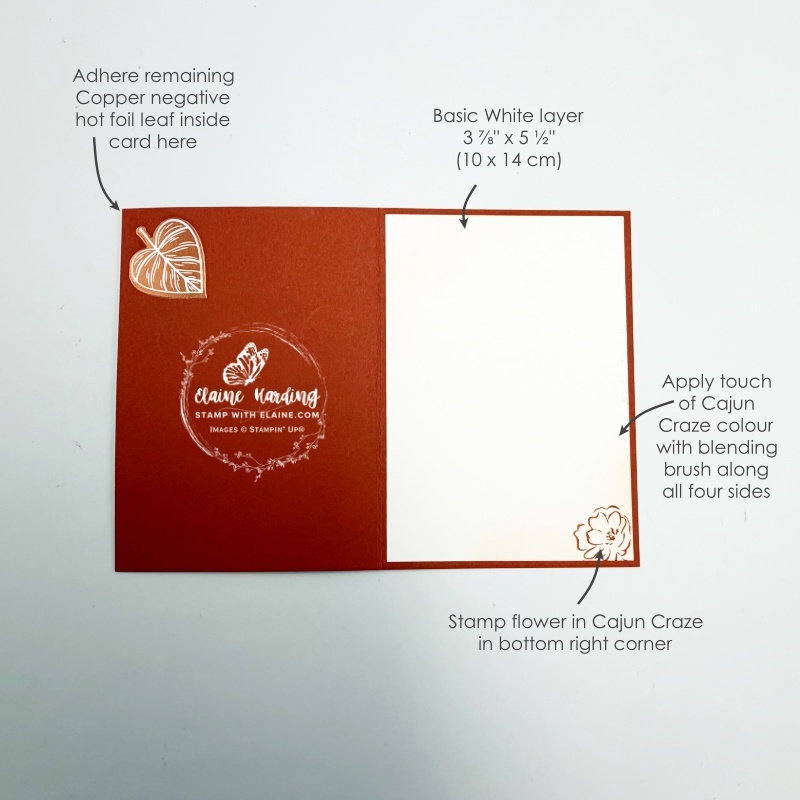
Inside card
- Cut Basic White piece 3 ⅞” x 5 ½” (10 cm x 14 cm)
- Use blending brush to apply colour on all 4 edges of Basic White layer.
- Stamp floral element with Cajun Craze ink in bottom right corner.
- Adhere remaining negative foiled leaf in top left corner of inside of card front as pictured.
How to prevent Over-foiling tip
From my own experience using the Stampin’ Hot Foil System, I had better results by following the instructions that came with the Stampin’ Hot Foil System. I added a thin piece of copy paper on top of the card stock before placing the green Hot Foil Shim on. This helps protect the shim from picking up any excess foil in the process.
- After the red light goes solid red, put your hot foil die on to the heated surface with flat side down. Press the white timer button. The platform beeps and a yellow light flashes while the die heats up (approximately 1 ½ minutes). The white timer button and the red light stays lit and when ready, the platform beeps again and the green light turns on. All lights will be lit.
- Next build your sandwich by placing these items on the die in order: Foil (shiny side down)>Card stock/or desired material> thin piece of copy paper (to prevent foil from getting on to your shim)>Hot Foil Shim>Hot Foil Spacer.
- Unplug the cord from the platform and carefully remove it from the silicone platform station, keeping the sandwich stable to prevent foil transfer. Place it on the Stampin’ Cut & Emboss Machine and slowly run it through without reversing as the die may shift and smudge the card stock.
Stampin’ Hot Foil System
This is a new tool by Stampin’ Up! with special Hot Foil Dies. If you missed the post introducing the machine and information all about it, here’s a video to explain how the system works. Please be aware this machine is designed to fit Stampin’ Up!’s larger Stampin’ Cut & Emboss machine and was tested with their own line of products. It would render the 1 year warranty on the Stampin’ Hot Foil System null and void if you use it on non-Stampin’ Up! machines which may not fit.
Also be sure you’re ordering the machine with the right plug for your market. Foils and dies have to be purchased separately.
If you purchase the Stampin’ Hot Foil System before Jan 4, 2027, it will also include the Metallic Magic Craft Class for free. The class will cost £28.00 to purchase when the free class offer ends.
.
Reverse Hot Foil Die
Maximise your Stampin’ Hot Foil Rolls (and your creativity!) with the Reverse Hot Foil Die. This solid die lets you create two designs from one piece of foil: the main design and the negative image left on the foil. Simply apply the used foil following the usual foiling process for a shiny bonus design.
Watch Stampin’ Up!’s video on how to use the Reverse Hot Foil Die.
There is absolutely no waste of the hot foil pieces if you invest in the Reverse Hot Foil Die. It is a “must have” so that you can make use of all the bits of foil.
Supply list
Listed below is the supply list. Just click on the picture to take you directly to the item in my online store.
Product List![Lustrous Leaves Bundle [ 170559 ]](https://assets1.tamsnetwork.com/images/EC042017NF/170559s.jpg "Lustrous Leaves Bundle [ 170559 ]")
![Radiant Sunflowers Bundle (English) [ 168359 ]](https://assets1.tamsnetwork.com/images/EC042017NF/168359s.jpg "Radiant Sunflowers Bundle (English) [ 168359 ]")
![Reverse Hot Foil Die [ 170043 ]](https://assets1.tamsnetwork.com/images/EC042017NF/170043s.jpg "Reverse Hot Foil Die [ 170043 ]")
![Textured Tree Ring 3 D Embossing Folder [ 168220 ]](https://assets1.tamsnetwork.com/images/EC042017NF/168220s.jpg "Textured Tree Ring 3 D Embossing Folder [ 168220 ]")
![Adhesive Backed Metallic Gems [ 163780 ]](https://assets1.tamsnetwork.com/images/EC042017NF/163780s.jpg "Adhesive Backed Metallic Gems [ 163780 ]")
![Copper Stampin' Hot Foil Rolls [ 170553 ]](https://assets1.tamsnetwork.com/images/EC042017NF/170553s.jpg "Copper Stampin' Hot Foil Rolls [ 170553 ]")
![Basic White A4 Cardstock [ 166781 ]](https://assets1.tamsnetwork.com/images/EC042017NF/166781s.jpg "Basic White A4 Cardstock [ 166781 ]")
![Cajun Craze A4 Card Stock [ 121683 ]](https://assets1.tamsnetwork.com/images/EC042017NF/121683s.jpg "Cajun Craze A4 Card Stock [ 121683 ]")
![Golden Glow A4 Cardstock [ 167686 ]](https://assets1.tamsnetwork.com/images/EC042017NF/167686s.jpg "Golden Glow A4 Cardstock [ 167686 ]")
![Cajun Craze Classic Stampin' Pad [ 147085 ]](https://assets1.tamsnetwork.com/images/EC042017NF/147085s.jpg "Cajun Craze Classic Stampin' Pad [ 147085 ]")
![Golden Glow Classic Stampin' Pad [ 167676 ]](https://assets1.tamsnetwork.com/images/EC042017NF/167676s.jpg "Golden Glow Classic Stampin' Pad [ 167676 ]")
![Blending Brushes [ 153611 ]](https://assets1.tamsnetwork.com/images/EC042017NF/153611s.jpg "Blending Brushes [ 153611 ]")
![Uk/Ie Stampin' Hot Foil System & Craft Class [ 170011 ]](https://assets1.tamsnetwork.com/images/EC042017NF/170011s.jpg "Uk/Ie Stampin' Hot Foil System & Craft Class [ 170011 ]")
![Stampin' Cut & Emboss Machine [ 149653 ]](https://assets1.tamsnetwork.com/images/EC042017NF/149653s.jpg "Stampin' Cut & Emboss Machine [ 149653 ]")

- SHOP ONLINE – EARN 10% REWARDS ON ALL PURCHASES OVER £20
- PURCHASE A STARTER KIT : Get £155 worth of products for only £99. Choose from current catalogues and any specials available. Free Shipping. Read more
- Subscribe to my Video Tutorials – click here
