
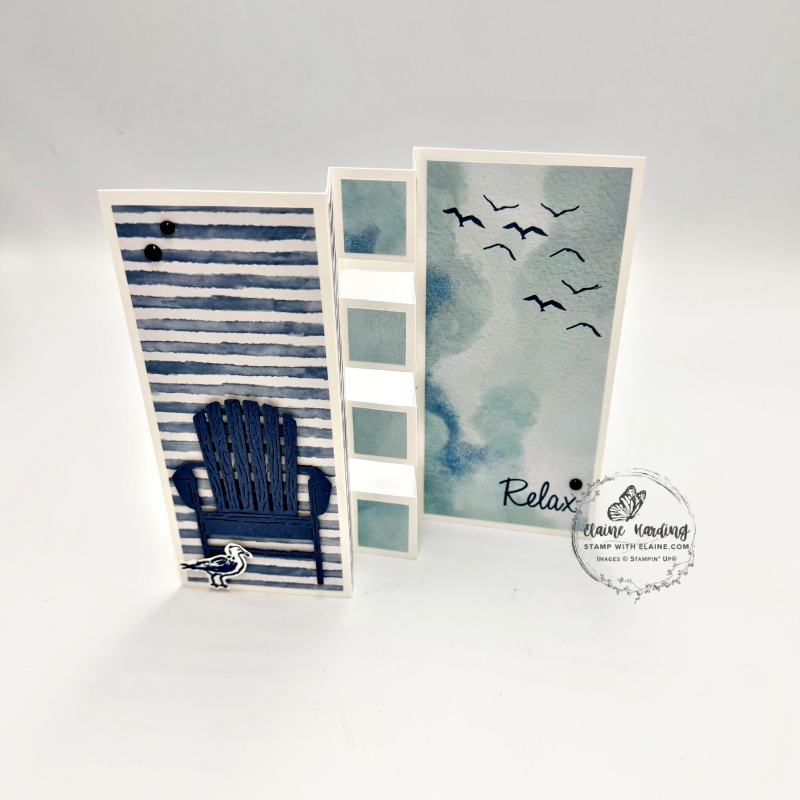
Pop-out column card – Lakeside Retreat. This pop-out column card is easier than you think. In fact it is an altered card from April’s Paper Pumpkin kit (Lakeside Retreat).
Hybrid card
An example of a hybrid card – I supplied my own card base in Basic White but used the kit elements for the mat layers. In addition, the Waterside Retreat Bundle, Misty Moonlight card stock and ink were used.
Cutting and scoring guide
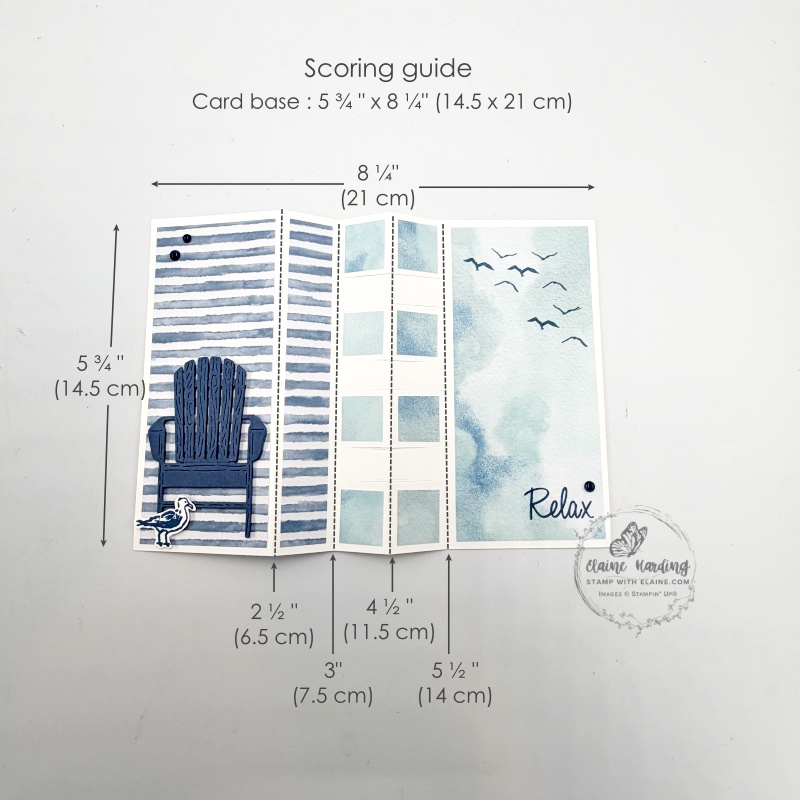
- Card base : Basic White thick cut at 5 ¾” x 8 ¼” (14.5 cm x 21 cm). Long side on top score at : 2 ½”, 3″, 3 ½”, 4 ½”, 5 ½” (6.5 cm, 7.5 cm, 11.5 cm, 14 cm)
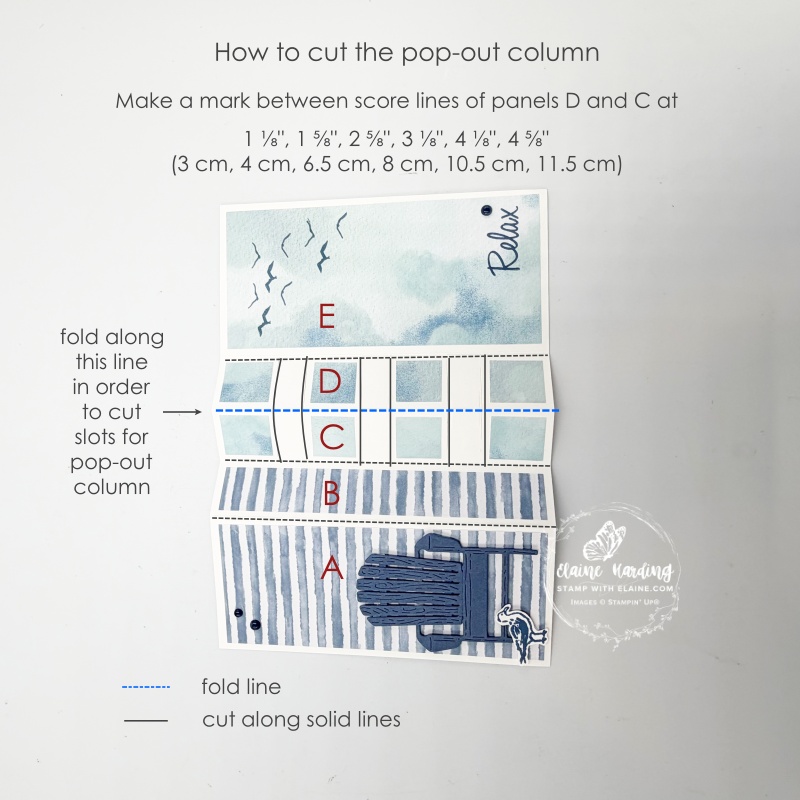
- Rotate card stock a quarter turn anti-clockwise so that the 2 ¾” panel E is at the top and make score marks between Panels D and C at 1 ⅛”, 1 ⅝”, 2 ⅝“, 3 ⅛”, 4 ⅛”, 4 ⅝“ (3 cm, 4 cm, 6.5 cm, 8 cm, 10.5 cm, 11.5 cm)
- Fold on the score line between C and D and cut along the score lines marked to create the pop-out column.
Lakeside Retreat card base and envelop
- Front of card : panel A -cut Lakeside Retreat striped card base 2 ¼” x 5 ½” (6 cm x 14 cm)
- Panel B – cut Lakeside Retreat striped card base at ¾” x 5 ½” (2 cm x 14 cm)
- Cut up envelop : 4 pieces measuring H ⅞” x W ¾” (2.2 cm x 2 cm) these are for the top and bottom pop out columns
- Envelop pieces for remaining column : 4 square pieces ¾” x ¾” (2 cm x 2 cm)
- Cut envelop piece for Panel E at cut 2 ½”x 5 ½”(6.5 cm x 14 cm)
Cutting pieces for Back of card
- Misty Moonlight card stock cut at 2 ½” x 5 ½”(6.5 cm x 14 cm)
- Basic White cut at 2 ¼” x 5 ¼” (6 cm x 13.5 cm).
- Pre-printed striped card base from kit cut at 1 ¼” x 5 ½”(3.5 cm x 14 cm)
- Cut ¼” (0.5 cm) Misty Moonlight strip from Misty Moonlight layer from Kit and adhere along edge of pre-printed striped card piece.
- Stamp taller bulrush image from Relaxing Waterside stamp set in Misty Moonlight ink and die cut with corresponding die from Relaxing Waterside dies.
Assembling card

- Adhere 2 ¼” x 5 ½” (6 cm x 14) striped piece on Panel A on left.
- Die cut Adirondack chair with Misty Moonlight card from Relaxing Waterside dies and adhere with dimensionals to bottom of panel. Stamp and die cut seagull and adhere as shown in picture.
- Panel B – adhere Striped piece measuring ¾” x 5 ½” (2 cm x 14 cm).
- Adhere envelop pieces measuring H ⅞” x W ¾” (2.2 cm x 2 cm) to C1 and C4, D1 and D4.
- Next adhere envelop pieces measuring ¾” x ¾” (2 cm x 2 cm) to C2 and C3, D2 and D3.
- On Panel E – adhere envelop piece measuring 2 ½”x 5 ½”(6.5 cm x 14 cm) and stamp birds with Misty Moonlight ink as shown. Also stamp Relax in bottom right corner and embellish with Dewdrops embellishments.
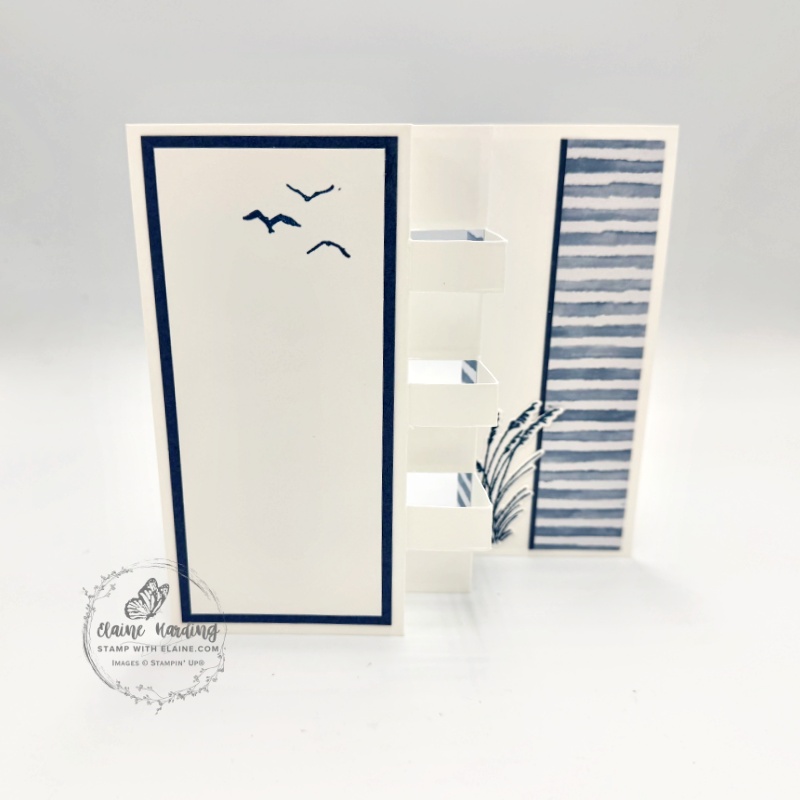
Back of card
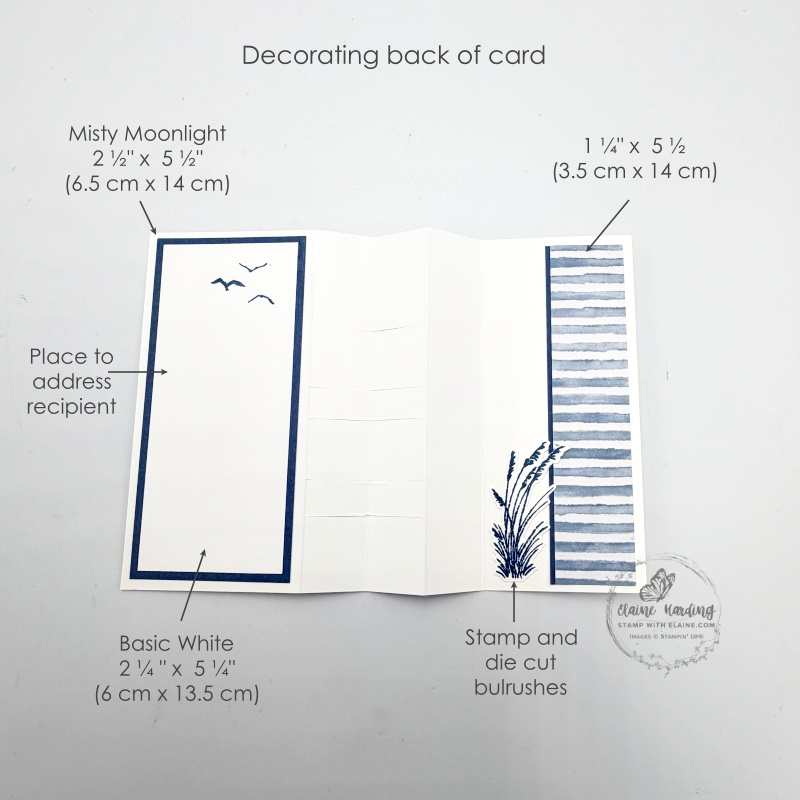
- Adhere Misty Moonlight piece first as pictured above.
- Stamp birds with Misty Moonlight ink on Basic White layer then adhere on top of Misty Moonlight piece.
- Next, stamp taller bulrush image from Relaxing Waterside Bundle on Basic White scrap and die cut with corresponding die.
- Adhere a strip Misty Moonlight on edge of striped piece and adhere to card base as pictured.
- Lastly adhere die cut bulrush as shown in photo.
Supply list
Listed below is the supply list. Just click on the picture to take you directly to the item in my online store.
Product List![Paper Pumpkin Subscription [ 166815 ]](https://assets1.tamsnetwork.com/images/EC042017NF/166815s.jpg "Paper Pumpkin Subscription [ 166815 ]")
![Paper Pumpkin 3 Month Subscription [ 166816 ]](https://assets1.tamsnetwork.com/images/EC042017NF/166816s.jpg "Paper Pumpkin 3 Month Subscription [ 166816 ]")
![Paper Pumpkin 6 Month Subscription [ 166817 ]](https://assets1.tamsnetwork.com/images/EC042017NF/166817s.jpg "Paper Pumpkin 6 Month Subscription [ 166817 ]")
![Paper Pumpkin 12 Month Subscription [ 166818 ]](https://assets1.tamsnetwork.com/images/EC042017NF/166818s.jpg "Paper Pumpkin 12 Month Subscription [ 166818 ]")
![Relaxing Waterside Bundle (English) [ 167928 ]](https://assets1.tamsnetwork.com/images/EC042017NF/167928s.jpg "Relaxing Waterside Bundle (English) [ 167928 ]")
![Dewdrops Embellishments [ 167748 ]](https://assets1.tamsnetwork.com/images/EC042017NF/167748s.jpg "Dewdrops Embellishments [ 167748 ]")
![Basic White A4 Thick Cardstock [ 159230 ]](https://assets1.tamsnetwork.com/images/EC042017NF/159230s.jpg "Basic White A4 Thick Cardstock [ 159230 ]")
![Basic White A4 Cardstock [ 166781 ]](https://assets1.tamsnetwork.com/images/EC042017NF/166781s.jpg "Basic White A4 Cardstock [ 166781 ]")
![Misty Moonlight A4 Cardstock [ 153086 ]](https://assets1.tamsnetwork.com/images/EC042017NF/153086s.jpg "Misty Moonlight A4 Cardstock [ 153086 ]")
![Lakeside Retreat Paper Pumpkin Refill (English) [ 171464 ]](https://assets1.tamsnetwork.com/images/EC042017NF/171464s.jpg "Lakeside Retreat Paper Pumpkin Refill (English) [ 171464 ]")

- SHOP ONLINE – EARN 10% REWARDS ON ALL PURCHASES OVER £20
- PURCHASE A STARTER KIT : Get £155 worth of products for only £99. Choose from current catalogues and any specials available. Free Shipping. Read more
- Subscribe to my Video Tutorials – click here