
Simply stamped card – Sweetly Sentimental. I’d bought the Sweetly Sentimental Hot Foil bundle, so it had an accompanying stamp set as well, but I wanted to show the value of having the stamp set even if you have not yet invested in the Stampin’ Hot Foil System or are still thinking about how useful it would be. It’s a short cut to embossing with powders because you have to stamp with versamark first, sprinkle with embossing powders and then heat setting it with a heat tool.
The advantage of having the Hot Foil system is that you can use the Sweetly Sentimental Hot Foil dies which have multiple sentiments (eleven in total) with one pass through the Stampin’ Cut & Emboss machine after it’s been hot foiled.
Sweetly Sentimental stamp set
The Sweetly Sentimental stamp set is a two-step stampin’ set. It allows you to layer two or more images to create one final image with extra texture and dimension in the your choice of colours. It has a large, elegant flower makes a stunning focal point, while three texture stamps add depth and dimension to every card.
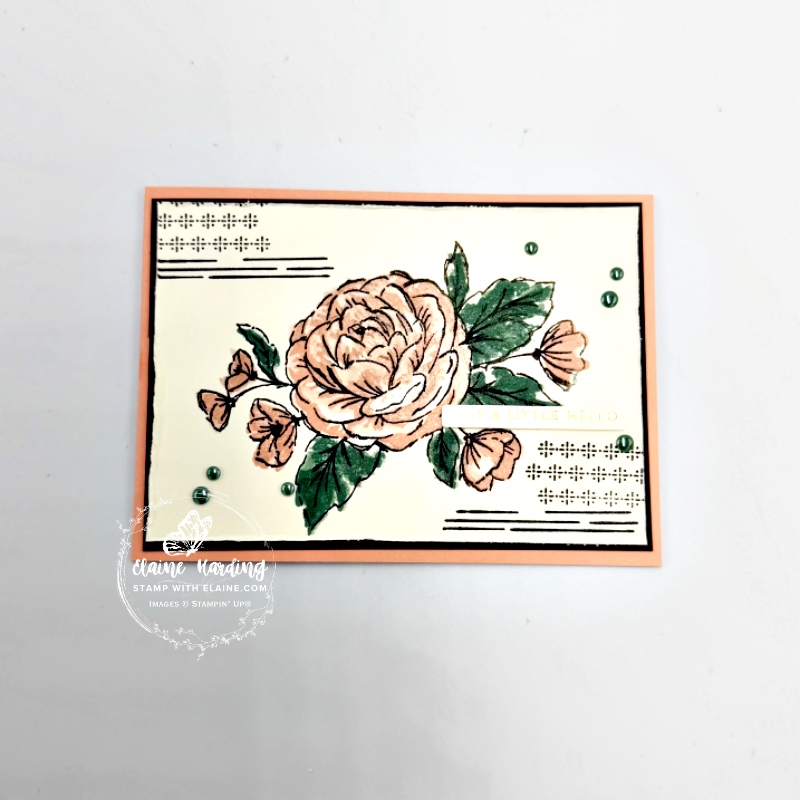
Cutting guide
- Card base : Crisp Cantaloupe cut at 4 ⅛” x 11 ½” (10.5 cm x 29 cm) and folded in half.
- Cut 2 pieces Early Espresso mat layers at 3 ⅞” x 5 ½” (10 cm x 14 cm)
- Very Vanilla – 2 pieces cut at 3 ¾” x 5 ⅜” (9.5 cm x 13.5 cm)
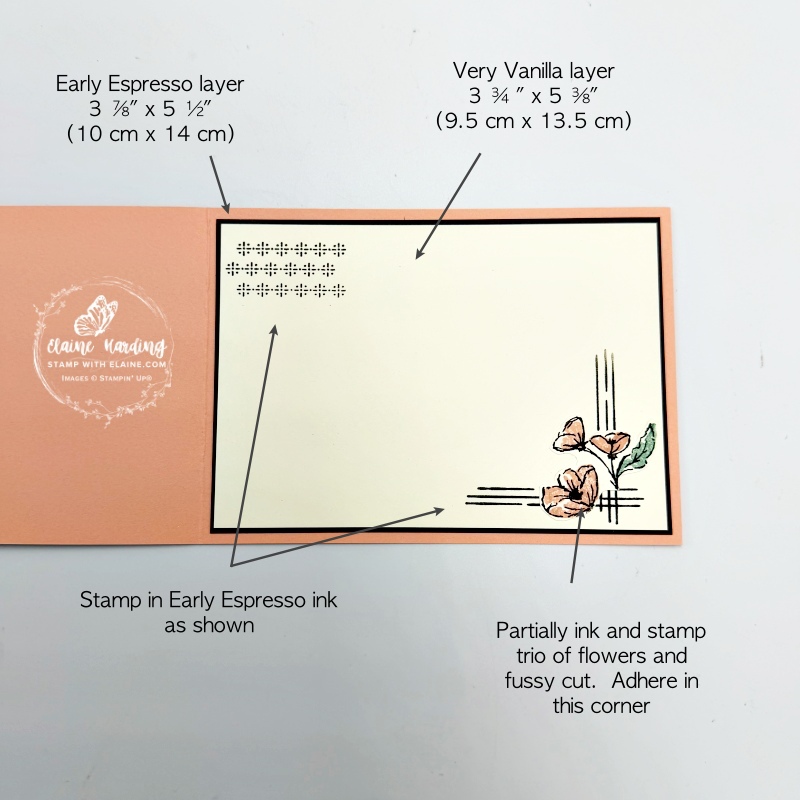
- Scrap of Very Vanilla to partially stamp flower and fussy cut for inside of card.
How to assemble card
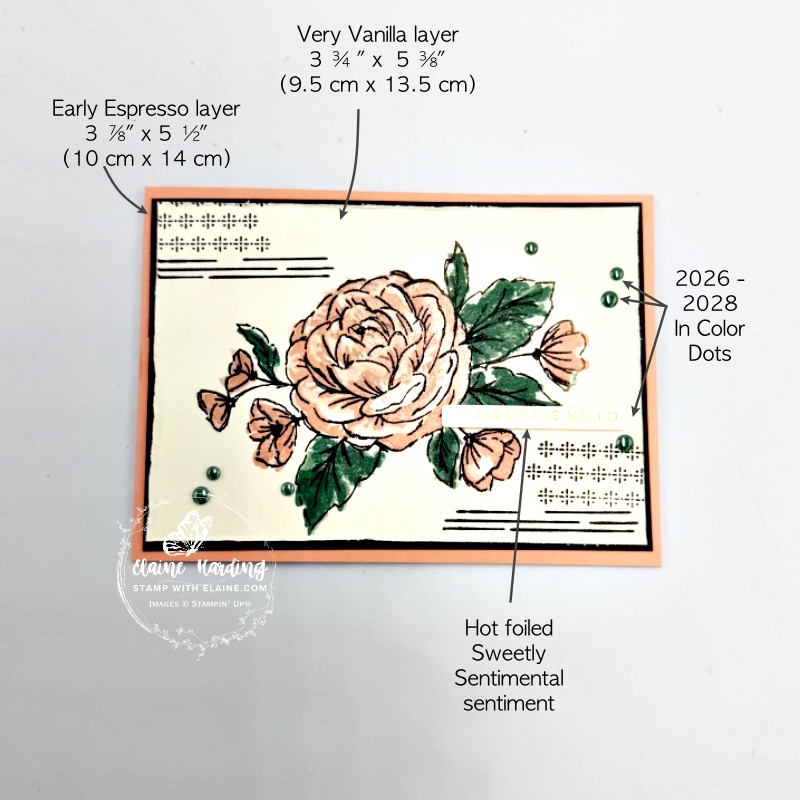
Front of card
- Adhere one of the Early Espresso pieces to front of card leaving an even border on all 4 sides.
- Very Vanilla piece : stamp the large floral line image with Early Espresso ink. Then use two-step stamping to fill in floral images with Calpyso Coral ink and the leaves with Peaceful Pine ink.
- In the top left and bottom right corner stamp the linear image followed by the cross hatch patterns as pictured.
- Use the Crisp Cantaloupe and Peaceful Pine shimmer brushes to add a touch of sparkle to the flowers and leaves respectively.
- Distress all 4 sides of Very Vanilla layer and adhere on top of Early Espresso layer ensuring even borders on all 4 sides.
- Add an odd number of 2026-2028 In Color dots.
- I used a hot foiled sentiment from a previous project for the greeting. If you don’t have the hot foil system or the hot foil dies, simply substitute a different sentiment from a stamp set of your choice.
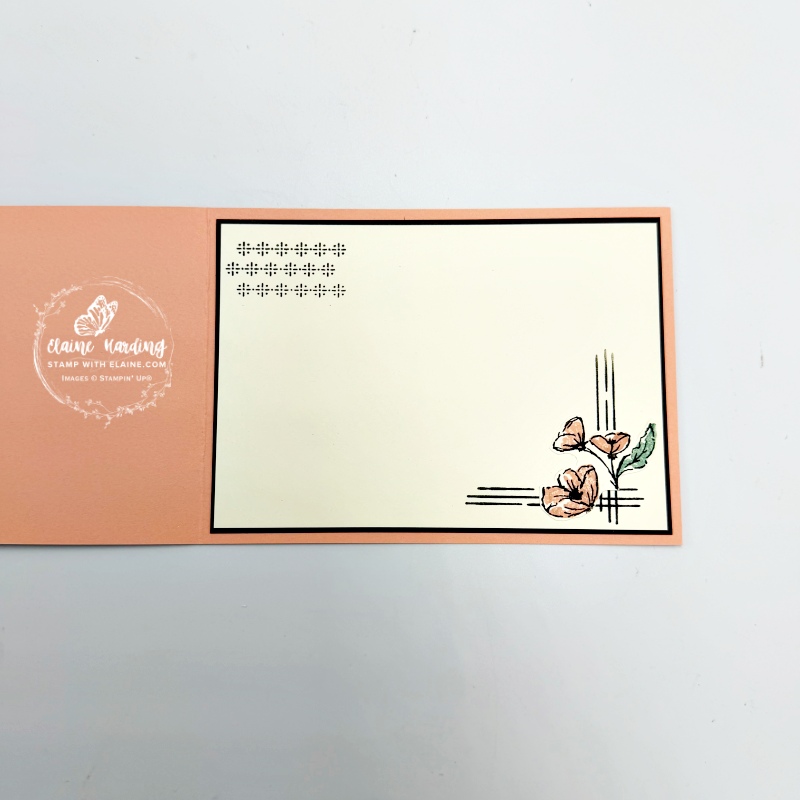
Inside card
- Adhere remaining Early Espresso layer inside card as pictured.
- Stamp cross hatch image in top left corner with Early Espresso ink.
- In the bottom right corner stamp the linear image so that it intersects as pictured.
- Partially ink up face up large floral image on the block where the trio of flowers is situated. Place scrap of Very Vanilla on top and rub hand over it to transfer image. Use two-step method to add colour to the flowers and leaf. Fussy cut and adhere in bottom right corner where the linear image intersects.
- Adhere on top of Early Espresso layer to finish card.
I’ve included Stampin’ Up!’s video on how to hot foil, but if it’s not on your radar at this time, just skip past it.
Stampin’ Hot Foil System
This is a new tool by Stampin’ Up! with special Hot Foil Dies. If you missed the post introducing the machine and information all about it, here’s a video to explain how the system works. Please be aware this machine is designed to fit Stampin’ Up!’s larger Stampin’ Cut & Emboss machine and was tested with their own line of products. It would render the 1 year warranty on the Stampin’ Hot Foil System null and void if you use it on non-Stampin’ Up! machines which may not fit.
Also be sure you’re ordering the machine with the right plug for your market. Foils and dies have to be purchased separately.
If you purchase the Stampin’ Hot Foil System before Jan 4, 2027, it will also include the Metallic Magic Craft Class for free. The class will cost £28.00 to purchase when the free class offer ends.
.
Supply list
Listed below is the supply list. Just click on the picture to take you directly to the item in my online store.
Product List![Uk/Ie Stampin' Hot Foil System & Craft Class [ 170011 ]](https://assets1.tamsnetwork.com/images/EC042017NF/170011s.jpg "Uk/Ie Stampin' Hot Foil System & Craft Class [ 170011 ]")
![Sweetly Sentimental Bundle (English) [ 170053 ]](https://assets1.tamsnetwork.com/images/EC042017NF/170053s.jpg "Sweetly Sentimental Bundle (English) [ 170053 ]")
![Sweetly Sentimental Photopolymer Stamp Set [ 170050 ]](https://assets1.tamsnetwork.com/images/EC042017NF/170050s.jpg "Sweetly Sentimental Photopolymer Stamp Set [ 170050 ]")
![Sweetly Sentimental Hot Foil Dies (English) [ 170052 ]](https://assets1.tamsnetwork.com/images/EC042017NF/170052s.jpg "Sweetly Sentimental Hot Foil Dies (English) [ 170052 ]")
![Gold Stampin' Hot Foil Rolls [ 170066 ]](https://assets1.tamsnetwork.com/images/EC042017NF/170066s.jpg "Gold Stampin' Hot Foil Rolls [ 170066 ]")
![Stampin' Cut & Emboss Machine [ 149653 ]](https://assets1.tamsnetwork.com/images/EC042017NF/149653s.jpg "Stampin' Cut & Emboss Machine [ 149653 ]")
![Crisp Cantaloupe A4 Cardstock [ 167694 ]](https://assets1.tamsnetwork.com/images/EC042017NF/167694s.jpg "Crisp Cantaloupe A4 Cardstock [ 167694 ]")
![Early Espresso A4 Card Stock [ 121686 ]](https://assets1.tamsnetwork.com/images/EC042017NF/121686s.jpg "Early Espresso A4 Card Stock [ 121686 ]")
![Very Vanilla A4 Cardstock [ 166785 ]](https://assets1.tamsnetwork.com/images/EC042017NF/166785s.jpg "Very Vanilla A4 Cardstock [ 166785 ]")
![Early Espresso Classic Stampin' Pad [ 147114 ]](https://assets1.tamsnetwork.com/images/EC042017NF/147114s.jpg "Early Espresso Classic Stampin' Pad [ 147114 ]")
![Crisp Cantaloupe Classic Stampin Pad [ 167680 ]](https://assets1.tamsnetwork.com/images/EC042017NF/167680s.jpg "Crisp Cantaloupe Classic Stampin Pad [ 167680 ]")
![2026–2028 In Color™ Dots [ 167546 ]](https://assets1.tamsnetwork.com/images/EC042017NF/167546s.jpg "2026–2028 In Color™ Dots [ 167546 ]")

- SHOP ONLINE – EARN 10% REWARDS ON ALL PURCHASES OVER £20
- PURCHASE A STARTER KIT : Get £155 worth of products for only £99. Choose from current catalogues and any specials available. Free Shipping. Read more
- Subscribe to my Video Tutorials – click here
