
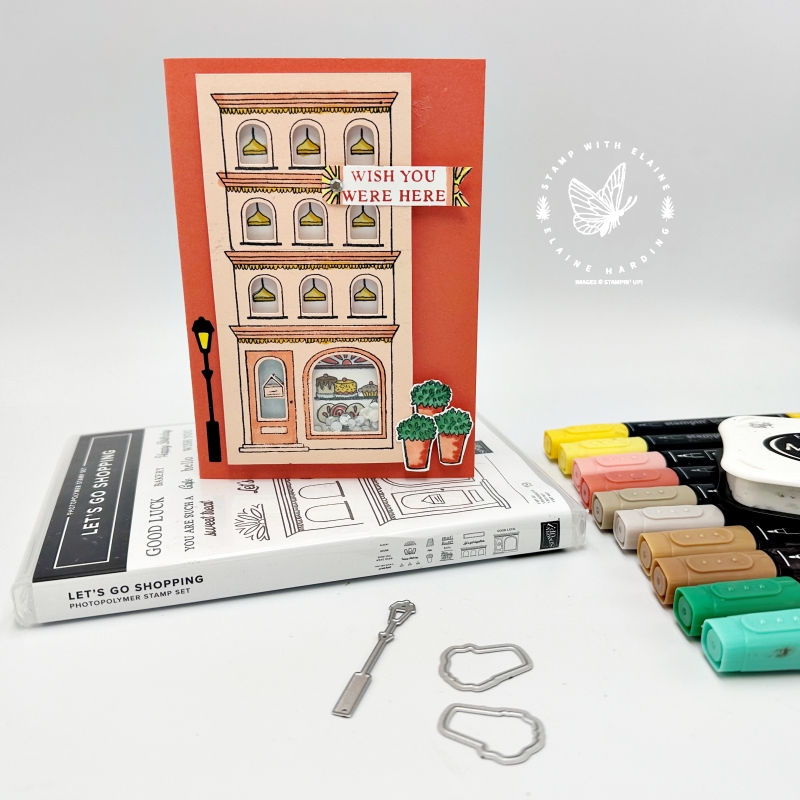
Who doesn’t love a shaker card – I made one with the Let’s Go Shopping stamps and dies. If you purchase them together as a bundle, it saves you 10%.
Shaker cards
These are relatively easy to do. You cut a piece of neutral card stock, in this case I used Basic White, the same size as the front piece you wish to stamp on. The window sheet should be a tad smaller and you attach this to the front piece with double sided tape. Then you add a foam adhesive strip on top on all four sides without leaving any gaps.
Stamp your background on the Basic White piece, add the sequins, or sprinkles, remove the backing of the foam adhesive strip from front piece, place over the Basic White piece and hey presto – you have your shaker card.
How I created the Let’s Go Shopping shaker card
- Cut standard card base in Calypso Coral (half A4 sheet folded in half).
- Stamp the shop fronts on Petal Pink card stock with Tuxedo Black Memento ink then trim to desired size leaving approximately ¼” (0.5 cm) border around stamped image. Cut Basic White piece same size as trimmed Petal Pink piece. Cut window sheet slightly smaller than Petal Pink piece.
- Colour door and window trims with Stampin’ Blends.
- Cut out the apertures for the windows and door frames.
- Lay over Basic White piece and use pencil to lightly trace where apertures are.
- Stamp with lights and window dressing in Tuxedo Black Memento ink using the pencil lines as a guide as to where to stamp.
- Colour all the elements with Stampin’ Blends.
- Attach window sheet to Petal Pink piece and add foam adhesive strip.
- Place sprinkles in middle of Basic White piece and align lights with apertures on Petal Pink piece then adhere firmly to create shaker card.
- Stamp three flower pots in Tuxedo Black Memento ink and colour with Stampin’ Blends and die cut.
- Die cut lamp post in Basic White – use Basic Black Stampin’ Blend to colour post and lamp shade, then the insert in Daffodil Delight.
- Stamp sentiment and cut out label as shown – optional to decorate with “arc” stamp and colour with Stampin’ Blends.
Assembly
- Adhere completed shaker piece to card base, leaving sufficient room for lamp post.
- Align lamp-post with bottom of Shaker piece on the left and adhere to card base.
- Partially attach first flower pot on shop front and the other part with a dimensional to card base.
- Use dimensionals to stagger and adhere remaining pots as shown in photo.
- Stamp and decorate inside of card as you wish.
Supply list
Listed below is the supply list. Just click on the picture to take you directly to the item in my online store.
Product List")
")


I hope it’s inspired you to make one of your own. Thanks for popping by and enjoy the rest of your weekend!

- SHOP ONLINE – EARN 10% REWARDS ON ALL PURCHASES OVER £20
- PURCHASE A STARTER KIT : Get £155 worth of products for only £99. Choose from current catalogues and any specials available. Free Shipping. Read more
- Subscribe to my Video Tutorials – click here