
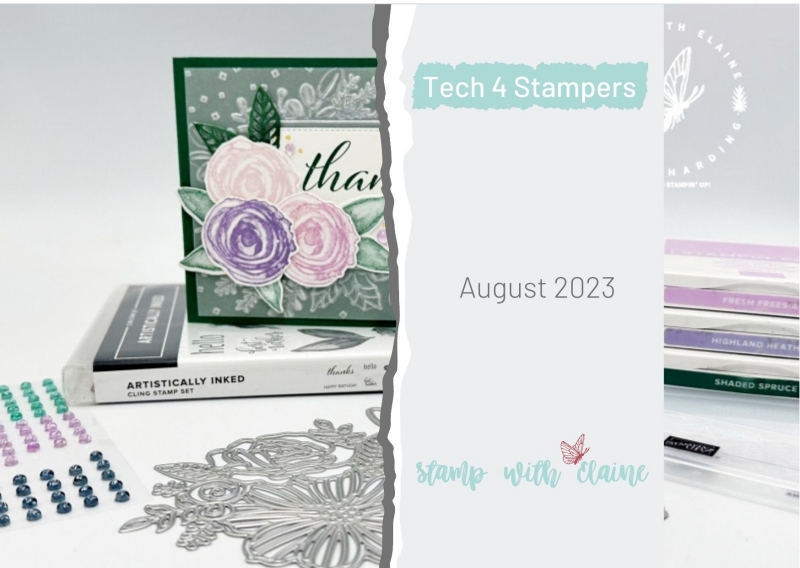
The theme for August’s Tech 4 Stampers Blog Hop is all about Vellum. There are lots of different ways to use Vellum. The heavier duty Vellum can be used for Pergamano. Pergamano is the art of embellishing and decorating parchment paper (or vellum) by using techniques like embossing, perforating, colouring or cutting to make intricate patterns.
I’ve gone down the dry embossing route and you can achieve this so easily because Stampin’ Up! has a plethora of embossing folders to choose from. You may have to put a thin shim (eg copy paper) over the embossing folder to prevent your vellum from “tearing” especially if it’s the 3D embossing folders because they make a much deeper impression than standard embossing folders.

The Build & Bloom Stampers Blog hop (formerly Tech 4 Stampers)is a monthly subscription group run by Louise Sims. She mentors and enables members to understand IT jargon and equips them with a fountain of Technical knowledge to build or manage their own websites. It takes the mystery out of “tech” and I’ve certainly grown in confidence thanks to her expertise, patience and guidance. Not only that, I’ve met and made new friends with my fellow “Techs” and love the camaraderie within the group.
Embossing vellum
You can emboss vellum with an embossing folder. Where there is an embossed impression, it goes white and the rest of the vellum stays translucent. You can achieve a Pergamano effect without having to use special tools and it’s quick and easy to do with an embossing folder.

Materials
Stamps & Accessories
I am guilty of “playing with new” and sometimes I forget the old. So I’m revisiting an “oldie” but “goldie”.
- Artistically Inked
- Artistic Dies
- Merriest Frames Hybrid Embossing Folder
- Tinsel Gems Three-pack
Paper
- Shaded Spruce card base cut at 4 ⅛” x 11 ¾” (10.5 cm x 29 cm) card base folded in half.
- Vellum card stock 3 ⅞”x 5 ⅜” (9.5 cm x 13.5 cm) embossed with Merriest Frames Hybrid Embossing Folder.
- Basic White scrap to stamp and die cut 3 flowers
- Stamp off in Shaded Spruce before stamping leaves on Basic White card stock and die cut with Artistic Dies.
- Die cut large open work Merriest Frames Hybrid Embossing Folder die in Basic White.
- Cut a label for front of card with Merriest Frames Hybrid Embossing Folder dies
- Inside card : Basic White 3 ¾” x 5 ½” (9.5 cm x 14 cm)
Ink
- Shaded Spruce Classic Stampin’ Pad
- Fresh Freesia Classic Stampin’ Pad
- Bubble Bath Classic Stampin’ Pad
- Highland Heather Classic Stampin’ Pad
- Daffodil Delight Classic Stampin’ Pad
- Shaded Spruce Alcohol Stampin’ Blends combo
Card Assembly
- Adhere embossed vellum behind the rectangle centre. If you place adhesive here it won’t be seen from the front.
- Stamp “Thanks” in Shaded Spruce on the Basic White stitched rectangle die cut from Merriest Frames Hybrid Embossing folder and adhere to corresponding rectangle on the embossed Vellum. This will hide the adhesive on back of vellum.
- Arrange stamped and die cut flowers in Bubble Bath, Fresh Freesia and Highland Heather in bottom left corner.
- Select the stamp with the four “dots” on it and randomly stamp in Daffodil Delight at the top left and bottom right corner.
- Tuck in stamped and die cut leaves behind flowers.
- Ink up trio of flower stamp and stamp and die cut trio of flowers in Fresh Freesia. Arrange in bottom right corner and adhere as shown.
- Trim off elements of leaves you require from large Basic White openwork Artistic Die-cut and colour these in with the Shaded Spruce Stampin’ Blends combo.
- Arrange elements and adhere to card front.
- Add the Tinsel Gems three-pack to finish the front.
- Lastly for the inside Basic White piece : stamp the large flower in Highland Heather, the flower centre in Daffodil Delight and the leaves in Shaded Spruce. Adhere to inside of card.
Other ways to use vellum
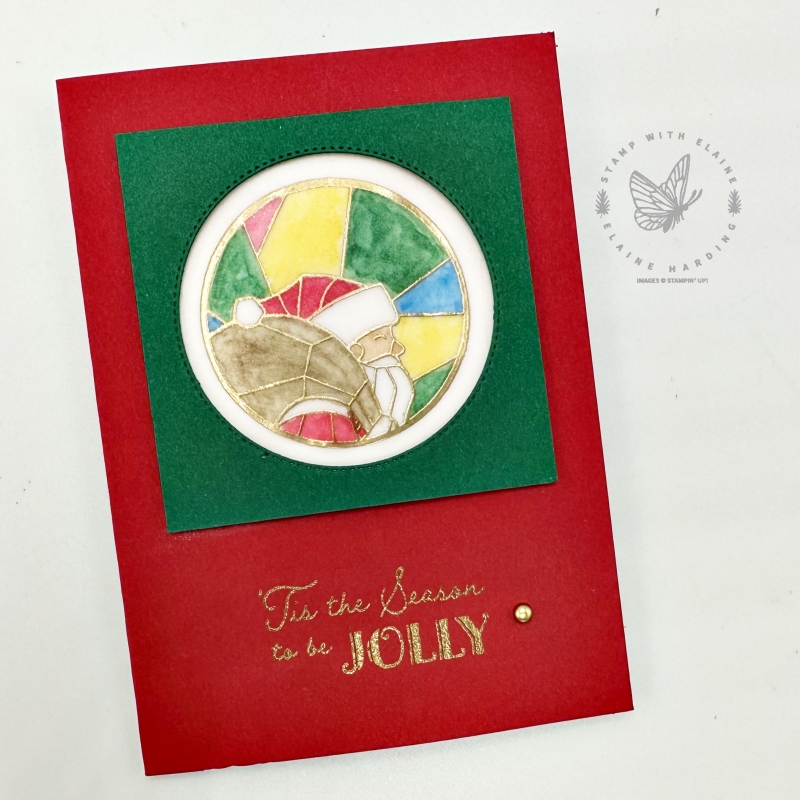

You can emboss the front, and add colour from the back to make it look like stained glass, or use it to overlay brightly coloured card stock to tone it down. Some vellums have a printed pattern, and you can also use a blending brush on the back to make the pattern “pop”. Vellum can also be used to punch or die cut sprigs of leaves to add to a project (not pictured).
Supply list
Listed below is the supply list. Just click on the picture to take you directly to the item in my online store.
Product List


Thanks for visiting. I would love to know what you think of my project and would appreciate it if you could leave a comment. To visit the next person on the list and see their fabulous creations, simply click on the link below or before my name depending who you visited initially. Happy hopping!

- SHOP ONLINE – EARN 10% REWARDS ON ALL PURCHASES OVER £20
- PURCHASE A STARTER KIT : Get £155 worth of products for only £99. Choose from current catalogues and any specials available. Free Shipping. Read more
- Subscribe to my Video Tutorials – click here
Such a pretty card Elaine. The embossing folder looks amazing on vellum.
One of my favourite techniques!