
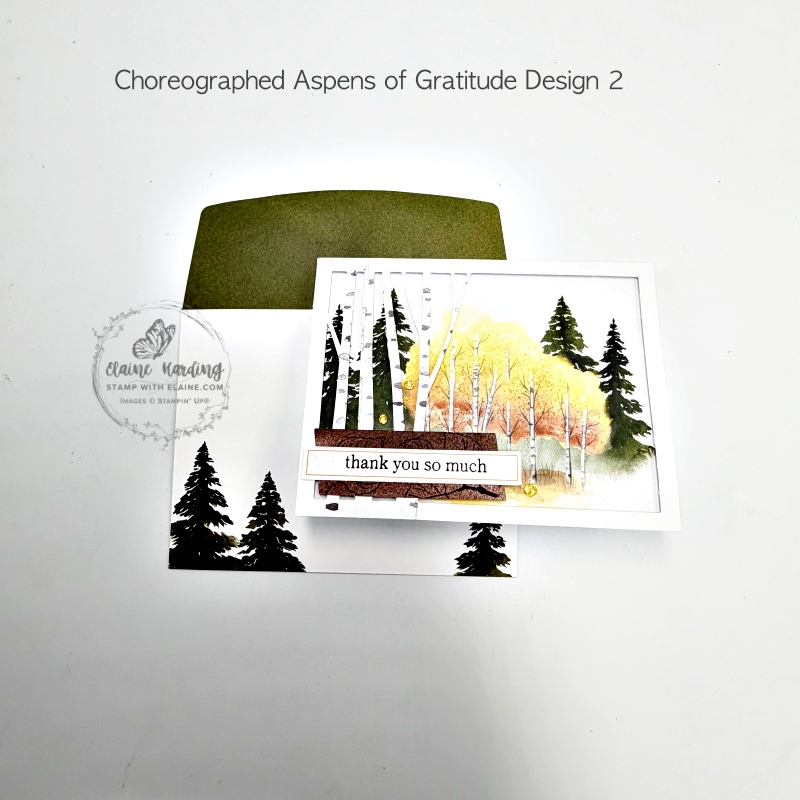
Altered Paper Pumpkin – Aspens of Gratitude part 2. Due to time constraints I only made 2 altered cards with the 2nd choreographed Kit Card Design 2. There’s so much happening at the moment, the Halloween Series, Christmas Series and the upcoming new November Online Exclusives I just haven’t been able to do more.
The picture on the left is the choreographed Kit Card Design 2 of the Aspens of Gratitude Paper Pumpkin September set and my last chance to use the add on dies which were assigned for July, August and September Paper Pumpkin Kits.
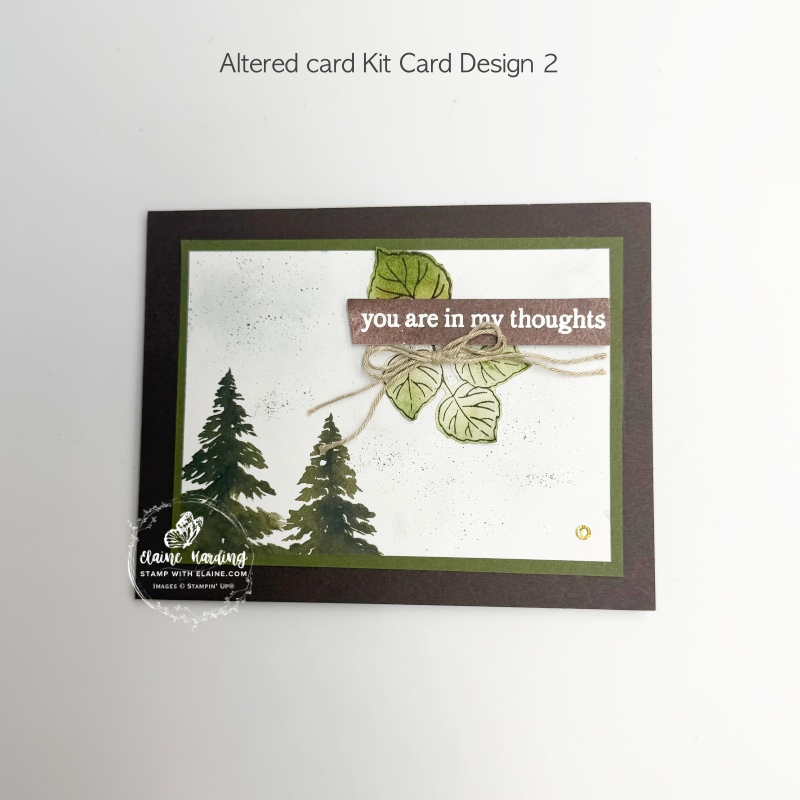
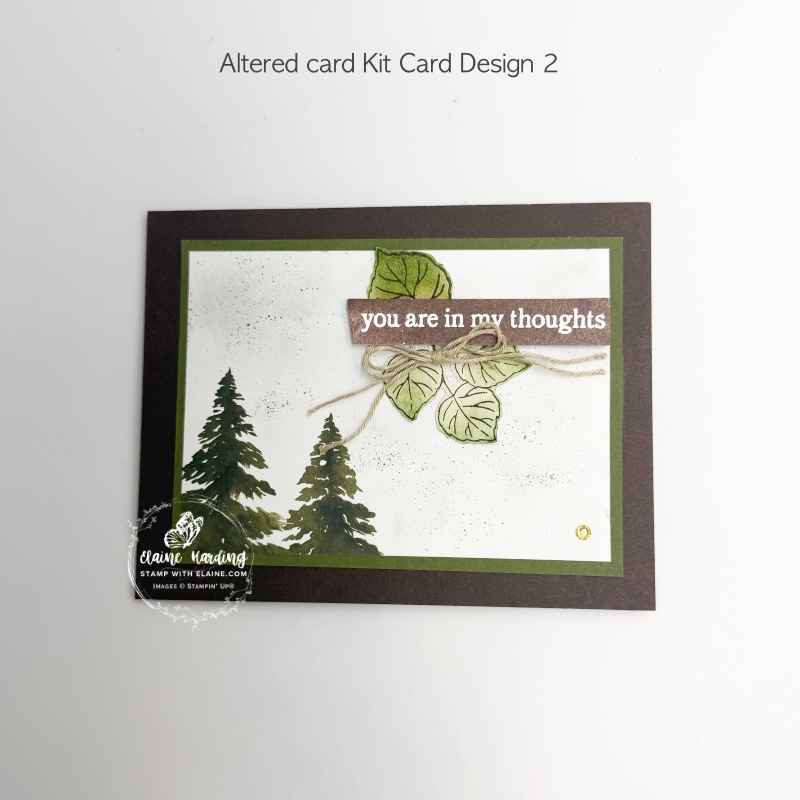
First altered Aspens of Gratitude Kit Card design 2
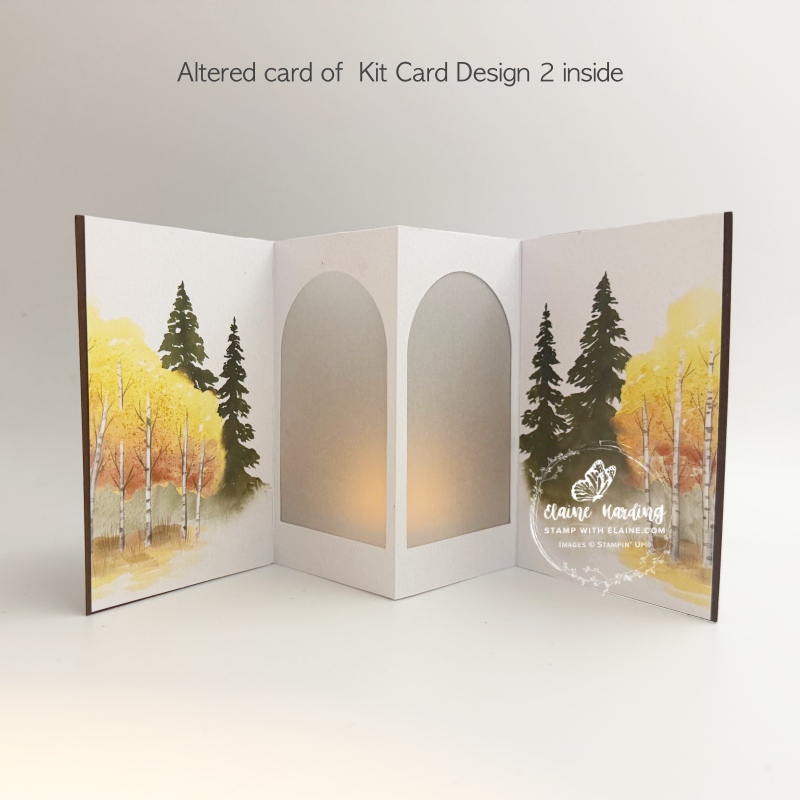
I used part of the envelop for the front of the card, then cut the front of the card in half and switched them around for the inside. The back of the card was scored and folded in half to cut apertures for both sides with the Everyday Arches dies. Vellum was added to create a luminary card. The back of card was decorated with the remaining tree from the envelop. This is a variation of the Peek-a-boo card I made for Halloween HERE. For today’s card I added some vellum.
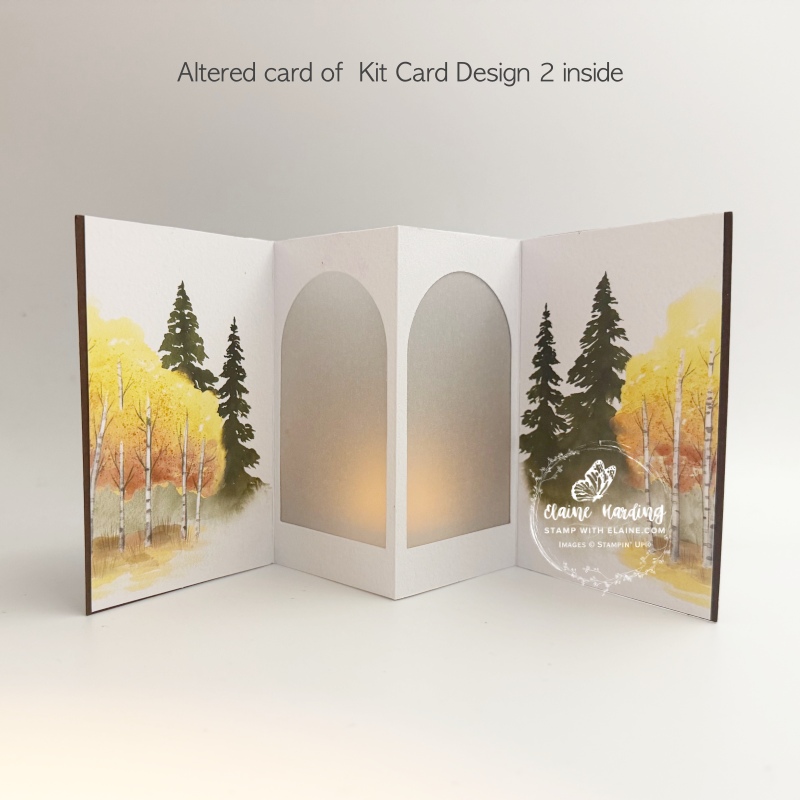
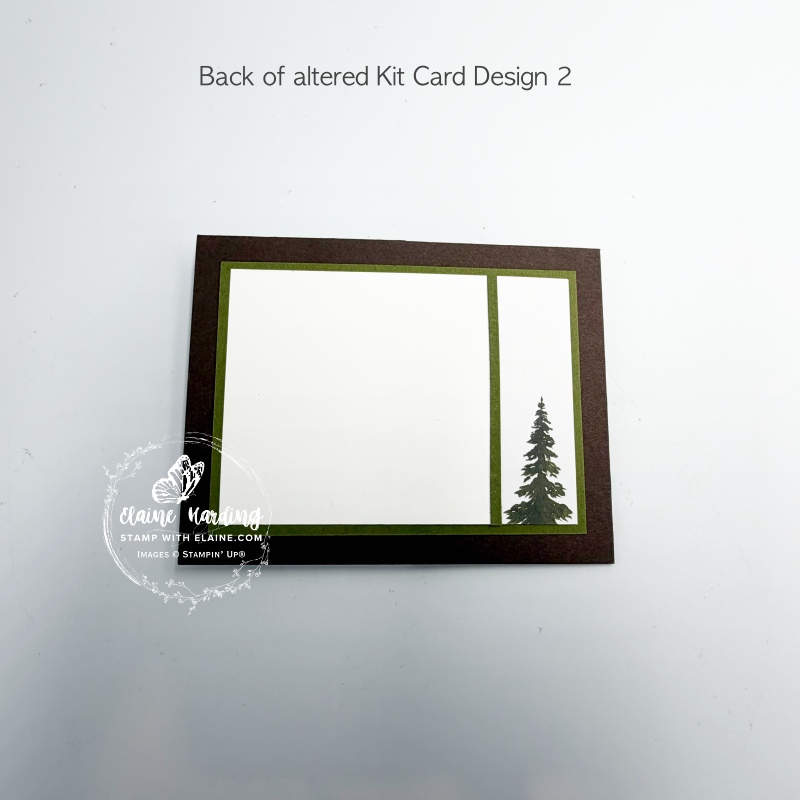
Cutting guide for first altered card from Kit Card Design 2
Card base and front of card
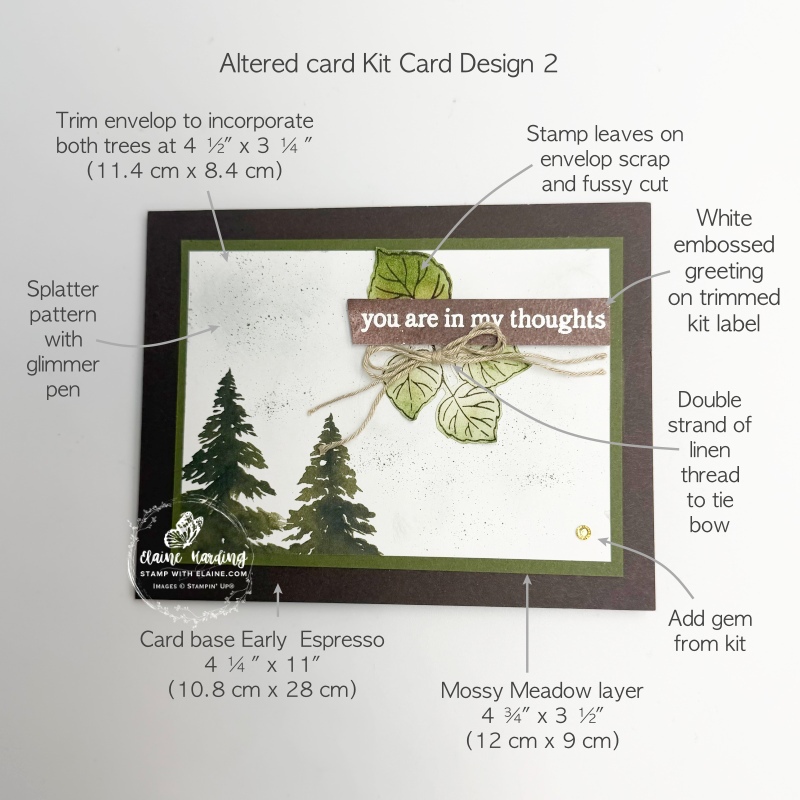
- Card base : 4 ¼” x 11″ (10.8 cm x 28 cm) folded in half.
- Mossy Meadow layer : 4 ¾” x 3 ½” (12 cm x 9 cm)
- Envelop – trim incorporating 2 trees : 4 ½” x 3 ¼” (11.4 cm x 8.4 cm), reserve remaining piece for back of card.
- Trim label in half and emboss with greeting in Basic White embossing powder.
- Stamp trio of leaves and single leaf with Early Espresso ink on scrap of envelop. Colour with sponge dauber with Old Olive ink. Fussy cut leaves and set aside.
- Length of Linen thread to tie bow.
Inside card – illuminating panels
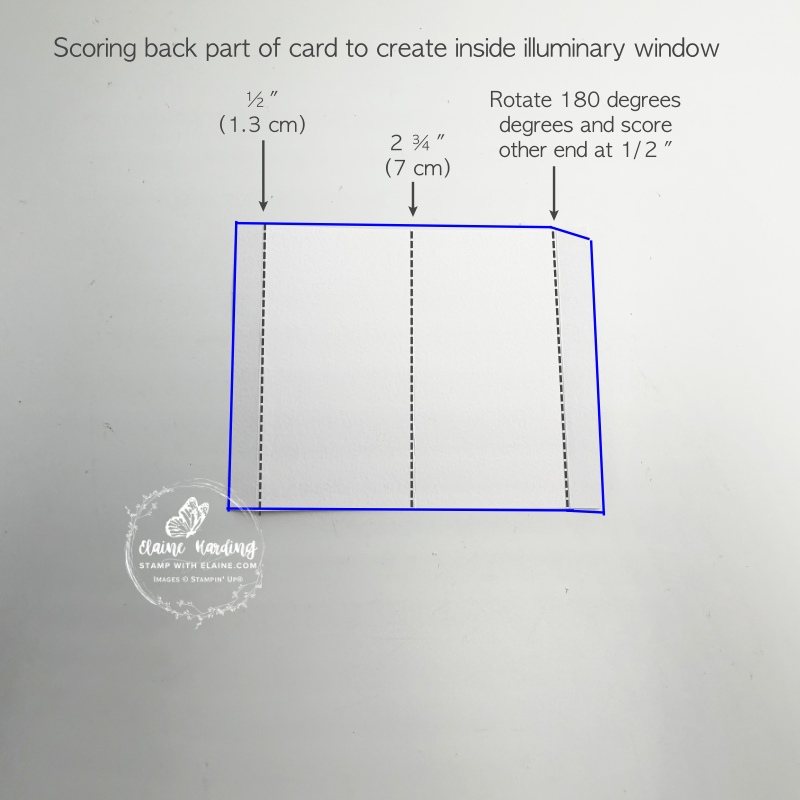
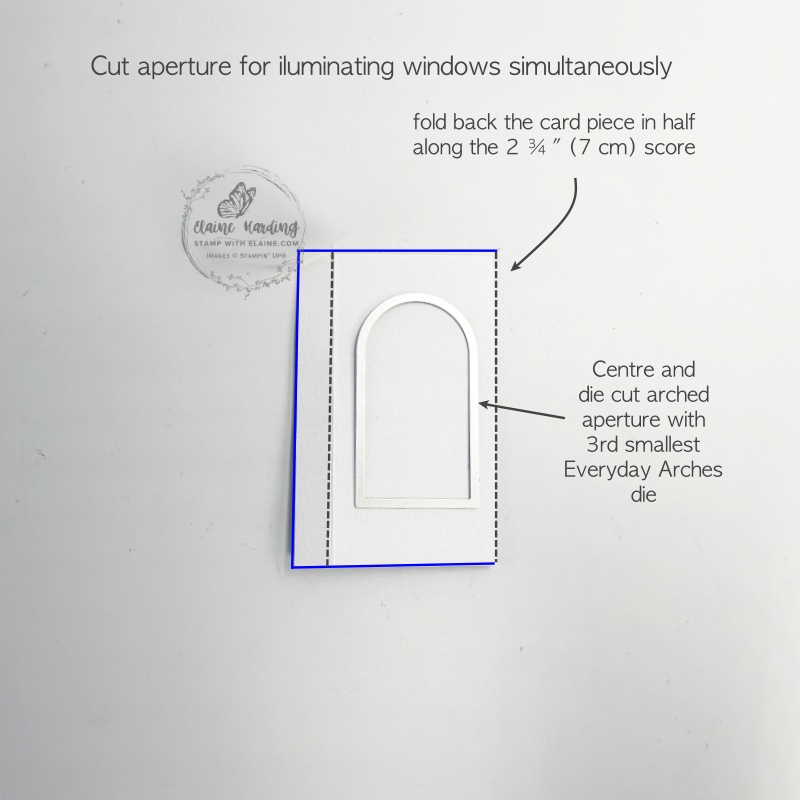
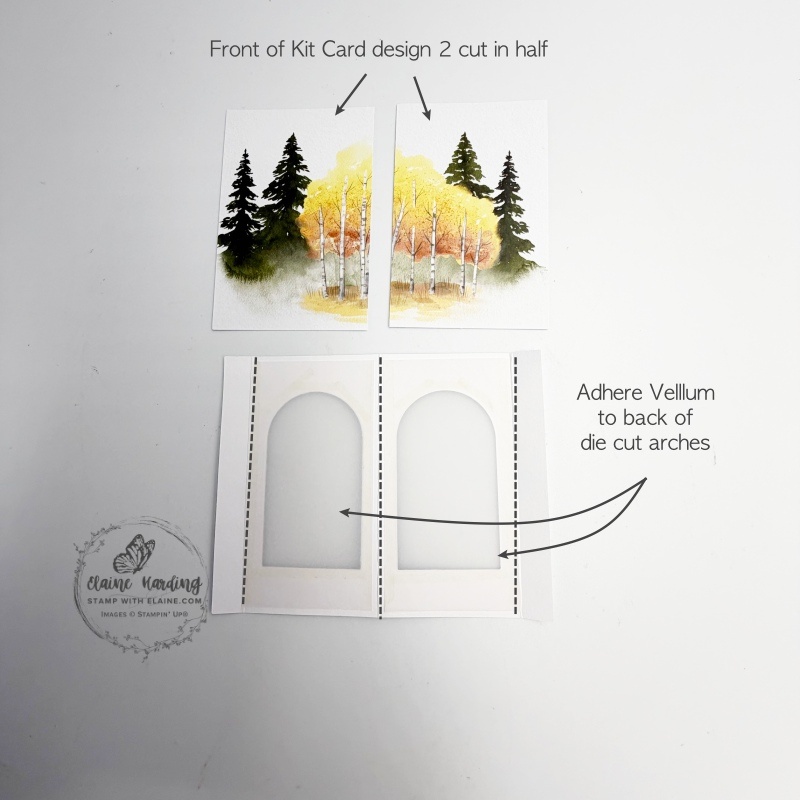
- On the long side, score the back of kit card piece at 2 ¾” (7 cm) and score each end ½”(1.3 cm) pictured on left.
- Fold on 2 ¾” (7 cm) and cut arched apertures with Everyday Arches die centred as shown in middle picutre.
- Cut the front of the Kit Card Design 2 in half so that it measures 2 ¾” x 4 ¼” (7 cm x 10.8 cm). Adhere vellum on the back of the die cut apertures.
Joining the card front pieces/attaching it to inside card base
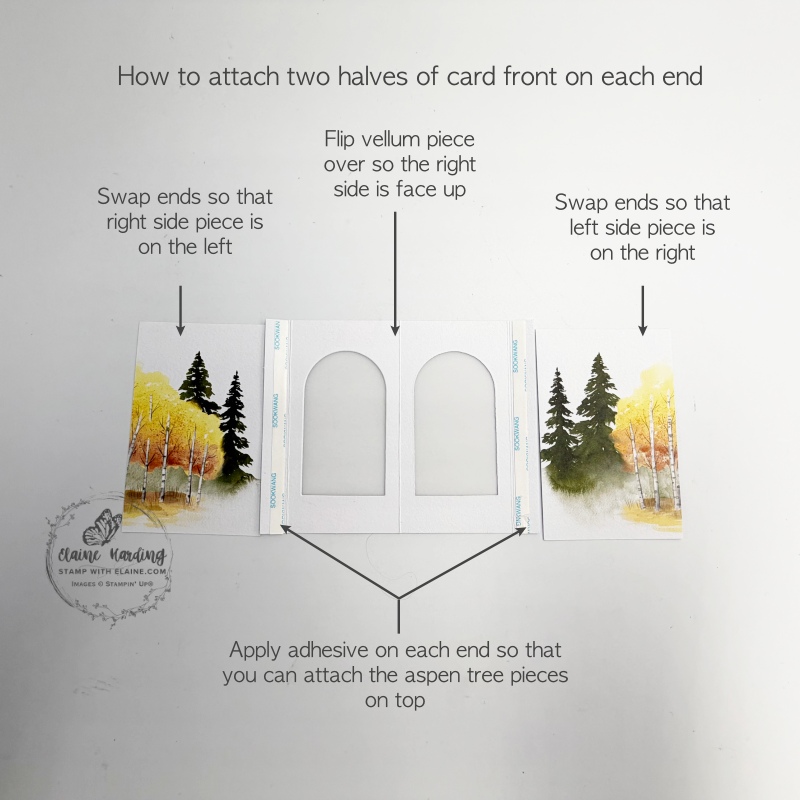
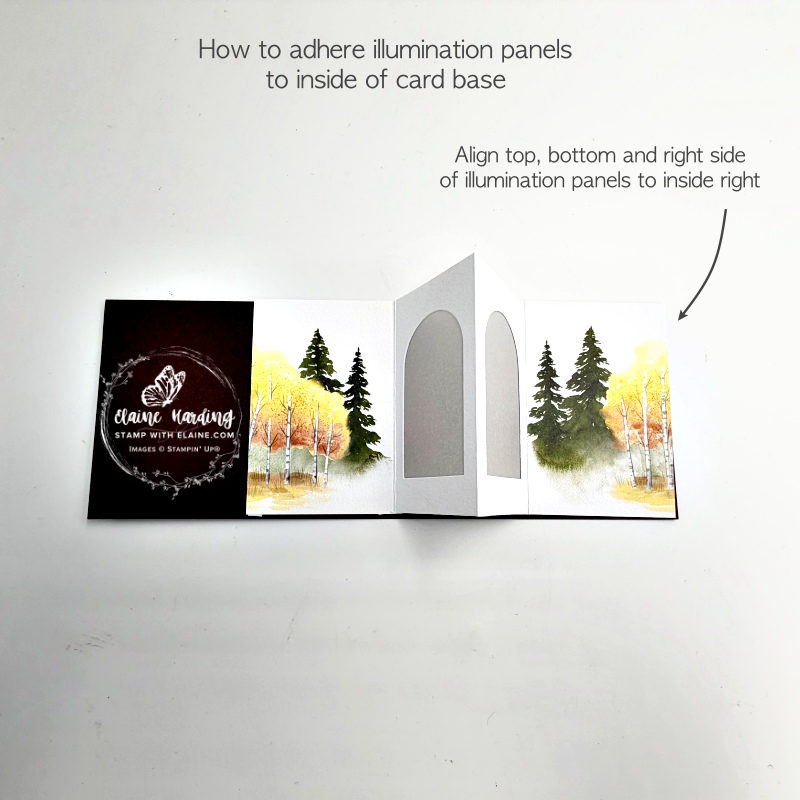
How to join 2 halves of card to illuminating pieces (picture on left)
- Swap card front ends so that the right half is on the left, and the left half is on the right as pictured above.
- Flip vellum aperture over so the the right side is face up. Apply tear n’ tape on the ½” (1.3 cm) flaps.
- Align and adhere right edge of left hand piece shy of scoreline to the arch on the left.
- Repeat for the other side – align and adhere left edge of right hand piece shy of the score line to the arch on the right.
- Ensure the panels are right way up by aligning top, bottom and right edge with right inside of card base as pictured. You may have to adjust alignment on right edge because the panel is shorter than 11″ (28 cm) and won’t lie completely flat when open.
Adhering illumination panel to front of card
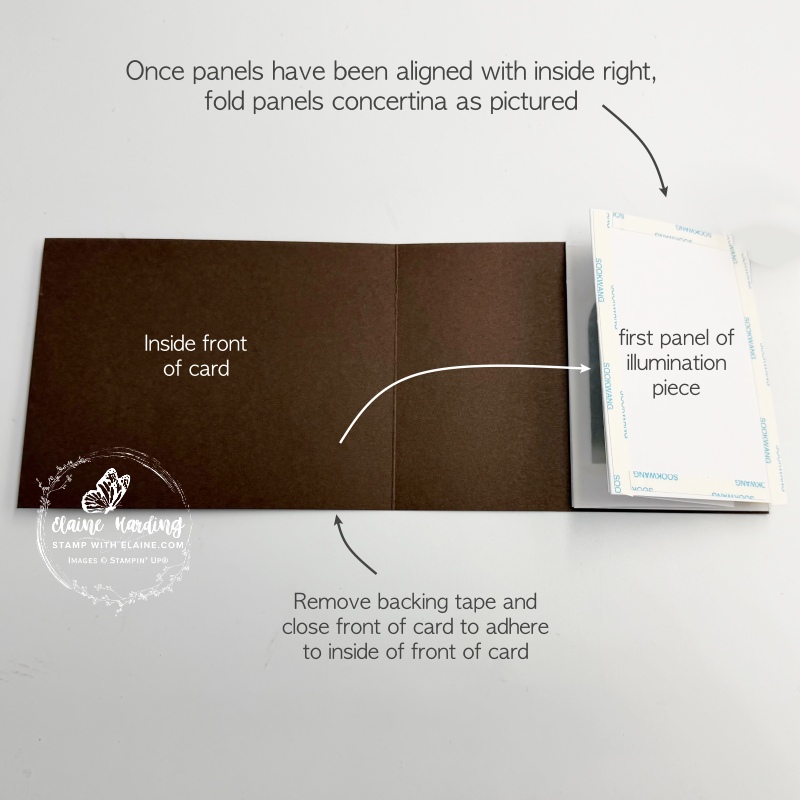
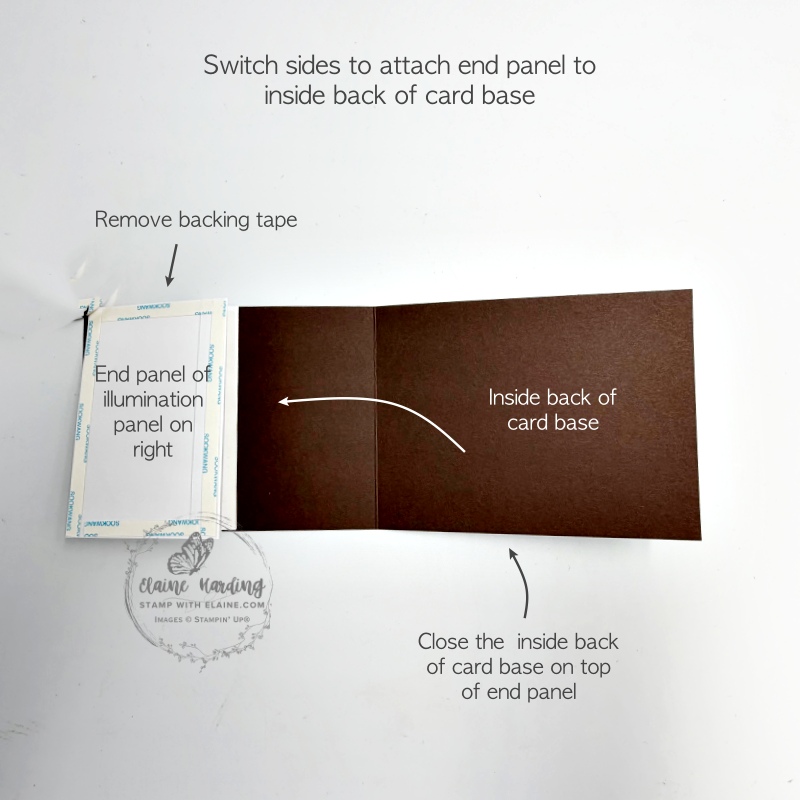
- Once aligned, fold the panels in concertina shape and remove backing tape. Close inside front of card on top of folded panels to attach it.
- Switch sides so the end panel on the right is now on top of the inside left of card (middle picture). Remove backing tape and close inside back of card base on top to attach it.
- Picture on the right shows the panel now attached to inside of card with a battery candle lit behind the velllum.
Back of card for first altered Kit Card 2 Choreographed Design
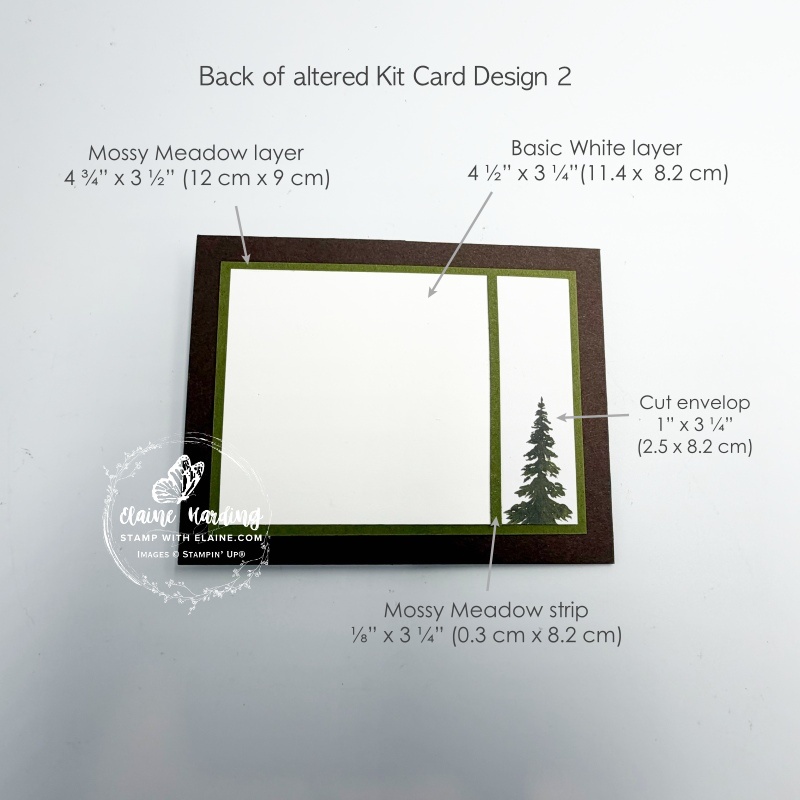
- Cut Mossy Meadow layer 4 ¾” x 3 ½” (12 cm x 9 cm)
- Basic White layer 4 ½” x 3 ¼” (11.4 cm x 8.2 cm)
- Cut envelop with single tree at 1″ x 3 ¼” (2.5 cm x 8.2 cm) – glue on right on top of Basic White layer as pictured.
- Strip of Mossy meadow cut at ⅛” x 3 ¼” (0.3 cm x 8.2 cm) – glue strip butted up to envelop piece to complete card.
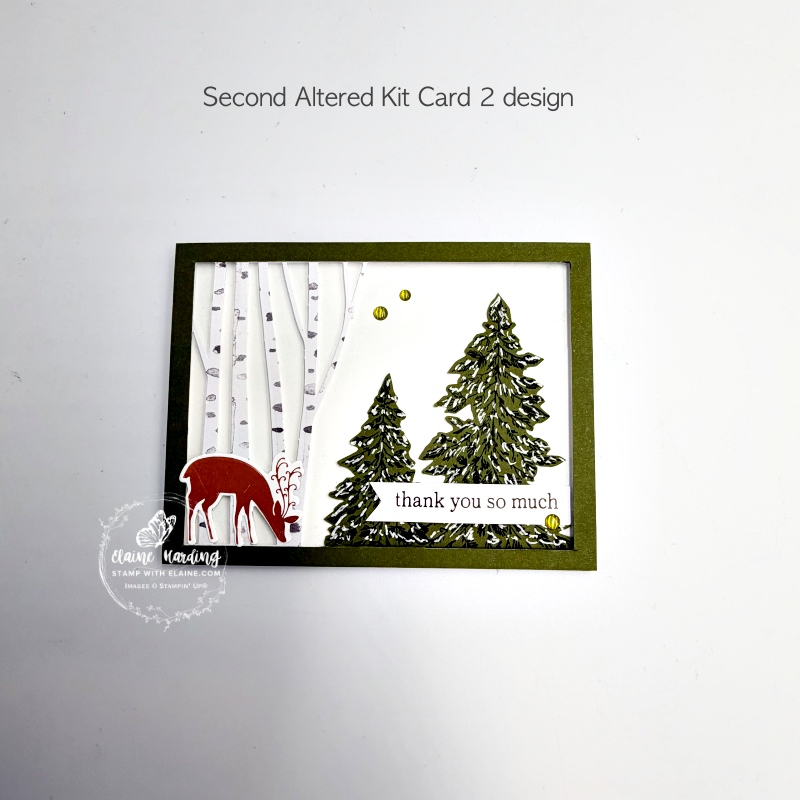
Second altered card from Choreographed Kit Card 2
I used the trees kit card layer of tree trunks to make my second altered card. Materials added were extra card stock and the Christmas tree images from Graceful Evergreen Deer Bundle which uses the Hot Foil System, white gel pen, Mossy Meadow, Cloud cover ink, Copper foil roll, blending brush, the Hot Foil System, and Stampin’ cut & Emboss machine.
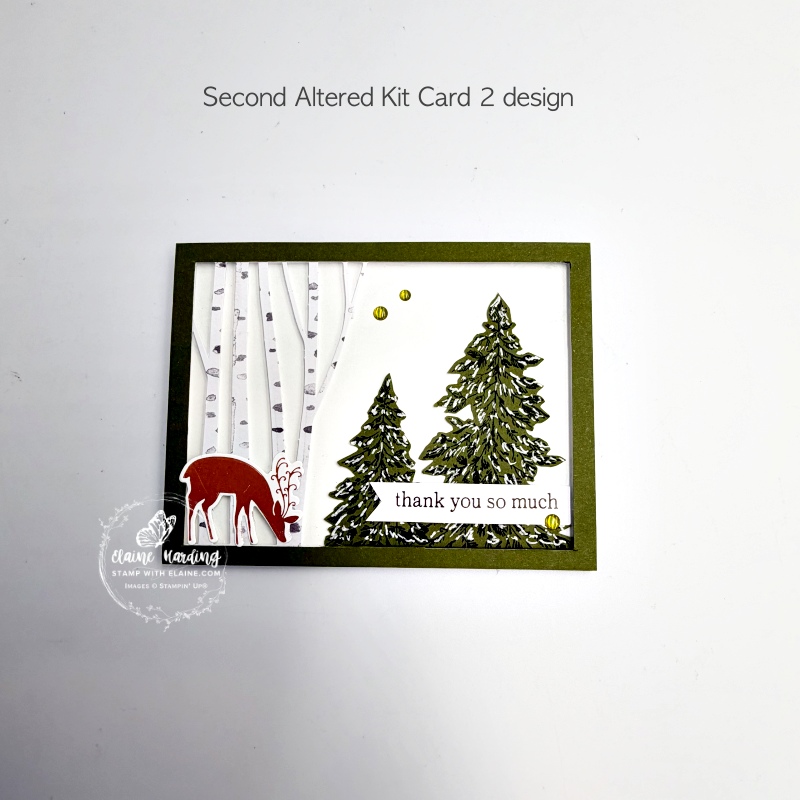
Cutting guide for Second altered card from Choreographed Kit Card 2
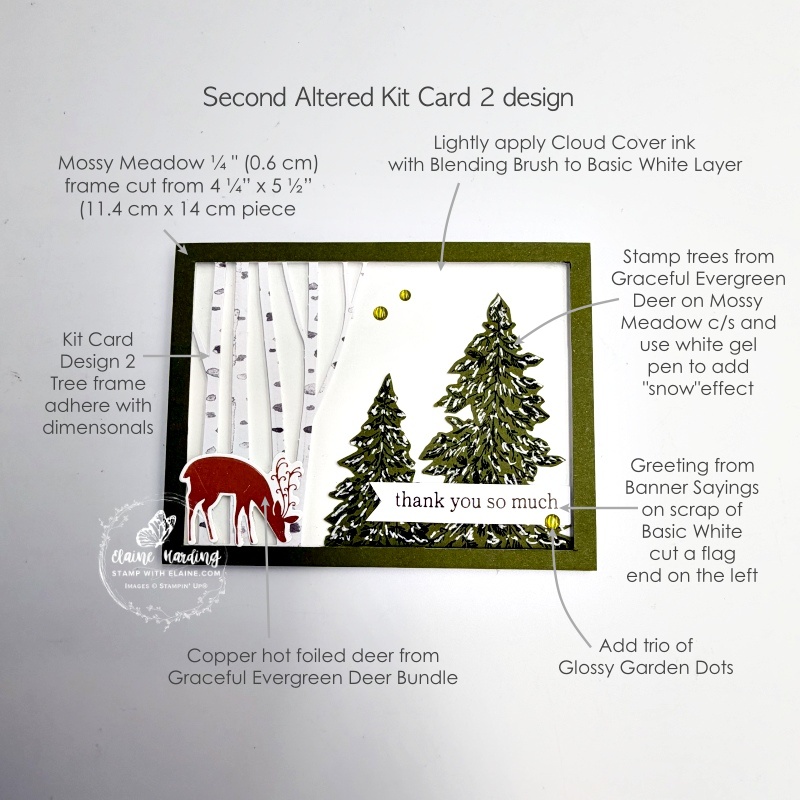
- Mossy Meadow card base cut at 4 ¼” x 11″ (10.8 cm x 28 cm) folded in half.
- Cut a ¼” frame from a piece of Mossy Meadow measuring 4 ¼”x 5 ½” (10.5 cm x 14 cm)
- Basic White layer for front of card 4 ¼”x 5 ½” (10.5 cm x 14 cm). Us blending brush and lightly apply Cloud Cover ink all over. (It’s barely visible in photo)
- On scrap of Mossy Meadow stamp the trees in Mossy Meadow and fussy cut. Then use white gel pen to put “snow” on its branches. Adhere directly to right of Basic White layer.
- Apply dimensionals to the back of the trees and frame – align and ahere to card front.
- Adhere Mossy Meadow frame on top also aligned with frame on all 4 sides.
- On scrap of Basic White, stamp Banner sentiment and cut flag end on left. Adhere as shown in picture on to card front.
- Lastly add *copper hot foiled deer on top of trees and add a trio of Glossy Garden dots.
*If you haven’t hot foiled before see Stampin’ Up!’s video all about it below.
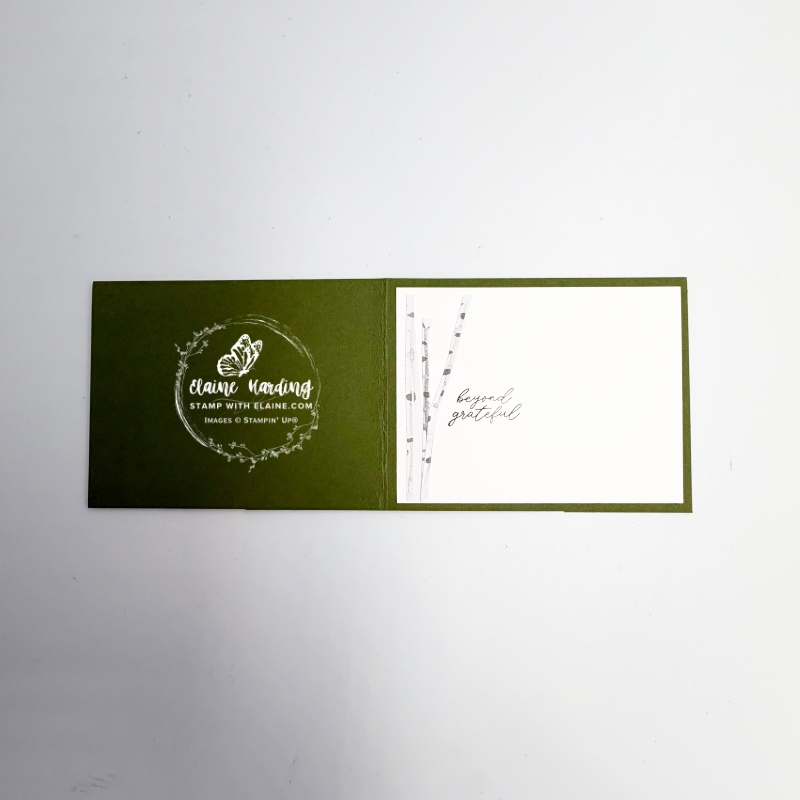
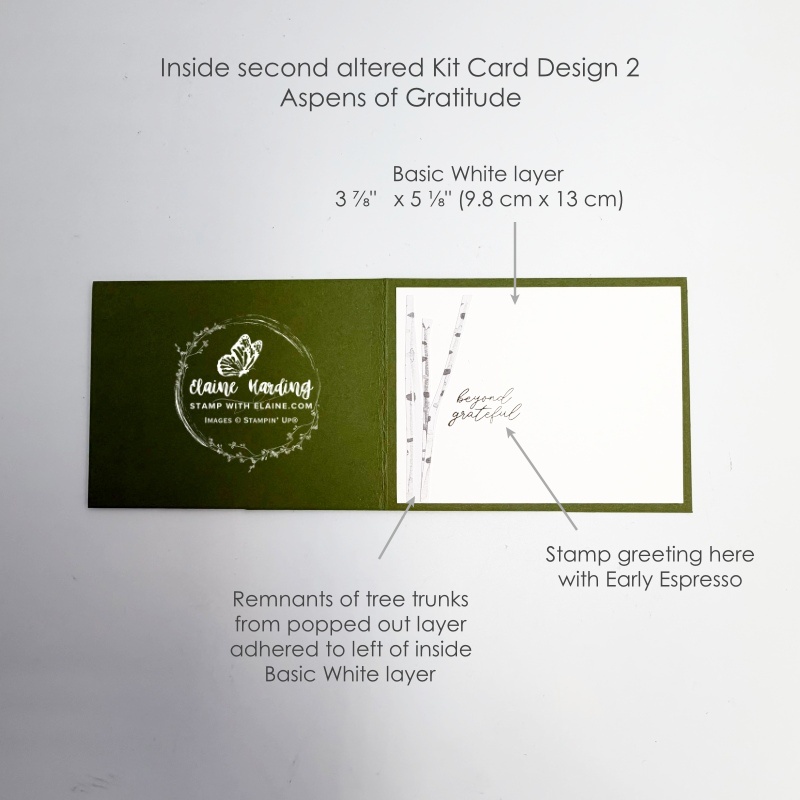
Inside card
- Cut Basic White layer 3 ⅞” x 5 ¼” (9.8 cm x 13 cm). Adhere to inside of card leaving an even border on all 4 sides.
- Adhere remnants of tree frunks from popped out layer and adhere to left of inside of Basic White layer.
- Stamp greeting with Early Espresso ink as shown.
How to prevent Over-foiling tip
From my own experience using the Stampin’ Hot Foil System, I had better results by following the instructions that came with the Stampin’ Hot Foil System. I added a thin piece of copy paper on top of the card stock before placing the green Hot Foil Shim on. This helps protect the shim from picking up any excess foil in the process.
- After the red light goes solid red, put your hot foil die on to the heated surface with flat side down. Press the white timer button. The platform beeps and a yellow light flashes while the die heats up (approximately 1 ½ minutes). The white timer button and the red light stays lit and when ready, the platform beeps again and the green light turns on. All lights will be lit.
- Next build your sandwich by placing these items on the die in order: Foil (shiny side down)>Card stock/or desired material> thin piece of copy paper (to prevent foil from getting on to your shim)>Hot Foil Shim>Hot Foil Spacer.
- Unplug the cord from the platform and carefully remove it from the silicone platform station, keeping the sandwich stable to prevent foil transfer. Place it on the Stampin’ Cut & Emboss Machine and slowly run it through without reversing as the die may shift and smudge the card stock.
Stampin’ Hot Foil System
This is a new tool by Stampin’ Up! with special Hot Foil Dies. If you missed the post introducing the machine and information all about it, here’s a video to explain how the system works. Please be aware this machine is designed to fit Stampin’ Up!’s larger Stampin’ Cut & Emboss machine and was tested with their own line of products. It would render the 1 year warranty on the Stampin’ Hot Foil System null and void if you use it on non-Stampin’ Up! machines which may not fit.
Also be sure you’re ordering the machine with the right plug for your market. Foils and dies have to be purchased separately.
If you purchase the Stampin’ Hot Foil System before Jan 4, 2027, it will also include the Metallic Magic Craft Class for free. The class will cost £28.00 to purchase when the free class offer ends.
.
Supply list
Listed below is the supply list. Just click on the picture to take you directly to the item in my online store.
Product List![Everyday Arches Dies [ 164629 ]](https://assets1.tamsnetwork.com/images/EC042017NF/164629s.jpg "Everyday Arches Dies [ 164629 ]")
![Banner Sayings Photopolymer Stamp Set (English) [ 167044 ]](https://assets1.tamsnetwork.com/images/EC042017NF/167044s.jpg "Banner Sayings Photopolymer Stamp Set (English) [ 167044 ]")
![Banner Sayings Bundle (English) [ 167051 ]](https://assets1.tamsnetwork.com/images/EC042017NF/167051s.jpg "Banner Sayings Bundle (English) [ 167051 ]")
![Graceful Evergreen Deer Bundle [ 170567 ]](https://assets1.tamsnetwork.com/images/EC042017NF/170567s.jpg "Graceful Evergreen Deer Bundle [ 170567 ]")
![Copper Foil Sheets [ 142020 ]](https://assets1.tamsnetwork.com/images/EC042017NF/142020s.jpg "Copper Foil Sheets [ 142020 ]")
![Uk/Ie Stampin' Hot Foil System & Craft Class [ 170011 ]](https://assets1.tamsnetwork.com/images/EC042017NF/170011s.jpg "Uk/Ie Stampin' Hot Foil System & Craft Class [ 170011 ]")
![Paper Trimmer [ 152392 ]](https://assets1.tamsnetwork.com/images/EC042017NF/152392s.jpg "Paper Trimmer [ 152392 ]")
![Stampin' Cut & Emboss Machine [ 149653 ]](https://assets1.tamsnetwork.com/images/EC042017NF/149653s.jpg "Stampin' Cut & Emboss Machine [ 149653 ]")
![Early Espresso A4 Card Stock [ 121686 ]](https://assets1.tamsnetwork.com/images/EC042017NF/121686s.jpg "Early Espresso A4 Card Stock [ 121686 ]")
![Mossy Meadow A4 Cardstock [ 133683 ]](https://assets1.tamsnetwork.com/images/EC042017NF/133683s.jpg "Mossy Meadow A4 Cardstock [ 133683 ]")
![White Vellum A4 Card Stock [ 106584 ]](https://assets1.tamsnetwork.com/images/EC042017NF/106584s.jpg "White Vellum A4 Card Stock [ 106584 ]")
![Glossy Garden Dots [ 168577 ]](https://assets1.tamsnetwork.com/images/EC042017NF/168577s.jpg "Glossy Garden Dots [ 168577 ]")
![Versamark Pad [ 102283 ]](https://assets1.tamsnetwork.com/images/EC042017NF/102283s.jpg "Versamark Pad [ 102283 ]")
![Mossy Meadow Classic Stampin' Pad [ 147111 ]](https://assets1.tamsnetwork.com/images/EC042017NF/147111s.jpg "Mossy Meadow Classic Stampin' Pad [ 147111 ]")
![Cloud Cover Classic Stampin' Ink Refill [ 165279 ]](https://assets1.tamsnetwork.com/images/EC042017NF/165279s.jpg "Cloud Cover Classic Stampin' Ink Refill [ 165279 ]")
![Uninked Premium Stampin' Spots [ 170901 ]](https://assets1.tamsnetwork.com/images/EC042017NF/170901s.jpg "Uninked Premium Stampin' Spots [ 170901 ]")
![Basics Wow! Embossing Powder [ 165679 ]](https://assets1.tamsnetwork.com/images/EC042017NF/165679s.jpg "Basics Wow! Embossing Powder [ 165679 ]")
![Embossing Additions Tool Kit [ 159971 ]](https://assets1.tamsnetwork.com/images/EC042017NF/159971s.jpg "Embossing Additions Tool Kit [ 159971 ]")
![Heat Tool - Uk Plug [ 129054 ]](https://assets1.tamsnetwork.com/images/EC042017NF/129054s.jpg "Heat Tool - Uk Plug [ 129054 ]")
![Sponge Daubers [ 133773 ]](https://assets1.tamsnetwork.com/images/EC042017NF/133773s.jpg "Sponge Daubers [ 133773 ]")
![Small Blending Brushes [ 160518 ]](https://assets1.tamsnetwork.com/images/EC042017NF/160518s.jpg "Small Blending Brushes [ 160518 ]")

- SHOP ONLINE – EARN 10% REWARDS ON ALL PURCHASES OVER £20
- PURCHASE A STARTER KIT : Get £155 worth of products for only £99. Choose from current catalogues and any specials available. Free Shipping. Read more
- Subscribe to my Video Tutorials – click here
