
Buffalo Check Hot Foil – Christmas Countdown Series. In week 2 of 12, here’s a really simple card just by using the Buffalo Check Hot Foil Die. The Reverse Hot Foil Die will be your best friend because by foiling both the positive and negative foil pieces there is literally ZERO waste!
If you’re new to foiling, scroll down to end of post to see Stampin’ Up!’s video on the Stampin’ Hot Foil System and how to use the Reverse Hot Foil Die.
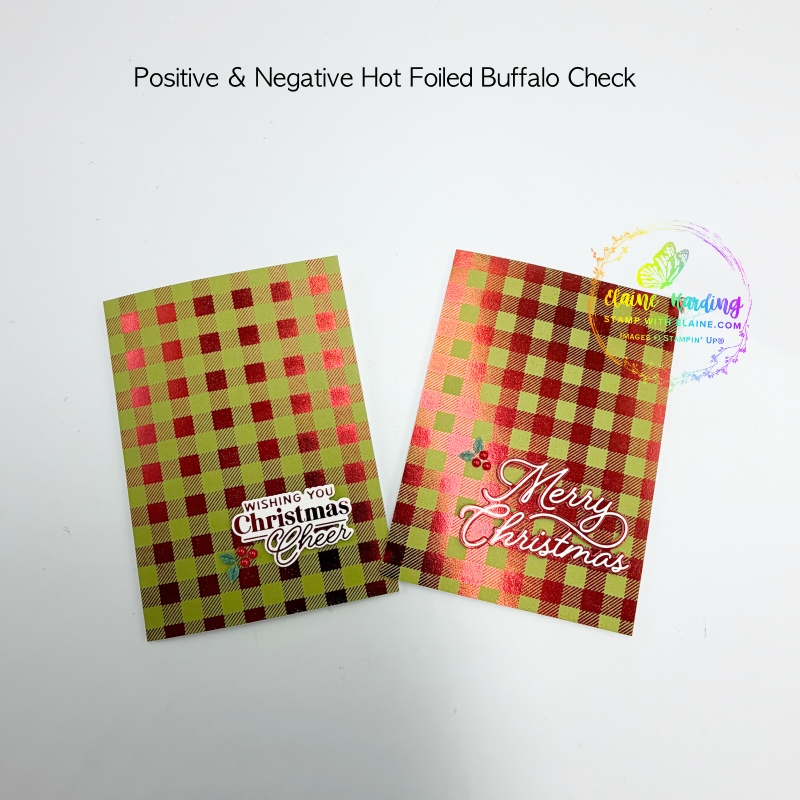
The positive and negative foiled Buffalo Check Hot Foil die
Hot foiling with the Buffalo Check Hot Foil die and the Reverse Hot Foil Die makes really quick easy backgrounds for a card. Not only that, you can choose from a variety of 7 different coloured foils to coordinate with any colour card stock so the possibilities are endless! Simply add a hot foiled sentiment from hot foiling the Magical Christmas Hot Foil Dies (English), add an embellishment and you’re done!
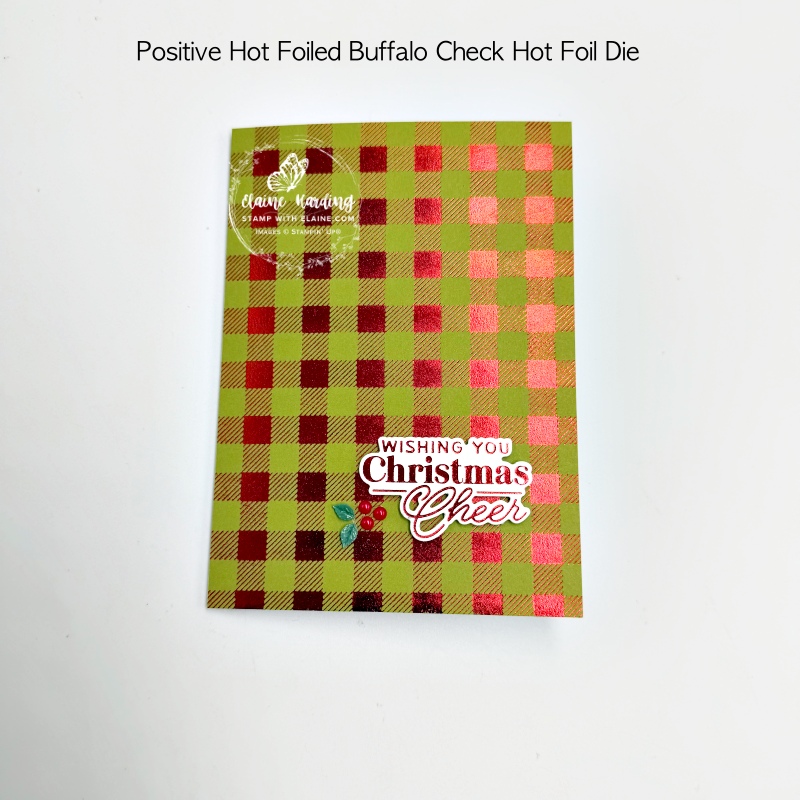
The positive foiled Buffalo Check Hot Foil die
I used the darker side of the Old Olive two-tone card stock. Stampin’ Up! informs us that you get the best results using the two-tone card stock because it has a much smoother finish and you have the option of using the darker or lighter side.
Cutting Guide – Positive hot foiled card
In a previous post I had hot foiled a variety of hot foil colours both positive and negative sentiments from the Magical Christmas Hot Foil Dies which you can see HERE. So I’m using them on my cards today. You get 7 christmas themed greetings, stars and candy canes which you can use on multiple cards.
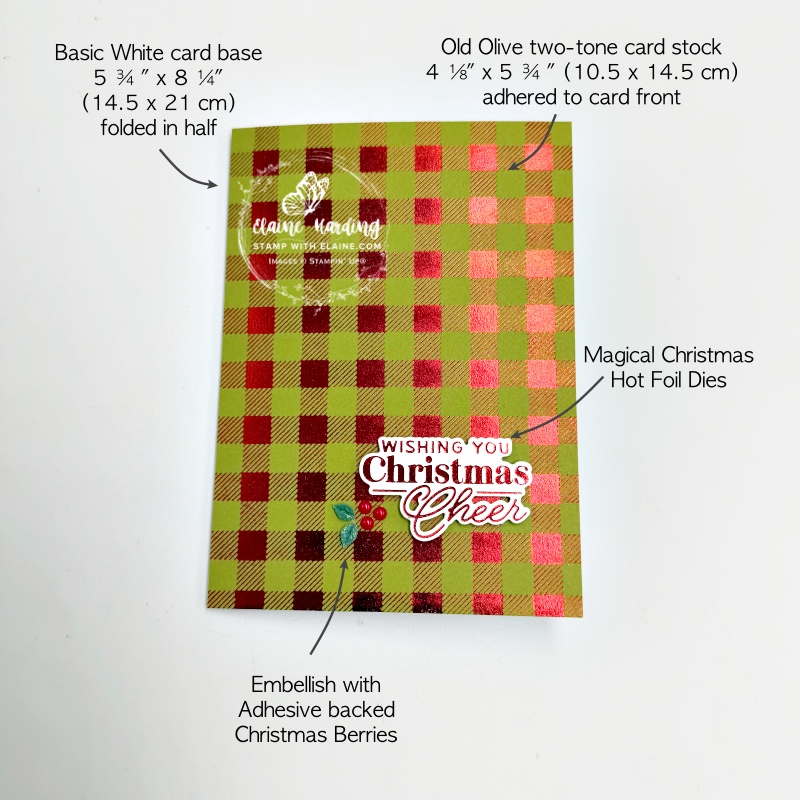
Front of card
- Card base : Basic White cut at 5 ¾” x 8 ¼” (14.5 x 21 cm) folded in half.
- Red Stampin’ Hot Foil roll – cut 5″ x 6 ¼” (12.7 x 16 cm)
- Trim Old Olive two-tone card layer to 4 ⅛” x 5 ¾” (10.5 x 14.5 cm) but hot foil with a larger piece to allow tolerance in case the hot foiling is slightly off kilter. Once foiled and trimmed, adhere to front of card base.
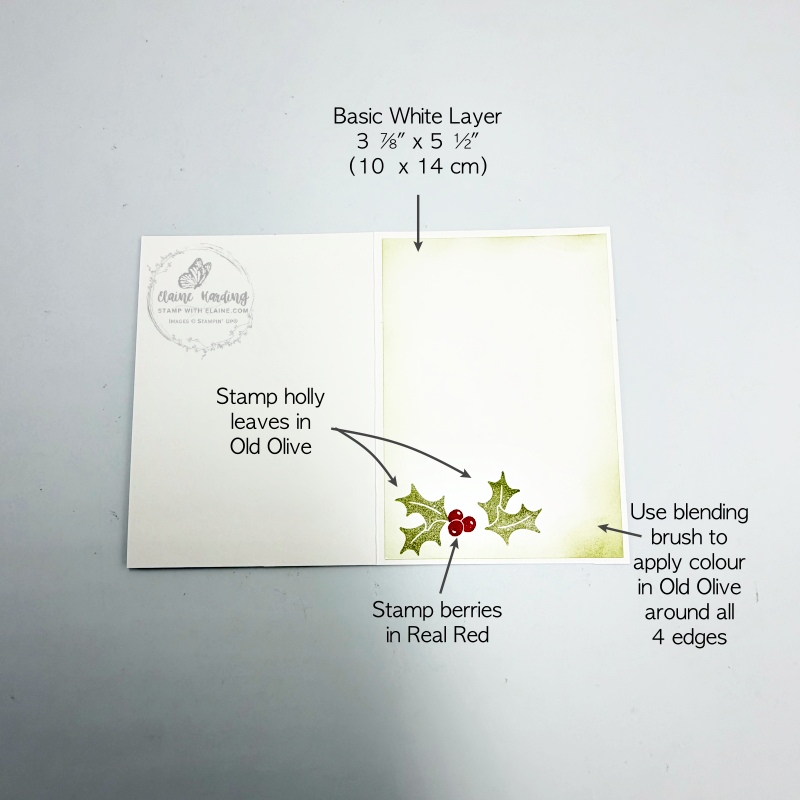
- Inside layer : Basic White 3 ⅞” x 5 ½” (10 x 14 cm)
- Use one of the positive hot foiled Magical Christmas sentiments and adhere with dimensionals in bottom right corner.
- Embellish with Adhesive backed Christmas Berries.
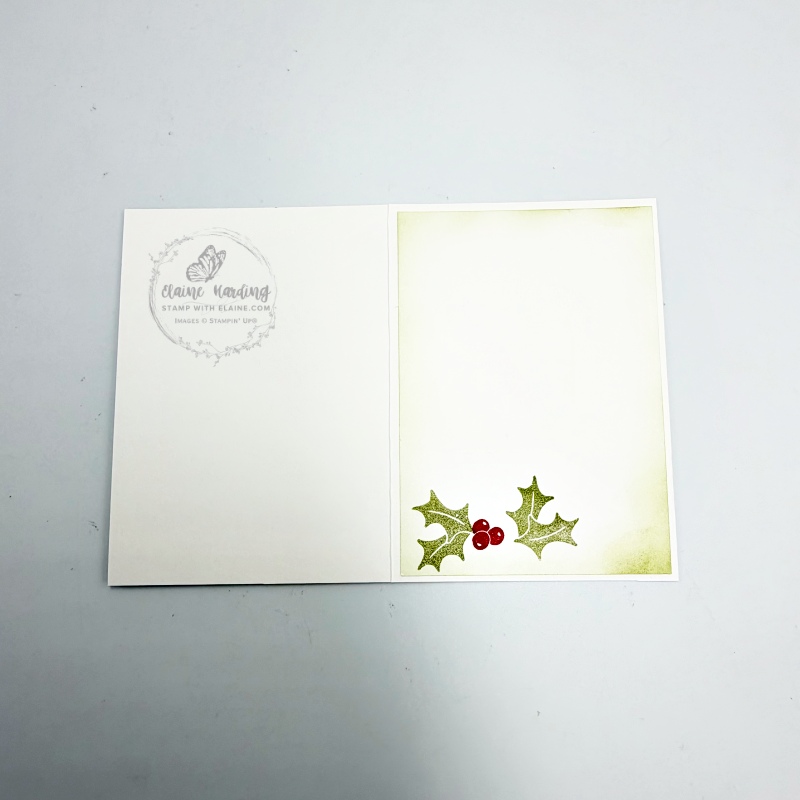
Inside card
- Basic White cut at 3 ⅞” x 5 ½” (10 x 14 cm).
- Use blending brush and lightly apply Old Olive on all 4 sides of Basic White layer before adhering to inside of card base leaving an even border on all 4 sides.
- Holly Leaves from Scalloped Christmas Cheer stamped with Old Olive ink.
- Berries from Scalloped Christmas Cheer stamped with Real Red ink.
How to prevent Over-foiling tip
From my own experience using the Stampin’ Hot Foil System, I had better results by following the instructions that came with the Stampin’ Hot Foil System. I added a thin piece of copy paper on top of the card stock before placing the green Hot Foil Shim on. This helps protect the shim from picking up any excess foil in the process.
- After the red light goes solid red, put your hot foil die on to the heated surface with flat side down. Press the white timer button. The platform beeps and a yellow light flashes while the die heats up (approximately 1 ½ minutes). The white timer button and the red light stays lit and when ready, the platform beeps again and the green light turns on. All lights will be lit.
- Next build your sandwich by placing these items on the die in order: Foil (shiny side down)>Card stock/or desired material> thin piece of copy paper (to prevent foil from getting on to your shim)>Hot Foil Shim>Hot Foil Spacer.
- Unplug the cord from the platform and carefully remove it from the silicone platform station, keeping the sandwich stable to prevent foil transfer. Place it on the Stampin’ Cut & Emboss Machine and slowly run it through without reversing as the die may shift and smudge the card stock.
The Negative foiled Buffalo Check Hot Foil die
Here’s the negative one using the remnant of the foil. Which do you prefer? I think I’m leaning toward the Negative hot foiled one with the Reverse Hot Foil die.
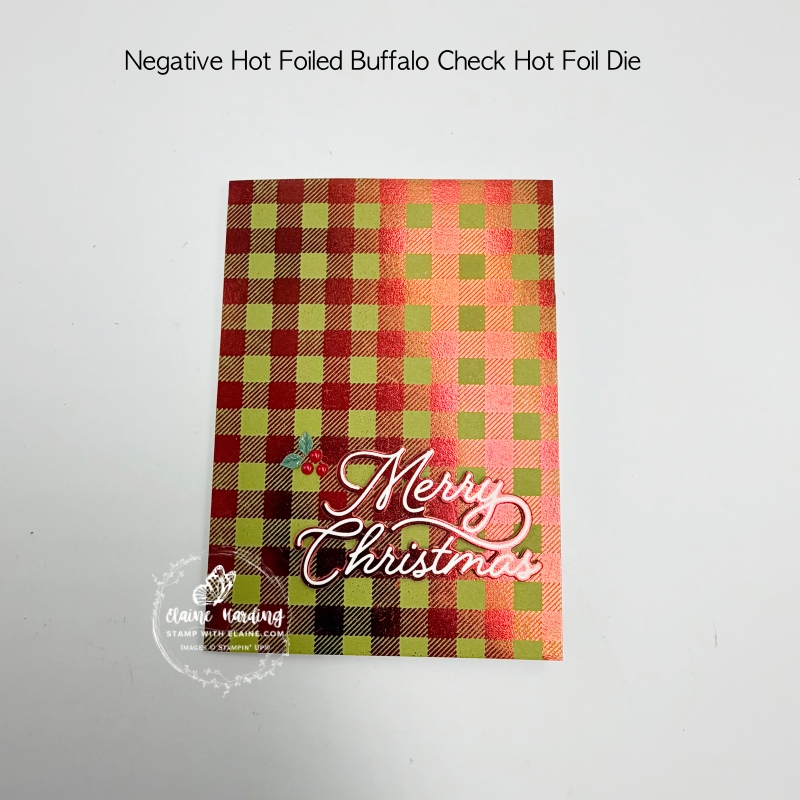
Cutting Guide – Negative hot foiled card
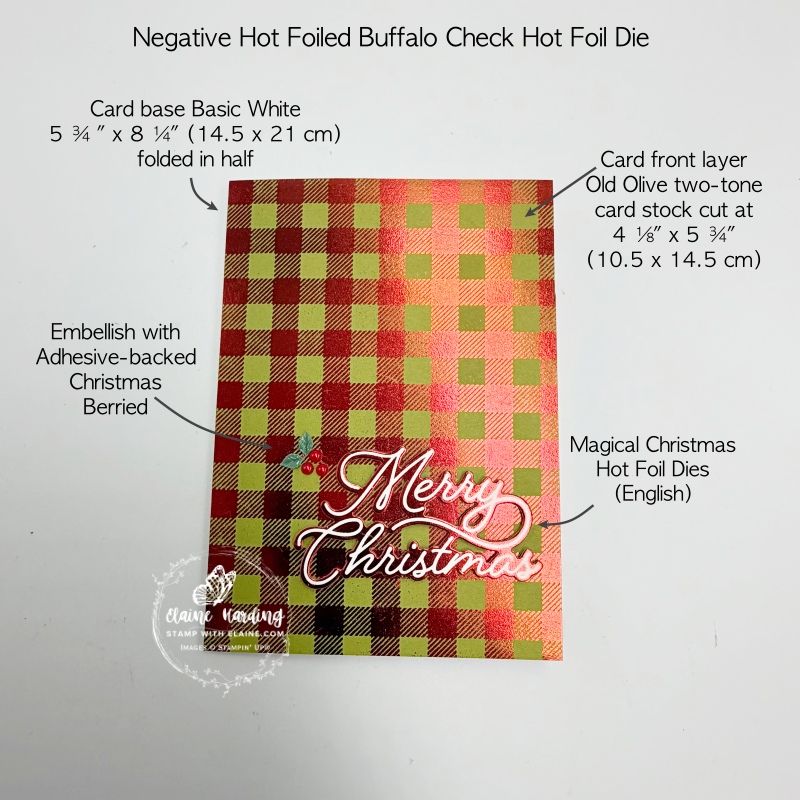
Card front
- Card base : Basic White cut at 5 ¾” x 8 ¼” (14.5 x 21 cm) folded in half.
- Use the same foil and hot foil on Reverse Hot Foil die.
- Trim Old Olive two-tone card layer to 4 ⅛” x 5 ¾” (10.5 x 14.5 cm) but hot foil with a larger piece to allow tolerance in case the hot foiling is slightly off kilter. Once foiled and trimmed, adhere to front of card base.
- Inside layer : Basic White 3 ⅞” x 5 ½” (10 x 14 cm)
- Use one of the negative hot foiled Magical Christmas sentiments and adhere with dimensionals in bottom right corner.
- Embellish with Adhesive backed Christmas Berries.
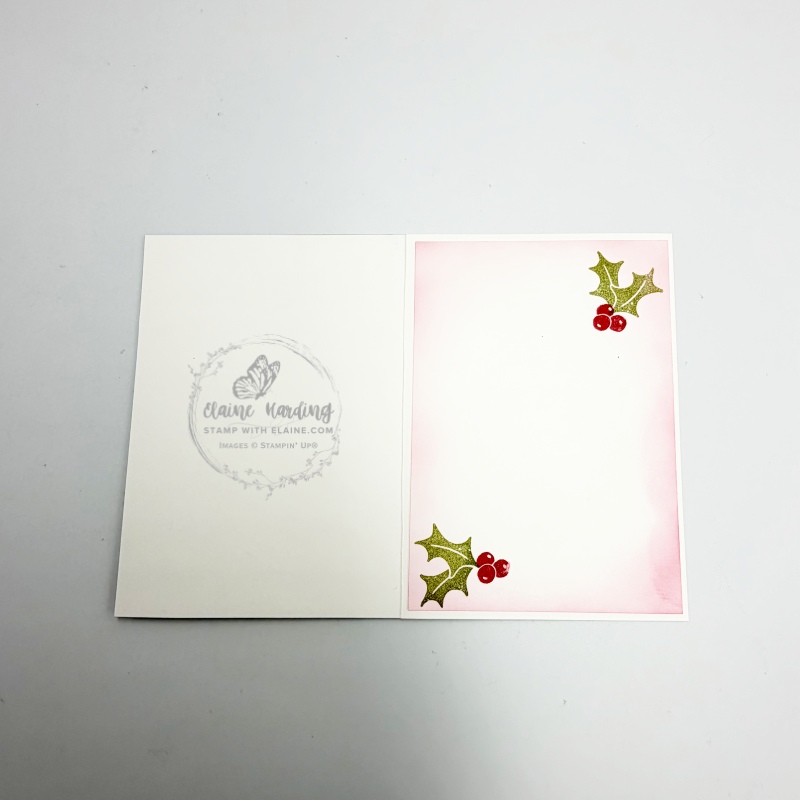
Inside card
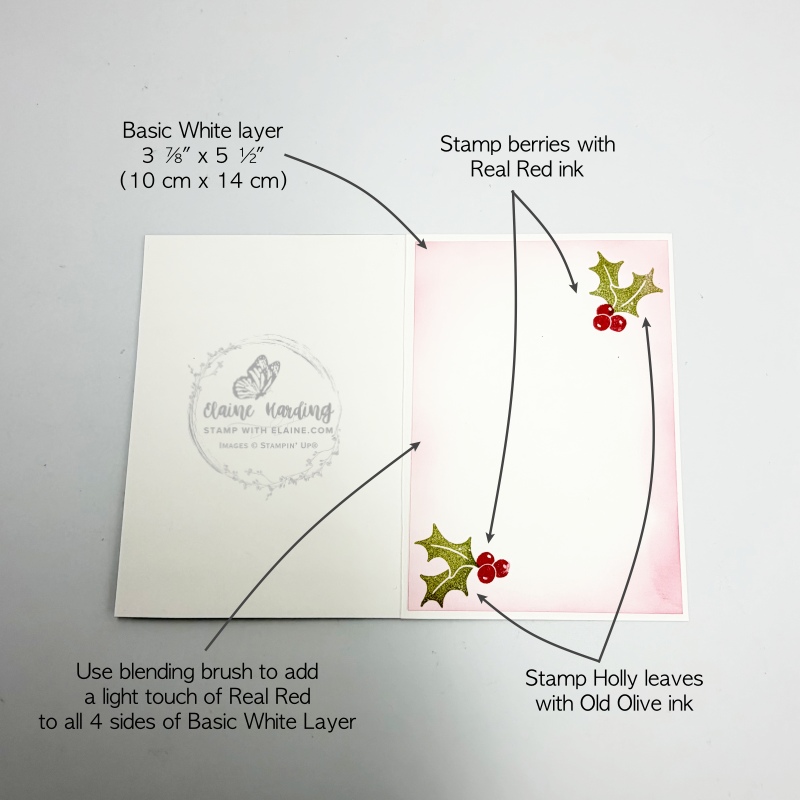
- Basic White cut at 3 ⅞” x 5 ½” (10 x 14 cm).
- Use blending brush and lightly apply Real Red on all 4 sides of Basic White layer before adhering to inside of card base leaving an even border on all 4 sides.
- Holly Leaves from Scalloped Christmas Cheer stamped with Old Olive ink.
- Berries from Scalloped Christmas Cheer stamped with Real Red ink.
Stampin’ Hot Foil System
This is a new tool by Stampin’ Up! with special Hot Foil Dies. If you missed the post introducing the machine and information all about it, here’s a video to explain how the system works. Please be aware this machine is designed to fit Stampin’ Up!’s larger Stampin’ Cut & Emboss machine and was tested with their own line of products. It would render the 1 year warranty on the Stampin’ Hot Foil System null and void if you use it on non-Stampin’ Up! machines which may not fit.
Also be sure you’re ordering the machine with the right plug for your market. Foils and dies have to be purchased separately.
If you purchase the Stampin’ Hot Foil System before Jan 4, 2027, it will also include the Metallic Magic Craft Class for free. The class will cost £28.00 to purchase when the free class offer ends.
.
Reverse Hot Foil Die
Maximise your Stampin’ Hot Foil Rolls (and your creativity!) with the Reverse Hot Foil Die. This solid die lets you create two designs from one piece of foil: the main design and the negative image left on the foil. Simply apply the used foil following the usual foiling process for a shiny bonus design.
Watch Stampin’ Up!’s video on how to use the Reverse Hot Foil Die.
Supply list
Listed below is the supply list. Just click on the picture to take you directly to the item in my online store.
Product List![Buffalo Check Hot Foil Die [ 170590 ]](https://assets1.tamsnetwork.com/images/EC042017NF/170590s.jpg "Buffalo Check Hot Foil Die [ 170590 ]")
![Reverse Hot Foil Die [ 170043 ]](https://assets1.tamsnetwork.com/images/EC042017NF/170043s.jpg "Reverse Hot Foil Die [ 170043 ]")
![Magical Christmas Hot Foil Dies (English) [ 170592 ]](https://assets1.tamsnetwork.com/images/EC042017NF/170592s.jpg "Magical Christmas Hot Foil Dies (English) [ 170592 ]")
![Scalloped Christmas Cheer Bundle (English) [ 168545 ]](https://assets1.tamsnetwork.com/images/EC042017NF/168545s.jpg "Scalloped Christmas Cheer Bundle (English) [ 168545 ]")
![Scalloped Christmas Cheer Photopolymer Stamp Set (English) [ 168538 ]](https://assets1.tamsnetwork.com/images/EC042017NF/168538s.jpg "Scalloped Christmas Cheer Photopolymer Stamp Set (English) [ 168538 ]")
![Scalloped Christmas Cheer Dies [ 168544 ]](https://assets1.tamsnetwork.com/images/EC042017NF/168544s.jpg "Scalloped Christmas Cheer Dies [ 168544 ]")
![Red Stampin' Hot Foil Rolls [ 170552 ]](https://assets1.tamsnetwork.com/images/EC042017NF/170552s.jpg "Red Stampin' Hot Foil Rolls [ 170552 ]")
![Uk/Ie Stampin' Hot Foil System & Craft Class [ 170011 ]](https://assets1.tamsnetwork.com/images/EC042017NF/170011s.jpg "Uk/Ie Stampin' Hot Foil System & Craft Class [ 170011 ]")
![Stampin' Cut & Emboss Machine [ 149653 ]](https://assets1.tamsnetwork.com/images/EC042017NF/149653s.jpg "Stampin' Cut & Emboss Machine [ 149653 ]")
![Old Olive 12" X 12" (30.5 X 30.5 Cm) Two Tone Cardstock [ 166683 ]](https://assets1.tamsnetwork.com/images/EC042017NF/166683s.jpg "Old Olive 12\" X 12\" (30.5 X 30.5 Cm) Two Tone Cardstock [ 166683 ]")
![Basic White A4 Cardstock [ 166781 ]](https://assets1.tamsnetwork.com/images/EC042017NF/166781s.jpg "Basic White A4 Cardstock [ 166781 ]")
![Adhesive Backed Christmas Berries [ 168549 ]](https://assets1.tamsnetwork.com/images/EC042017NF/168549s.jpg "Adhesive Backed Christmas Berries [ 168549 ]")
![Blending Brushes [ 153611 ]](https://assets1.tamsnetwork.com/images/EC042017NF/153611s.jpg "Blending Brushes [ 153611 ]")
![Real Red Classic Stampin' Pad [ 147084 ]](https://assets1.tamsnetwork.com/images/EC042017NF/147084s.jpg "Real Red Classic Stampin' Pad [ 147084 ]")
![Old Olive Classic Stampin' Pad [ 147090 ]](https://assets1.tamsnetwork.com/images/EC042017NF/147090s.jpg "Old Olive Classic Stampin' Pad [ 147090 ]")

- SHOP ONLINE – EARN 10% REWARDS ON ALL PURCHASES OVER £20
- PURCHASE A STARTER KIT : Get £155 worth of products for only £99. Choose from current catalogues and any specials available. Free Shipping. Read more
- Subscribe to my Video Tutorials – click here
